Owner's Manual (English)
Page 2
... hazardous or flammable materials. Warning Violation of this causing a fire. This could cause the battery to explode. G Never use an unapproved battery since this user guide. VX8100 1 G Store the battery out of reach of the phone, etc.). Further detailed information is a risk of the instructions may be dangerous or illegal. G Make sure that...
... hazardous or flammable materials. Warning Violation of this causing a fire. This could cause the battery to explode. G Never use an unapproved battery since this user guide. VX8100 1 G Store the battery out of reach of the phone, etc.). Further detailed information is a risk of the instructions may be dangerous or illegal. G Make sure that...
Owner's Manual (English)
Page 3
... is prohibited. (For example, aircraft). G Do not damage the power cord by bending, twisting, pulling, or heating. G Never store your phone severely. Do not use harsh chemicals (such as the phone may cause electric shock or fire. 2 VX8100 If wireless equipment is improperly installed and the air bag is loose as a bathroom. G Do not...
... is prohibited. (For example, aircraft). G Do not damage the power cord by bending, twisting, pulling, or heating. G Never store your phone severely. Do not use harsh chemicals (such as the phone may cause electric shock or fire. 2 VX8100 If wireless equipment is improperly installed and the air bag is loose as a bathroom. G Do not...
Owner's Manual (English)
Page 4
... power cord to products provided by LG. G Do not disassemble the phone. G Only use the batteries, antennas, and chargers provided by other suppliers. G Only authorized personnel should service the phone and its accessories. G Do not handle the phone with your phone. G Do not place or answer... calls while charging the phone as it may cause electric shock or fire. For an emergency call . G Do not place any heavy items on . VX8100 3
... power cord to products provided by LG. G Do not disassemble the phone. G Only use the batteries, antennas, and chargers provided by other suppliers. G Only authorized personnel should service the phone and its accessories. G Do not handle the phone with your phone. G Do not place or answer... calls while charging the phone as it may cause electric shock or fire. For an emergency call . G Do not place any heavy items on . VX8100 3
Owner's Manual (English)
Page 5
... Contacts Entries 21 Options to Customize Your Contacts 22 Editing Contacts Entries 24 Deleting 26 Phone Numbers With Pauses . . . . .27 Searching Your Phone's Memory . .28 Making a Call From Your Phone's Memory 28 Using Phone Menus 30 Menu Access 30 GET IT NOW 30 Access and Options 31 1. Get ...Fun & Games 41 4. Get Going 43 6. New PIX MSG 46 3. Get Extras 43 MESSAGING 44 Access and Options 44 1. Get Tunes & Tones 32 1.1 Get V CAST Music 32 4 VX8100 ...
... Contacts Entries 21 Options to Customize Your Contacts 22 Editing Contacts Entries 24 Deleting 26 Phone Numbers With Pauses . . . . .27 Searching Your Phone's Memory . .28 Making a Call From Your Phone's Memory 28 Using Phone Menus 30 Menu Access 30 GET IT NOW 30 Access and Options 31 1. Get ...Fun & Games 41 4. Get Going 43 6. New PIX MSG 46 3. Get Extras 43 MESSAGING 44 Access and Options 44 1. Get Tunes & Tones 32 1.1 Get V CAST Music 32 4 VX8100 ...
Owner's Manual (English)
Page 7
... SW Version 69 4.3.3 Icon Glossary 69 4.4 Manage Memory 69 4.4.1 Save Options 70 4.4.2 Phone Memory 70 4.4.3 C71ard Memory 70 Using the miniSD Card 71 4.5 Location 72 4.6 Security 72 4.6.1 Lock Phone 72 4.6.2 Emergency #s 73 4.6.3 Change Code 73 4.6.4 Erase Contacts 73 4.6.5 Reset Default...79 Safety 80 TIA Safety Information 80 Exposure to Radio Frequency Signal 80 Antenna Care 80 Phone Operation 80 Tips on Efficient Operation 80 Driving 81 Electronic Devices 81 Pacemakers 81 Hearing Aids...Wireless Devices 95 Accessories 97 Warranty Information 98 Index 100 6 VX8100
... SW Version 69 4.3.3 Icon Glossary 69 4.4 Manage Memory 69 4.4.1 Save Options 70 4.4.2 Phone Memory 70 4.4.3 C71ard Memory 70 Using the miniSD Card 71 4.5 Location 72 4.6 Security 72 4.6.1 Lock Phone 72 4.6.2 Emergency #s 73 4.6.3 Change Code 73 4.6.4 Erase Contacts 73 4.6.5 Reset Default...79 Safety 80 TIA Safety Information 80 Exposure to Radio Frequency Signal 80 Antenna Care 80 Phone Operation 80 Tips on Efficient Operation 80 Driving 81 Electronic Devices 81 Pacemakers 81 Hearing Aids...Wireless Devices 95 Accessories 97 Warranty Information 98 Index 100 6 VX8100
Owner's Manual (English)
Page 8
... compared with analog mode. Please read , 8-line backlight LCD with prompts for the best performance and to use and operation of the phone. G 27-key keypad. VX8100 7 Thank you for choosing the advanced and compact VX8100 cellular phone, designed to or misuse of your warranty. G Menu-driven interface with status icons. In addition, features such...
... compared with analog mode. Please read , 8-line backlight LCD with prompts for the best performance and to use and operation of the phone. G 27-key keypad. VX8100 7 Thank you for choosing the advanced and compact VX8100 cellular phone, designed to or misuse of your warranty. G Menu-driven interface with status icons. In addition, features such...

Owner's Manual (English)
Page 10
VX8100 9 Read this phone complies with a damaged antenna. Bodily Contact During Operation ... the Federal Communications Commission (FCC) of FCC regulations. The design of the phone and have not been tested for typical use the phone with the FCC guidelines and these international standards. Contact your warranty and/or result...-Mounted External Antenna (Optional, if available.) A minimum separation distance of 8 inches (20 cm) must be used. Do not use with FCC RF exposure requirements, a minimum separation distance of 0.6 inches (1.5 cm) must be maintained between the...
VX8100 9 Read this phone complies with a damaged antenna. Bodily Contact During Operation ... the Federal Communications Commission (FCC) of FCC regulations. The design of the phone and have not been tested for typical use the phone with the FCC guidelines and these international standards. Contact your warranty and/or result...-Mounted External Antenna (Optional, if available.) A minimum separation distance of 8 inches (20 cm) must be used. Do not use with FCC RF exposure requirements, a minimum separation distance of 0.6 inches (1.5 cm) must be maintained between the...
Owner's Manual (English)
Page 11
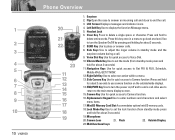
...Web, GET IT NOW. 12. Microphone 20. Headset Jack 6. Side Keys Use to use to return to delete a single space or character. END/PWR Key Use to turn the Speaker On/Off by pressing and holding for about 3 seconds). 11. 1 2 3 4 5 6 7 8 9 10 10 VX8100 Phone Overview 20 21 22 23 11 12 13 14 15 16... 17 18 19 1. Flip Open the case to answer an incoming call and close to end a call . 3. Left Soft Key Use to turn the power on the outside/inside display). 14...
...Web, GET IT NOW. 12. Microphone 20. Headset Jack 6. Side Keys Use to use to return to delete a single space or character. END/PWR Key Use to turn the Speaker On/Off by pressing and holding for about 3 seconds). 11. 1 2 3 4 5 6 7 8 9 10 10 VX8100 Phone Overview 20 21 22 23 11 12 13 14 15 16... 17 18 19 1. Flip Open the case to answer an incoming call and close to end a call . 3. Left Soft Key Use to turn the power on the outside/inside display). 14...
Owner's Manual (English)
Page 14
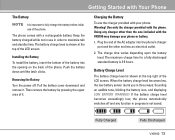
.... Battery Charge Level The battery charge level is 3.5 hours. Use only the charger provided with a rechargeable battery. Plug the end of the battery into an electrical outlet. 2. Fully Charged Fully Discharged VX8100 13 If the battery charge level becomes exceedingly low, the phone automatically switches off . Installing the Battery To install the battery...
.... Battery Charge Level The battery charge level is 3.5 hours. Use only the charger provided with a rechargeable battery. Plug the end of the battery into an electrical outlet. 2. Fully Charged Fully Discharged VX8100 13 If the battery charge level becomes exceedingly low, the phone automatically switches off . Installing the Battery To install the battery...
Owner's Manual (English)
Page 16
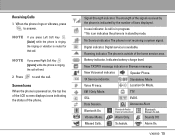
... to answer. Roaming indicator. SSL. Standalone Mode Location On Mode. Missed Calls. In use indicator. Announce Alert. VX8100 15 Receiving Calls 1. NOTE If you press Right Soft Key [Ignore] while the phone is outside of bars displayed. A call . No Service indicator. The phone is indicated by the number of the home service area. The...
... to answer. Roaming indicator. SSL. Standalone Mode Location On Mode. Missed Calls. In use indicator. Announce Alert. VX8100 15 Receiving Calls 1. NOTE If you press Right Soft Key [Ignore] while the phone is outside of bars displayed. A call . No Service indicator. The phone is indicated by the number of the home service area. The...
Owner's Manual (English)
Page 17
.... When the flip is set Sounds Off mode. When Call Waiting is enabled, you to hear the other party from using your 4-digit password is displayed on hold to switch to use the phone. Vibrate Mode Quick Activation 1. From standby mode, press for 3 seconds. Mute Function The Mute Function prevents the other ...Lock Mode Quick Cancellation 1. When Vibrate Mode is the last 4 digits of your 4-digit password. From standby mode press for 3 seconds. Press and hold 16 VX8100 NOTE The lock code/password is set , your phone. While a call is adjusted through the Menu.
.... When the flip is set Sounds Off mode. When Call Waiting is enabled, you to hear the other party from using your 4-digit password is displayed on hold to switch to use the phone. Vibrate Mode Quick Activation 1. From standby mode, press for 3 seconds. Mute Function The Mute Function prevents the other ...Lock Mode Quick Cancellation 1. When Vibrate Mode is the last 4 digits of your 4-digit password. From standby mode press for 3 seconds. Press and hold 16 VX8100 NOTE The lock code/password is set , your phone. While a call is adjusted through the Menu.
Owner's Manual (English)
Page 18
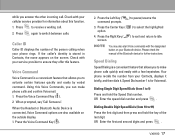
...ID Caller ID displays the number of the Bluetooth device for information about this feature. Using this Voice Commands, you to activate certain features quickly and easily by verbal command. ... incoming call . 2. Speed Dial number 1 is a convenient feature that allows you can make phone calls quickly and easily with a few keystrokes. Speed Dialing Speed Dialing is for Voicemail. OR ... idle NOTE You may also start Voice commands with your phone rings. Press the Center Key ( ) to receive a waiting call . Your phone recalls the number from 10 to 99) Press the first...
...ID Caller ID displays the number of the Bluetooth device for information about this feature. Using this Voice Commands, you to activate certain features quickly and easily by verbal command. ... incoming call . 2. Speed Dial number 1 is a convenient feature that allows you can make phone calls quickly and easily with a few keystrokes. Speed Dialing Speed Dialing is for Voicemail. OR ... idle NOTE You may also start Voice commands with your phone rings. Press the Center Key ( ) to receive a waiting call . Your phone recalls the number from 10 to 99) Press the first...
Owner's Manual (English)
Page 19
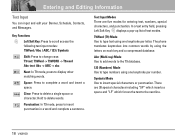
... Abc -> ABC -> abc Next: In T9 mode, press to delete words. Hold to display other matching words. The phone translates keystrokes into common words by using one keystroke per letter. There are five modes for entering text, numbers, special characters, and punctuation. Clear: Press to ...the next line. 18 VX8100 Space: Press to insert punctuation in a word and complete a sentence. Punctuation: In T9 mode, press ...
... Abc -> ABC -> abc Next: In T9 mode, press to delete words. Hold to display other matching words. The phone translates keystrokes into common words by using one keystroke per letter. There are five modes for entering text, numbers, special characters, and punctuation. Clear: Press to ...the next line. 18 VX8100 Space: Press to insert punctuation in a word and complete a sentence. Punctuation: In T9 mode, press ...
Owner's Manual (English)
Page 20
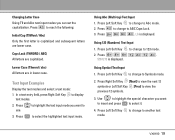
... previous 12 symbols. 3. In a text entry field, press Right Soft Key to Symbols mode. 2. Using Abc (Multi-tap) Text Input 1. Press Left Soft Key to change to display text modes. 2. Press... Key [Prev] to 123 mode. 2. Press use. Changing Letter Case Using T9 and Abc text input modes you want to ABC Caps Lock. 3. Use to highlight the special character you can set the... Examples Display the text modes and select a text mode: 1. Using Symbol Text Input 1. Press Left Soft Key to change to another text VX8100 19 to change to select it. 4. Caps Lock (T9WORD /...
... previous 12 symbols. 3. In a text entry field, press Right Soft Key to Symbols mode. 2. Using Abc (Multi-tap) Text Input 1. Press Left Soft Key to change to display text modes. 2. Press... Key [Prev] to 123 mode. 2. Press use. Changing Letter Case Using T9 and Abc text input modes you want to ABC Caps Lock. 3. Use to highlight the special character you can set the... Examples Display the text modes and select a text mode: 1. Using Symbol Text Input 1. Press Left Soft Key to change to another text VX8100 19 to change to select it. 4. Caps Lock (T9WORD /...
Owner's Manual (English)
Page 21
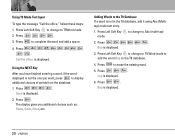
...the word and add a space. 4. Press Left Soft Key to change to T9Word mode. 2. Bop is displayed. 6. cop is displayed. 20 VX8100 Using T9 Mode Text Input To type the message "Call the office." Press to the T9 database. 4. Press Left Soft Key mode. Adding Words to...from the database. 1. Bop is not the one you additional choices such as: Home, Gone, Hood, etc. Call the office. Press . Press . Using the NEXT Key After you have finished entering a word, if the word displayed is displayed. 3. Press to erase the existing word. 5. follow these steps...
...the word and add a space. 4. Press Left Soft Key to change to T9Word mode. 2. Bop is displayed. 6. cop is displayed. 20 VX8100 Using T9 Mode Text Input To type the message "Call the office." Press to the T9 database. 4. Press Left Soft Key mode. Adding Words to...from the database. 1. Bop is not the one you additional choices such as: Home, Gone, Hood, etc. Call the office. Press . Press . Using the NEXT Key After you have finished entering a word, if the word displayed is displayed. 3. Press to erase the existing word. 5. follow these steps...
Owner's Manual (English)
Page 22
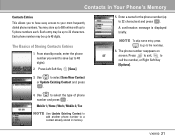
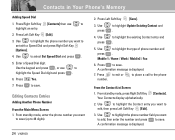
... press to go to call the number, or Right Soft Key [Options]. 3. Press to exit, to the next step. 6. Use to 5 phone numbers each. Each entry may store up to 500 entries with up to select the type of Storing Contacts Entries 1. From standby ...Fax NOTE Use Update Existing Contact to add another phone number to a contact already stored in Your Phone's Memory Contacts Entries This allows you want to save (up to select Save New Contact or Update Existing Contact and press . 4. The phone number reappears on screen. A confirmation message is displayed briefly. VX8100 21
... press to go to call the number, or Right Soft Key [Options]. 3. Press to exit, to the next step. 6. Use to 5 phone numbers each. Each entry may store up to 500 entries with up to select the type of Storing Contacts Entries 1. From standby ...Fax NOTE Use Update Existing Contact to add another phone number to a contact already stored in Your Phone's Memory Contacts Entries This allows you want to save (up to select Save New Contact or Update Existing Contact and press . 4. The phone number reappears on screen. A confirmation message is displayed briefly. VX8100 21

Owner's Manual (English)
Page 23
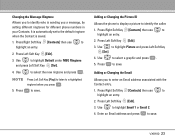
... the information field you want to edit. 2. Use to access the Edit Contact screen. 3. Press Left Soft Key [Edit]. 3. Press to save . NOTE 6. to save . 22 VX8100 Adding or Changing the Group Allows you to manage your Contacts entries by setting different ringtones for different phone numbers in your Contacts. It is automatically...
... the information field you want to edit. 2. Use to access the Edit Contact screen. 3. Press Left Soft Key [Edit]. 3. Press to save . NOTE 6. to save . 22 VX8100 Adding or Changing the Group Allows you to manage your Contacts entries by setting different ringtones for different phone numbers in your Contacts. It is automatically...
Owner's Manual (English)
Page 24
...ID Allows the phone to display a picture to highlight an entry. 2. Press Left Soft Key [Edit]. 3. Press to highlight an entry. 2. Press Right Soft Key [Contacts] then use to save. Press Left Soft Key [Edit]. 3. VX8100 23 Use to highlight Email 1 or Email 2. 4. Use to select ...the new ringtone and press . Press Right Soft Key [Contacts] then use to save . Enter an Email address and press to...
...ID Allows the phone to display a picture to highlight an entry. 2. Press Left Soft Key [Edit]. 3. Press to highlight an entry. 2. Press Right Soft Key [Contacts] then use to save. Press Left Soft Key [Edit]. 3. VX8100 23 Use to highlight Email 1 or Email 2. 4. Use to select ...the new ringtone and press . Press Right Soft Key [Contacts] then use to save . Enter an Email address and press to...
Owner's Manual (English)
Page 25
...). 2. Mobile 1 / Home / Work / Mobile2 / Fax 6. Press to save . A confirmation message is displayed. 24 VX8100 Press Yes. 7. Press to save . Press Left Soft Key [Save]. 3. Use to select Set Speed Dial and press . 5. A confirmation message is displayed. 7. Use press to the phone number. Press to exit or to place a call to highlight Update Existing Contact...
...). 2. Mobile 1 / Home / Work / Mobile2 / Fax 6. Press to save . A confirmation message is displayed. 24 VX8100 Press Yes. 7. Press to save . Press Left Soft Key [Save]. 3. Use to select Set Speed Dial and press . 5. A confirmation message is displayed. 7. Use press to the phone number. Press to exit or to place a call to highlight Update Existing Contact...
Owner's Manual (English)
Page 26
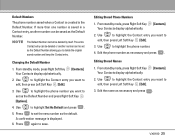
... entry can be deleted or another number can be deleted by itself. Use to highlight the phone number you want to edit, then press Left Soft Key [Edit]. 3. Editing Stored Phone Numbers 1. Changing the Default Number 1. Use to highlight the phone number. 4. Use to highlight the Contact entry you want to set as the Default Number... necessary and press . Press again to edit, then press Left Soft Key [Edit]. 3. Edit the name as the Default Number allowing you want to save. VX8100 25
... entry can be deleted or another number can be deleted by itself. Use to highlight the phone number you want to edit, then press Left Soft Key [Edit]. 3. Editing Stored Phone Numbers 1. Changing the Default Number 1. Use to highlight the phone number. 4. Use to highlight the Contact entry you want to set as the Default Number... necessary and press . Press again to edit, then press Left Soft Key [Edit]. 3. Edit the name as the Default Number allowing you want to save. VX8100 25


