
Service Manual
Page 1
R Microwave Oven Service Manual RRRRRCCCCCSSSSS1111100000PAMMMBPPPDASAAA RRFCSS1120MPPSSAA RRRFCFSSS111220SGSWW22AA RFS12MPSA RFS12G CAUTION BEFORE SERVICING THE UNIT, READ THE SAFETY PRECAUTIONS IN THIS MANUAL.
R Microwave Oven Service Manual RRRRRCCCCCSSSSS1111100000PAMMMBPPPDASAAA RRFCSS1120MPPSSAA RRRFCFSSS111220SGSWW22AA RFS12MPSA RFS12G CAUTION BEFORE SERVICING THE UNIT, READ THE SAFETY PRECAUTIONS IN THIS MANUAL.

Service Manual
Page 2
...with the door open. PRECAUTIONS TO BE OBSERVED BEFORE AND DURING SERVICING TO AVOID POSSIBLE EXPOSURE TO EXCESSIVE MICROWAVE ENERGY A) Do not operate or allow the oven to be operated with the Federal Performance Standard should be repaired, replaced, or adjusted by properly qualified ...service personnel. D) Any defective or misadjusted components in the interlock, monitor, door seal, and microwave generation and transmission systems shall be performed on each oven prior to release to the owner. Consult the service manual for proper service procedures to assure continued safety...
...with the door open. PRECAUTIONS TO BE OBSERVED BEFORE AND DURING SERVICING TO AVOID POSSIBLE EXPOSURE TO EXCESSIVE MICROWAVE ENERGY A) Do not operate or allow the oven to be operated with the Federal Performance Standard should be repaired, replaced, or adjusted by properly qualified ...service personnel. D) Any defective or misadjusted components in the interlock, monitor, door seal, and microwave generation and transmission systems shall be performed on each oven prior to release to the owner. Consult the service manual for proper service procedures to assure continued safety...
Service Manual
Page 4
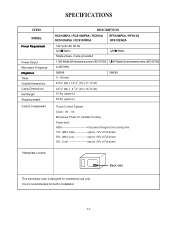
...Dimensions Cavity Dimensions Net Weight Net Weight Shipping weight Shipping weight CoCnotrnotrl oCl oCmomplepmlemenetnt DESCRIPTION RCS10MPA / RCS10MPSA / RCSD1E0SACRIPRTFISO12NMPSA / RFS12G RRCCS1S01S0WMP2AA / RCS10PRBCDSA10MPSA RFRSF1S21S2WM2PASA RFS12G 121020VVolotsltsAACC6600HHzz 1,15,05000WWaatttsts .....5500%%ooffFFuullllppoowweerr 202%0%(L(oLwow a-apppproroxx..2200%%ooffFFuullllppoowweerr NamNaempleaptelaLteocLaotcioantion This microwave oven is designed for commercial use only. Back side Back side This microwave oven is not recommended for buelt-in Installation. 1-1 1-1 ...
...Dimensions Cavity Dimensions Net Weight Net Weight Shipping weight Shipping weight CoCnotrnotrl oCl oCmomplepmlemenetnt DESCRIPTION RCS10MPA / RCS10MPSA / RCSD1E0SACRIPRTFISO12NMPSA / RFS12G RRCCS1S01S0WMP2AA / RCS10PRBCDSA10MPSA RFRSF1S21S2WM2PASA RFS12G 121020VVolotsltsAACC6600HHzz 1,15,05000WWaatttsts .....5500%%ooffFFuullllppoowweerr 202%0%(L(oLwow a-apppproroxx..2200%%ooffFFuullllppoowweerr NamNaempleaptelaLteocLaotcioantion This microwave oven is designed for commercial use only. Back side Back side This microwave oven is not recommended for buelt-in Installation. 1-1 1-1 ...

Service Manual
Page 5
... load attached. A resulting static electric discharge may radiate from the magnetron or other appliances, the microwave oven is energized. ¥ Proper operation of the microwave oven requires that the magnetron gasket is improperly used or connection. CAUTIONS Unlike other microwave generating device if it is properly installed around the dome of the tube whenever installing...
... load attached. A resulting static electric discharge may radiate from the magnetron or other appliances, the microwave oven is energized. ¥ Proper operation of the microwave oven requires that the magnetron gasket is improperly used or connection. CAUTIONS Unlike other microwave generating device if it is properly installed around the dome of the tube whenever installing...
Service Manual
Page 6
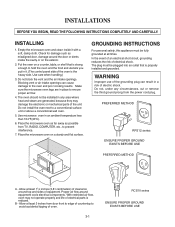
... components. In the event of an electrical short circuit, grounding reduces the risk of electrical parts is properly installed and grounded. Place the microwave oven on a counter, table, or shelf that is reduced. The plug must be plugged into an outlet that is the heavy side. Allow... at all times. Make sure the microwave oven legs are generated, because they may not operate properly and life of electrical shock. INSTALLING 1. Check for damage such as possible from the...
... components. In the event of an electrical short circuit, grounding reduces the risk of electrical parts is properly installed and grounded. Place the microwave oven on a counter, table, or shelf that is reduced. The plug must be plugged into an outlet that is the heavy side. Allow... at all times. Make sure the microwave oven legs are generated, because they may not operate properly and life of electrical shock. INSTALLING 1. Check for damage such as possible from the...
Service Manual
Page 14
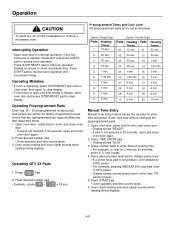
... 2X Pads 1. Press number pads to enter desired cooking time. • For example, to clear display. • If oven door is not pressed in microwave oven. Close door and press START pad to resume oven operation. • Press STOP/RESET pad to show countdown time. Display continues to interrupt operation. Press desired number pad...
... 2X Pads 1. Press number pads to enter desired cooking time. • For example, to clear display. • If oven door is not pressed in microwave oven. Close door and press START pad to resume oven operation. • Press STOP/RESET pad to show countdown time. Display continues to interrupt operation. Press desired number pad...

Service Manual
Page 16
...Allows beep when pad is heating.) AllowAs lolovewnstoardedsuinmge hheeaatitninggtimtime ceouwnhtdiolewnovafetenr idsoohreisatoinpegn.ed during cycle. eyboard disabled Prevents adding heating time while oven is opened during cycle. Display message for approximately 5 seconds. ¥ After 5 seconds, signal sounds. Display shows ...Press and hold pad 2 for 24 hours every 30 days. Press START pad to advance to customized the microwave ovenÕs operation. Do no(tAdilsloplwaysmuessesagoef. manual time entry and preprogrammed pads.) Display messag e for 24 hours every...
...Allows beep when pad is heating.) AllowAs lolovewnstoardedsuinmge hheeaatitninggtimtime ceouwnhtdiolewnovafetenr idsoohreisatoinpegn.ed during cycle. eyboard disabled Prevents adding heating time while oven is opened during cycle. Display message for approximately 5 seconds. ¥ After 5 seconds, signal sounds. Display shows ...Press and hold pad 2 for 24 hours every 30 days. Press START pad to advance to customized the microwave ovenÕs operation. Do no(tAdilsloplwaysmuessesagoef. manual time entry and preprogrammed pads.) Display messag e for 24 hours every...
Service Manual
Page 18
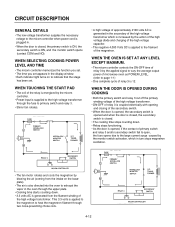
... set. WHEN TOUCHING THE START PAD • The coil of the relay is energized by the applied signal to vary the average output power of microwave oven as POWER LEVEL. (refer to page 1-1) • One complete cycle of relay 3 is 12. FUSE PRIMARY INTERLLOCK L SWITCH N INTERLLOCK MONITOR SWITCH ...the secondary switch is ON, and the monitor switch opens (contact COM and NO). TRANSFORMER RELAY 3 SECONDARY SWITCH MICOM CONTROLLER 4-12 WHEN THE OVEN IS SET AT ANY LEVEL EXCEPT MAXIMUM. • The micom controller controls the ON-OFF time of the magnetron. This 3.3 volts is applied ...
... set. WHEN TOUCHING THE START PAD • The coil of the relay is energized by the applied signal to vary the average output power of microwave oven as POWER LEVEL. (refer to page 1-1) • One complete cycle of relay 3 is 12. FUSE PRIMARY INTERLLOCK L SWITCH N INTERLLOCK MONITOR SWITCH ...the secondary switch is ON, and the monitor switch opens (contact COM and NO). TRANSFORMER RELAY 3 SECONDARY SWITCH MICOM CONTROLLER 4-12 WHEN THE OVEN IS SET AT ANY LEVEL EXCEPT MAXIMUM. • The micom controller controls the ON-OFF time of the magnetron. This 3.3 volts is applied ...
Service Manual
Page 19
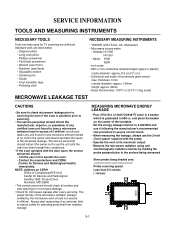
... graduated to have excessive emission levels at its maximum output. ¥ Measure the microwave radiation using and electromagnetic radiation monitor by the microwave oven should ascertain the cause of an unknown field to operate the oven. - Contact the manufacturer and CDRH (Center for Devices and Radiological Health) immediately. Tell the user not to assure...
... graduated to have excessive emission levels at its maximum output. ¥ Measure the microwave radiation using and electromagnetic radiation monitor by the microwave oven should ascertain the cause of an unknown field to operate the oven. - Contact the manufacturer and CDRH (Center for Devices and Radiological Health) immediately. Tell the user not to assure...
Service Manual
Page 20
... NOTIFICATION AFTER MEASUREMENT ¥ After adjustment and repair of any microwave energy interruption or microwave energy blocking device, record the measured values for calibration by its manufacturer. MEASUREMENT WITH A FULLY ASSEMBLED OVEN ¥ After all components, including the outer case, are ...fully assembled, measure for microwave energy leakage around the door viewing window, the exhaust opening, and air inlet openings. ¥ Microwave energy leakage must be more than...
... NOTIFICATION AFTER MEASUREMENT ¥ After adjustment and repair of any microwave energy interruption or microwave energy blocking device, record the measured values for calibration by its manufacturer. MEASUREMENT WITH A FULLY ASSEMBLED OVEN ¥ After all components, including the outer case, are ...fully assembled, measure for microwave energy leakage around the door viewing window, the exhaust opening, and air inlet openings. ¥ Microwave energy leakage must be more than...

Service Manual
Page 21
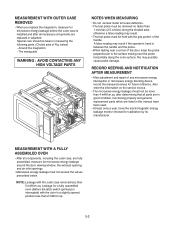
...x (∆T) T is measured while the microwave generator is added to the vessel. The outer case must be moved backward to be lifted off. MEASUREMENT OF MICROWAVE POWER OUTPUT • Microwave power output measurement is made with the microwave oven supplied at its rated voltage and operated at... its maximum microwave power setting with a load of (1000±5) g of potable ...
...x (∆T) T is measured while the microwave generator is added to the vessel. The outer case must be moved backward to be lifted off. MEASUREMENT OF MICROWAVE POWER OUTPUT • Microwave power output measurement is made with the microwave oven supplied at its rated voltage and operated at... its maximum microwave power setting with a load of (1000±5) g of potable ...
Service Manual
Page 22
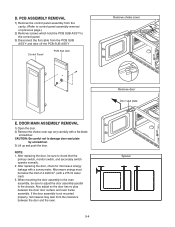
..., be sure to the chassis. If the door assembly is not mounted properly, microwaves may leak from the clearance between the inner door surface and oven frame assembly. PCB ASSEMBLY REMOVAL 1) Remove the control panel assembly from the PCB SUB ASSÕY and take off the PCB SUB...REMOVAL 1) Open the door. 2) Remove the choke cover cap very carefully with a survey meter. After replacing the door, check for microwave energy leakage with a flat-blade screwdriver. NOTE: 1. Microwave energy must be below the limit of 4 mW/cm2. (with a 275 ml water load) 3. CAUTION: Be careful not to...
..., be sure to the chassis. If the door assembly is not mounted properly, microwaves may leak from the clearance between the inner door surface and oven frame assembly. PCB ASSEMBLY REMOVAL 1) Remove the control panel assembly from the PCB SUB ASSÕY and take off the PCB SUB...REMOVAL 1) Open the door. 2) Remove the choke cover cap very carefully with a survey meter. After replacing the door, check for microwave energy leakage with a flat-blade screwdriver. NOTE: 1. Microwave energy must be below the limit of 4 mW/cm2. (with a 275 ml water load) 3. CAUTION: Be careful not to...

Service Manual
Page 23
When replacing the magnetron, be sure to the oven cavity ASS'Y 3) After repairing the motor, replace the removed leadwire. NOTE: 1. Be sure to the magnetron. Stirrer fan motor Magnetron 5-5 G. NOTE: 1. REMOVING THE STIRRER FAN ... lead from the stirrer fan motor terminals. 2) Remove the screw securing the stirrer fan motor to install the magnetron gasket in good condition. 3. To prevent microwave leakage, tighten the mounting screws properly, making sure there is clear from the waveguide. Make sure that the gasket is rigidly attached to grasp the...
When replacing the magnetron, be sure to the oven cavity ASS'Y 3) After repairing the motor, replace the removed leadwire. NOTE: 1. Be sure to the magnetron. Stirrer fan motor Magnetron 5-5 G. NOTE: 1. REMOVING THE STIRRER FAN ... lead from the stirrer fan motor terminals. 2) Remove the screw securing the stirrer fan motor to install the magnetron gasket in good condition. 3. To prevent microwave leakage, tighten the mounting screws properly, making sure there is clear from the waveguide. Make sure that the gasket is rigidly attached to grasp the...
Service Manual
Page 29
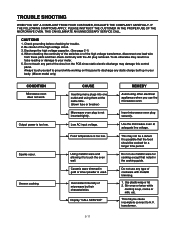
...in thDeocnoootkuinsgegmuiedtea.llic ware for cooking except that the food sThohuisldmbaeycnoootkbeed afodr eafect. icrowave oven plug securely. Use the microwave oven at aUdesqeutahtee mlinicerovowlatavgee.oven at the s(balmowentimfuese. loItnigsepr otismseibpleertihoadt. se any type of cookware with metallic 1t...low. or breaker) (blown fuse or breaker) Microwave oven plug is not Miniscerortwedavtieghotvlye.n plug is possible that noted in your body. (Micom model only) CONDITION CONDITION Microwave oven Midcrooewsanvoet wovoerkn. It is not inserted tightly. Ceramic...
...in thDeocnoootkuinsgegmuiedtea.llic ware for cooking except that the food sThohuisldmbaeycnoootkbeed afodr eafect. icrowave oven plug securely. Use the microwave oven at aUdesqeutahtee mlinicerovowlatavgee.oven at the s(balmowentimfuese. loItnigsepr otismseibpleertihoadt. se any type of cookware with metallic 1t...low. or breaker) (blown fuse or breaker) Microwave oven plug is not Miniscerortwedavtieghotvlye.n plug is possible that noted in your body. (Micom model only) CONDITION CONDITION Microwave oven Midcrooewsanvoet wovoerkn. It is not inserted tightly. Ceramic...
Service Manual
Page 33
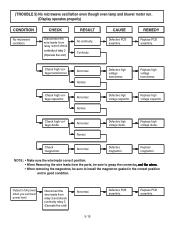
..... • W¥hWehneRneRmeomvoinvigngthtehewwiriereleleaaddssfrfroommtthheeppaarrttss,, bbee ssuurree ttooggrraassppththeeccoonnnnecetcotro,rn, ontotthtehwe iwreisre. Abnormal. 5-15 Defective PCB aDsesefemcbtilvye. Disconnect the Diswciroenlneeacdtsthfreom wirelaleya2dsanfrdomcheck relcaoyn3tinaunitdy crehleayck2. (TROUBLE 5) No microwave oscillation even though oven lamp and blower motor run. (TROUBLE 5()DNisopmlaiycroopwearvaeteosspcrilolapteiornlye) ven though oven lamp and fan motor run. (Display operates properly) CONDITION CHECK RESULT CAUSE REMEDY CONDITION No...
..... • W¥hWehneRneRmeomvoinvigngthtehewwiriereleleaaddssfrfroommtthheeppaarrttss,, bbee ssuurree ttooggrraassppththeeccoonnnnecetcotro,rn, ontotthtehwe iwreisre. Abnormal. 5-15 Defective PCB aDsesefemcbtilvye. Disconnect the Diswciroenlneeacdtsthfreom wirelaleya2dsanfrdomcheck relcaoyn3tinaunitdy crehleayck2. (TROUBLE 5) No microwave oscillation even though oven lamp and blower motor run. (TROUBLE 5()DNisopmlaiycroopwearvaeteosspcrilolapteiornlye) ven though oven lamp and fan motor run. (Display operates properly) CONDITION CHECK RESULT CAUSE REMEDY CONDITION No...


