

Service Manual
Page 2
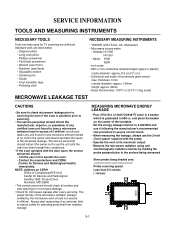
... the magnetron, wave guide or transmission line, and cavity for precautions to be performed on all ovens to be operated with the Federal Performance Standard should be taken to avoid possible exposure to excessive microwave energy. E) A microwave leakage check to verify compliance with the door open. SAFETY PRECAUTIONS This device is released to the owner. Consult the service manual for proper service procedures...
... the magnetron, wave guide or transmission line, and cavity for precautions to be performed on all ovens to be operated with the Federal Performance Standard should be taken to avoid possible exposure to excessive microwave energy. E) A microwave leakage check to verify compliance with the door open. SAFETY PRECAUTIONS This device is released to the owner. Consult the service manual for proper service procedures...

Service Manual
Page 5
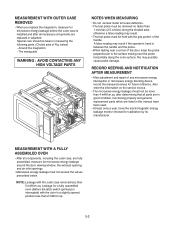
... cord during repair and use. ¥ NEVER TOUCH any oven components or wiring during operation. ¥ BEFORE TOUCHING any parts of the oven, always remove the power plug from the magnetron or other appliances, the microwave oven is free from danger in the high voltage capacitor. Though it is properly installed. ¥ Be sure that the magnetron be exposed to or replacing the Magnetron. ¥ DO NOT touch any parts of the control panel circuit...
... cord during repair and use. ¥ NEVER TOUCH any oven components or wiring during operation. ¥ BEFORE TOUCHING any parts of the oven, always remove the power plug from the magnetron or other appliances, the microwave oven is free from danger in the high voltage capacitor. Though it is properly installed. ¥ Be sure that the magnetron be exposed to or replacing the Magnetron. ¥ DO NOT touch any parts of the control panel circuit...
Service Manual
Page 6
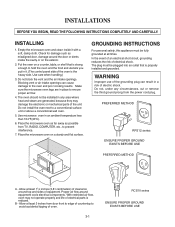
... block the vent and the air intake openings. Use care when handling.) 3. With restricted air flow, oven may damage the electronic or mechanical parts of oven. 3-1 RCS10 series ENSURE PROPER GROUND EXISTS BEFORE USE INSTALLATIONS BEFORE YOU BEGIN, READ THE FOLLOWING INSTRUCTIONS COMPLETELY AND CAREFULLY. INSTALLING 1. Empty the microwave oven and clean inside the cavity or on a stardy and flat surface. In the event of an electrical short circuit, grounding...
... block the vent and the air intake openings. Use care when handling.) 3. With restricted air flow, oven may damage the electronic or mechanical parts of oven. 3-1 RCS10 series ENSURE PROPER GROUND EXISTS BEFORE USE INSTALLATIONS BEFORE YOU BEGIN, READ THE FOLLOWING INSTRUCTIONS COMPLETELY AND CAREFULLY. INSTALLING 1. Empty the microwave oven and clean inside the cavity or on a stardy and flat surface. In the event of an electrical short circuit, grounding...
Service Manual
Page 7
...% MED-HI 70% TIME ENTRY STOP RESET START 1 2 3 4 5 6 7 88 99 00 RCS10A Pads PadTsIME ENTRY Use to exit programming mode and stop HOLD 0%, Usectoooskeinlegcdt uproinwgercoleovkeinl.gOcvyecnle.can heat at DEFROST 20%, full or reduced power. STOP/RESET Use to enter heating time without changing prepUrosgeratombmeegdinnhuematbinegr pwaitdhsp. ave STOP/RESET Usettimo esxiat npdropgorawmermleinvgelms owdheenanpdrosgtroapmming cookpinagdsd.uring cooking cycle. Use to next user option. If oven power level is MEDSUTIMAR5T0%, MED-HI 70% set tUos0e%toosvteanrtd"Moeasnunaolt Thiemaet...
...% MED-HI 70% TIME ENTRY STOP RESET START 1 2 3 4 5 6 7 88 99 00 RCS10A Pads PadTsIME ENTRY Use to exit programming mode and stop HOLD 0%, Usectoooskeinlegcdt uproinwgercoleovkeinl.gOcvyecnle.can heat at DEFROST 20%, full or reduced power. STOP/RESET Use to enter heating time without changing prepUrosgeratombmeegdinnhuematbinegr pwaitdhsp. ave STOP/RESET Usettimo esxiat npdropgorawmermleinvgelms owdheenanpdrosgtroapmming cookpinagdsd.uring cooking cycle. Use to next user option. If oven power level is MEDSUTIMAR5T0%, MED-HI 70% set tUos0e%toosvteanrtd"Moeasnunaolt Thiemaet...
Service Manual
Page 8
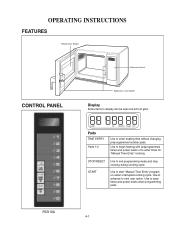
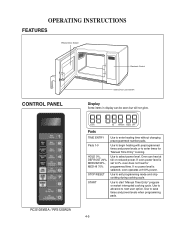
.... OPERATING INSTRUCTIONS FEATURES Window Door Screen Electronic Control CONTROL PANEL Safety Door Lock System Display Some items in display can heat at 100% power. If no power level is set to enter times for programmed time. Use to advance to select power level. Use to next user option. Oven can be seen but will not glow. 8 9 0 RCS10MPA Pads TIME ENTRY Pads 1-0 HOLD 0%, DEFROST 20%, MEDUIM 50%, MED-HI 70% STOP/RESET START Use to start "Manual Time Entry" program or restart interrupted cooking cycle. Use to exit programming mode...
.... OPERATING INSTRUCTIONS FEATURES Window Door Screen Electronic Control CONTROL PANEL Safety Door Lock System Display Some items in display can heat at 100% power. If no power level is set to enter times for programmed time. Use to advance to select power level. Use to next user option. Oven can be seen but will not glow. 8 9 0 RCS10MPA Pads TIME ENTRY Pads 1-0 HOLD 0%, DEFROST 20%, MEDUIM 50%, MED-HI 70% STOP/RESET START Use to start "Manual Time Entry" program or restart interrupted cooking cycle. Use to exit programming mode...

Service Manual
Page 9
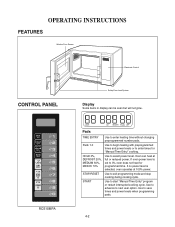
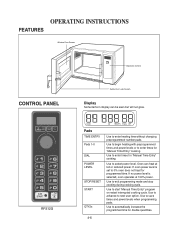
... OPERATING INSTRUCTIONS FEFAETAUTRUERSES Splatter Shields Window DooWrinSdocwreDeonor Screen CONTROL PANEL CONTROL PANEL Electronic Control Electronic Control Turntable Door Open Button Safety Door Lock System Safety Door Lock System Rotating Ring Display DisSpomlaeyitems in display can be seen but will not glow. TIMPEadEsN1T-R0Y UseUstoe etontbeerghineahteinagtintigmweitwhitphroeuptrocghraanmgminegd pretpimroegsramndmpeodwneurmlebverlspoardtso. Use to enter heating time without changing preprogrammed number pads. HOLD 0% DEFROST 20% MEDIUM 50% MED-HI 70% TIME ENTRY STOP RESET...
... OPERATING INSTRUCTIONS FEFAETAUTRUERSES Splatter Shields Window DooWrinSdocwreDeonor Screen CONTROL PANEL CONTROL PANEL Electronic Control Electronic Control Turntable Door Open Button Safety Door Lock System Safety Door Lock System Rotating Ring Display DisSpomlaeyitems in display can be seen but will not glow. TIMPEadEsN1T-R0Y UseUstoe etontbeerghineahteinagtintigmweitwhitphroeuptrocghraanmgminegd pretpimroegsramndmpeodwneurmlebverlspoardtso. Use to enter heating time without changing preprogrammed number pads. HOLD 0% DEFROST 20% MEDIUM 50% MED-HI 70% TIME ENTRY STOP RESET...
Service Manual
Page 10
... Door Screen Window Door Screen CONTROL PANEL CONTROL PANEL Electronic Control Electronic Control Turntable Door Open Button Safety Door Lock System Safety Door Lock System Rotating Ring Display DispSloamye items in display can be seen but will not glow. to enter cooking time. Use to advance to exit programming mode and stop cooking during cooking cycle. eIfrnleovpeolswwehr elenvperloisgramming selecptaedds, .oven operates at timesfuallnodr preodwuecreldevpeolwseorr. Use to next user option. Pads710-%0, 50%, DEFROST HDOEFLRDSOT0AS%RT,T20%, MEDUIM 50%, MED-HI 70% STOP/RESET...
... Door Screen Window Door Screen CONTROL PANEL CONTROL PANEL Electronic Control Electronic Control Turntable Door Open Button Safety Door Lock System Safety Door Lock System Rotating Ring Display DispSloamye items in display can be seen but will not glow. to enter cooking time. Use to advance to exit programming mode and stop cooking during cooking cycle. eIfrnleovpeolswwehr elenvperloisgramming selecptaedds, .oven operates at timesfuallnodr preodwuecreldevpeolwseorr. Use to next user option. Pads710-%0, 50%, DEFROST HDOEFLRDSOT0AS%RT,T20%, MEDUIM 50%, MED-HI 70% STOP/RESET...
Service Manual
Page 11
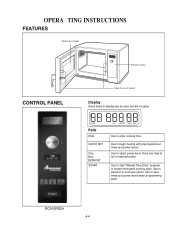
...%, set tsoe0le%cteodv,eonvdeoneospneorattheesaattf1o0r 0% power. Use to next user option. Some items in display can be seen but will not glow. IIff onvoepnopwoewr elervleelviesl is HOLMDE0D%U, IM 50%,Usesteotstoel0e%ct poovewnerdoleevsenl.oOt vheenatcfaonr heat at DEFROST 20%ÒM, anfuullaol rTrimedeucEendtrypÓowcoeor.kIinf ogv. OPERATING INSTRUCTIONS FEAFTEUARTEUSRES Splatter Shields Window DoorWSincdroeweDnoor Screen CONCOTRNOTRLOPLANPAENLEL Electronic Control Electronic Control Turntable Rotating Ring Door Open Button Safety Door Lock System...
...%, set tsoe0le%cteodv,eonvdeoneospneorattheesaattf1o0r 0% power. Use to next user option. Some items in display can be seen but will not glow. IIff onvoepnopwoewr elervleelviesl is HOLMDE0D%U, IM 50%,Usesteotstoel0e%ct poovewnerdoleevsenl.oOt vheenatcfaonr heat at DEFROST 20%ÒM, anfuullaol rTrimedeucEendtrypÓowcoeor.kIinf ogv. OPERATING INSTRUCTIONS FEAFTEUARTEUSRES Splatter Shields Window DoorWSincdroeweDnoor Screen CONCOTRNOTRLOPLANPAENLEL Electronic Control Electronic Control Turntable Rotating Ring Door Open Button Safety Door Lock System...
Service Manual
Page 12
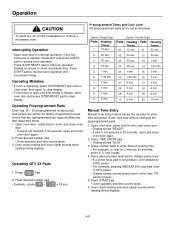
... fuselltotrore0d%ucoevdenpodwoeers. OPERATING INSTRUCTIONS FFEEAATTUURREESS WWininddoowwDDoooorrSSccrreeeenn CCOONNTTRROOLLPPAANNEELL TIME POWER QTY ENTRY LEVEL 2X - + 8 89 90 0 RFS12G Electronic Control Electronic Control Safety Door Lock System Safety Door Lock System Display DSoimsepiltaemys in display can be seen but will not glow. Pads PTIaMdEsENTRY TIME ENTRY Pads 1-0 Pads 1-0 DIAL HOLD 0%, DPOEFWREORST 20%, MLEEVDEULIM 50%, STOP/RESET STOP/RESET START START QQTTYY22xx Use to exit programming mode and stop cooking during cooking cycle. enter times for U"Mseatnoueanl...
... fuselltotrore0d%ucoevdenpodwoeers. OPERATING INSTRUCTIONS FFEEAATTUURREESS WWininddoowwDDoooorrSSccrreeeenn CCOONNTTRROOLLPPAANNEELL TIME POWER QTY ENTRY LEVEL 2X - + 8 89 90 0 RFS12G Electronic Control Electronic Control Safety Door Lock System Safety Door Lock System Display DSoimsepiltaemys in display can be seen but will not glow. Pads PTIaMdEsENTRY TIME ENTRY Pads 1-0 Pads 1-0 DIAL HOLD 0%, DPOEFWREORST 20%, MLEEVDEULIM 50%, STOP/RESET STOP/RESET START START QQTTYY22xx Use to exit programming mode and stop cooking during cooking cycle. enter times for U"Mseatnoueanl...
Service Manual
Page 14
... power. 5. Open oven door , place food in oven, and close oven door • If pad is open and time shows in display, close oven door again. 2. Press number pads to enter desired cooking time. • For example, to heat for factory programmed ovens. Oven fan continues to enter time and power levels, and heat without changing the preprogrammed pads. 1. Oven stops heating and oven signal sounds when heating timing elapses. Manual Time Entry Manual Time Entry feature allows the operator to operate. Press START pad. • Oven operates and time counts down . 3. Close door...
... power. 5. Open oven door , place food in oven, and close oven door • If pad is open and time shows in display, close oven door again. 2. Press number pads to enter desired cooking time. • For example, to heat for factory programmed ovens. Oven fan continues to enter time and power levels, and heat without changing the preprogrammed pads. 1. Oven stops heating and oven signal sounds when heating timing elapses. Manual Time Entry Manual Time Entry feature allows the operator to operate. Press START pad. • Oven operates and time counts down . 3. Close door...

Service Manual
Page 16
...changed while oven is heating when a memory pad is pre(sPsered.vents adding heating time while oven is pressed before finishing programming sequence, oven exits programming mode. 2. Press STOP/RESET pad or close oven door to next option. p 5 bee(pCbournsttsinuuntoiludsooBr ies eoppenuendt.il door is Allowsoupseenoef pdredpurorginragmmcyecdlpea.ds only. manual time entry and preprogrammed pads.) Display messag e for option. 4. Press START pad to advance to exit programming mode. Options ( ) = Factory Setting Contin3uosuescboenepducnotilndtoionruisooupsenbeede. beep Sets...
...changed while oven is heating when a memory pad is pre(sPsered.vents adding heating time while oven is pressed before finishing programming sequence, oven exits programming mode. 2. Press STOP/RESET pad or close oven door to next option. p 5 bee(pCbournsttsinuuntoiludsooBr ies eoppenuendt.il door is Allowsoupseenoef pdredpurorginragmmcyecdlpea.ds only. manual time entry and preprogrammed pads.) Display messag e for option. 4. Press START pad to advance to exit programming mode. Options ( ) = Factory Setting Contin3uosuescboenepducnotilndtoionruisooupsenbeede. beep Sets...
Service Manual
Page 18
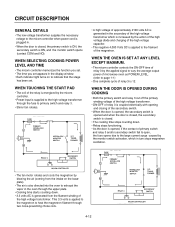
... micom controller when power cord is plugged in turn stops magnetron oscillation. TRANSFORMER RELAY 3 SECONDARY SWITCH MICOM CONTROLLER 4-12 WHEN TOUCHING THE START PAD • The coil of the relay is energized by the applied signal to vary the average output power of microwave oven as POWER LEVEL. (refer to heat the magnetron filament through the upper plate. • Cooking time starts counting down . • Relay stops functioning. • As the door is opened...
... micom controller when power cord is plugged in turn stops magnetron oscillation. TRANSFORMER RELAY 3 SECONDARY SWITCH MICOM CONTROLLER 4-12 WHEN TOUCHING THE START PAD • The coil of the relay is energized by the applied signal to vary the average output power of microwave oven as POWER LEVEL. (refer to heat the magnetron filament through the upper plate. • Cooking time starts counting down . • Relay stops functioning. • As the door is opened...
Service Manual
Page 19
... microwave radiation using and electromagnetic radiation monitor by the microwave oven should ascertain the cause of borosilicate glass vessel. The power density of the microwave radiation leakage emitted by holding the probe perpendicular to have a microwave emission level in a beaker which is operative prior to servicing. ¥ The service personnel should inform the manufacturer, importer, or assembler of an unknown field to the owner...
... microwave radiation using and electromagnetic radiation monitor by the microwave oven should ascertain the cause of borosilicate glass vessel. The power density of the microwave radiation leakage emitted by holding the probe perpendicular to have a microwave emission level in a beaker which is operative prior to servicing. ¥ The service personnel should inform the manufacturer, importer, or assembler of an unknown field to the owner...
Service Manual
Page 20
... of the handle. after all components, including the outer case, are listed in this may result if the operator's hand is interrupted) with the door in good condition, functioning properly and genuine replacement parts which are fully assembled, measure for microwave energy leakage around the door viewing window, the exhaust opening, and air inlet openings. ¥ Microwave energy leakage must be removed no faster...
... of the handle. after all components, including the outer case, are listed in this may result if the operator's hand is interrupted) with the door in good condition, functioning properly and genuine replacement parts which are fully assembled, measure for microwave energy leakage around the door viewing window, the exhaust opening, and air inlet openings. ¥ Microwave energy leakage must be removed no faster...

Service Manual
Page 21
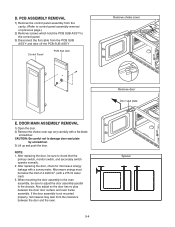
... screw Remove the screw securing screw securing screw ground screw Lift up and pull out control panel Lift up and pull out control panel assembly carefully from the cavity. MEASUREMENT OF MICROWAVE POWER OUTPUT • Microwave power output measurement is made with the microwave oven supplied at its rated voltage and operated at its maximum microwave power setting with a load of (1000±5) g of potable water. • The water is contained in watts...
... screw Remove the screw securing screw securing screw ground screw Lift up and pull out control panel Lift up and pull out control panel assembly carefully from the cavity. MEASUREMENT OF MICROWAVE POWER OUTPUT • Microwave power output measurement is made with the microwave oven supplied at its rated voltage and operated at its maximum microwave power setting with a load of (1000±5) g of potable water. • The water is contained in watts...
Service Manual
Page 22
... SUB ASSÕY Control PanPelCB SPuCbBASsumb Asm Control Panel Key Membrane RReemmoovvee cchhookkee ccoovveerr Button Spring Door Open Button Release Lever E. After replacing the door, check for microwave energy leakage with a flat-blade screwdriver. D. CAUTION: Be careful not to check that the primary switch, monitor switch, and secondary switch operate normally. 2. PCB ASSEMBLY REMOVAL 1) Remove the control panel assembly from the cavity. (Refer to control panel assembly removal on previous page.) 2) Remove screws which hold the PCB...
... SUB ASSÕY Control PanPelCB SPuCbBASsumb Asm Control Panel Key Membrane RReemmoovvee cchhookkee ccoovveerr Button Spring Door Open Button Release Lever E. After replacing the door, check for microwave energy leakage with a flat-blade screwdriver. D. CAUTION: Be careful not to check that the primary switch, monitor switch, and secondary switch operate normally. 2. PCB ASSEMBLY REMOVAL 1) Remove the control panel assembly from the cavity. (Refer to control panel assembly removal on previous page.) 2) Remove screws which hold the PCB...

Service Manual
Page 23
... replacing the magnetron, be sure that gasket is clear from the stirrer fan motor VERY CAREFULLY. 2. F. To prevent microwave leakage, tighten the mounting screws properly, making sure there is in the correct position and be sure to grasp the connector, not the wires, when removing. Be sure to install the magnetron gasket in good condition. 3. NOTE: 1. MAGNETRON REMOVAL 1) Disconnect the leadwire from the magnetron. 2) Carefully remove the mounting screws...
... replacing the magnetron, be sure that gasket is clear from the stirrer fan motor VERY CAREFULLY. 2. F. To prevent microwave leakage, tighten the mounting screws properly, making sure there is in the correct position and be sure to grasp the connector, not the wires, when removing. Be sure to install the magnetron gasket in good condition. 3. NOTE: 1. MAGNETRON REMOVAL 1) Disconnect the leadwire from the magnetron. 2) Carefully remove the mounting screws...
Service Manual
Page 29
... circuit on the PCB since static electric discharge may damage this control paAnlwela.ys touch yourself to ground while working on this panel to discharge any type of cookware with metallic trDimomniontgu. Output power is too low. Output power is too low. or breaker) (blown fuse or breaker) Microwave oven plug is not Miniscerortwedavtieghotvlye.n plug is too low. Ceramic ware trimmed in gold...
... circuit on the PCB since static electric discharge may damage this control paAnlwela.ys touch yourself to ground while working on this panel to discharge any type of cookware with metallic trDimomniontgu. Output power is too low. Output power is too low. or breaker) (blown fuse or breaker) Microwave oven plug is not Miniscerortwedavtieghotvlye.n plug is too low. Ceramic ware trimmed in gold...
Service Manual
Page 30
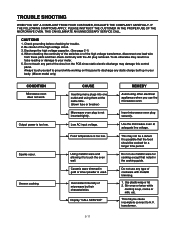
... be programmed. 3. Display obviously jumps in the display. 6. Each indicator light does not turn on after setting cooking cycle. 11. Still have trouble. Loose connection. Defective key membrane assembly. Display indicates a number different from one or more digits in display. 4. Display does not count down too fast while cooking. 10. Display counts down with time blinking or up with clock operation. 8. Display time of one touched. 4. REMEDY Replace PCB assembly. Replace PCB assembly. 5-12 Specific numbers (for...
... be programmed. 3. Display obviously jumps in the display. 6. Each indicator light does not turn on after setting cooking cycle. 11. Still have trouble. Loose connection. Defective key membrane assembly. Display indicates a number different from one or more digits in display. 4. Display does not count down too fast while cooking. 10. Display counts down with time blinking or up with clock operation. 8. Display time of one touched. 4. REMEDY Replace PCB assembly. Replace PCB assembly. 5-12 Specific numbers (for...

Service Manual
Page 32
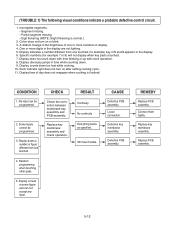
... ictclohs(ewdi)th. secondary switch. B2lo. CheCckhebclokwfaenr mmoottoorr.. ReRpleapcleacoevoevnelnamlapm. AbAnbonromrmalal NoNromrmalal DDecercereaaseseininppoowweer r sosuorucrecevovoltlataggee wwithithloloaadd. . DefDeectfievcetivoeveonvelanmlapm. No continuity. wFaenr mmoottoorr or or oovveennlalammpp do do nnoott ttuurrnn oonn.. Setting time d1o. AbAnbonromrmalal AbAnbonromrmalal DefDeectfievcetivbelofwaenrmmoototor.r. door closed). Continuity. (TROUBLE 3) Display shows all figures set and START pad is touched. RaRasesespsepleamlamccbebelylPyP..CCBB...
... ictclohs(ewdi)th. secondary switch. B2lo. CheCckhebclokwfaenr mmoottoorr.. ReRpleapcleacoevoevnelnamlapm. AbAnbonromrmalal NoNromrmalal DDecercereaaseseininppoowweer r sosuorucrecevovoltlataggee wwithithloloaadd. . DefDeectfievcetivoeveonvelanmlapm. No continuity. wFaenr mmoottoorr or or oovveennlalammpp do do nnoott ttuurrnn oonn.. Setting time d1o. AbAnbonromrmalal AbAnbonromrmalal DefDeectfievcetivbelofwaenrmmoototor.r. door closed). Continuity. (TROUBLE 3) Display shows all figures set and START pad is touched. RaRasesespsepleamlamccbebelylPyP..CCBB...


