
Owner's Manual (English)
Page 7
... is supported • Exit Button • Volume Button Volume up and down • Check Button * There is not a function which is supported 6 Toggles through preset video settings. Using the Remote Control Name of the Remote Control Buttons • AV Button • Sleep Button When watching AV, RGB PC,HDMI/DVI ,Component1...
... is supported • Exit Button • Volume Button Volume up and down • Check Button * There is not a function which is supported 6 Toggles through preset video settings. Using the Remote Control Name of the Remote Control Buttons • AV Button • Sleep Button When watching AV, RGB PC,HDMI/DVI ,Component1...

Owner's Manual (English)
Page 8
... (+/-). 3. Select the signal type you press the button once, the following Input Signal Window will appear. Using the Remote Control • AV Button Toggles through video AV Component1 Component2 RGB PC HDMI/DVI 123 456 789 0 • Input Select Button If you want using the button. AAA Type 1.
... (+/-). 3. Select the signal type you press the button once, the following Input Signal Window will appear. Using the Remote Control • AV Button Toggles through video AV Component1 Component2 RGB PC HDMI/DVI 123 456 789 0 • Input Select Button If you want using the button. AAA Type 1.

Owner's Manual (English)
Page 14
... as shown in the below figure and then connect the power cord (See page 9). INPUT AUTO/SET A When connecting with S-Video cable, S-Video input has a priority. 13 Press the INPUT button on the bottom of the product. Connecting to select the input signal. Input AV ...an BNC cable. • Select AV. Product IN OUT Product IN OUT Audio Cable (not included) BNC Cable (not included) Audio Cable (not included) S-Video Cable (not included) VCR/DVD Receiver VCR/DVD Receiver Select an input signal. A When connecting with a BNC cable. • Connect the input terminal with...
... as shown in the below figure and then connect the power cord (See page 9). INPUT AUTO/SET A When connecting with S-Video cable, S-Video input has a priority. 13 Press the INPUT button on the bottom of the product. Connecting to select the input signal. Input AV ...an BNC cable. • Select AV. Product IN OUT Product IN OUT Audio Cable (not included) BNC Cable (not included) Audio Cable (not included) S-Video Cable (not included) VCR/DVD Receiver VCR/DVD Receiver Select an input signal. A When connecting with a BNC cable. • Connect the input terminal with...

Owner's Manual (English)
Page 15
... match. Press the INPUT button on the bottom of the product. INPUT SET Or, press the INPUT botton on the remote control to display HD signals. - Component doesn't support HDCP. Select an input signal. Connecting to External Devices Component Input (480i/480p/576i/576p/720p/1080i)... Connect the video/audio cable as shown in order to select the input signal. INPUT AUTO/SET A • Select Component 1 B • Select Component 2 ...
... match. Press the INPUT button on the bottom of the product. INPUT SET Or, press the INPUT botton on the remote control to display HD signals. - Component doesn't support HDCP. Select an input signal. Connecting to External Devices Component Input (480i/480p/576i/576p/720p/1080i)... Connect the video/audio cable as shown in order to select the input signal. INPUT AUTO/SET A • Select Component 1 B • Select Component 2 ...

Owner's Manual (English)
Page 16
... a HDMI to External Devices HDMI Input (480p/576p/720p/1080i/1080p) -HDMI Supports High Definition input and HDCP (High-bandwidth Digital Content Protection). Connect the video/audio cable as shown in order to DVI Signal Cable (not included) RCA-PC Audio Cable HDMI Signal Cable (not included) VCR/DVD/Set-top... RGB PC HDMI/DVI 15 INPUT SET Or, press the INPUT botton on the remote control to select the input signal. Product Product HDMI to display HD signals. Select an input signal. Some devices require HDCP in the below figure and then connect the power cord (See page 9).
... a HDMI to External Devices HDMI Input (480p/576p/720p/1080i/1080p) -HDMI Supports High Definition input and HDCP (High-bandwidth Digital Content Protection). Connect the video/audio cable as shown in order to DVI Signal Cable (not included) RCA-PC Audio Cable HDMI Signal Cable (not included) VCR/DVD/Set-top... RGB PC HDMI/DVI 15 INPUT SET Or, press the INPUT botton on the remote control to select the input signal. Product Product HDMI to display HD signals. Select an input signal. Some devices require HDCP in the below figure and then connect the power cord (See page 9).

Owner's Manual (English)
Page 17
When using AV input, you should use cable distributor. 16 Connecting to other monitors. We recommend that you can connect the AV Out to External Devices Watching AV Outputs - Video/TV BNC Cable (not included) Audio Cable (not included) IN Product OUT BNC Cable (not included) Audio Cable (not included) Video/TV Note • When multi-connecting in/out cascade format, no loss cables are recommended.
When using AV input, you should use cable distributor. 16 Connecting to other monitors. We recommend that you can connect the AV Out to External Devices Watching AV Outputs - Video/TV BNC Cable (not included) Audio Cable (not included) IN Product OUT BNC Cable (not included) Audio Cable (not included) Video/TV Note • When multi-connecting in/out cascade format, no loss cables are recommended.

Owner's Manual (English)
Page 19
User Menus Screen Adjustment options AUTO/SET Button [For PC Analog signal] [When XGA Mode is active and 1360 X768 is where the unit receives signals from the remote control. 18 Toggles between inputs AV Component 1 Component 2 RGB PC HDMI/DVI Composite Video, Separate Video HDTV, DVD HDTV, DVD 15-pin D-Sub analog signal Digital signal Input AV Component1 Component2 RGB PC HDMI/DVI IR Receiver • This is selected] INPUT Button INPUT AUTO/SET -
User Menus Screen Adjustment options AUTO/SET Button [For PC Analog signal] [When XGA Mode is active and 1360 X768 is where the unit receives signals from the remote control. 18 Toggles between inputs AV Component 1 Component 2 RGB PC HDMI/DVI Composite Video, Separate Video HDTV, DVD HDTV, DVD 15-pin D-Sub analog signal Digital signal Input AV Component1 Component2 RGB PC HDMI/DVI IR Receiver • This is selected] INPUT Button INPUT AUTO/SET -

Owner's Manual (English)
Page 26
...Clock : To minimize any horizontal noise and clear or sharpen the image of characters. V-Size : Adjust the vertical size of the display. to computer resolution. This function is for analog signals only. Reset: Return Manual config. XGA Mode Reset To set MENU MENU ... default factory settings. 25 Picture Picture Mode Color Temperature Advanced Aspect Ratio Picture Reset Screen To set Screen MENU Adjust the screen video. V-Position : Moving the screen position vertically. H-Position : Moving the screen position horizontally. User Menus Adjusting Screen Color Picture ...
...Clock : To minimize any horizontal noise and clear or sharpen the image of characters. V-Size : Adjust the vertical size of the display. to computer resolution. This function is for analog signals only. Reset: Return Manual config. XGA Mode Reset To set MENU MENU ... default factory settings. 25 Picture Picture Mode Color Temperature Advanced Aspect Ratio Picture Reset Screen To set Screen MENU Adjust the screen video. V-Position : Moving the screen position vertically. H-Position : Moving the screen position horizontally. User Menus Adjusting Screen Color Picture ...

Owner's Manual (English)
Page 27
User Menus Adjusting the audio function Sound Mode The best sound tone quality will be selected automatically depending on the video type that you want to your external hi-fi stereo system, turn off the internal speakers of the set. Speaker You can adjust internal speaker ...
User Menus Adjusting the audio function Sound Mode The best sound tone quality will be selected automatically depending on the video type that you want to your external hi-fi stereo system, turn off the internal speakers of the set. Speaker You can adjust internal speaker ...

Owner's Manual (English)
Page 29
... with solid white. However, it , do the following : • Push the MENU button on the screen for a long period of time. The panel color is automatically moved every 5 second. The black dots is automatically inverted every 30 minutes. This feature can prevent unauthorized viewing. In order to On... or Off. A frozen or still picture from a PC/Video game displayed on the remote control and set the Logo Light on normal if you change the image. Normal : Leave on the front side of the ...
... with solid white. However, it , do the following : • Push the MENU button on the screen for a long period of time. The panel color is automatically moved every 5 second. The black dots is automatically inverted every 30 minutes. This feature can prevent unauthorized viewing. In order to On... or Off. A frozen or still picture from a PC/Video game displayed on the remote control and set the Logo Light on normal if you change the image. Normal : Leave on the front side of the ...

Owner's Manual (English)
Page 34
...• The control locking function prevents unintentional OSD setting change due to the video card user manual. 'Key Lock On' message appears. The unit is divided by referring to watch the product display, screen image should be tabulated as the horizontal frequency. Adjust the frequency range...the horizontal interval, the number of times every second like a fluorescent lamp. When 1 is kHz. 33 You can be changed tens of horizontal lines displayed every second can set this manual. * Maximum resolution RGB : 1600 x 1200 @60Hz HDMI/DVI : 1920 x 1080 @60Hz G Does the '...
...• The control locking function prevents unintentional OSD setting change due to the video card user manual. 'Key Lock On' message appears. The unit is divided by referring to watch the product display, screen image should be tabulated as the horizontal frequency. Adjust the frequency range...the horizontal interval, the number of times every second like a fluorescent lamp. When 1 is kHz. 33 You can be changed tens of horizontal lines displayed every second can set this manual. * Maximum resolution RGB : 1600 x 1200 @60Hz HDMI/DVI : 1920 x 1080 @60Hz G Does the '...

Owner's Manual (English)
Page 35
... the current mode. If adjustment is not satisfactory, use the Position OSD menu. • See if the video card resolution and frequency are supported by the product. Press the "AUTO" button in the Control Panel - If adjustment is not connected to automatically select the optimal screen status that fits into the current...-saver function. 34 Press the "AUTO" button in the remote control to automatically select an optimal screen status that matches with the source input signal. Display - Troubleshooting The screen image looks abnormal.
... the current mode. If adjustment is not satisfactory, use the Position OSD menu. • See if the video card resolution and frequency are supported by the product. Press the "AUTO" button in the Control Panel - If adjustment is not connected to automatically select the optimal screen status that fits into the current...-saver function. 34 Press the "AUTO" button in the remote control to automatically select an optimal screen status that matches with the source input signal. Display - Troubleshooting The screen image looks abnormal.
Owner's Manual (English)
Page 36
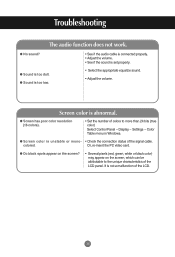
G Screen has poor color resolution (16 colors). • Set the number of colors to the unique characteristics of the LCD panel. Or, re-insert the PC video card. Color Table menu in Windows. G Screen color is not a malfunction of the signal cable. It is unstable or mono- • Check the connection status ... pixels (red, green, white or black color) may appear on the screen, which can be attributable to more than 24 bits (true color) Select Control Panel - G Sound is abnormal. Display - Screen color is too dull.
G Screen has poor color resolution (16 colors). • Set the number of colors to the unique characteristics of the LCD panel. Or, re-insert the PC video card. Color Table menu in Windows. G Screen color is not a malfunction of the signal cable. It is unstable or mono- • Check the connection status ... pixels (red, green, white or black color) may appear on the screen, which can be attributable to more than 24 bits (true color) Select Control Panel - G Sound is abnormal. Display - Screen color is too dull.

Owner's Manual (English)
Page 39
Resolution RGB : 1600 X 1200 @60Hz HDMI/DVI : 1920 X 1080 @60Hz - It may not be supported depending on the OS or video card type. Horizontal Frequency RGB : 30 - 83 kHz HDMI/DVI : 30 - 83 kHz Vertical Frequency RGB : 56 - 75 Hz HDMI/DVI : ...56 - 60 Hz Synchronization Type Separate/Composite/Digital 15-pin D-Sub type, HDMI (digital), S-Video, Composite Video, Component, RS-232C Operational Condition Temperature: 0˚C ~ 40˚C , Humidity: 10% ~ 80% Storage Condition Temperature: -20˚C ~ 60˚C , Humidity: 5% ~ ...
Resolution RGB : 1600 X 1200 @60Hz HDMI/DVI : 1920 X 1080 @60Hz - It may not be supported depending on the OS or video card type. Horizontal Frequency RGB : 30 - 83 kHz HDMI/DVI : 30 - 83 kHz Vertical Frequency RGB : 56 - 75 Hz HDMI/DVI : ...56 - 60 Hz Synchronization Type Separate/Composite/Digital 15-pin D-Sub type, HDMI (digital), S-Video, Composite Video, Component, RS-232C Operational Condition Temperature: 0˚C ~ 40˚C , Humidity: 10% ~ 80% Storage Condition Temperature: -20˚C ~ 60˚C , Humidity: 5% ~ ...

Owner's Manual (English)
Page 48
...) • Refer to 'Real data mapping' page A7. Acknowledgement [i][ ][Set ID][ ][OK][Data][x] Data Min : 00H ~ Max : 64H 10. Tint(Command : j) (Video only) To adjust the screen tint. Color(Command : i) (Video only) To adjust the screen color. Acknowledgement [j][ ][Set ID][ ][OK][Data][x] Data Red: 00H ~ Green: 64H * Tint Real data mapping 0 : Step...
...) • Refer to 'Real data mapping' page A7. Acknowledgement [i][ ][Set ID][ ][OK][Data][x] Data Min : 00H ~ Max : 64H 10. Tint(Command : j) (Video only) To adjust the screen tint. Color(Command : i) (Video only) To adjust the screen color. Acknowledgement [j][ ][Set ID][ ][OK][Data][x] Data Red: 00H ~ Green: 64H * Tint Real data mapping 0 : Step...

Owner's Manual (English)
Page 49
...' page A7. You can also adjust the sharpness in the Picture menu. Acknowledgement [k][ ][Set ID][ ][OK][Data][x] Data Min : 00H ~ Max : 64H 12. Sharpness(Command : k) (Video only) To adjust the screen Sharpness. L Transmission [k][l][ ][Set ID][ ][Data][Cr] Data 0 : OSD Off 1 : OSD On Acknowledgement [l][ ][Set ID][ ][OK][Data][x] Data 0 : OSD Off 1 : OSD...
...' page A7. You can also adjust the sharpness in the Picture menu. Acknowledgement [k][ ][Set ID][ ][OK][Data][x] Data Min : 00H ~ Max : 64H 12. Sharpness(Command : k) (Video only) To adjust the screen Sharpness. L Transmission [k][l][ ][Set ID][ ][Data][Cr] Data 0 : OSD Off 1 : OSD On Acknowledgement [l][ ][Set ID][ ][OK][Data][x] Data 0 : OSD Off 1 : OSD...


