
User Guide
Page 2
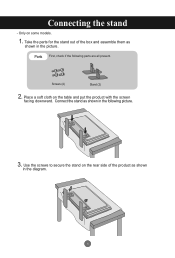
Screws (4) Stand (2) 2. Connect the stand as shown in the diagram. 1 Connecting the stand - Use the screws to secure the stand on the rear side of the box and assemble them as shown in the following parts are all present. Parts First, check if the following picture. 3. Take the parts for the stand out of the product as shown in the picture. Place a soft cloth on some models. 1. Only on the table and put the product with the screen facing downward.
Screws (4) Stand (2) 2. Connect the stand as shown in the diagram. 1 Connecting the stand - Use the screws to secure the stand on the rear side of the box and assemble them as shown in the following parts are all present. Parts First, check if the following picture. 3. Take the parts for the stand out of the product as shown in the picture. Place a soft cloth on some models. 1. Only on the table and put the product with the screen facing downward.

User Guide
Page 54
... 4 : Turn the monitor off by RS-232C function 8 : Turn the monitor off by off time function 9 : Turn the monitor off by auto off status when Stand-by mode. Transmission [j][p][ ][Set ID][ ][Data][Cr] Data 1H : Inversion 2H : Orbiter 4H : White Wash 8H : Normal 10H : Dot Wash Acknowledgement [p][ ][Set ID][ ][OK][Data...
... 4 : Turn the monitor off by RS-232C function 8 : Turn the monitor off by off time function 9 : Turn the monitor off by auto off status when Stand-by mode. Transmission [j][p][ ][Set ID][ ][Data][Cr] Data 1H : Inversion 2H : Orbiter 4H : White Wash 8H : Normal 10H : Dot Wash Acknowledgement [p][ ][Set ID][ ][OK][Data...


