
User Guide
Page 2
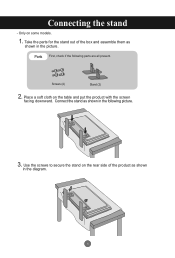
Screws (4) Stand (2) 2. Only on the table and put the product with the screen facing downward. Connecting the stand - Connect the stand as shown in the following parts are all present. Take the parts for the stand out of the product as shown in the diagram. 1 Place a soft cloth on some models. 1. Use the screws to secure the stand on the rear side of the box and assemble them as shown in the picture. Parts First, check if the following picture. 3.
Screws (4) Stand (2) 2. Only on the table and put the product with the screen facing downward. Connecting the stand - Connect the stand as shown in the following parts are all present. Take the parts for the stand out of the product as shown in the diagram. 1 Place a soft cloth on some models. 1. Use the screws to secure the stand on the rear side of the box and assemble them as shown in the picture. Parts First, check if the following picture. 3.
User Guide
Page 7
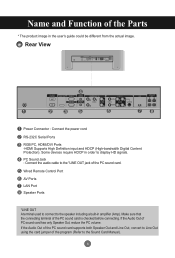
... Out and Line Out, convert to Line Out using the card jumper of the PC sound card. Make sure that the connecting terminal of the Parts * The product image in amplifier (Amp). Name and Function of the PC sound card is checked before connecting.
... Out and Line Out, convert to Line Out using the card jumper of the PC sound card. Make sure that the connecting terminal of the Parts * The product image in amplifier (Amp). Name and Function of the PC sound card is checked before connecting.
