

Owners Manual
Page 1
High Definition Television Receiver OWNER'S MANUAL MODEL : LST-3100A Before connecting, operating or adjusting this product, please read this owner's manual carefully and completely.
High Definition Television Receiver OWNER'S MANUAL MODEL : LST-3100A Before connecting, operating or adjusting this product, please read this owner's manual carefully and completely.

Owners Manual
Page 2
... 60069, USA Phone: 1-847-941-8000 CAUTION DO NOT ATTEMPT TO MODIFY THIS PRODUCT IN ANY WAY WITHOUT WRITTEN AUTHORIZATION FROM LG ELECTRONICS CORPORATION. ENERGY STAR® is provided to call the cable TV system installer's attention to which can radiate radio frequency energy... experienced radio/TV technician for this equipment in a residential installation. REFER TO QUALIFIED SERVICE PERSONNEL. THIS EQUIPMENT IS INTENDED TO RECEIVE AND DECODE SIGNALS TRANSMITTED ACCORDING TO ATSC DIGITAL TELEVISION STANDARD A/53, SPECIFICATION AND IS INTENDED TO BE USED WITH AN APPROPRIATE ...
... 60069, USA Phone: 1-847-941-8000 CAUTION DO NOT ATTEMPT TO MODIFY THIS PRODUCT IN ANY WAY WITHOUT WRITTEN AUTHORIZATION FROM LG ELECTRONICS CORPORATION. ENERGY STAR® is provided to call the cable TV system installer's attention to which can radiate radio frequency energy... experienced radio/TV technician for this equipment in a residential installation. REFER TO QUALIFIED SERVICE PERSONNEL. THIS EQUIPMENT IS INTENDED TO RECEIVE AND DECODE SIGNALS TRANSMITTED ACCORDING TO ATSC DIGITAL TELEVISION STANDARD A/53, SPECIFICATION AND IS INTENDED TO BE USED WITH AN APPROPRIATE ...
Owners Manual
Page 4
... Laboratories. Indicates special operating features of Contents 4 Front Panel Controls and Display Window 5 Remote Control Key Functions 6 Unpacking HDTV Receiver and Accessories/Connection Overview 7 Connection Panel 8 INSTALLATION Connections 9-16 Antenna Connections 9 Analog Monitor Connections 10 HD Monitor Component (YPbPr... Connections . . 11 HD Monitor RGB Connections 12 HD Monitor DVI-HDTV Connections 13 VCR Connections 14 Amplifier (Receiver) Connections 15 Setting the Display Format 16 MENU OPERATION Initial Settings 17 General Operation 17 Help Function 17 Setup Menu...
... Laboratories. Indicates special operating features of Contents 4 Front Panel Controls and Display Window 5 Remote Control Key Functions 6 Unpacking HDTV Receiver and Accessories/Connection Overview 7 Connection Panel 8 INSTALLATION Connections 9-16 Antenna Connections 9 Analog Monitor Connections 10 HD Monitor Component (YPbPr... Connections . . 11 HD Monitor RGB Connections 12 HD Monitor DVI-HDTV Connections 13 VCR Connections 14 Amplifier (Receiver) Connections 15 Setting the Display Format 16 MENU OPERATION Initial Settings 17 General Operation 17 Help Function 17 Setup Menu...

Owners Manual
Page 5
... to a menu option and then use the SELECT button to normal viewing by pressing the EXIT button. Remote Control Sensor Receives signals from any menu. Resolution indicator Indicates output resolution. Connection indicator Indicates output connection. Standby indicator Lights when the HDTV... Receiver is displayed, the LEFT/RIGHT arrows control the volume setting and the UP/DOWN arrows select channels. You can return ...
... to a menu option and then use the SELECT button to normal viewing by pressing the EXIT button. Remote Control Sensor Receives signals from any menu. Resolution indicator Indicates output resolution. Connection indicator Indicates output connection. Standby indicator Lights when the HDTV... Receiver is displayed, the LEFT/RIGHT arrows control the volume setting and the UP/DOWN arrows select channels. You can return ...

Owners Manual
Page 6
.... gram channels such as 2-1, 2-2, etc. STATION Brings up the Program Guide. SELECT ( ) Completes the channel number input and promptly tunes to the HDTV Receiver. POWER Turns the HDTV Receiver ON and OFF. MENU Accesses or closes main menu. HELP (?) You can see the help description of a menu option while that menu is...
.... gram channels such as 2-1, 2-2, etc. STATION Brings up the Program Guide. SELECT ( ) Completes the channel number input and promptly tunes to the HDTV Receiver. POWER Turns the HDTV Receiver ON and OFF. MENU Accesses or closes main menu. HELP (?) You can see the help description of a menu option while that menu is...

Owners Manual
Page 7
... PROGRAM STATION GUIDE AA AA 7 INTRODUCTION STB TV VCR DVD AUX STB MODE POWER TV/INPUT ez ADD AUDIO CC * SIGNAL High Definition Television Receiver The HDTV Receiver is capable of ANT IN jack to your component has only one input for left audio). They are used to connect the HDTV... many other devices. If your TV. The YPbPr Component jacks carry only the picture signals, not the sound. Remote Control In addition to the HDTV Receiver, the remote control can be color coded (yellow for video, red for right audio, and white for audio (mono), connect it to an industry ...
... PROGRAM STATION GUIDE AA AA 7 INTRODUCTION STB TV VCR DVD AUX STB MODE POWER TV/INPUT ez ADD AUDIO CC * SIGNAL High Definition Television Receiver The HDTV Receiver is capable of ANT IN jack to your component has only one input for left audio). They are used to connect the HDTV... many other devices. If your TV. The YPbPr Component jacks carry only the picture signals, not the sound. Remote Control In addition to the HDTV Receiver, the remote control can be color coded (yellow for video, red for right audio, and white for audio (mono), connect it to an industry ...
Owners Manual
Page 8
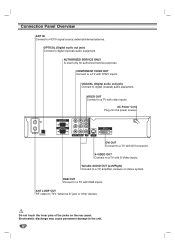
COAXIAL (Digital audio out jack) Connect to a TV, amplifier, receiver or stereo system. Variable AUDIO OUT (Left/Right) Connect to digital (coaxial) audio equipment. ANT LOOP OUT RF output to the unit. 8 AUTHORIZED SERVICE ONLY ...
COAXIAL (Digital audio out jack) Connect to a TV, amplifier, receiver or stereo system. Variable AUDIO OUT (Left/Right) Connect to digital (coaxial) audio equipment. ANT LOOP OUT RF output to the unit. 8 AUTHORIZED SERVICE ONLY ...

Owners Manual
Page 9
...used only in your HDTV receiver does not find HDTV channels/content information for operation under HDTV.) Please make sure that before deciding to use an optional attenuator device, you need to install a 10 dB attenuator to the Antenna input "ANT IN" on the LST-3100A. INSTALLATION Connections Antenna Connections 1... Connect the "Antenna" to the "ANT IN" jack on the HDTV Receiver using a coaxial RF cable.
...used only in your HDTV receiver does not find HDTV channels/content information for operation under HDTV.) Please make sure that before deciding to use an optional attenuator device, you need to install a 10 dB attenuator to the Antenna input "ANT IN" on the LST-3100A. INSTALLATION Connections Antenna Connections 1... Connect the "Antenna" to the "ANT IN" jack on the HDTV Receiver using a coaxial RF cable.
Owners Manual
Page 10
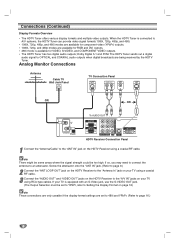
...Monitor Connections Antenna Cable TV Wall Jack Panel TV Connection Panel ANTENNA INPUT AUDIO INPUT VIDEO INPUT L R L S-VIDEO INPUT OR OR To AUDIO OUT HDTV Receiver Connection Panel 1 Connect the "Antenna/Cable" to the "ANT IN" jack on page 16) ote These connections are only useable if the display format settings.... Dolby Digital 5.1 and PCM. Screw the attenuator onto the "ANT IN" jack. (Refer to page 9.) 2 Connect the "ANT LOOP OUT" jack on the HDTV Receiver to the "Antenna In" jack on your TV using a coaxial RF cable. 3 Connect the "AUDIO OUT" and "VIDEO OUT" jacks on the HDTV...
...Monitor Connections Antenna Cable TV Wall Jack Panel TV Connection Panel ANTENNA INPUT AUDIO INPUT VIDEO INPUT L R L S-VIDEO INPUT OR OR To AUDIO OUT HDTV Receiver Connection Panel 1 Connect the "Antenna/Cable" to the "ANT IN" jack on page 16) ote These connections are only useable if the display format settings.... Dolby Digital 5.1 and PCM. Screw the attenuator onto the "ANT IN" jack. (Refer to page 9.) 2 Connect the "ANT LOOP OUT" jack on the HDTV Receiver to the "Antenna In" jack on your TV using a coaxial RF cable. 3 Connect the "AUDIO OUT" and "VIDEO OUT" jacks on the HDTV...

Owners Manual
Page 11
... ANTENNA INPUT COMPONENT VIDEO INPUT AUDIO INPUT VIDEO INPUT Pr Pb Y L R OR To AUDIO OUT HDTV Receiver Connection Panel 1 Connect the "Antenna/Cable" to the L/R "AUDIO IN" jacks on the HDTV Receiver using RCAtype cables. ote 1080i, 720p, 480p, and 480i modes are available for component video (YPbPr) ...the signal strength could be set to YPbPr, refer to Setting the Display Format on page 16) 4 Connect the L/R "AUDIO OUT" jacks on the HDTV Receiver to the "ANT IN" jack on your TV using a coaxial RF cable. Screw the attenuator onto the "ANT IN" jack. (Refer to page 9.)...
... ANTENNA INPUT COMPONENT VIDEO INPUT AUDIO INPUT VIDEO INPUT Pr Pb Y L R OR To AUDIO OUT HDTV Receiver Connection Panel 1 Connect the "Antenna/Cable" to the L/R "AUDIO IN" jacks on the HDTV Receiver using RCAtype cables. ote 1080i, 720p, 480p, and 480i modes are available for component video (YPbPr) ...the signal strength could be set to YPbPr, refer to Setting the Display Format on page 16) 4 Connect the L/R "AUDIO OUT" jacks on the HDTV Receiver to the "ANT IN" jack on your TV using a coaxial RF cable. Screw the attenuator onto the "ANT IN" jack. (Refer to page 9.)...

Owners Manual
Page 12
... to RGB, refer to Setting the Display Format on page 16) 4 Connect the L/R "AUDIO OUT" jacks on the HDTV Receiver to the L/R "AUDIO IN" jacks on the HDTV Receiver using a coaxial RF cable. Connections (Continued) HD Monitor RGB Connections Antenna Cable TV Wall Jack Panel OR HD Ready TV Connection... Panel ANTENNA INPUT S-VIDEO INPUT RGB INPUT VIDEO INPUT AUDIO INPUT L R To AUDIO OUT HDTV Receiver Connection Panel 11 Connect the "Antenna/Cable" to the "ANT IN" jack on your TV using VGA-type connector. (The Output Selection must be...
... to RGB, refer to Setting the Display Format on page 16) 4 Connect the L/R "AUDIO OUT" jacks on the HDTV Receiver to the L/R "AUDIO IN" jacks on the HDTV Receiver using a coaxial RF cable. Connections (Continued) HD Monitor RGB Connections Antenna Cable TV Wall Jack Panel OR HD Ready TV Connection... Panel ANTENNA INPUT S-VIDEO INPUT RGB INPUT VIDEO INPUT AUDIO INPUT L R To AUDIO OUT HDTV Receiver Connection Panel 11 Connect the "Antenna/Cable" to the "ANT IN" jack on your TV using VGA-type connector. (The Output Selection must be...

Owners Manual
Page 13
... Some HD Monitors designed for PC applications using DVI-D may need to connect the antenna to the "ANT IN" jack on the HDTV Receiver using RCAtype cables. INSTALLATION Connections (Continued) HD Monitor DVI-HDTV Connections Antenna Cable TV Wall Jack Panel OR HD Ready TV Connection Panel ANTENNA... INPUT S-VIDEO INPUT VIDEO INPUT AUDIO INPUT L R DVI-HDTV INPUT To AUDIO OUT HDTV Receiver Connection Panel 11 Connect the "Antenna/Cable" to an attenuator. Screw the attenuator onto the "ANT IN" jack. (Refer to page 9.) 2 ...
... Some HD Monitors designed for PC applications using DVI-D may need to connect the antenna to the "ANT IN" jack on the HDTV Receiver using RCAtype cables. INSTALLATION Connections (Continued) HD Monitor DVI-HDTV Connections Antenna Cable TV Wall Jack Panel OR HD Ready TV Connection Panel ANTENNA... INPUT S-VIDEO INPUT VIDEO INPUT AUDIO INPUT L R DVI-HDTV INPUT To AUDIO OUT HDTV Receiver Connection Panel 11 Connect the "Antenna/Cable" to an attenuator. Screw the attenuator onto the "ANT IN" jack. (Refer to page 9.) 2 ...
Owners Manual
Page 14
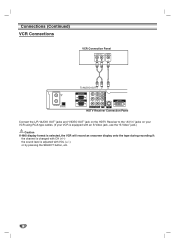
Connections (Continued) VCR Connections VCR Connection Panel AUDIO INPUT VIDEO INPUT L R L To AUDIO OUT HDTV Receiver Connection Panel Connect the L/R "AUDIO OUT" jacks and "VIDEO OUT" jack on the HDTV Receiver to the "A/V in" jacks on your VCR using RCA-type cables. (If your VCR is equipped with an S-Video jack, use the "S-Video" jack.) Caution If 480i display format is selected, the VCR will record an onscreen display onto the tape during recording if: the channel is changed with CH (+/-) the sound level is adjusted with VOL (+/-) or by pressing the SELECT button, etc. 14
Connections (Continued) VCR Connections VCR Connection Panel AUDIO INPUT VIDEO INPUT L R L To AUDIO OUT HDTV Receiver Connection Panel Connect the L/R "AUDIO OUT" jacks and "VIDEO OUT" jack on the HDTV Receiver to the "A/V in" jacks on your VCR using RCA-type cables. (If your VCR is equipped with an S-Video jack, use the "S-Video" jack.) Caution If 480i display format is selected, the VCR will record an onscreen display onto the tape during recording if: the channel is changed with CH (+/-) the sound level is adjusted with VOL (+/-) or by pressing the SELECT button, etc. 14

Owners Manual
Page 15
.... Connecting to an amplifier equipped with two channel digital stereo (PCM) or to an Audio/ Video receiver equipped with two channel analog stereo or Dolby Surround Connect the Left and Right AUDIO OUT jacks on the HDTV... sound A digital multi-channel connection provides the best sound quality. INSTALLATION Connections (Continued) Amplifier (Receiver) Connections Amplifier (Receiver) Connection Panel OPTICAL COAXIAL DIGITAL INPUT R L AUDIO INPUT OR HDTV Receiver Connection Panel Connecting to an amplifier equipped with a multi-channel decoder (Dolby Digital™) Connect ...
.... Connecting to an amplifier equipped with two channel digital stereo (PCM) or to an Audio/ Video receiver equipped with two channel analog stereo or Dolby Surround Connect the Left and Right AUDIO OUT jacks on the HDTV... sound A digital multi-channel connection provides the best sound quality. INSTALLATION Connections (Continued) Amplifier (Receiver) Connections Amplifier (Receiver) Connection Panel OPTICAL COAXIAL DIGITAL INPUT R L AUDIO INPUT OR HDTV Receiver Connection Panel Connecting to an amplifier equipped with a multi-channel decoder (Dolby Digital™) Connect ...
Owners Manual
Page 16
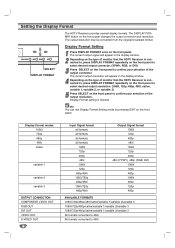
... broadcast format. The current output signal will appear in the display window. 2 Depending on the type of monitor that the HDTV Receiver is finished ote You can exit Display Format Setting mode by pressing EXIT on the front panel changes the output connector and resolution....1080i/720p/480p/native/variable 1/variable 2/variable 3 All formats converted to 480i All formats converted to confirm your selection of monitor that the HDTV Receiver is connected to, press DISPLAY FORMAT repeatedly on the front panel to select desired output connector. (YPbPr, RGB, or DVI) 3 Press SELECT ...
... broadcast format. The current output signal will appear in the display window. 2 Depending on the type of monitor that the HDTV Receiver is finished ote You can exit Display Format Setting mode by pressing EXIT on the front panel changes the output connector and resolution....1080i/720p/480p/native/variable 1/variable 2/variable 3 All formats converted to 480i All formats converted to confirm your selection of monitor that the HDTV Receiver is connected to, press DISPLAY FORMAT repeatedly on the front panel to select desired output connector. (YPbPr, RGB, or DVI) 3 Press SELECT ...

Owners Manual
Page 20
... viewing. Setup Menu Options (Continued) Manual Channel Add/Delete This feature allows you how to navigate through the on-screen menus available on the HDTV Receiver. 1 Press MENU to display the on-screen menu. 2 Select the SETUP menu using 3 / 4 then press (SELECT) or 2 to move to the second level. 3 Select the...
... viewing. Setup Menu Options (Continued) Manual Channel Add/Delete This feature allows you how to navigate through the on-screen menus available on the HDTV Receiver. 1 Press MENU to display the on-screen menu. 2 Select the SETUP menu using 3 / 4 then press (SELECT) or 2 to move to the second level. 3 Select the...

Owners Manual
Page 21
.... • When multiple audio tracks are cases where the TV station does not send, or sends wrong date and/or time information causing the HDTV Receiver to set an incorrect time. • You have no way to manually set Time Zone: (Atlantic, Eastern, Central, Mountain, Pacific, Alaska, Hawaii, New F.land) 5 Press...
.... • When multiple audio tracks are cases where the TV station does not send, or sends wrong date and/or time information causing the HDTV Receiver to set an incorrect time. • You have no way to manually set Time Zone: (Atlantic, Eastern, Central, Mountain, Pacific, Alaska, Hawaii, New F.land) 5 Press...
Owners Manual
Page 24
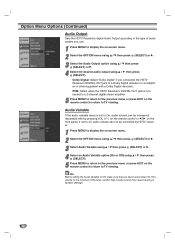
... MENU to On, audio volume can not be increased/ decreased with a Dolby Digital decoder). Option Menu Options (Continued) Audio Output Sets the HDTV Receiver's digital Audio Output according to the type of audio system you use. 1 Press MENU to display the on-screen menu. 2 Select the OPTION menu using 3 /..., sudden high volume sound may cause hearing or speaker damage. 24 If set to display the on the front panel. PCM: Select when the HDTV Receiver's DIGITAL OUT jack is set to off, audio volume can be controlled by pressing VOL (+/-) on the remote control or 1 / 2 on -screen menu. 2 ...
... MENU to On, audio volume can not be increased/ decreased with a Dolby Digital decoder). Option Menu Options (Continued) Audio Output Sets the HDTV Receiver's digital Audio Output according to the type of audio system you use. 1 Press MENU to display the on-screen menu. 2 Select the OPTION menu using 3 /..., sudden high volume sound may cause hearing or speaker damage. 24 If set to display the on the front panel. PCM: Select when the HDTV Receiver's DIGITAL OUT jack is set to off, audio volume can be controlled by pressing VOL (+/-) on the remote control or 1 / 2 on -screen menu. 2 ...

Owners Manual
Page 25
... 708) will not appear on the current program, the caption language for the program is selected for analog caption. 25 The caption language options are received simultaneously, you can only select DTV Caption. Options are available, the DTV caption icon ( ) appears on the program information display, Program guide, or Station guide...
... 708) will not appear on the current program, the caption language for the program is selected for analog caption. 25 The caption language options are received simultaneously, you can only select DTV Caption. Options are available, the DTV caption icon ( ) appears on the program information display, Program guide, or Station guide...

Owners Manual
Page 27
ote Analog Captions will appear if they are received simultaneously, you to be in sync with the sound, used for displaying Analog Caption Data. Caption 2 Caption 2 is the special non-synchronous caption service that ...
ote Analog Captions will appear if they are received simultaneously, you to be in sync with the sound, used for displaying Analog Caption Data. Caption 2 Caption 2 is the special non-synchronous caption service that ...
