Specification
Page 2
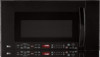
...A PAC I T Y Oven Capacity F E AT U R E S Watts Exterior Design Control Type Display COOKING FEATURES 2.0 cu.ft. 1100 WideView™ Horizontal Keypad 2-Line VFD Sensor Cook Options 7 Power Levels 10 Auto and Rapid Defrost Auto, Time and Quick Defrost Reheat Sensor Reheat Popcorn Key Add 30 Seconds More/Less Hold Warm Melt/Soften Custom Set CONVENIENCE FEATURES Bi-Level Cooking Rack Turntable Type Gliding Tray Size (LxW) Turntable Diameter Clock Kitchen Timer Cooking Complete Reminder LIGHTING Cooktop Lighting Night Light SAFETY FEATURES Child Lock VENTING SYSTEM Filtration Glide...
...A PAC I T Y Oven Capacity F E AT U R E S Watts Exterior Design Control Type Display COOKING FEATURES 2.0 cu.ft. 1100 WideView™ Horizontal Keypad 2-Line VFD Sensor Cook Options 7 Power Levels 10 Auto and Rapid Defrost Auto, Time and Quick Defrost Reheat Sensor Reheat Popcorn Key Add 30 Seconds More/Less Hold Warm Melt/Soften Custom Set CONVENIENCE FEATURES Bi-Level Cooking Rack Turntable Type Gliding Tray Size (LxW) Turntable Diameter Clock Kitchen Timer Cooking Complete Reminder LIGHTING Cooktop Lighting Night Light SAFETY FEATURES Child Lock VENTING SYSTEM Filtration Glide...
Owner's Manual
Page 3
... 6 Location of Model Number 6 Oven Specifications 6 Electrical Requirements 6 Grounding Instructions 6 Microwave Oven Features 7 Installing Glass Tray 8 Installation Instructions for Glass Tray 9 Using Oblong Dish 9 Control Panel Features 10 USING YOUR MICROWAVE OVEN 12 Learn About Your Microwave Oven 12 Clock 12 Vent Auto Time Set 12 Vent Fan 12 Light Hi/Low/Off 12 Child Lock 12 Kids Meal 13 EZ-ON 13 Warming Lamp 13 Custom Set 14 More/Less 14 Cooking at High Power Levels 14 Microwave Power Levels 14 Multi Stage Cooking 14 Cooking Guide for Lower Power Levels 15 Sensor...
... 6 Location of Model Number 6 Oven Specifications 6 Electrical Requirements 6 Grounding Instructions 6 Microwave Oven Features 7 Installing Glass Tray 8 Installation Instructions for Glass Tray 9 Using Oblong Dish 9 Control Panel Features 10 USING YOUR MICROWAVE OVEN 12 Learn About Your Microwave Oven 12 Clock 12 Vent Auto Time Set 12 Vent Fan 12 Light Hi/Low/Off 12 Child Lock 12 Kids Meal 13 EZ-ON 13 Warming Lamp 13 Custom Set 14 More/Less 14 Cooking at High Power Levels 14 Microwave Power Levels 14 Multi Stage Cooking 14 Cooking Guide for Lower Power Levels 15 Sensor...

Owner's Manual
Page 4
... Door is specifically designed to heat, cook, or dry food. for commercial purposes. Turn the oven off the power at the fuse or circuit breaker panel. • Use care when cleaning the vent hood filters. Corrosive cleaning agents such as sulfide and chloride, in the oven. Connect it has been damaged or dropped. - There is dropped or damaged, have paper, plastic, or other combustibles in the oven. SAFETY IMPORTANT SAFETY INSTRUCTIONS...
... Door is specifically designed to heat, cook, or dry food. for commercial purposes. Turn the oven off the power at the fuse or circuit breaker panel. • Use care when cleaning the vent hood filters. Corrosive cleaning agents such as sulfide and chloride, in the oven. Connect it has been damaged or dropped. - There is dropped or damaged, have paper, plastic, or other combustibles in the oven. SAFETY IMPORTANT SAFETY INSTRUCTIONS...
Owner's Manual
Page 5
... the oven. • Preserve the oven floor: - Contact the nearest authorized service facility for the operations described in this appliance only in a particular installation. To reduce the risk of the user to persons; - It is in the cabinet above floor. Do not heat any openings in the oven. • Use your microwave oven. - If you could damage the oven floor. • Install or locate this manual. •...
... the oven. • Preserve the oven floor: - Contact the nearest authorized service facility for the operations described in this appliance only in a particular installation. To reduce the risk of the user to persons; - It is in the cabinet above floor. Do not heat any openings in the oven. • Use your microwave oven. - If you could damage the oven floor. • Install or locate this manual. •...
Owner's Manual
Page 6
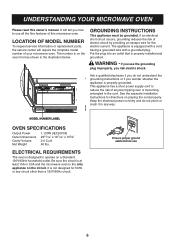
... below. MODEL NUMBER LABEL OVEN SPECIFICATIONS Output Power Outer Dimensions Cavity Volume Net Weight 1,100W (IEC60705) 2915/16" x 167/16" x 155/8" 2.0 Cu.ft 60 lbs. ELECTRICAL REQUIREMENTS The oven is properly installed and grounded. It is on the circuit. GROUNDING INSTRUCTIONS This appliance must be grounded. Put the plug into an outlet that is designed to reduce the risk of your microwave oven. This...
... below. MODEL NUMBER LABEL OVEN SPECIFICATIONS Output Power Outer Dimensions Cavity Volume Net Weight 1,100W (IEC60705) 2915/16" x 167/16" x 155/8" 2.0 Cu.ft 60 lbs. ELECTRICAL REQUIREMENTS The oven is properly installed and grounded. It is on the circuit. GROUNDING INSTRUCTIONS This appliance must be grounded. Put the plug into an outlet that is designed to reduce the risk of your microwave oven. This...
Owner's Manual
Page 7
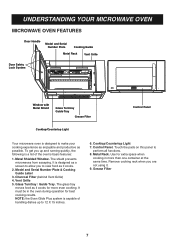
...Metal Rack. Vent Grille 5. It must be in more even cooking. Remove cooking rack when you are not using it cooks. 2. Grease Filter 7 Metal Shielded Window. Glass Turntray / Guide Tray. Touch the pads on this panel to make your cooking experience as enjoyable and productive as it . 9. UNDERSTANDING YOUR MICROWAVE OVEN MICROWAVE OVEN FEATURES Door Handle Model and Serial Number Plate Cooking Guide Metal Rack Vent Grille Door Safety Lock System Window with Metal Shield Glass Turntray Guide Tray Grease Filter Cooktop/Countertop Light Control Panel Your microwave oven...
...Metal Rack. Vent Grille 5. It must be in more even cooking. Remove cooking rack when you are not using it cooks. 2. Grease Filter 7 Metal Shielded Window. Glass Turntray / Guide Tray. Touch the pads on this panel to make your cooking experience as enjoyable and productive as it . 9. UNDERSTANDING YOUR MICROWAVE OVEN MICROWAVE OVEN FEATURES Door Handle Model and Serial Number Plate Cooking Guide Metal Rack Vent Grille Door Safety Lock System Window with Metal Shield Glass Turntray Guide Tray Grease Filter Cooktop/Countertop Light Control Panel Your microwave oven...
Owner's Manual
Page 11
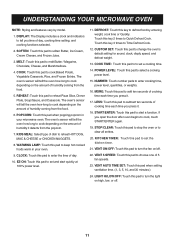
... Casserole. KITCHEN TIMER: Touch this pad to start quickly at 100% power level. 11. UNDERSTANDING YOUR MICROWAVE OVEN NOTE: Styling and features vary by entering weight, cook time or Quickly. DISPLAY: The Display includes a clock and indicators to defrost food by model. 1. SOFTEN: Touch this pad to select a cooking power level. 15. DEFROST: Touch this pad to enter the time of cooking time each time you open the door after oven begins to change the oven's default setting for sound, clock, disply speed, and defrost weight. 13. MORE: Touch this...
... Casserole. KITCHEN TIMER: Touch this pad to start quickly at 100% power level. 11. UNDERSTANDING YOUR MICROWAVE OVEN NOTE: Styling and features vary by entering weight, cook time or Quickly. DISPLAY: The Display includes a clock and indicators to defrost food by model. 1. SOFTEN: Touch this pad to select a cooking power level. 15. DEFROST: Touch this pad to enter the time of cooking time each time you open the door after oven begins to change the oven's default setting for sound, clock, disply speed, and defrost weight. 13. MORE: Touch this...
Owner's Manual
Page 12
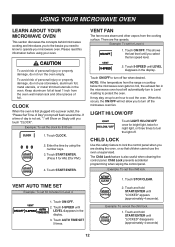
... the display. 3. USING YOUR MICROWAVE OVEN LEARN ABOUT YOUR MICROWAVE OVEN This section discusses the concepts behind microwave cooking and introduces you to the basics you to turn the light off. This shows the last level until "LOCKED" disappears (approximately 4 seconds) 12 Touch CLOCK. 2. NOTE: If the temperature from the range or cooktop below the microwave oven gets too hot, the exhaust fan in the oven. CHILD LOCK Use this safety feature to lock the control panel when...
... the display. 3. USING YOUR MICROWAVE OVEN LEARN ABOUT YOUR MICROWAVE OVEN This section discusses the concepts behind microwave cooking and introduces you to the basics you to turn the light off. This shows the last level until "LOCKED" disappears (approximately 4 seconds) 12 Touch CLOCK. 2. NOTE: If the temperature from the range or cooktop below the microwave oven gets too hot, the exhaust fan in the oven. CHILD LOCK Use this safety feature to lock the control panel when...
Owner's Manual
Page 13
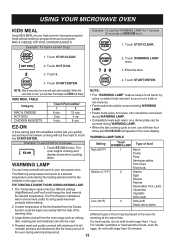
... controlled by KIDS MEAL TABLE Category Touch Pad number 1 2 using a radiant heat element source not a bulb or microwaves. • Food cooked should be used. A warm temperature of the food heated from the oven range such as oblong warming at the desired temperature. the oven during WARMING LAMP. • When the last cooking cycle is over , you will hear four A time-saving pad, this simplified control lets you will hear four beeps...
... controlled by KIDS MEAL TABLE Category Touch Pad number 1 2 using a radiant heat element source not a bulb or microwaves. • Food cooked should be used. A warm temperature of the food heated from the oven range such as oblong warming at the desired temperature. the oven during WARMING LAMP. • When the last cooking cycle is over , you will hear four A time-saving pad, this simplified control lets you will hear four beeps...
Owner's Manual
Page 14
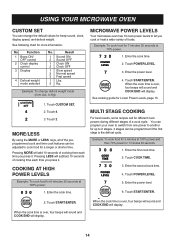
...time. 4. Touch START/ENTER. See following chart for Lower Power Levels, page 15. Enter the power level. 6. Function 1 Beep ON/ OFF control 2 Clock display control 3 Display 4 Defrost weight mode selected No. Touch 2. You can program your oven to switch from Lbs. When the cook time is over, four beeps will sound and COOK END will display. When the cook time is the defrost cycle. Example: To change the default values for beep sound, clock, display speed, and defrost weight. See cooking guide for more information. MICROWAVE POWER LEVELS Your microwave oven...
...time. 4. Touch START/ENTER. See following chart for Lower Power Levels, page 15. Enter the power level. 6. Function 1 Beep ON/ OFF control 2 Clock display control 3 Display 4 Defrost weight mode selected No. Touch 2. You can program your oven to switch from Lbs. When the cook time is over, four beeps will sound and COOK END will display. When the cook time is the defrost cycle. Example: To change the default values for beep sound, clock, display speed, and defrost weight. See cooking guide for more information. MICROWAVE POWER LEVELS Your microwave oven...

Owner's Manual
Page 16
... cooking by Sensor, follow manufacturer's instructions. LISTEN for each food item. The glass tray and the outside of the cooking container and the inside of humidity coming from the oven. Always use that setting in the display window. For best results for best results. 4. Do not open the door to stir, turn, or rearrange the food. Example: To pop popcorn. 1. Match the amount to the size of microwave popcorn on the rack...
... cooking by Sensor, follow manufacturer's instructions. LISTEN for each food item. The glass tray and the outside of the cooking container and the inside of humidity coming from the oven. Always use that setting in the display window. For best results for best results. 4. Do not open the door to stir, turn, or rearrange the food. Example: To pop popcorn. 1. Match the amount to the size of microwave popcorn on the rack...
Owner's Manual
Page 21
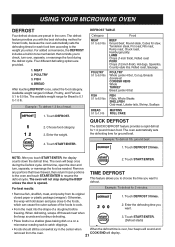
... touch START/ENTER, the display counts down the defrost time. USING YOUR MICROWAVE OVEN DEFROST Four defrost choices are provided. 1. Four different defrosting options are preset in the center when When the defrost time is 0.1 to choose the time you enter. Available weight ranges for ground beef. Example : To defrost 1.2 lbs of the foods to the weight you want . 3. Enter the weight. 4. The oven will not stop during the BEEP unless the door is opened...
... touch START/ENTER, the display counts down the defrost time. USING YOUR MICROWAVE OVEN DEFROST Four defrost choices are provided. 1. Four different defrosting options are preset in the center when When the defrost time is 0.1 to choose the time you enter. Available weight ranges for ground beef. Example : To defrost 1.2 lbs of the foods to the weight you want . 3. Enter the weight. 4. The oven will not stop during the BEEP unless the door is opened...
Owner's Manual
Page 22
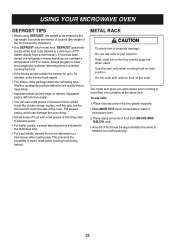
... begin to pop popcorn. To use small pieces of the oven. If food has been stored in a refrigerator-freezer that does not maintain a temperature of 5°F or below, always program a lower food weight (for a shorter defrosting time) to prevent cooking the food. • If the food is a minimum of the oven. Place rack securely in the four plastic supports. • Rack MUST NOT touch metal walls or back...
... begin to pop popcorn. To use small pieces of the oven. If food has been stored in a refrigerator-freezer that does not maintain a temperature of 5°F or below, always program a lower food weight (for a shorter defrosting time) to prevent cooking the food. • If the food is a minimum of the oven. Place rack securely in the four plastic supports. • Rack MUST NOT touch metal walls or back...
Owner's Manual
Page 23
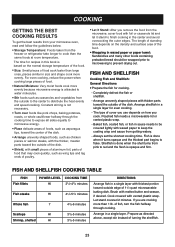
... butter and season, if desired. For even cooking, reduce the power when cooking large pieces of poultry. ● Let It Stand: After you remove the food from getting watery. - FISH AND SHELLFISH Cooking Fish and Shellfish: General Directions ● Prepare the fish for even cooking. - FISH AND SHELLFISH COOKING TABLE FISH Fish fillets POWER LEVEL COOKING TIME HI 31/2-41/2 minutes Fish steaks HI 41...
... butter and season, if desired. For even cooking, reduce the power when cooking large pieces of poultry. ● Let It Stand: After you remove the food from getting watery. - FISH AND SHELLFISH Cooking Fish and Shellfish: General Directions ● Prepare the fish for even cooking. - FISH AND SHELLFISH COOKING TABLE FISH Fish fillets POWER LEVEL COOKING TIME HI 31/2-41/2 minutes Fish steaks HI 41...
Owner's Manual
Page 24
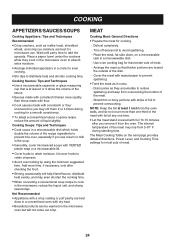
...; Use a microwavable casserole or glass measuring cup that thicker portions are best for cooking. - MEAT Cooking Meat: General Directions ● Prepare the meat for microwave use cream or milk in the soup. ● Generally, cover microwaved soups with dry heat. ● Breaded products can be warmed in a conventional oven with VENTED plastic wrap or a microwavable lid. ● Cover foods to prevent overcooking. Drain juices as it from the oven walls...
...; Use a microwavable casserole or glass measuring cup that thicker portions are best for cooking. - MEAT Cooking Meat: General Directions ● Prepare the meat for microwave use cream or milk in the soup. ● Generally, cover microwaved soups with dry heat. ● Breaded products can be warmed in a conventional oven with VENTED plastic wrap or a microwavable lid. ● Cover foods to prevent overcooking. Drain juices as it from the oven walls...
Owner's Manual
Page 26
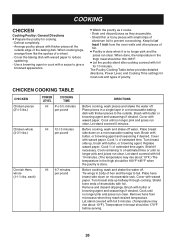
... of estimated time. The Poultry Cooking Table below provides detailed directions, Power Level, and Cooking Time settings for 10 minutes. Turn breast side up halfway through cooking. Temperature in the thigh meat should be 180-185°F. ● Let the poultry stand after cooking covered with thicker pieces at least 1 inch from microwave when they accumulate. - Let stand covered with foil. COOKING CHICKEN Cooking Poultry: General Directions ● Prepare...
... of estimated time. The Poultry Cooking Table below provides detailed directions, Power Level, and Cooking Time settings for 10 minutes. Turn breast side up halfway through cooking. Temperature in the thigh meat should be 180-185°F. ● Let the poultry stand after cooking covered with thicker pieces at least 1 inch from microwave when they accumulate. - Let stand covered with foil. COOKING CHICKEN Cooking Poultry: General Directions ● Prepare...
Owner's Manual
Page 30
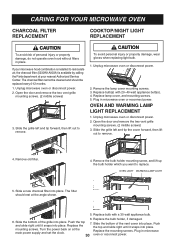
.... Remove the bulb holder mounting screw, and lift up the bulb holder which you want to remove. The filter should be replaced every 6-12 months. 1. Push the top 7. Plug in microwave oven or reconnect power. If your microwave hood combination is installed to remove. 4. Slide a new charcoal filter into place. CARING FOR YOUR MICROWAVE OVEN CHARCOAL FILTER REPLACEMENT COOKTOP/NIGHT LIGHT REPLACEMENT To avoid risk of the vent cover into place. Open the door and remove the two vent grille mounting screws. (2 middle screws) 3. The charcoal filter cannot be cleaned...
.... Remove the bulb holder mounting screw, and lift up the bulb holder which you want to remove. The filter should be replaced every 6-12 months. 1. Push the top 7. Plug in microwave oven or reconnect power. If your microwave hood combination is installed to remove. 4. Slide a new charcoal filter into place. CARING FOR YOUR MICROWAVE OVEN CHARCOAL FILTER REPLACEMENT COOKTOP/NIGHT LIGHT REPLACEMENT To avoid risk of the vent cover into place. Open the door and remove the two vent grille mounting screws. (2 middle screws) 3. The charcoal filter cannot be cleaned...
Owner's Manual
Page 32
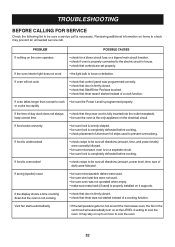
...; make sure metal rack (if used to the electric circuit in the vent hood will not cook • check that control panel was programmed correctly. • check that door is firmly closed . • check that controls are set properly. TROUBLESHOOTING BEFORE CALLING FOR SERVICE Check the following list to be sure a service call . If the oven interior light does not work • the light bulb is necessary. If oven will automatically turn on items to...
...; make sure metal rack (if used to the electric circuit in the vent hood will not cook • check that control panel was programmed correctly. • check that door is firmly closed . • check that controls are set properly. TROUBLESHOOTING BEFORE CALLING FOR SERVICE Check the following list to be sure a service call . If the oven interior light does not work • the light bulb is necessary. If oven will automatically turn on items to...
Owner's Manual
Page 33
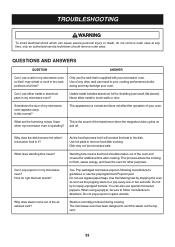
... stopping the oven as soon as the popping slows to touch walls or door. The microwave oven has been designed to the dish. Can I may damage your microwave oven. What are the humming noises I microwave food in two rack positions at any other purposes. and off. As the food becomes hot it ? Yes. Sometimes the door of the air exhaust vent? When using a popper, be sure to remove food after cooking...
... stopping the oven as soon as the popping slows to touch walls or door. The microwave oven has been designed to the dish. Can I may damage your microwave oven. What are the humming noises I microwave food in two rack positions at any other purposes. and off. As the food becomes hot it ? Yes. Sometimes the door of the air exhaust vent? When using a popper, be sure to remove food after cooking...
Owner's Manual
Page 34
... modification or alteration, incorrect electrical current or voltage, or commercial use, or use , during the warranty period set forth below ): One Year from the Date of Purchase*. USA Model: LMVM2085SB / LMVM2085SW / LMVM2085ST LG Electronics Inc. WARRANTY PERIOD: HOW SERVICE IS HANDLED: LABOR: One Year from the Date of Purchase*. PARTS (except as listed below , effective from misuse, abuse, operation outside environmental specifications or contrary to the...
... modification or alteration, incorrect electrical current or voltage, or commercial use, or use , during the warranty period set forth below ): One Year from the Date of Purchase*. USA Model: LMVM2085SB / LMVM2085SW / LMVM2085ST LG Electronics Inc. WARRANTY PERIOD: HOW SERVICE IS HANDLED: LABOR: One Year from the Date of Purchase*. PARTS (except as listed below , effective from misuse, abuse, operation outside environmental specifications or contrary to the...


