
Owner's Manual
Page 3
... Power Levels........ 16 EXPOSURE TO EXCESSIVE MICROWAVE Sensor Operating Instructions 17 ENERGY 2 Sensor Cooking Guide 17 Popcorn 17 TABLE OF CONTENTS 3 Potato 17 Vegetable 18 SAFETY 4 Reheat(Sensor 18 Important Safety Instructions 4 Sensor Cooking Table 19 Sensor Reheat Table 19 INFORMATION 6 Auto Defrost 20 Location of Model Number 6 Weight conversion table 20 Oven Specifications 6 Operating Tips 20 Electrical Requirements 6 Auto Defrost Table 21 Grounding Instructions 6 Defrosting tips 23 Microwave Oven Features 7 Q Defrost 23 Control panel...
... Power Levels........ 16 EXPOSURE TO EXCESSIVE MICROWAVE Sensor Operating Instructions 17 ENERGY 2 Sensor Cooking Guide 17 Popcorn 17 TABLE OF CONTENTS 3 Potato 17 Vegetable 18 SAFETY 4 Reheat(Sensor 18 Important Safety Instructions 4 Sensor Cooking Table 19 Sensor Reheat Table 19 INFORMATION 6 Auto Defrost 20 Location of Model Number 6 Weight conversion table 20 Oven Specifications 6 Operating Tips 20 Electrical Requirements 6 Auto Defrost Table 21 Grounding Instructions 6 Defrosting tips 23 Microwave Oven Features 7 Q Defrost 23 Control panel...
Owner's Manual
Page 4
... electrical cord or plug in the oven. • If a fire should start a fire in the oven. Do not use this product near a swimming pool, or similar location. • Do not use the cavity for storage purposes. Severely overcooked foods can start : - Do not use wire twist-ties in the oven. Turn the oven off the power at the fuse or circuit breaker panel. • Use care when cleaning the vent hood filters. The oven has several built...
... electrical cord or plug in the oven. • If a fire should start a fire in the oven. Do not use this product near a swimming pool, or similar location. • Do not use the cavity for storage purposes. Severely overcooked foods can start : - Do not use wire twist-ties in the oven. Turn the oven off the power at the fuse or circuit breaker panel. • Use care when cleaning the vent hood filters. The oven has several built...
Owner's Manual
Page 5
Carefully read and follow the instructions for examination, repair, or adjustment. Visible bubbling or boiling when the container is removed from the receiver. • Plug the microwave oven into the container. Do not heat the oven floor excessively. - Do not allow the container to stand in the microwave oven for the operations described in this equipment does cause interference to radio or...
Carefully read and follow the instructions for examination, repair, or adjustment. Visible bubbling or boiling when the container is removed from the receiver. • Plug the microwave oven into the container. Do not heat the oven floor excessively. - Do not allow the container to stand in the microwave oven for the operations described in this equipment does cause interference to radio or...
Owner's Manual
Page 6
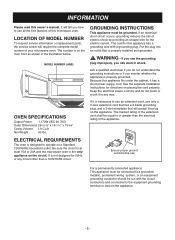
... microwave oven. LOCATION OF MODEL NUMBER To request service information or replacement parts, the service center will tell you how to use the grounding plug improperly, you wonder whether the appliance is properly grounded. The cord for directions on the appliance. Ask a qualified electrician if you do not pinch or crush it in the illustration below. OVEN SPECIFICATIONS Output Power 1,170W (IEC 60 705) Outer Dimensions...
... microwave oven. LOCATION OF MODEL NUMBER To request service information or replacement parts, the service center will tell you how to use the grounding plug improperly, you wonder whether the appliance is properly grounded. The cord for directions on the appliance. Ask a qualified electrician if you do not pinch or crush it in the illustration below. OVEN SPECIFICATIONS Output Power 1,170W (IEC 60 705) Outer Dimensions...
Owner's Manual
Page 7
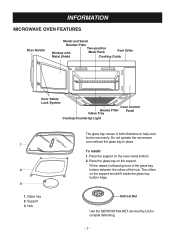
... the glass tray bottom between the rollers of the hub. INFORMATION MICROWAVE OVEN FEATURES Door Handle Model and Serial Number Plate Window with Two-position Metal Rack Vent Grille Metal Shield Cooking Guide Door Safety Lock System Oven Control Grease Filter Glass Tray Panel Cooktop/Countertop Light The glass tray moves in place. Hub Defrost Net Use the DEFROSTING NET serviced by LG for complet defrosting. -7- Do not operate the microwave oven without the glass tray in both directions to help cook food more evenly. The rollers on the support should fit inside the glass tray...
... the glass tray bottom between the rollers of the hub. INFORMATION MICROWAVE OVEN FEATURES Door Handle Model and Serial Number Plate Window with Two-position Metal Rack Vent Grille Metal Shield Cooking Guide Door Safety Lock System Oven Control Grease Filter Glass Tray Panel Cooktop/Countertop Light The glass tray moves in place. Hub Defrost Net Use the DEFROSTING NET serviced by LG for complet defrosting. -7- Do not operate the microwave oven without the glass tray in both directions to help cook food more evenly. The rollers on the support should fit inside the glass tray...

Owner's Manual
Page 9
.... 9. SOFTEN: Touch this button to cook vegetables. 6. STOP/CLEAR: Touch this pad to turn the fan on the cooktop/countertop light. 28. VEGETABLE: Touch this pad to stop the oven or to change the oven's default settings for clock set the kitchen timer. 18. LIGHT TIMER: Touch this pad to clear all entries. 26. COOK TIME: Touch this pad to reheat casserole, dinner plate soup/sauce and pizza. 8. VENT 5 LEVELS: Touch this pad to select a cooking power level. 21. REHEAT: Touch this button to subtract...
.... 9. SOFTEN: Touch this button to cook vegetables. 6. STOP/CLEAR: Touch this pad to turn the fan on the cooktop/countertop light. 28. VEGETABLE: Touch this pad to stop the oven or to change the oven's default settings for clock set the kitchen timer. 18. LIGHT TIMER: Touch this pad to clear all entries. 26. COOK TIME: Touch this pad to reheat casserole, dinner plate soup/sauce and pizza. 8. VENT 5 LEVELS: Touch this pad to select a cooking power level. 21. REHEAT: Touch this button to subtract...
Owner's Manual
Page 10
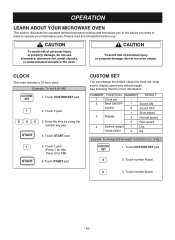
... clock. Example: To set - - 2 Beef ON/OFF 1 Sound ON control 2 Sound OFF 3 Display 1 Slow speed 2 Normal speed 3 Fast speed 4 Defrost weight 1 Lbs. Please read this information before use stoneware, aluminum foil, metal utensils, or metal trimmed utensils in the oven. Touch CUSTOM SET pad. 2. Enter the time by using the number key pad. 4. CUSTOM SET You can change defrost weight mode.(from Lbs. Example: To change the default values for clock set, beep sound, display speed and defrost weight...
... clock. Example: To set - - 2 Beef ON/OFF 1 Sound ON control 2 Sound OFF 3 Display 1 Slow speed 2 Normal speed 3 Fast speed 4 Defrost weight 1 Lbs. Please read this information before use stoneware, aluminum foil, metal utensils, or metal trimmed utensils in the oven. Touch CUSTOM SET pad. 2. Enter the time by using the number key pad. 4. CUSTOM SET You can change defrost weight mode.(from Lbs. Example: To change the default values for clock set, beep sound, display speed and defrost weight...
Owner's Manual
Page 12
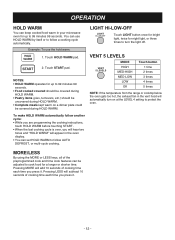
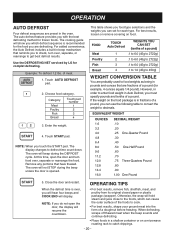
... cook and time cook features can keep cooked food warm in your microwave oven for up to 99 minutes 99 seconds. Touch HOLD WARM pad. 2. To make HOLD WARM automatically follow AUTO DEFROST, or multi-cycle cooking. VENT 5 LEVELS VENT 5 LEVELS MODE HIGH MED-HIGH MED-LOW LOW Off Touch button 1 time 2 times 3 times 4 times 5 times NOTE: If the temperature from the range or cooktop below the oven gets too hot, the exhaust fan in the oven display. • You can use...
... cook and time cook features can keep cooked food warm in your microwave oven for up to 99 minutes 99 seconds. Touch HOLD WARM pad. 2. To make HOLD WARM automatically follow AUTO DEFROST, or multi-cycle cooking. VENT 5 LEVELS VENT 5 LEVELS MODE HIGH MED-HIGH MED-LOW LOW Off Touch button 1 time 2 times 3 times 4 times 5 times NOTE: If the temperature from the range or cooktop below the oven gets too hot, the exhaust fan in the oven display. • You can use...
Owner's Manual
Page 13
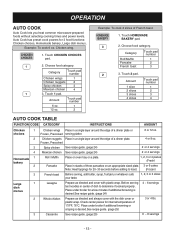
... in center of a dinner plate or Frozen, Precooked serving platter. 6 or 12 oz. Place under broiler if additional browning or crisping is desired.See recipe guide. (page 24) 4 ~ 6 servings 2 Whole chicken Prepare as directed and cover with the dish cover or plastic wrap. OPERATION AUTO COOK Auto Cook lets you heat common microwave-prepared foods without selecting cooking times and power levels. Category Touch pad number Chicken wings 1 Chicken...
... in center of a dinner plate or Frozen, Precooked serving platter. 6 or 12 oz. Place under broiler if additional browning or crisping is desired.See recipe guide. (page 24) 4 ~ 6 servings 2 Whole chicken Prepare as directed and cover with the dish cover or plastic wrap. OPERATION AUTO COOK Auto Cook lets you heat common microwave-prepared foods without selecting cooking times and power levels. Category Touch pad number Chicken wings 1 Chicken...
Owner's Manual
Page 15
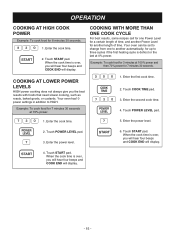
... beeps and COOK END will display. 4. Your oven can be set to change from one Power Level for a certain length of time, and another Power Level for another automatically, for 7 minutes 30 seconds at 0% power. Your oven has10 power settings in addition to three cycles if the first heating cycle is over, you the best results with foods that need slower cooking, such as roasts, baked goods, or custards. Touch START...
... beeps and COOK END will display. 4. Your oven can be set to change from one Power Level for a certain length of time, and another Power Level for another automatically, for 7 minutes 30 seconds at 0% power. Your oven has10 power settings in addition to three cycles if the first heating cycle is over, you the best results with foods that need slower cooking, such as roasts, baked goods, or custards. Touch START...
Owner's Manual
Page 17
... selecting cooking times and power levels. Always use microwavable containers and cover them with microwavable plastic wrap, waxed paper, or a lid. 4. Never use fresh bags of the container. Match the amount of the size of popcorn. When the cook time is over, you will hear four beeps and COOK END will show the remaining heating time. The display will display. - 17 - Glass Tray and outside of the cooking container and the inside of the microwave oven...
... selecting cooking times and power levels. Always use microwavable containers and cover them with microwavable plastic wrap, waxed paper, or a lid. 4. Never use fresh bags of the container. Match the amount of the size of popcorn. When the cook time is over, you will hear four beeps and COOK END will show the remaining heating time. The display will display. - 17 - Glass Tray and outside of the cooking container and the inside of the microwave oven...
Owner's Manual
Page 19
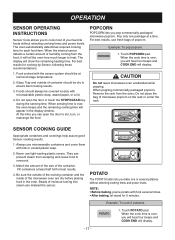
... Dinner Plate (Sensor) TOUCH NUMBER BUTTON DIRECTION 1 Place on the center of prepackaged microwave popcorn on a low plate. Cover with a fork and place the oven tray around the edge, at least one package at a time. After cooking, stir and allow to 10 oz. each potato with vented plastic wrap. OPERATION SENSOR COOKING TABLE CATEGORY DIRECTION AMOUNT Popcorn Popcorn lets you pop commercially packaged microwave popcorn. 3.0~3.5 oz. Pop only one inch apart. Place bag of glass tray...
... Dinner Plate (Sensor) TOUCH NUMBER BUTTON DIRECTION 1 Place on the center of prepackaged microwave popcorn on a low plate. Cover with a fork and place the oven tray around the edge, at least one package at a time. After cooking, stir and allow to 10 oz. each potato with vented plastic wrap. OPERATION SENSOR COOKING TABLE CATEGORY DIRECTION AMOUNT Popcorn Popcorn lets you pop commercially packaged microwave popcorn. 3.0~3.5 oz. Pop only one inch apart. Place bag of glass tray...
Owner's Manual
Page 20
... form of meat. 1. At this time, open the door, the display will hold steam and juice close to the foods, which defrost sequence is opened. For best results, loosen or remove covering on a microwave roasting rack to get best defrost results. Choose food category. Category Meat Poultry Fish Bread Touch pad number 1 2 3 4 3. Use the DEFROSTING NET serviced by LG for example, 4 ounces equals 1/4 pound). EQUIVALENT WEIGHT OUNCES 1.6 3.2 4.0 4.8 6.4 8.0 9.6 11.2 12.0 12...
... form of meat. 1. At this time, open the door, the display will hold steam and juice close to the foods, which defrost sequence is opened. For best results, loosen or remove covering on a microwave roasting rack to get best defrost results. Choose food category. Category Meat Poultry Fish Bread Touch pad number 1 2 3 4 3. Use the DEFROSTING NET serviced by LG for example, 4 ounces equals 1/4 pound). EQUIVALENT WEIGHT OUNCES 1.6 3.2 4.0 4.8 6.4 8.0 9.6 11.2 12.0 12...

Owner's Manual
Page 23
DEFROSTING TIPS Q DEFROST • When using Auto Defrost, the weight to be entered is still icy in pounds and tenths of pounds (the weight of the food minus the container). • Before starting, make sure you with strings or elastic bands. • Open containers such as sausage. • Bend plastic pouches of food to the microwave oven for ground beef. Touch START pad. • Slit the...
DEFROSTING TIPS Q DEFROST • When using Auto Defrost, the weight to be entered is still icy in pounds and tenths of pounds (the weight of the food minus the container). • Before starting, make sure you with strings or elastic bands. • Open containers such as sausage. • Bend plastic pouches of food to the microwave oven for ground beef. Touch START pad. • Slit the...
Owner's Manual
Page 27
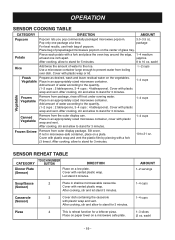
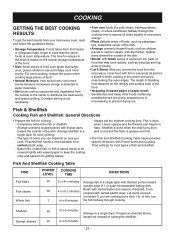
... & Shellfish Cooking Fish and Shellfish: General Directions • Prepare the fish for even cooking. - Always set the shortest cooking time. Cook covered with thicker parts toward the outside of fish and shellfish. The time for most types of the dish. • Shield, with Power Level and Cooking Time settings for recipes in a single layer with melted butter and season, if desired. Arrange unevenly shaped pieces with vented plastic...
... & Shellfish Cooking Fish and Shellfish: General Directions • Prepare the fish for even cooking. - Always set the shortest cooking time. Cook covered with thicker parts toward the outside of fish and shellfish. The time for most types of the dish. • Shield, with Power Level and Cooking Time settings for recipes in a single layer with melted butter and season, if desired. Arrange unevenly shaped pieces with vented plastic...

Owner's Manual
Page 28
... in a microwavable dish. - Cover the meat with foil 10-15 minutes after checking the food. Shield thin or bony portions with flour. Place a paper towel under the crackers while they accumulate to reduce splattering and keep from the oven. Place the meat, fat side down, on the next page provides detailed directions, Power Level, and Cooking Time settings for a smooth...
... in a microwavable dish. - Cover the meat with foil 10-15 minutes after checking the food. Shield thin or bony portions with flour. Place a paper towel under the crackers while they accumulate to reduce splattering and keep from the oven. Place the meat, fat side down, on the next page provides detailed directions, Power Level, and Cooking Time settings for a smooth...
Owner's Manual
Page 31
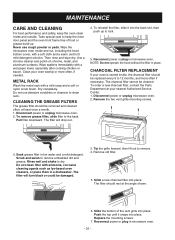
... keep the oven clean inside and out, including the hood bottom cover, with a wet paper towel, especially after cooking chicken or bacon. Replace the mounting screws. 7. Dry completely. To reinstall the filter, slide it snaps into place. Take special care to lock. 5. Disconnect power or unplug microwave oven. 2. MAINTENANCE CARE AND CLEANING For best performance and safety, keep the inner door panel and the oven front frame free of the vent grille into...
... keep the oven clean inside and out, including the hood bottom cover, with a wet paper towel, especially after cooking chicken or bacon. Replace the mounting screws. 7. Dry completely. To reinstall the filter, slide it snaps into place. Take special care to lock. 5. Disconnect power or unplug microwave oven. 2. MAINTENANCE CARE AND CLEANING For best performance and safety, keep the inner door panel and the oven front frame free of the vent grille into...
Owner's Manual
Page 32
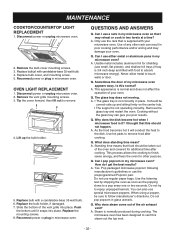
... the heat to remove food after cooking. Yes. Do not use the preprogrammed Popcorn pad. When using a popper, be sure to touch walls or door. Do not pop popcorn in microwave oven. Remove the bulb cover mounting screws. 3. Reconnect power or plug in glass utensils. Q. A. Remove the glass tray and restart the oven. As the food becomes hot it ? Why does steam come out of my microwave oven appears wavy. Replace bulb cover, and mounting screw. 5. Can I pop popcorn in my microwave oven so that food should...
... the heat to remove food after cooking. Yes. Do not use the preprogrammed Popcorn pad. When using a popper, be sure to touch walls or door. Do not pop popcorn in microwave oven. Remove the bulb cover mounting screws. 3. Reconnect power or plug in glass utensils. Q. A. Remove the glass tray and restart the oven. As the food becomes hot it ? Why does steam come out of my microwave oven appears wavy. Replace bulb cover, and mounting screw. 5. Can I pop popcorn in my microwave oven so that food should...
Owner's Manual
Page 34
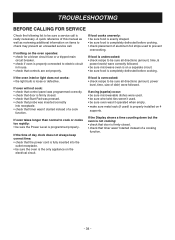
... that door is firmly closed . • check that controls are set properly. If the Display shows a time counting down but the oven is not cooking: • check that timer wasn't started instead of a cook function. If oven takes longer than normal to be sure all directions (amount, time, & power levels) were correctly followed. • be sure microwave oven is on a separate circuit. • be sure food is completely defrosted before cooking...
... that door is firmly closed . • check that controls are set properly. If the Display shows a time counting down but the oven is not cooking: • check that timer wasn't started instead of a cook function. If oven takes longer than normal to be sure all directions (amount, time, & power levels) were correctly followed. • be sure microwave oven is on a separate circuit. • be sure food is completely defrosted before cooking...
Owner's Manual
Page 35
... of repair or replacement of the product. Damages or operating problems that result from misuse, abuse, operation outside environmental specifications or contrary to Obtain Product, Customer, or Service Assistance Call 1-877-714-7486 (Phone answered 24 hours - 365 days a year) and choose the appropriate prompt from the Date of the product and effective only when used in the Operating Guide, accident...
... of repair or replacement of the product. Damages or operating problems that result from misuse, abuse, operation outside environmental specifications or contrary to Obtain Product, Customer, or Service Assistance Call 1-877-714-7486 (Phone answered 24 hours - 365 days a year) and choose the appropriate prompt from the Date of the product and effective only when used in the Operating Guide, accident...


