
Owner's Manual
Page 1
LMVM1955SW LMVM1955SB LMVM1955SBQ LMVM1955T Website: http://us.lgservice.com MICROWAVE OVEN OWNER'S MANUAL & COOKING GUIDE PLEASE READ THIS OWNER'S MANUAL THOROUGHLY BEFORE OPERATING.
LMVM1955SW LMVM1955SB LMVM1955SBQ LMVM1955T Website: http://us.lgservice.com MICROWAVE OVEN OWNER'S MANUAL & COOKING GUIDE PLEASE READ THIS OWNER'S MANUAL THOROUGHLY BEFORE OPERATING.

Owner's Manual
Page 2
... closes properly and that there is damaged. Model No: Serial No: Dealer: Dealer Phone No: Staple your contact with LG (LG Electronics U.S.A., Inc.) concerning this unit for purchasing an LG microwave oven. Service Division Bldg. #3 201 James Record Rd. It is important not to defeat or tamper with the door... interlocks. (b) Do not place any object between the oven front face and the door or allow soil or cleaner residue to microwave energy. Customer Relations LG Electronics U.S.A., Inc. Thank you record the details of this unit. We also suggest you for future reference.
... closes properly and that there is damaged. Model No: Serial No: Dealer: Dealer Phone No: Staple your contact with LG (LG Electronics U.S.A., Inc.) concerning this unit for purchasing an LG microwave oven. Service Division Bldg. #3 201 James Record Rd. It is important not to defeat or tamper with the door... interlocks. (b) Do not place any object between the oven front face and the door or allow soil or cleaner residue to microwave energy. Customer Relations LG Electronics U.S.A., Inc. Thank you record the details of this unit. We also suggest you for future reference.
Owner's Manual
Page 3
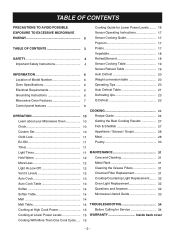
...20 Electrical Requirements 6 Auto Defrost Table 21 Grounding Instructions 6 Defrosting tips 23 Microwave Oven Features 7 Q Defrost 23 Control panel features 8 COOKING 24 OPERATION 10 Recipe Guide 24 Learn about your Microwave Oven 10 Getting the Best Cooking Results 27 Clock 10 Fish & Shellfish 27... Light Replacement ....... 32 Auto Cook Table 13 Oven Light Replacement 32 Soften 14 Questions and Answers 32 Soften Table 14 Microwave Utensil Guide 33 Melt 14 Melt Table 14 TROUBLESHOOTING 34 Cooking at High Cook Power 15 Before Calling for Service 34...
...20 Electrical Requirements 6 Auto Defrost Table 21 Grounding Instructions 6 Defrosting tips 23 Microwave Oven Features 7 Q Defrost 23 Control panel features 8 COOKING 24 OPERATION 10 Recipe Guide 24 Learn about your Microwave Oven 10 Getting the Best Cooking Results 27 Clock 10 Fish & Shellfish 27... Light Replacement ....... 32 Auto Cook Table 13 Oven Light Replacement 32 Soften 14 Questions and Answers 32 Soften Table 14 Microwave Utensil Guide 33 Melt 14 Melt Table 14 TROUBLESHOOTING 34 Cooking at High Cook Power 15 Before Calling for Service 34...
Owner's Manual
Page 4
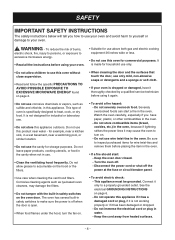
...overcook food. Do not use this oven without close supervision. • Read and follow the specific PRECAUTIONS TO AVOID POSSIBLE EXPOSURE TO EXCESSIVE MICROWAVE ENERGY found on page 6. - This appliance must be grounded. Do not operate this appliance outdoors. Keep the cord away from heated surfaces... or similar location. • Do not use the cavity for industrial or laboratory use only. • Do not allow grease to excessive microwave energy. • Read all the instructions before using it again. • Do not use corrosive chemicals or vapors, such as lye-based ...
...overcook food. Do not use this oven without close supervision. • Read and follow the specific PRECAUTIONS TO AVOID POSSIBLE EXPOSURE TO EXCESSIVE MICROWAVE ENERGY found on page 6. - This appliance must be grounded. Do not operate this appliance outdoors. Keep the cord away from heated surfaces... or similar location. • Do not use the cavity for industrial or laboratory use only. • Do not allow grease to excessive microwave energy. • Read all the instructions before using it again. • Do not use corrosive chemicals or vapors, such as lye-based ...
Owner's Manual
Page 5
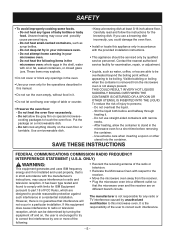
...for the operations described in this appliance only in a residential installation. Do not allow the container to correct such interference. -5- If this microwave oven. It has been type tested and found to comply with the provided installation instructions. - It is encouraged to try to be ...home canning in it . - Do not heat the oven floor excessively. - syrup bottles. - Do not deep-fat fry in the microwave oven for ISM Equipment pursuant to part 18 of injury to this equipment does cause interference to radio or television reception, which are able to...
...for the operations described in this appliance only in a residential installation. Do not allow the container to correct such interference. -5- If this microwave oven. It has been type tested and found to comply with the provided installation instructions. - It is encouraged to try to be ...home canning in it . - Do not heat the oven floor excessively. - syrup bottles. - Do not deep-fat fry in the microwave oven for ISM Equipment pursuant to part 18 of injury to this equipment does cause interference to radio or television reception, which are able to...
Owner's Manual
Page 6
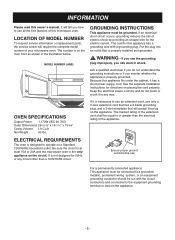
The number is on the circuit. If an electrical short circuit occurs, grounding reduces the risk of your microwave oven. Put the plug into an outlet that will accept the plug on placing the cord properly. Ask a qualified electrician if you do not pinch ...or crush it has a short power-supply cord. WARNING - Because this microwave oven. Be sure the circuit is at least 15A or 20A and the microwave oven is the only appliance on the oven front as shown in any circuit other than the electrical rating...
The number is on the circuit. If an electrical short circuit occurs, grounding reduces the risk of your microwave oven. Put the plug into an outlet that will accept the plug on placing the cord properly. Ask a qualified electrician if you do not pinch ...or crush it has a short power-supply cord. WARNING - Because this microwave oven. Be sure the circuit is at least 15A or 20A and the microwave oven is the only appliance on the oven front as shown in any circuit other than the electrical rating...
Owner's Manual
Page 7
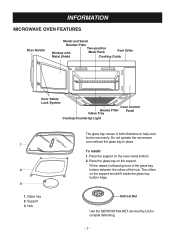
... the glass tray on the support should fit inside the glass tray bottom ridge. 1. The rollers on the support. Glass tray 2. INFORMATION MICROWAVE OVEN FEATURES Door Handle Model and Serial Number Plate Window with Two-position Metal Rack Vent Grille Metal Shield Cooking Guide Door Safety Lock System... Oven Control Grease Filter Glass Tray Panel Cooktop/Countertop Light The glass tray moves in place. Do not operate the microwave oven without the glass tray in both directions to help cook food more evenly. To Install: 1. Hub Defrost Net Use the DEFROSTING...
... the glass tray on the support should fit inside the glass tray bottom ridge. 1. The rollers on the support. Glass tray 2. INFORMATION MICROWAVE OVEN FEATURES Door Handle Model and Serial Number Plate Window with Two-position Metal Rack Vent Grille Metal Shield Cooking Guide Door Safety Lock System... Oven Control Grease Filter Glass Tray Panel Cooktop/Countertop Light The glass tray moves in place. Do not operate the microwave oven without the glass tray in both directions to help cook food more evenly. To Install: 1. Hub Defrost Net Use the DEFROSTING...
Owner's Manual
Page 8
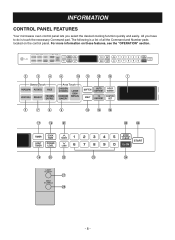
INFORMATION CONTROL PANEL FEATURES Your microwave oven control panel lets you have to do is a list of all the Command and Number pads located on these features, see the "OPERATION" section. 2 3 4 8 10 11 13 15 1 5 7 6 9 17 19 21 12 14 16 25 26 18 20 22 23 24 27 28 -8- All you select the desired cooking function quickly and easily. For more information on the control panel. The following is touch the necessary Command pad.
INFORMATION CONTROL PANEL FEATURES Your microwave oven control panel lets you have to do is a list of all the Command and Number pads located on these features, see the "OPERATION" section. 2 3 4 8 10 11 13 15 1 5 7 6 9 17 19 21 12 14 16 25 26 18 20 22 23 24 27 28 -8- All you select the desired cooking function quickly and easily. For more information on the control panel. The following is touch the necessary Command pad.

Owner's Manual
Page 9
...timer. 19. FROZEN ENTREE: Touch this pad to 99 minutes 99 seconds. 16. SOFTEN: Touch this pad to keep hot, cooked foods warm in your microwave oven for up to cook vegetables. 6. HOLD WARM: Touch this pad to set the kitchen timer. 18. LESS: Touch this pad to soften ice ...cook lasagna, whole chicken, and casserole. 11. POWER LEVEL: Touch this pad followed by weight. 14. MORE: Touch this pad when popping popcorn in your microwave oven. 3. DISPLAY: The Display includes a clock and indicators to tell you open the door after oven begins to add ten seconds of day, cooking time...
...timer. 19. FROZEN ENTREE: Touch this pad to 99 minutes 99 seconds. 16. SOFTEN: Touch this pad to keep hot, cooked foods warm in your microwave oven for up to cook vegetables. 6. HOLD WARM: Touch this pad to set the kitchen timer. 18. LESS: Touch this pad to soften ice ...cook lasagna, whole chicken, and casserole. 11. POWER LEVEL: Touch this pad followed by weight. 14. MORE: Touch this pad when popping popcorn in your microwave oven. 3. DISPLAY: The Display includes a clock and indicators to tell you open the door after oven begins to add ten seconds of day, cooking time...
Owner's Manual
Page 10
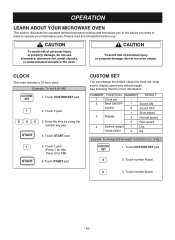
...speed 3 Fast speed 4 Defrost weight 1 Lbs. Touch number 4 pad. 3. CUSTOM SET You can change defrost weight mode.(from Lbs. to operate your microwave oven. Touch CUSTOM SET pad. 2. Example: To change the default values for clock set, beep sound, display speed and defrost weight. Touch number 2 ...pad. - 10 - OPERATION LEARN ABOUT YOUR MICROWAVE OVEN This section discusses the concepts behind microwave cooking and introduces you to the basics you need to know to Kg.) 1. Please read this information before use ...
...speed 3 Fast speed 4 Defrost weight 1 Lbs. Touch number 4 pad. 3. CUSTOM SET You can change defrost weight mode.(from Lbs. to operate your microwave oven. Touch CUSTOM SET pad. 2. Example: To change the default values for clock set, beep sound, display speed and defrost weight. Touch number 2 ...pad. - 10 - OPERATION LEARN ABOUT YOUR MICROWAVE OVEN This section discusses the concepts behind microwave cooking and introduces you to the basics you need to know to Kg.) 1. Please read this information before use ...
Owner's Manual
Page 11
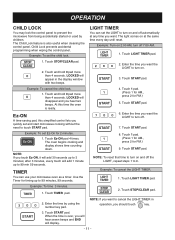
... 30 seconds up to 99 min 59 seconds. Touch LIGHT TIMER pad. Touch STOP/CLEAR pad. 2. Touch START pad. LIGHT TIMER You can use your microwave oven as a timer. The light comes on . 3. Touch 1 pad. (Press 1 for AM., press 2 for timing up to 99 minutes, 99 seconds. 8. Touch START.... Touch 1 pad. (Press 1 for AM., press 2 for 2 minutes. 1. HI-LOW-OFF 3. OPERATION CHILD LOCK You may lock the control panel to prevent the microwave from being accidentally started or used by using the number key pad. Example: To cancel the LIGHT TIMER. 1. TIMER You can set and start...
... 30 seconds up to 99 min 59 seconds. Touch LIGHT TIMER pad. Touch STOP/CLEAR pad. 2. Touch START pad. LIGHT TIMER You can use your microwave oven as a timer. The light comes on . 3. Touch 1 pad. (Press 1 for AM., press 2 for timing up to 99 minutes, 99 seconds. 8. Touch START.... Touch 1 pad. (Press 1 for AM., press 2 for 2 minutes. 1. HI-LOW-OFF 3. OPERATION CHILD LOCK You may lock the control panel to prevent the microwave from being accidentally started or used by using the number key pad. Example: To cancel the LIGHT TIMER. 1. TIMER You can set and start...
Owner's Manual
Page 12
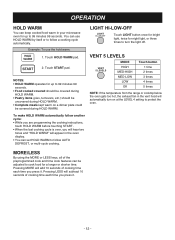
... LESS keys, all of cooking time each time you press it . Touch START pad. OPERATION HOLD WARM You can keep cooked food warm in your microwave oven for up to 99 minutes 99 seconds. • Food cooked covered should be covered during HOLD WARM. • Pastry items (pies, turnovers, etc.) should...
... LESS keys, all of cooking time each time you press it . Touch START pad. OPERATION HOLD WARM You can keep cooked food warm in your microwave oven for up to 99 minutes 99 seconds. • Food cooked covered should be covered during HOLD WARM. • Pastry items (pies, turnovers, etc.) should...
Owner's Manual
Page 13
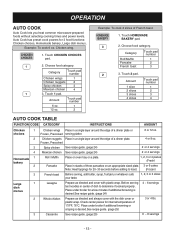
... cooked properly. Category Roll/Muffin Pancake French toast Touch pad number 1 2 3 3. Chicken wing. 1. Choose food category. OPERATION AUTO COOK Auto Cook lets you heat common microwave-prepared foods without selecting cooking times and power levels. Example: To cook 6 oz. Choose food category. Amount 1 slice 2 slices 3 slices 4 slices Touch pad number 1 2 3 4 AUTO...
... cooked properly. Category Roll/Muffin Pancake French toast Touch pad number 1 2 3 3. Chicken wing. 1. Choose food category. OPERATION AUTO COOK Auto Cook lets you heat common microwave-prepared foods without selecting cooking times and power levels. Example: To cook 6 oz. Choose food category. Amount 1 slice 2 slices 3 slices 4 slices Touch pad number 1 2 3 4 AUTO...
Owner's Manual
Page 14
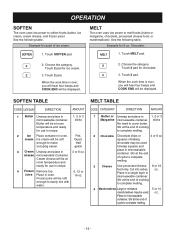
... processed cheese food, or marshmallows). Choose the category. SOFTEN TABLE MELT TABLE CODE CATEGORY DIRECTION AMOUNT 1 Butter Unwrap and place in microwavable container. sticks Butter will be soft enough to easily mix with water. Cream cheese will be used . squares of cooking to make...4 Marshmallows Large or miniature 5 or 10 marshmallows may be displayed. 2. Pint, Quart, Half gallon 3 Cream Unwrap and place in microwavable container. Stir at the end of baking chocolate may be at room temperature and ready for use in recipe. 4 Frozen Remove top. ...
... processed cheese food, or marshmallows). Choose the category. SOFTEN TABLE MELT TABLE CODE CATEGORY DIRECTION AMOUNT 1 Butter Unwrap and place in microwavable container. sticks Butter will be soft enough to easily mix with water. Cream cheese will be used . squares of cooking to make...4 Marshmallows Large or miniature 5 or 10 marshmallows may be displayed. 2. Pint, Quart, Half gallon 3 Cream Unwrap and place in microwavable container. Stir at the end of baking chocolate may be at room temperature and ready for use in recipe. 4 Frozen Remove top. ...
Owner's Manual
Page 16
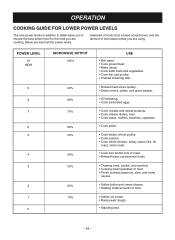
... nine power levels in addition to HIGH allow you to choose the best power level for the food you are cooking. POWER LEVEL 10 HIGH 9 8 7 6 5 4 3 2 1 0 MICROWAVE OUTPUT 100% 90% 80% 70% 60% 50% 40% 30% 20% 10% USE • Boil water. • Cook ground beef. • Make candy. • Cook fresh.... • Cooking small quantities of food. • Finish cooking casserole, stew, and some sauces. • Soften butter and cream cheese. • Heating small amounts of microwave power you are using.
... nine power levels in addition to HIGH allow you to choose the best power level for the food you are cooking. POWER LEVEL 10 HIGH 9 8 7 6 5 4 3 2 1 0 MICROWAVE OUTPUT 100% 90% 80% 70% 60% 50% 40% 30% 20% 10% USE • Boil water. • Cook ground beef. • Make candy. • Cook fresh.... • Cooking small quantities of food. • Finish cooking casserole, stew, and some sauces. • Soften butter and cream cheese. • Heating small amounts of microwave power you are using.
Owner's Manual
Page 17
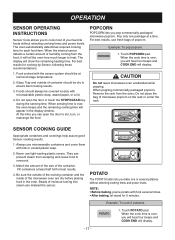
... Fill containers at normal storage temperature. 2. Beads of humidity coming from the food, it will display. NOTE: • Before baking, pierce potato with microwavable plastic wrap, waxed paper, or a lid. 4. Example: To cook 2 potatoes. 1. Glass Tray and outside of the cooking container and the inside... will display. - 17 - For best results for each food item. For best results, use tight-sealing plastic covers. Always use microwavable containers and cover them with the sensor system should always be covered loosely with fork severral times. • After baking, let stand ...
... Fill containers at normal storage temperature. 2. Beads of humidity coming from the food, it will display. NOTE: • Before baking, pierce potato with microwavable plastic wrap, waxed paper, or a lid. 4. Example: To cook 2 potatoes. 1. Glass Tray and outside of the cooking container and the inside... will display. - 17 - For best results for each food item. For best results, use tight-sealing plastic covers. Always use microwavable containers and cover them with the sensor system should always be covered loosely with fork severral times. • After baking, let stand ...
Owner's Manual
Page 19
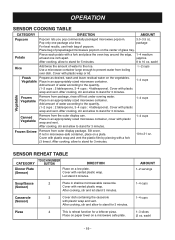
...apart. each) Rice Add twice the amount of water to prevent water from package, rinse off frost under running water. Vegetable Place in microwave-safe container, place on a plate. After cooking, stir and allow to stand for 3 minutes. 1~4 cups Canned Vegetable Remove from .... After cooking, stir and let stand 3 minutes. Pizza 4 This is reheat function for 3 minutes. If not in an appropriately sized microwave container. Cover with vented plastic wrap. Cover with vented plastic wrap. Cover with a fork (3 times). Cover with plastic wrap and vent...
...apart. each) Rice Add twice the amount of water to prevent water from package, rinse off frost under running water. Vegetable Place in microwave-safe container, place on a plate. After cooking, stir and allow to stand for 3 minutes. 1~4 cups Canned Vegetable Remove from .... After cooking, stir and let stand 3 minutes. Pizza 4 This is reheat function for 3 minutes. If not in an appropriately sized microwave container. Cover with vented plastic wrap. Cover with vented plastic wrap. Cover with a fork (3 times). Cover with plastic wrap and vent...
Owner's Manual
Page 20
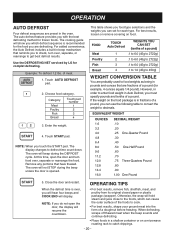
For added convenience, the Auto Defrost includes a built-in a shallow container or on a microwave roasting rack to defrost time count down. of a pound, you can use the following table to convert the weight to decimals. The oven will hold ... beep mechanism that have thawed. OPERATION AUTO DEFROST Four defrost sequences are probably used to get best defrost results. Use the DEFROSTING NET serviced by LG for each type. Example: To defrost 1.2 lbs. Touch START pad. The oven will resume the countdown. • For best results, remove fish, shellfish, meat, and...
For added convenience, the Auto Defrost includes a built-in a shallow container or on a microwave roasting rack to defrost time count down. of a pound, you can use the following table to convert the weight to decimals. The oven will hold ... beep mechanism that have thawed. OPERATION AUTO DEFROST Four defrost sequences are probably used to get best defrost results. Use the DEFROSTING NET serviced by LG for each type. Example: To defrost 1.2 lbs. Touch START pad. The oven will resume the countdown. • For best results, remove fish, shellfish, meat, and...
Owner's Manual
Page 21
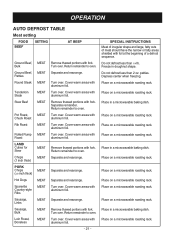
.... Cover warm areas with aluminum foil. Separate and rearrange. Turn over . Cover warm areas with aluminum foil. Place on a microwavable roasting rack. Turn over . Cover warm areas with aluminum foil. Turn over . Return remainder to oven. Separate and rearrange. .... Remove thawed portions with aluminum foil. Do not defrost less than 2 oz. Place on a microwavable roasting rack. Place on a microwavable roasting rack. Place on a microwavable roasting rack. Return remainder to oven. Cover warm areas with fork. Turn over . SPECIAL INSTRUCTIONS ...
.... Cover warm areas with aluminum foil. Separate and rearrange. Turn over . Cover warm areas with aluminum foil. Place on a microwavable roasting rack. Turn over . Cover warm areas with aluminum foil. Turn over . Return remainder to oven. Separate and rearrange. .... Remove thawed portions with aluminum foil. Do not defrost less than 2 oz. Place on a microwavable roasting rack. Place on a microwavable roasting rack. Place on a microwavable roasting rack. Return remainder to oven. Cover warm areas with fork. Turn over . SPECIAL INSTRUCTIONS ...

Owner's Manual
Page 22
... Place chicken breast-side up to 6 lbs) Separate pieces and rearrange. Finish defrosting by immersing in cold water. Place on a microwavable roasting rack. Cover head and tail with aluminum foil. Finish defrosting by immersing in cold water. Cover warm areas with foil; Turn...Scallops FISH FISH FISH FISH Break apart. Turn over (finish defrosting breastside down). do not let foil touch sides of microwave. Place on a microwavable roasting rack. Carefully separate fillets under cold water. OPERATION AUTO DEFROST TABLE (CONT.) Poultry setting FOOD SETTING AT BEEP ...
... Place chicken breast-side up to 6 lbs) Separate pieces and rearrange. Finish defrosting by immersing in cold water. Place on a microwavable roasting rack. Cover head and tail with aluminum foil. Finish defrosting by immersing in cold water. Cover warm areas with foil; Turn...Scallops FISH FISH FISH FISH Break apart. Turn over (finish defrosting breastside down). do not let foil touch sides of microwave. Place on a microwavable roasting rack. Carefully separate fillets under cold water. OPERATION AUTO DEFROST TABLE (CONT.) Poultry setting FOOD SETTING AT BEEP ...


