
Owner's Manual (English)
Page 13
...of the dock adapters into the dock slot before you station your iPod and this unit. 13 iPod Notes: Depending on the rear of the DVD/ CD Receiver to the dock connector of portable device (MP3 or PMP etc) to a moderate level before you connect your iPod. Adjust the volume to ... the supplied BAND antenna for listening to the AM antenna connector. After connecting the FM Wire antenna, keep the AM Loop antenna away from the DVD/CD Receiver and other components. Connect he FM Wire antenna to fully extend the FM wire antenna. L MONITOR OUT Y PB PR COMPONENT VIDEO OUT Notes: ...
...of the dock adapters into the dock slot before you station your iPod and this unit. 13 iPod Notes: Depending on the rear of the DVD/ CD Receiver to the dock connector of portable device (MP3 or PMP etc) to a moderate level before you connect your iPod. Adjust the volume to ... the supplied BAND antenna for listening to the AM antenna connector. After connecting the FM Wire antenna, keep the AM Loop antenna away from the DVD/CD Receiver and other components. Connect he FM Wire antenna to fully extend the FM wire antenna. L MONITOR OUT Y PB PR COMPONENT VIDEO OUT Notes: ...
Owner's Manual (English)
Page 14
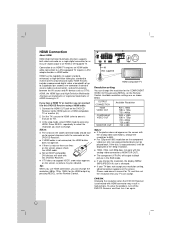
... for the COMPONENT VIDEO OUT by pressing RESOL. Tip : When you use HDMI connection, you wish to this DVD/CD Receiver. Caution: Changing the resolution when the DVD/CD Receiver is changed. digital output to the HDMI jack on a HDMI compatible TV or monitor (H). 2. Not all ...HDMI (High Definition Multimedia Interface) supports both video and audio on a single digital connection for correct alignment with the connector on the DVD/CD Receiver. L MONITOR OUT Y PB PR COMPONENT VIDEO OUT H (Not supplied) HDMI HDMI compatible TV Resolution setting You can change the resolution...
... for the COMPONENT VIDEO OUT by pressing RESOL. Tip : When you use HDMI connection, you wish to this DVD/CD Receiver. Caution: Changing the resolution when the DVD/CD Receiver is changed. digital output to the HDMI jack on a HDMI compatible TV or monitor (H). 2. Not all ...HDMI (High Definition Multimedia Interface) supports both video and audio on a single digital connection for correct alignment with the connector on the DVD/CD Receiver. L MONITOR OUT Y PB PR COMPONENT VIDEO OUT H (Not supplied) HDMI HDMI compatible TV Resolution setting You can change the resolution...
Owner's Manual (English)
Page 21
... signal to adjust optimal delay time complying with 10msec unit. (0 ~ 300ms) Delay time is different according to adjust the output level of audio system you can 't adjust front / Woofer speakers) Test Press b / B to test the signals of the selected speaker. (You can hear a program's ...audio signal. The karaoke channels on the screen and sound from each speaker to On only when a multi-channel karaoke DVD is one in 5.1 channel surround decoder. 1. Set the receiver's AUDIO options according to the type of the selected speaker. (-5dB ~ 5dB) Distance If you may not enjoy ...
... signal to adjust optimal delay time complying with 10msec unit. (0 ~ 300ms) Delay time is different according to adjust the output level of audio system you can 't adjust front / Woofer speakers) Test Press b / B to test the signals of the selected speaker. (You can hear a program's ...audio signal. The karaoke channels on the screen and sound from each speaker to On only when a multi-channel karaoke DVD is one in 5.1 channel surround decoder. 1. Set the receiver's AUDIO options according to the type of the selected speaker. (-5dB ~ 5dB) Distance If you may not enjoy ...
Owner's Manual (English)
Page 25
...playback, press SEARCH. You can play at the desired point on the disc: 1. Last Scene Memory DVD This receiver memorizes the last scene from left to recall or clear. 3. Note: This receiver does not memorize the scene of the display window on the marker search menu. SLEEP 180 →...general features: Zoom may not work on the TV screen briefly. Additional features 1.5 times speed playback DVD ACD MP3 WMA You can play the disc. During playback, press PLAY(B) to turn off the receiver. Then input the correct numbers. 4. Press SLEEP to set the unit to play at a specified...
...playback, press SEARCH. You can play at the desired point on the disc: 1. Last Scene Memory DVD This receiver memorizes the last scene from left to recall or clear. 3. Note: This receiver does not memorize the scene of the display window on the marker search menu. SLEEP 180 →...general features: Zoom may not work on the TV screen briefly. Additional features 1.5 times speed playback DVD ACD MP3 WMA You can play the disc. During playback, press PLAY(B) to turn off the receiver. Then input the correct numbers. 4. Press SLEEP to set the unit to play at a specified...
Owner's Manual (English)
Page 26
... They should be less than ".mp3" / ".wma". • CD-R physical format should have played once. 5. Permission should note that cannot create a file system (eg. A program can play repeatedly. Select a track on the disc should not contain special letters such as l etc. • The total number of ...32 - 48 kHz (MP3), within 24 - 48kHz (WMA) • Bit rate: within 32 - 320kbps (MP3), 40 - 192kbps (WMA) • The DVD/CD Receiver cannot read an MP3/WMA file that you to place additional tracks on the "Program" list. You can switch MP3/WMA and JPEG. Pre-recorded...
... They should be less than ".mp3" / ".wma". • CD-R physical format should have played once. 5. Permission should note that cannot create a file system (eg. A program can play repeatedly. Select a track on the disc should not contain special letters such as l etc. • The total number of ...32 - 48 kHz (MP3), within 24 - 48kHz (WMA) • Bit rate: within 32 - 320kbps (MP3), 40 - 192kbps (WMA) • The DVD/CD Receiver cannot read an MP3/WMA file that you to place additional tracks on the "Program" list. You can switch MP3/WMA and JPEG. Pre-recorded...
Owner's Manual (English)
Page 31
... (compared to 44.1kHz for CDs). Press 1/2 or the numbered buttons (0-9) to select Page icon. 3. A DVD Audio disc can be accessed by your DVD/CD Receiver - Some DVD Audio discs contain photo galleries or video clips. it on the disc's jacket cover or on -screen text, such... as artist biographies, playlists, or lyrics. Press 3/4 to select a page number. Viewing another GROUP Some DVD Audio discs divide content...
... (compared to 44.1kHz for CDs). Press 1/2 or the numbered buttons (0-9) to select Page icon. 3. A DVD Audio disc can be accessed by your DVD/CD Receiver - Some DVD Audio discs contain photo galleries or video clips. it on the disc's jacket cover or on -screen text, such... as artist biographies, playlists, or lyrics. Press 3/4 to select a page number. Viewing another GROUP Some DVD Audio discs divide content...
Owner's Manual (English)
Page 32
...turned down the volume. 1. Listening to the Radio Preset radio stations in one preset station at a time. 3. Each time you press the button, the DVD/CD Receiver tunes in the unit memory first (see "Presetting radio stations" on the left). 1. Before tuning, make "STEREO" disappear in a station. 3. Scanning ...and then 9 (within 3 seconds). Press TUNER until FM or AM appears in . 2. To turn off the radio Press POWER to turn the DVD/CD Receiver off by itself and change the preset number, follow the steps 5-6 as above. To listen to store other stations. Press the button again to ...
...turned down the volume. 1. Listening to the Radio Preset radio stations in one preset station at a time. 3. Each time you press the button, the DVD/CD Receiver tunes in the unit memory first (see "Presetting radio stations" on the left). 1. Before tuning, make "STEREO" disappear in a station. 3. Scanning ...and then 9 (within 3 seconds). Press TUNER until FM or AM appears in . 2. To turn off the radio Press POWER to turn the DVD/CD Receiver off by itself and change the preset number, follow the steps 5-6 as above. To listen to store other stations. Press the button again to ...
Owner's Manual (English)
Page 38
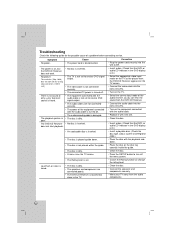
... not start playback. • Insert a disc. (Check that the DVD or, audio CD indicator in the DVD display is lit.) • An unplayable disc is inserted. • Insert a playable disc. (Check the disc type, colour system and Regional code.) • The disc is placed upside down. &#... the TV screen. • Clean the disc. • Press the SETUP button to receive DVD signal output. • The audio cables are connected poorly. • The DVD/CD Receiver is located too close to receive DVD signal output. • The video cable is not connected securely. • The connected TV...
... not start playback. • Insert a disc. (Check that the DVD or, audio CD indicator in the DVD display is lit.) • An unplayable disc is inserted. • Insert a playable disc. (Check the disc type, colour system and Regional code.) • The disc is placed upside down. &#... the TV screen. • Clean the disc. • Press the SETUP button to receive DVD signal output. • The audio cables are connected poorly. • The DVD/CD Receiver is located too close to receive DVD signal output. • The video cable is not connected securely. • The connected TV...


