
User Guide
Page 5
... Removing the Monitor Pedestal Base 15 Mounting the Monitor ...16 Locating the Rating Labels ...18 4 Operating the Monitor Software and Utilities ...19 The Information File ...19 The Image Color Matching File 19 Installing the .INF and .ICM Files ...20 Installing from the CD ...20 Downloading from the Worldwide Web 20 Using the Auto-Adjustment Function 21 Front Panel Controls ...22 Adjusting the Monitor Settings ...23 Using the On-Screen Display Menu 23 OSD Menu Selections 23 Optimizing Digital Conversion...
... Removing the Monitor Pedestal Base 15 Mounting the Monitor ...16 Locating the Rating Labels ...18 4 Operating the Monitor Software and Utilities ...19 The Information File ...19 The Image Color Matching File 19 Installing the .INF and .ICM Files ...20 Installing from the CD ...20 Downloading from the Worldwide Web 20 Using the Auto-Adjustment Function 21 Front Panel Controls ...22 Adjusting the Monitor Settings ...23 Using the On-Screen Display Menu 23 OSD Menu Selections 23 Optimizing Digital Conversion...
User Guide
Page 6
Installing the HP Display LiteSaver Software 29 sRGB Support ...30 Changing the Color Temperature 30 Installing the sRGB ICM File for Microsoft Windows 2000 and Windows XP 31 Installing the sRGB ICM File for Microsoft Windows Vista 31 Appendix A Troubleshooting Solving Common Problems ...32 Using the Worldwide Web ...33 Preparing to Call Technical Support 33 Appendix B Technical Specifications L1750 Model ...34 L1950 Model ...35 Recognizing Preset Display Resolutions 36 Entering User Modes ...37 Energy...
Installing the HP Display LiteSaver Software 29 sRGB Support ...30 Changing the Color Temperature 30 Installing the sRGB ICM File for Microsoft Windows 2000 and Windows XP 31 Installing the sRGB ICM File for Microsoft Windows Vista 31 Appendix A Troubleshooting Solving Common Problems ...32 Using the Worldwide Web ...33 Preparing to Call Technical Support 33 Appendix B Technical Specifications L1750 Model ...34 L1950 Model ...35 Recognizing Preset Display Resolutions 36 Entering User Modes ...37 Energy...
User Guide
Page 7
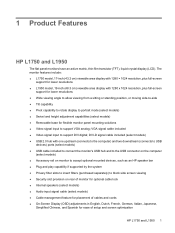
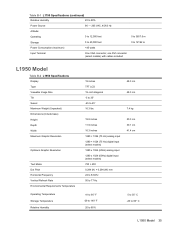
... rotate display to portrait mode (select models) ● Swivel and height adjustment capabilities (select models) ● Removable base for ease of setup and screen optimization HP L1750 and L1950 1 DVI-D signal cable included (select models) ● USB 2.0 hub with 1280 x 1024 resolution, plus full-screen support for lower resolutions ● L1950 model, 19-inch (48.3 cm) viewable area display with one upstream (connects to the computer) and two downstream (connects to USB devices) ports (select models) ● USB cable included to connect the monitor's USB...
... rotate display to portrait mode (select models) ● Swivel and height adjustment capabilities (select models) ● Removable base for ease of setup and screen optimization HP L1750 and L1950 1 DVI-D signal cable included (select models) ● USB 2.0 hub with 1280 x 1024 resolution, plus full-screen support for lower resolutions ● L1950 model, 19-inch (48.3 cm) viewable area display with one upstream (connects to the computer) and two downstream (connects to USB devices) ports (select models) ● USB cable included to connect the monitor's USB...
User Guide
Page 10
... service this monitor, as the screen. Never disconnect the monitor by using a screen saver program and turning off the monitor when not in use. ● Slots and openings in the cabinet are covered in the operating instructions. These openings must lay the monitor face down on the power cord. Turn off the monitor and the computer. 2. These chemicals may need it from excessive light, heat or moisture. ● When removing the monitor base...
... service this monitor, as the screen. Never disconnect the monitor by using a screen saver program and turning off the monitor when not in use. ● Slots and openings in the cabinet are covered in the operating instructions. These openings must lay the monitor face down on the power cord. Turn off the monitor and the computer. 2. These chemicals may need it from excessive light, heat or moisture. ● When removing the monitor base...
User Guide
Page 22
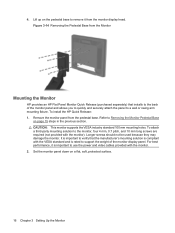
... the pedestal base to remove it is compliant with the monitor). Refer to a wall or swing arm mounting fixture. CAUTION: This monitor supports the VESA industry standard 100 mm mounting holes. Figure 3-14 Removing the Pedestal Base from the Monitor Mounting the Monitor HP provides an HP Flat Panel Monitor Quick Release (purchased separately) that the manufacturer's mounting solution is important to use the power and video cables provided with the monitor. 2. Set the monitor panel down...
... the pedestal base to remove it is compliant with the monitor). Refer to a wall or swing arm mounting fixture. CAUTION: This monitor supports the VESA industry standard 100 mm mounting holes. Figure 3-14 Removing the Pedestal Base from the Monitor Mounting the Monitor HP provides an HP Flat Panel Monitor Quick Release (purchased separately) that the manufacturer's mounting solution is important to use the power and video cables provided with the monitor. 2. Set the monitor panel down...
User Guide
Page 26
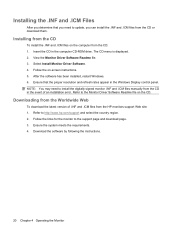
View the Monitor Driver Software Readme file. 3. Ensure the system meets the requirements. 4. Installing from the CD To install the .INF and .ICM files on -screen instructions. 5. Insert the CD in the Windows Display control panel. The CD menu is displayed. 2. Refer to the Monitor Driver Software Readme file on the CD. Follow the on the computer from the CD or download them. Ensure that you can install the .INF...
View the Monitor Driver Software Readme file. 3. Ensure the system meets the requirements. 4. Installing from the CD To install the .INF and .ICM files on -screen instructions. 5. Insert the CD in the Windows Display control panel. The CD menu is displayed. 2. Refer to the Monitor Driver Software Readme file on the CD. Follow the on the computer from the CD or download them. Ensure that you can install the .INF...

User Guide
Page 28
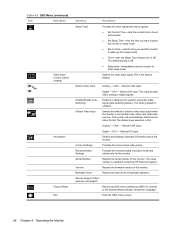
...Sleep mode. Front Panel Controls Table 4-1 Monitor Front Panel Controls Control 1 Menu 2 - (Minus)/Auto 3 + (Plus)/Input 4 Power LED 5 Power Function Opens, selects or exits the OSD menu. ● Navigates backward through the OSD menu and decreases adjustment levels. ● When the OSD menu is inactive, activates the auto adjustment feature to optimize the screen image. ● Navigates forward through the OSD menu and increases adjustment levels. ● When the OSD menu is inactive, an Input button chooses the video input signal input, VGA or DVI (select models have input...
...Sleep mode. Front Panel Controls Table 4-1 Monitor Front Panel Controls Control 1 Menu 2 - (Minus)/Auto 3 + (Plus)/Input 4 Power LED 5 Power Function Opens, selects or exits the OSD menu. ● Navigates backward through the OSD menu and decreases adjustment levels. ● When the OSD menu is inactive, activates the auto adjustment feature to optimize the screen image. ● Navigates forward through the OSD menu and increases adjustment levels. ● When the OSD menu is inactive, an Input button chooses the video input signal input, VGA or DVI (select models have input...
User Guide
Page 29
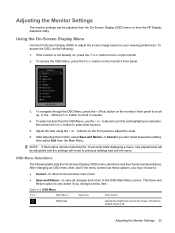
... On-Screen Display (OSD) menu or from the Main Menu. Using the On-Screen Display Menu Use the On-Screen Display (OSD) to scroll in reverse. 4. To navigate through the OSD Menu, press the + (Plus) button on the monitor's front panel to scroll up, or the - (Minus)/Auto button to adjust the screen image based on your selection, then press the Menu button to turn on , press the Power button to select that function. 5. OSD Menu Selections The following : 1. Adjusting the Monitor Settings The monitor settings...
... On-Screen Display (OSD) menu or from the Main Menu. Using the On-Screen Display Menu Use the On-Screen Display (OSD) to scroll in reverse. 4. To navigate through the OSD Menu, press the + (Plus) button on the monitor's front panel to scroll up, or the - (Minus)/Auto button to adjust the screen image based on your selection, then press the Menu button to turn on , press the Power button to select that function. 5. OSD Menu Selections The following : 1. Adjusting the Monitor Settings The monitor settings...
User Guide
Page 30
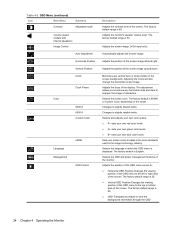
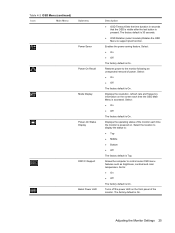
... and adjusts your own color scales: ● R-sets your own red color levels ● G-sets your own green color levels ● B-sets your own blue color levels Sets your screen colors to adapt to slightly blueish white. Changes to the color standards used in which the OSD menu is 80. Adjusts the monitor's speaker volume level. Adjusts the position of the screen image left or right area of the OSD menu to slightly reddish white. The factory default range is 50. ● Vertical OSD Position-Changes the viewing position of the OSD menu...
... and adjusts your own color scales: ● R-sets your own red color levels ● G-sets your own green color levels ● B-sets your own blue color levels Sets your screen colors to adapt to slightly blueish white. Changes to the color standards used in which the OSD menu is 80. Adjusts the monitor's speaker volume level. Adjusts the position of the screen image left or right area of the OSD menu to slightly reddish white. The factory default range is 50. ● Vertical OSD Position-Changes the viewing position of the OSD menu...
User Guide
Page 31
... factory default is On. Enables the power saving feature. Displays the resolution, refresh rate and frequency information on the front panel of power. Set to the monitor following an unexpected removal of the monitor. Displays the operating status of the monitor each time the OSD Main Menu is On. Select the location to display the status to control some OSD menu features such as brightness, contrast and color temperature. Turns off the power LED on the screen each time the monitor...
... factory default is On. Enables the power saving feature. Displays the resolution, refresh rate and frequency information on the front panel of power. Set to the monitor following an unexpected removal of the monitor. Displays the operating status of the monitor each time the OSD Main Menu is On. Select the location to display the status to control some OSD menu features such as brightness, contrast and color temperature. Turns off the power LED on the screen each time the monitor...
User Guide
Page 32
... analog or digital signals. Default Video Input Selects the default or primary video input signal when the monitor is Off. ● Sleep Now-immediately sets the monitor to two active and valid video sources. VGA - Selects DVI input. The default setting is connected to enter sleep mode Selects the video input signal. Selects VGA input Digital - Digital - Recommended Settings Provides the recommended resolution mode and refresh rate for the monitor. Table 4-2 OSD Menu (continued) Icon Main Menu Video Input Control (select models) Information Factory Reset...
... analog or digital signals. Default Video Input Selects the default or primary video input signal when the monitor is Off. ● Sleep Now-immediately sets the monitor to two active and valid video sources. VGA - Selects DVI input. The default setting is connected to enter sleep mode Selects the video input signal. Selects VGA input Digital - Digital - Recommended Settings Provides the recommended resolution mode and refresh rate for the monitor. Table 4-2 OSD Menu (continued) Icon Main Menu Video Input Control (select models) Information Factory Reset...
User Guide
Page 33
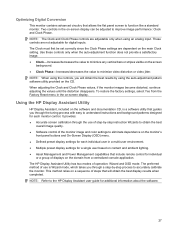
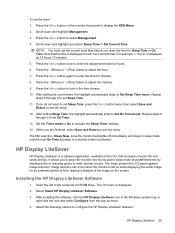
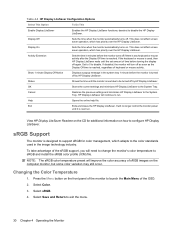
... -screen display. Two controls in the on the domain from the Factory Reset menu in the on the CD. It provides: ● Accurate screen calibration through a step-by -step instruction Wizards to obtain the best overall image quality. ● Software control of the monitor image and color settings to eliminate dependence on the monitor's front panel buttons and On-Screen Display (OSD) menu. ● Defined preset display settings for individual or a group of operation: Wizard and OSD mode. Optimizing Digital...
... -screen display. Two controls in the on the domain from the Factory Reset menu in the on the CD. It provides: ● Accurate screen calibration through a step-by -step instruction Wizards to obtain the best overall image quality. ● Software control of the monitor image and color settings to eliminate dependence on the monitor's front panel buttons and On-Screen Display (OSD) menu. ● Defined preset display settings for individual or a group of operation: Wizard and OSD mode. Optimizing Digital...
User Guide
Page 34
... the backlight bulbs in Progress-Indicates the auto-adjustment function is active. ● Monitor Going to Sleep-Indicates the screen display is entering a sleep mode. ● Check Video Cable-Indicates the video cable is not properly connected to 1280 x 1024 - 60Hz, -Indicates the monitor does not support the input signal because the resolution and/or refresh rate are Active-Use the OSD to select the desired video input- (select models) Indicates the monitor is connected to lock the OSD. ● Power Button Lock-Out...
... the backlight bulbs in Progress-Indicates the auto-adjustment function is active. ● Monitor Going to Sleep-Indicates the screen display is entering a sleep mode. ● Check Video Cable-Indicates the video cable is not properly connected to 1280 x 1024 - 60Hz, -Indicates the monitor does not support the input signal because the resolution and/or refresh rate are Active-Use the OSD to select the desired video input- (select models) Indicates the monitor is connected to lock the OSD. ● Power Button Lock-Out...
User Guide
Page 35
... helps protect the LCD panel against image retention. Insert the CD in a 24-hour clock format. is a software application, available on while displaying the same image for Sleep Time or On Time. After setting the current time, the highlight automatically skips to set Sleep Time, press the Menu button twice, then select Save and Return to lock in sleep mode until the next On Time activates or a monitor button...
... helps protect the LCD panel against image retention. Insert the CD in a 24-hour clock format. is a software application, available on while displaying the same image for Sleep Time or On Time. After setting the current time, the highlight automatically skips to set Sleep Time, press the Menu button twice, then select Save and Return to lock in sleep mode until the next On Time activates or a monitor button...
User Guide
Page 36
... of the OSD. 2. Press the Menu button on how to the System Tray. If disabled, the monitor will no longer control the monitor power until the set amount of the monitor to the color standards used , then HP Display LiteSaver waits until it is turned off . OK Stores the current settings and minimizes HP Display LiteSaver to exit the menu. 30 Chapter 4 Operating the Monitor Help Opens the online help file...
... of the OSD. 2. Press the Menu button on how to the System Tray. If disabled, the monitor will no longer control the monitor power until the set amount of the monitor to the color standards used , then HP Display LiteSaver waits until it is turned off . OK Stores the current settings and minimizes HP Display LiteSaver to exit the menu. 30 Chapter 4 Operating the Monitor Help Opens the online help file...
User Guide
Page 38
... video cable properly. Image appears blurred, indistinct, or too dark. Press the Menu button to open the OSD Menu, and adjust the brightness and contrast scales as needed. Connect the DVI-D signal cable to the DVI connector on the computer (select models), or the VGA cable to detect no effect, press and hold the power button for 10 consecutive minutes after the Display Off time has passed, before the monitor enters into lowpower mode. Video resolution and/or refresh rate...
... video cable properly. Image appears blurred, indistinct, or too dark. Press the Menu button to open the OSD Menu, and adjust the brightness and contrast scales as needed. Connect the DVI-D signal cable to the DVI connector on the computer (select models), or the VGA cable to detect no effect, press and hold the power button for 10 consecutive minutes after the Display Off time has passed, before the monitor enters into lowpower mode. Video resolution and/or refresh rate...
User Guide
Page 39
... and software you are not compatible and the monitor power can not be controlled. Power Button Lock-Out is compatible. unlock the power button function. The monitor screen should be compatible with the system. 1. The monitor's Power Button Press and hold the Menu button for 10 seconds to call : ● The monitor ● Monitor model number ● Serial number for power saving enable/disable controls. Confirm that the HP Display LiteSaver is enabled. Select Power Off Display from the menu. OSD Lock-Out is enabled. Using the...
... and software you are not compatible and the monitor power can not be controlled. Power Button Lock-Out is compatible. unlock the power button function. The monitor screen should be compatible with the system. 1. The monitor's Power Button Press and hold the Menu button for 10 seconds to call : ● The monitor ● Monitor model number ● Serial number for power saving enable/disable controls. Confirm that the HP Display LiteSaver is enabled. Select Power Off Display from the menu. OSD Lock-Out is enabled. Using the...
User Guide
Page 40
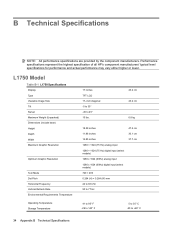
... Model Table B-1 L1750 Specifications Display Type Viewable Image Size Tilt Swivel Maximum Weight (Unpacked) Dimensions (include base) Height Depth Width Maximum Graphic Resolution Optimum Graphic Resolution Text Mode Dot Pitch Horizontal Frequency Vertical Refresh Rate Environmental Requirements Temperature 17 inches TFT LCD 17-inch diagonal -5 to 35° -45 to 45° 15 lbs. 43.2 cm 43.2 cm 6.8 kg 18.59 inches 11.86 inches 14.85 inches 1280 × 1024 (75 Hz) analog input...
... Model Table B-1 L1750 Specifications Display Type Viewable Image Size Tilt Swivel Maximum Weight (Unpacked) Dimensions (include base) Height Depth Width Maximum Graphic Resolution Optimum Graphic Resolution Text Mode Dot Pitch Horizontal Frequency Vertical Refresh Rate Environmental Requirements Temperature 17 inches TFT LCD 17-inch diagonal -5 to 35° -45 to 45° 15 lbs. 43.2 cm 43.2 cm 6.8 kg 18.59 inches 11.86 inches 14.85 inches 1280 × 1024 (75 Hz) analog input...
User Guide
Page 41
Table B-1 L1750 Specifications (continued) Relative Humidity 20 to 80% Power Source 90 - 265 VAC, 45/63 Hz Altitude: Operating 0 to 12,000 feet Storage 0 to 40,000 feet Power Consumption (maximum)
Table B-1 L1750 Specifications (continued) Relative Humidity 20 to 80% Power Source 90 - 265 VAC, 45/63 Hz Altitude: Operating 0 to 12,000 feet Storage 0 to 40,000 feet Power Consumption (maximum)
User Guide
Page 43
... and the Power light is green. The reduced power state will return to the computer manual for a mode that have energy saver features. The monitor automatically stores the new setting, then recognized the new mode just as it does a preset mode. Entering User Modes The video controller signal may need to readjust the parameters of the monitor screen by using a preset mode. NOTE: The above power saver feature only works when connected to...
... and the Power light is green. The reduced power state will return to the computer manual for a mode that have energy saver features. The monitor automatically stores the new setting, then recognized the new mode just as it does a preset mode. Entering User Modes The video controller signal may need to readjust the parameters of the monitor screen by using a preset mode. NOTE: The above power saver feature only works when connected to...


