

User Guide
Page 1
HP L1750 and L1950 LCD Monitors User Guide
HP L1750 and L1950 LCD Monitors User Guide
User Guide
Page 3
WARNING! NOTE: Text set off in damage to follow directions could result in bodily harm or loss of information. iii CAUTION: Text set off in this manner indicates that failure to follow directions could result in this manner indicates that failure to equipment or loss of life. About This Guide This guide provides information on setting up the monitor, installing drivers, using the on-screen display menu, troubleshooting and technical specifications. Text set off in this manner provides important supplemental information.
WARNING! NOTE: Text set off in damage to follow directions could result in bodily harm or loss of information. iii CAUTION: Text set off in this manner indicates that failure to follow directions could result in this manner indicates that failure to equipment or loss of life. About This Guide This guide provides information on setting up the monitor, installing drivers, using the on-screen display menu, troubleshooting and technical specifications. Text set off in this manner provides important supplemental information.
User Guide
Page 5
... HP L1750 and L1950 ...1 2 Safety and Maintenance Guidelines Important Safety Information ...3 Maintenance Guidelines ...4 Cleaning the Monitor ...4 Shipping the Monitor ...4 3 Setting Up the Monitor Unfolding the Monitor Pedestal Base 5 Rear Components ...7 Connecting the Cables ...8 Adjusting the Monitor ...11 Turning on the Monitor ...13 Connecting USB...Downloading from the Worldwide Web 20 Using the Auto-Adjustment Function 21 Front Panel Controls ...22 Adjusting the Monitor Settings ...23 Using the On-Screen Display Menu 23 OSD Menu Selections 23 Optimizing Digital Conversion 27 Using...
... HP L1750 and L1950 ...1 2 Safety and Maintenance Guidelines Important Safety Information ...3 Maintenance Guidelines ...4 Cleaning the Monitor ...4 Shipping the Monitor ...4 3 Setting Up the Monitor Unfolding the Monitor Pedestal Base 5 Rear Components ...7 Connecting the Cables ...8 Adjusting the Monitor ...11 Turning on the Monitor ...13 Connecting USB...Downloading from the Worldwide Web 20 Using the Auto-Adjustment Function 21 Front Panel Controls ...22 Adjusting the Monitor Settings ...23 Using the On-Screen Display Menu 23 OSD Menu Selections 23 Optimizing Digital Conversion 27 Using...
User Guide
Page 6
...Vista 31 Appendix A Troubleshooting Solving Common Problems ...32 Using the Worldwide Web ...33 Preparing to Call Technical Support 33 Appendix B Technical Specifications L1750 Model ...34 L1950 Model ...35 Recognizing Preset Display Resolutions 36 Entering User Modes ...37 Energy Saver Feature ...37 Appendix C Agency Regulatory Notices Federal Communications Commission Notice 38 Modifications... Disposal ...41 Disposal of Waste Equipment by Users in Private Household in the European Union ...41 Restriction of Hazardous Substances (RoHS 42 Appendix D LCD Monitor Quality and Pixel Policy vi
...Vista 31 Appendix A Troubleshooting Solving Common Problems ...32 Using the Worldwide Web ...33 Preparing to Call Technical Support 33 Appendix B Technical Specifications L1750 Model ...34 L1950 Model ...35 Recognizing Preset Display Resolutions 36 Entering User Modes ...37 Energy Saver Feature ...37 Appendix C Agency Regulatory Notices Federal Communications Commission Notice 38 Modifications... Disposal ...41 Disposal of Waste Equipment by Users in Private Household in the European Union ...41 Restriction of Hazardous Substances (RoHS 42 Appendix D LCD Monitor Quality and Pixel Policy vi
User Guide
Page 7
...cords ● On-Screen Display (OSD) adjustments in English, Dutch, French, German, Italian, Japanese, Simplified Chinese, and Spanish for flexible monitor panel mounting solutions ● Video signal input to support DVI digital; DVI-D signal cable included (select models) ● USB 2.0 hub with... cable (select models) ● Cable management feature for placement of setup and screen optimization HP L1750 and L1950 1 1 Product Features HP L1750 and L1950 The flat panel monitors have an active matrix, thin-film transistor (TFT), liquid crystal display (LCD). VGA signal cable included ...
...cords ● On-Screen Display (OSD) adjustments in English, Dutch, French, German, Italian, Japanese, Simplified Chinese, and Spanish for flexible monitor panel mounting solutions ● Video signal input to support DVI digital; DVI-D signal cable included (select models) ● USB 2.0 hub with... cable (select models) ● Cable management feature for placement of setup and screen optimization HP L1750 and L1950 1 1 Product Features HP L1750 and L1950 The flat panel monitors have an active matrix, thin-film transistor (TFT), liquid crystal display (LCD). VGA signal cable included ...
User Guide
Page 8
● Software and documentation CD that includes software, monitor drivers, and product documentation ● Energy saver feature to meet requirements for reduced power consumption ● Intelligent Management AssetControl ● Compliant with the following regulated specifications: ◦ European Union CE Directives ◦ Swedish MPR II 1990 ◦ Swedish TCO Requirements ◦ Energy Star 2 Chapter 1 Product Features
● Software and documentation CD that includes software, monitor drivers, and product documentation ● Energy saver feature to meet requirements for reduced power consumption ● Intelligent Management AssetControl ● Compliant with the following regulated specifications: ◦ European Union CE Directives ◦ Swedish MPR II 1990 ◦ Swedish TCO Requirements ◦ Energy Star 2 Chapter 1 Product Features
User Guide
Page 9
...reduce the risk of surge protection device such as a power strip or Uninterruptible Power Supply (UPS). CAUTION: For the protection of the monitor, as well as the computer, connect all power cords for computer users, and provides important electrical and mechanical safety information. Not all ... a Damage Replacement Policy so you can replace the equipment, if surge protection fails. the power strips must be specifically labeled as a monitor, printer, scanner) to the equipment: • Do not disable the power cord grounding feature. When unplugging from the electrical outlet. For...
...reduce the risk of surge protection device such as a power strip or Uninterruptible Power Supply (UPS). CAUTION: For the protection of the monitor, as well as the computer, connect all power cords for computer users, and provides important electrical and mechanical safety information. Not all ... a Damage Replacement Policy so you can replace the equipment, if surge protection fails. the power strips must be specifically labeled as a monitor, printer, scanner) to the equipment: • Do not disable the power cord grounding feature. When unplugging from the electrical outlet. For...
User Guide
Page 10
... the total ampere rating of the products connected to the cord does not exceed the rating of any other openings. ● Do not drop the monitor or place it from the outlet. You can easily reach. You may damage the cabinet finish as well as indicated on the power label to... determine the ampere rating (AMPS or A) for each device. ● Install the monitor near an outlet that are provided for this product yourself. Turn off when not in use benzene, thinner, ammonia, or any kind into cabinet slots...
... the total ampere rating of the products connected to the cord does not exceed the rating of any other openings. ● Do not drop the monitor or place it from the outlet. You can easily reach. You may damage the cabinet finish as well as indicated on the power label to... determine the ampere rating (AMPS or A) for each device. ● Install the monitor near an outlet that are provided for this product yourself. Turn off when not in use benzene, thinner, ammonia, or any kind into cabinet slots...
User Guide
Page 11
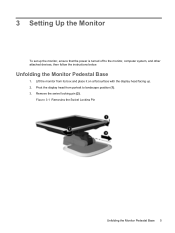
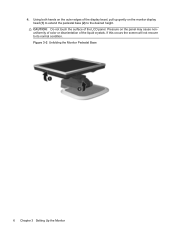
Remove the swivel locking pin (2). Figure 3-1 Removing the Swivel Locking Pin Unfolding the Monitor Pedestal Base 5 Unfolding the Monitor Pedestal Base 1. Lift the monitor from portrait to the monitor, computer system, and other attached devices, then follow the instructions below. Pivot the display head from its box and place it on a flat surface with the display head facing up the monitor, ensure that the power is turned off to landscape position (1). 3. 3 Setting Up the Monitor To set up . 2.
Remove the swivel locking pin (2). Figure 3-1 Removing the Swivel Locking Pin Unfolding the Monitor Pedestal Base 5 Unfolding the Monitor Pedestal Base 1. Lift the monitor from portrait to the monitor, computer system, and other attached devices, then follow the instructions below. Pivot the display head from its box and place it on a flat surface with the display head facing up the monitor, ensure that the power is turned off to landscape position (1). 3. 3 Setting Up the Monitor To set up . 2.
User Guide
Page 12
CAUTION: Do not touch the surface of the liquid crystals. Pressure on the monitor display head (1) to extend the pedestal base (2) to its normal condition. Figure 3-2 Unfolding the Monitor Pedestal Base 6 Chapter 3 Setting Up the Monitor 4. Using both hands on the outer edges of the display bezel, pull up gently on the panel may cause nonuniformity of color or disorientation of the LCD panel. If this occurs the screen will not recover to the desired height.
CAUTION: Do not touch the surface of the liquid crystals. Pressure on the monitor display head (1) to extend the pedestal base (2) to its normal condition. Figure 3-2 Unfolding the Monitor Pedestal Base 6 Chapter 3 Setting Up the Monitor 4. Using both hands on the outer edges of the display bezel, pull up gently on the panel may cause nonuniformity of color or disorientation of the LCD panel. If this occurs the screen will not recover to the desired height.
User Guide
Page 13
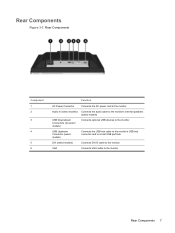
Connects VGA cable to a host USB port/hub. USB Upstream Connector (select models) Connects the USB hub cable to the monitor's USB hub connector and to the monitor. Rear Components 7 Rear Components Figure 3-3 Rear Components Component 1 2 3 4 5 6 Function AC Power Connector Connects the AC power cord to the monitor. DVI (select models) VGA Connects DVI-D cable to the monitor. Audio In (select models) Connects the audio cable to the monitor's internal speakers (select models) USB Downstream Connectors (2) (select models) Connects optional USB devices to the monitor.
Connects VGA cable to a host USB port/hub. USB Upstream Connector (select models) Connects the USB hub cable to the monitor's USB hub connector and to the monitor. Rear Components 7 Rear Components Figure 3-3 Rear Components Component 1 2 3 4 5 6 Function AC Power Connector Connects the AC power cord to the monitor. DVI (select models) VGA Connects DVI-D cable to the monitor. Audio In (select models) Connects the audio cable to the monitor's internal speakers (select models) USB Downstream Connectors (2) (select models) Connects optional USB devices to the monitor.
User Guide
Page 14
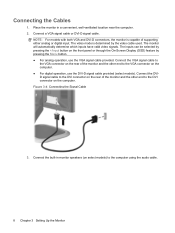
... Signal Cable 3. Connect the VGA signal cable to the VGA connector on the rear of the monitor and the other end to the computer using the audio cable. 8 Chapter 3 Setting Up the Monitor Connect a VGA signal cable or DVI-D signal cable. The inputs can be selected by the .... ● For analog operation, use the DVI-D signal cable provided (select models). NOTE: For models with both VGA and DVI-D connectors, the monitor is determined by pressing the +/Input button on the computer. ● For digital operation, use the VGA signal cable provided. Connect the built-in ...
... Signal Cable 3. Connect the VGA signal cable to the VGA connector on the rear of the monitor and the other end to the computer using the audio cable. 8 Chapter 3 Setting Up the Monitor Connect a VGA signal cable or DVI-D signal cable. The inputs can be selected by the .... ● For analog operation, use the DVI-D signal cable provided (select models). NOTE: For models with both VGA and DVI-D connectors, the monitor is determined by pressing the +/Input button on the computer. ● For digital operation, use the VGA signal cable provided. Connect the built-in ...
User Guide
Page 15
Connecting the Cables 9 4. To reduce the risk of electric shock or damage to the upstream USB connector on the monitor (on the rear panel of the provided USB cable to the USB hub connector on select models). Plug the power cord into a grounded (earthed) electrical ...
Connecting the Cables 9 4. To reduce the risk of electric shock or damage to the upstream USB connector on the monitor (on the rear panel of the provided USB cable to the USB hub connector on select models). Plug the power cord into a grounded (earthed) electrical ...

User Guide
Page 16
Place the cables through the cable management channel on the back of the monitor, and the other end to the AC power connector on the side of the power cable to an electrical wall outlet. Figure 3-7 Using the Cable Management Feature 10 Chapter 3 Setting Up the Monitor Connect one end of the monitor base. Figure 3-6 Connecting the Power Cable 6. 5.
Place the cables through the cable management channel on the back of the monitor, and the other end to the AC power connector on the side of the power cable to an electrical wall outlet. Figure 3-7 Using the Cable Management Feature 10 Chapter 3 Setting Up the Monitor Connect one end of the monitor base. Figure 3-6 Connecting the Power Cable 6. 5.
User Guide
Page 17
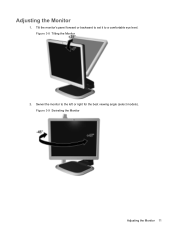
Tilt the monitor's panel forward or backward to set it to the left or right for the best viewing angle (select models). Figure 3-9 Swiveling the Monitor Adjusting the Monitor 11 Figure 3-8 Tilting the Monitor 2. Adjusting the Monitor 1. Swivel the monitor to a comfortable eye level.
Tilt the monitor's panel forward or backward to set it to the left or right for the best viewing angle (select models). Figure 3-9 Swiveling the Monitor Adjusting the Monitor 11 Figure 3-8 Tilting the Monitor 2. Adjusting the Monitor 1. Swivel the monitor to a comfortable eye level.

User Guide
Page 18
Figure 3-11 Pivoting the Monitor NOTE: To view information on the software and documentation CD. To rotate the OSD menu, access the OSD menu, select Management, then select OSD Control. 12 Chapter 3 Setting Up the Monitor Pivot the monitor clockwise from landscape to portrait orientation ...viewing to adapt to your application (select models). 3. Adjust the monitor's height so that it is parallel to your eye height for a comfortable...
Figure 3-11 Pivoting the Monitor NOTE: To view information on the software and documentation CD. To rotate the OSD menu, access the OSD menu, select Management, then select OSD Control. 12 Chapter 3 Setting Up the Monitor Pivot the monitor clockwise from landscape to portrait orientation ...viewing to adapt to your application (select models). 3. Adjust the monitor's height so that it is parallel to your eye height for a comfortable...
User Guide
Page 19
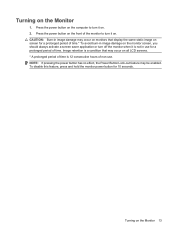
..., the Power Button Lock-out feature may occur on the front of non-use for 10 seconds. To disable this feature, press and hold the monitor power button for a prolonged period of time is not in use . CAUTION: Burn-in image damage may occur on... monitors that may be enabled. Turning on the Monitor 13 Press the power button on all LCD screens. * A prolonged period of time. Image retention is a condition that display the same static image on screen...
..., the Power Button Lock-out feature may occur on the front of non-use for 10 seconds. To disable this feature, press and hold the monitor power button for a prolonged period of time is not in use . CAUTION: Burn-in image damage may occur on... monitors that may be enabled. Turning on the Monitor 13 Press the power button on all LCD screens. * A prolonged period of time. Image retention is a condition that display the same static image on screen...
User Guide
Page 20
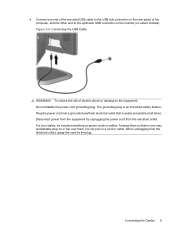
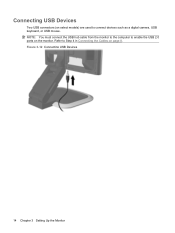
Refer to Step 4 in Connecting the Cables on the monitor. NOTE: You must connect the USB hub cable from the monitor to the computer to connect devices such as a digital camera, USB keyboard, or USB mouse. Figure 3-12 Connecting USB Devices 14 Chapter 3 Setting Up the Monitor Connecting USB Devices Two USB connectors (on select models) are used to enable the USB 2.0 ports on page 8.
Refer to Step 4 in Connecting the Cables on the monitor. NOTE: You must connect the USB hub cable from the monitor to the computer to connect devices such as a digital camera, USB keyboard, or USB mouse. Figure 3-12 Connecting USB Devices 14 Chapter 3 Setting Up the Monitor Connecting USB Devices Two USB connectors (on select models) are used to enable the USB 2.0 ports on page 8.
User Guide
Page 21
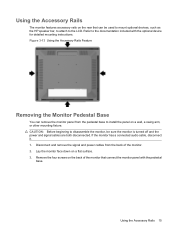
...to the documentation included with the pedestal base. If the monitor has a connected audio cable, disconnect it. 1. Using the Accessory Rails 15 Lay the monitor face down on the back of the monitor. 2. CAUTION: Before beginning to disassemble the monitor, be used to mount optional devices, such as the HP...LCD. Remove the four screws on a flat surface. 3. Disconnect and remove the signal and power cables from the back of the monitor that can remove the monitor panel from the pedestal base to install the panel on a wall, a swing arm, or other mounting fixture. Using the Accessory...
...to the documentation included with the pedestal base. If the monitor has a connected audio cable, disconnect it. 1. Using the Accessory Rails 15 Lay the monitor face down on the back of the monitor. 2. CAUTION: Before beginning to disassemble the monitor, be used to mount optional devices, such as the HP...LCD. Remove the four screws on a flat surface. 3. Disconnect and remove the signal and power cables from the back of the monitor that can remove the monitor panel from the pedestal base to install the panel on a wall, a swing arm, or other mounting fixture. Using the Accessory...
User Guide
Page 22
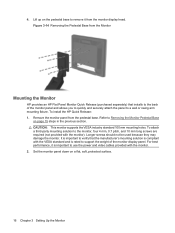
... 4 mm, 0.7 pitch, and 10 mm long screws are required (not provided with the monitor. 2. Set the monitor panel down on page 15 steps in the previous section. To attach a third-party mounting solution to the back of the monitor display panel. 4. Lift up on the pedestal base to remove it is rated to... support the weight of the monitor panel and allows you to quickly and securely attach the panel to use the power and...
... 4 mm, 0.7 pitch, and 10 mm long screws are required (not provided with the monitor. 2. Set the monitor panel down on page 15 steps in the previous section. To attach a third-party mounting solution to the back of the monitor display panel. 4. Lift up on the pedestal base to remove it is rated to... support the weight of the monitor panel and allows you to quickly and securely attach the panel to use the power and...


