
User Guide
Page 2
... easily accessible after installation. If you are not sure what type of power supply you leave the room for more than a short period of this manual or listed on a sloping shelf unless properly secured. There are frayed power cords and broken plugs. Operate the display only from dropping or pushing objects...
... easily accessible after installation. If you are not sure what type of power supply you leave the room for more than a short period of this manual or listed on a sloping shelf unless properly secured. There are frayed power cords and broken plugs. Operate the display only from dropping or pushing objects...
User Guide
Page 6
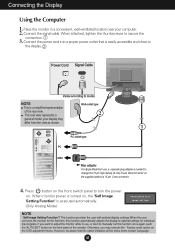
... Mac adapter For Apple Macintosh use , or wish to the display. Place the monitor in use , a separate plug adapter is easily accessible and close to manually run this function automatically adjusts the display to model. This function provides the user with optimal display settings.When the user connects the monitor for...
... Mac adapter For Apple Macintosh use , or wish to the display. Place the monitor in use , a separate plug adapter is easily accessible and close to manually run this function automatically adjusts the display to model. This function provides the user with optimal display settings.When the user connects the monitor for...
User Guide
Page 11
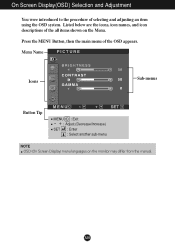
Listed below are the icons, icon names, and icon descriptions of the all items shown on the monitor may differ from the manual. A10 Press the MENU Button, then the main menu of selecting and adjusting an item using the OSD system. Menu Name PICTURE Icons Sub-menus Button Tip MENU : Exit - + : Adjust (Decrease/Increase) SET : Enter : Select another sub-menu NOTE OSD (On Screen Display) menu languages on the Menu. On Screen Display(OSD) Selection and Adjustment You were introduced to the procedure of the OSD appears.
Listed below are the icons, icon names, and icon descriptions of the all items shown on the monitor may differ from the manual. A10 Press the MENU Button, then the main menu of selecting and adjusting an item using the OSD system. Menu Name PICTURE Icons Sub-menus Button Tip MENU : Exit - + : Adjust (Decrease/Increase) SET : Enter : Select another sub-menu NOTE OSD (On Screen Display) menu languages on the Menu. On Screen Display(OSD) Selection and Adjustment You were introduced to the procedure of the OSD appears.
User Guide
Page 14
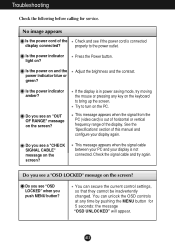
...? This message appears when the signal from the PC (video card) is connected properly to turn on the screen? See the 'Specifications' section of this manual and configure your display is in power saving mode, try again. Do you see a "OSD LOCKED" message on the screen? Troubleshooting Check the following before...
...? This message appears when the signal from the PC (video card) is connected properly to turn on the screen? See the 'Specifications' section of this manual and configure your display is in power saving mode, try again. Do you see a "OSD LOCKED" message on the screen? Troubleshooting Check the following before...
Service Manual
Page 1
Website:http://biz.LGservice.com E-mail:http://www.LGEservice.com/techsup.html COLOR MONITOR SERVICE MANUAL CHASSIS NO. : CL-82 MODEL: L1750SQ-SN (L1750SQ-SNN.AN**QP) L1750SQ-BN (L1750SQ-BNN.AN**QP) L1750SQ-WN (L1750SQ-WNN.AN**QP) ( ) **Same model for Service CAUTION BEFORE SERVICING THE UNIT, READ THE SAFETY PRECAUTIONS IN THIS MANUAL. *To apply the MSTAR Chip. 龙泉现代YDW资料收藏
Website:http://biz.LGservice.com E-mail:http://www.LGEservice.com/techsup.html COLOR MONITOR SERVICE MANUAL CHASSIS NO. : CL-82 MODEL: L1750SQ-SN (L1750SQ-SNN.AN**QP) L1750SQ-BN (L1750SQ-BNN.AN**QP) L1750SQ-WN (L1750SQ-WNN.AN**QP) ( ) **Same model for Service CAUTION BEFORE SERVICING THE UNIT, READ THE SAFETY PRECAUTIONS IN THIS MANUAL. *To apply the MSTAR Chip. 龙泉现代YDW资料收藏
Service Manual
Page 5
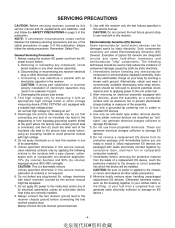
...to applying power to any receiver electrical plug or other safety precautions. 8. SERVICING PRECAUTIONS CAUTION: Before servicing receivers covered by this service manual and its supplements and addenda, read and follow the safety precautions. b. Discharging the picture tube anode. 2. Do not defeat any...strap to the unit under test. 2. CAUTION: Be sure no power is applied to the contacts with an electrolytic capacitor in this service manual, clean electrical contacts only by volume) isopropyl alcohol (90%-99% strength) CAUTION: This is connected, and then (b) touch the other...
...to applying power to any receiver electrical plug or other safety precautions. 8. SERVICING PRECAUTIONS CAUTION: Before servicing receivers covered by this service manual and its supplements and addenda, read and follow the safety precautions. b. Discharging the picture tube anode. 2. Do not defeat any...strap to the unit under test. 2. CAUTION: Be sure no power is applied to the contacts with an electrolytic capacitor in this service manual, clean electrical contacts only by volume) isopropyl alcohol (90%-99% strength) CAUTION: This is connected, and then (b) touch the other...
Service Manual
Page 13
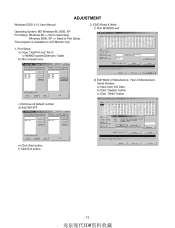
... a) Input User Info Data b) Click "Update" button c) Click " Write" button c) Remove all default number d) Add 300-3FF e) Click Start button. ADJUSTMENT Windows EDID V1.0 User Manual Operating System: MS Windows 98, 2000, XP Port Setup: Windows 98 => Don't need setup Windows 2000, XP => Need to "c:\WINNT\system32\drivers" folder b) Run Userport...
... a) Input User Info Data b) Click "Update" button c) Click " Write" button c) Remove all default number d) Add 300-3FF e) Click Start button. ADJUSTMENT Windows EDID V1.0 User Manual Operating System: MS Windows 98, 2000, XP Port Setup: Windows 98 => Don't need setup Windows 2000, XP => Need to "c:\WINNT\system32\drivers" folder b) Run Userport...
Service Manual
Page 14
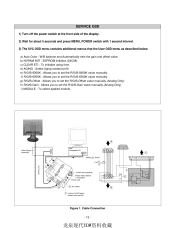
f) R/G/B-6500K : Allows you to set the R/G/B-9300K value manually. A 9 6 1 Video Signal Generator IBM Compatible PC 15 10 5 11 6 1 5 C 13 25 1 14 us ed PARALLEL PORT C 23 2 RS No t 5V OFF ON Control ... and Automatically sets the gain and offset value. e) R/G/B-9300K : Allows you to set the R/G/B-6500K value manually. g) R/G/B-Offset : Allows you to set the R/G/B-Offset value manually.(Analog Only) h) R/G/B-Gain : Allows you to set the R/G/B-Gain value manually.(Analog Only) i) MODULE : To select applied module. b) NVRAM INIT : EEPROM initialize.(24C08) c) CLEAR ...
f) R/G/B-6500K : Allows you to set the R/G/B-9300K value manually. A 9 6 1 Video Signal Generator IBM Compatible PC 15 10 5 11 6 1 5 C 13 25 1 14 us ed PARALLEL PORT C 23 2 RS No t 5V OFF ON Control ... and Automatically sets the gain and offset value. e) R/G/B-9300K : Allows you to set the R/G/B-6500K value manually. g) R/G/B-Offset : Allows you to set the R/G/B-Offset value manually.(Analog Only) h) R/G/B-Gain : Allows you to set the R/G/B-Gain value manually.(Analog Only) i) MODULE : To select applied module. b) NVRAM INIT : EEPROM initialize.(24C08) c) CLEAR ...

Service Manual
Page 22
...;收藏 DESCRIPTION / SPECIFICATION *S *AL LOC. PART NO. REPLACEMENT PARTS LIST CAUTION: BEFORE REPLACING ANY OF THESE COMPONENTS, READ CAREFULLY THE SAFETY PRECAUTIONS IN THIS MANUAL. * NOTE : S SAFETY Mark AL ALTERNATIVE PARTS *S *AL LOC. NO. NO.
...;收藏 DESCRIPTION / SPECIFICATION *S *AL LOC. PART NO. REPLACEMENT PARTS LIST CAUTION: BEFORE REPLACING ANY OF THESE COMPONENTS, READ CAREFULLY THE SAFETY PRECAUTIONS IN THIS MANUAL. * NOTE : S SAFETY Mark AL ALTERNATIVE PARTS *S *AL LOC. NO. NO.


