
User Guide
Page 2
...'s cabinet openings. Never leave the display ON when leaving the house. Do not Open the Display. In order to allow the proper operation of this manual or listed on a sloping shelf unless properly secured. The power supply cord is easily accessible after installation. Call your dealer if the display is OFF...
...'s cabinet openings. Never leave the display ON when leaving the house. Do not Open the Display. In order to allow the proper operation of this manual or listed on a sloping shelf unless properly secured. The power supply cord is easily accessible after installation. Call your dealer if the display is OFF...
User Guide
Page 6
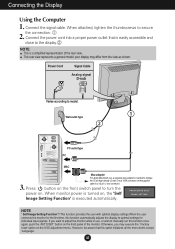
...to secure the connection. 2. NOTE ' Self Image Setting Function'? This function provides the user with optimal display settings.When the user connects the monitor for the first time, this option initializes all the menu items except 'Language'. If you may differ from the view as shown. However,...close to optimal settings for individual input signals. button on the front switch panel to a 15 pin 2 row connector. Otherwise, you want to manually run this function once again, push the 'AUTO/SET' button on . your display may execute the ' Factory reset' option on thesupplied cable ...
...to secure the connection. 2. NOTE ' Self Image Setting Function'? This function provides the user with optimal display settings.When the user connects the monitor for the first time, this option initializes all the menu items except 'Language'. If you may differ from the view as shown. However,...close to optimal settings for individual input signals. button on the front switch panel to a 15 pin 2 row connector. Otherwise, you want to manually run this function once again, push the 'AUTO/SET' button on . your display may execute the ' Factory reset' option on thesupplied cable ...
User Guide
Page 11
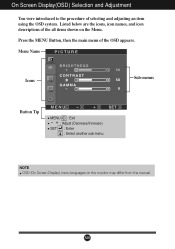
A10 On Screen Display(OSD) Selection and Adjustment You were introduced to the procedure of the OSD appears. Menu Name PICTURE Icons Sub-menus Button Tip MENU : Exit - + : Adjust (Decrease/Increase) SET : Enter : Select another sub-menu NOTE OSD (On Screen Display) menu languages on the Menu. Press the MENU Button, then the main menu of selecting and adjusting an item using the OSD system. Listed below are the icons, icon names, and icon descriptions of the all items shown on the monitor may differ from the manual.
A10 On Screen Display(OSD) Selection and Adjustment You were introduced to the procedure of the OSD appears. Menu Name PICTURE Icons Sub-menus Button Tip MENU : Exit - + : Adjust (Decrease/Increase) SET : Enter : Select another sub-menu NOTE OSD (On Screen Display) menu languages on the Menu. Press the MENU Button, then the main menu of selecting and adjusting an item using the OSD system. Listed below are the icons, icon names, and icon descriptions of the all items shown on the monitor may differ from the manual.
User Guide
Page 14
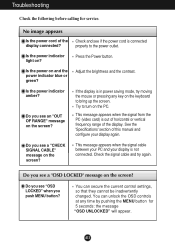
.... Is the power on ? Do you see a "OSD LOCKED" message on the screen? Adjust the brightness and the contrast. See the 'Specifications' section of this manual and configure your display is connected properly to the power outlet. You can unlock the OSD controls at any key on the keyboard to turn...
.... Is the power on ? Do you see a "OSD LOCKED" message on the screen? Adjust the brightness and the contrast. See the 'Specifications' section of this manual and configure your display is connected properly to the power outlet. You can unlock the OSD controls at any key on the keyboard to turn...


