
Owner's Manual
Page 5
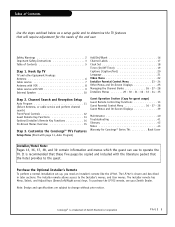
...Down/Left/Right arrow) keys. Note: Design and specifications are subject to the Installer's menus, and User menus. To purchase the LP702 remote, see your Zenith Dealer. Channel Search and Reception Setup Auto Program 11 (Select Antenna, or cable service and perform channel search) Front Panel... 6 Cable service 7 Antenna with VCR 8 Cable service with page 11, Auto Program) Guest Operation Section (Copy for guest usage) Guest Remote Control Key Functions 13 Guest Parental Control Menu 36 - 37 - 38 Guest Menus and On-Screen Displays 39 Maintenance 40 Troubleshooting 41 Glossary ...
...Down/Left/Right arrow) keys. Note: Design and specifications are subject to the Installer's menus, and User menus. To purchase the LP702 remote, see your Zenith Dealer. Channel Search and Reception Setup Auto Program 11 (Select Antenna, or cable service and perform channel search) Front Panel... 6 Cable service 7 Antenna with VCR 8 Cable service with page 11, Auto Program) Guest Operation Section (Copy for guest usage) Guest Remote Control Key Functions 13 Guest Parental Control Menu 36 - 37 - 38 Guest Menus and On-Screen Displays 39 Maintenance 40 Troubleshooting 41 Glossary ...

Owner's Manual
Page 6
... IN SPEAKER OUT AUDIO IN TV Back Panel (Expanded View) Antenna TV Back 5 Go to page 11 to the right. 3 Remove the back of the remote and put in the TV. They are usually about an inch long with two screws on one of the diagrams to Auto Program the TV.... Back of Remote 4 Plug in two AA batteries. Each end looks like a hex shaped nut with a wire sticking out on the back of your TV. PAGE 6 Antenna Hook...
... IN SPEAKER OUT AUDIO IN TV Back Panel (Expanded View) Antenna TV Back 5 Go to page 11 to the right. 3 Remove the back of the remote and put in the TV. They are usually about an inch long with two screws on one of the diagrams to Auto Program the TV.... Back of Remote 4 Plug in two AA batteries. Each end looks like a hex shaped nut with a wire sticking out on the back of your TV. PAGE 6 Antenna Hook...

Owner's Manual
Page 7
.... In Out If you 're using a cable box, leave the TV tuned to channel 3 or 4 and use the cable box to change channels. Back of Remote 4 Plug in two AA batter- The Concierge TV is on (usually channel 3 or 4). ies. If you 're using a cable box, Auto Program might only find... the channel your cable service is designed to the right. 3 Remove the back of the remote and put in the TV. Cable Box Output Switch 3 4 RF Coaxial Wire (75 ohm) TV Back ANTENNA CABLE VIDEO IN SPEAKER OUT AUDIO IN TV...
.... In Out If you 're using a cable box, leave the TV tuned to channel 3 or 4 and use the cable box to change channels. Back of Remote 4 Plug in two AA batter- The Concierge TV is on (usually channel 3 or 4). ies. If you 're using a cable box, Auto Program might only find... the channel your cable service is designed to the right. 3 Remove the back of the remote and put in the TV. Cable Box Output Switch 3 4 RF Coaxial Wire (75 ohm) TV Back ANTENNA CABLE VIDEO IN SPEAKER OUT AUDIO IN TV...

Owner's Manual
Page 8
Back of Remote 4 Plug in two AA batteries. ANTENNA CABLE VIDEO IN SPEAKER OUT AUDIO IN A/V Cables Not included with the TV. Antenna With VCR Hook Up Connect ... that runs from the antenna, according to operate on standard current, 120-volt 60 Hertz AC. The Concierge TV is designed to one of the remote and put in the TV.
Back of Remote 4 Plug in two AA batteries. ANTENNA CABLE VIDEO IN SPEAKER OUT AUDIO IN A/V Cables Not included with the TV. Antenna With VCR Hook Up Connect ... that runs from the antenna, according to operate on standard current, 120-volt 60 Hertz AC. The Concierge TV is designed to one of the remote and put in the TV.

Owner's Manual
Page 9
... AV Panel Output In Switch 3 4 Audio Video Out ANTENNA CABLE Super Port VIDEO IN SPEAKER OUT AUDIO IN A/V Cables Not included with TV Back of Remote 4 Plug in two AA batteries. TV Back Panel (Expanded View) Cable TV Wall Jack In Output Switch 3 4 Cable Box Out TV Back RF Coaxial Wire... on DC power. 120 V AC 60 Hz 5 Go to page 11 to Auto Program the TV. The Concierge TV is designed to one of the remote and put in the TV. Do not attempt to operate it on standard current, 120-volt 60 Hertz AC. No A/V cables are included with TV...
... AV Panel Output In Switch 3 4 Audio Video Out ANTENNA CABLE Super Port VIDEO IN SPEAKER OUT AUDIO IN A/V Cables Not included with TV Back of Remote 4 Plug in two AA batteries. TV Back Panel (Expanded View) Cable TV Wall Jack In Output Switch 3 4 Cable Box Out TV Back RF Coaxial Wire... on DC power. 120 V AC 60 Hz 5 Go to page 11 to Auto Program the TV. The Concierge TV is designed to one of the remote and put in the TV. Do not attempt to operate it on standard current, 120-volt 60 Hertz AC. No A/V cables are included with TV...
Owner's Manual
Page 11
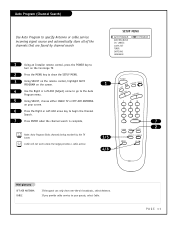
... of the channels that are found by the TV tuner. PAGE 11 Note: Auto Program finds channels being received by channel search 1 Using an Installer remote control, press the POWER key to turn on the Concierge TV. 2 Press the MENU key to show the SETUP MENU. 3 Using SELECT on the... remote control, highlight AUTO PROGRAM on the screen. 4 Use the Right or Left ADJ (Adjust) arrow to go to the Auto Program menu. 5 Using SELECT, choose ...
... of the channels that are found by the TV tuner. PAGE 11 Note: Auto Program finds channels being received by channel search 1 Using an Installer remote control, press the POWER key to turn on the Concierge TV. 2 Press the MENU key to show the SETUP MENU. 3 Using SELECT on the... remote control, highlight AUTO PROGRAM on the screen. 4 Use the Right or Left ADJ (Adjust) arrow to go to the Auto Program menu. 5 Using SELECT, choose ...

Owner's Manual
Page 13
... to select the Aux Channel. (Use the Audio/Video jacks on the back of the TV as the source of the keys on the guest remote and what they do POWER Turns TV On or Off. POWER CC FLSHBK MUTE VOLUME CHANNEL 1 23 4 56 7 89 0 ENTER TIMER ALARM CH ...channel. NUMBER KEYPAD Selects channels directly: enter channel numbers and press ENTER to go to the last channel viewed. Guest Remote Key Functions A brief overview of the picture and sound.) remote control part number SC652Z 124-213-18 6710V00108A PAGE 13 CC (CLOSED CAPTIONING) Press to guest's Parental Control menu. CHANNEL...
... to select the Aux Channel. (Use the Audio/Video jacks on the back of the TV as the source of the keys on the guest remote and what they do POWER Turns TV On or Off. POWER CC FLSHBK MUTE VOLUME CHANNEL 1 23 4 56 7 89 0 ENTER TIMER ALARM CH ...channel. NUMBER KEYPAD Selects channels directly: enter channel numbers and press ENTER to go to the last channel viewed. Guest Remote Key Functions A brief overview of the picture and sound.) remote control part number SC652Z 124-213-18 6710V00108A PAGE 13 CC (CLOSED CAPTIONING) Press to guest's Parental Control menu. CHANNEL...

Owner's Manual
Page 14
... some TVs. VOLUME LEFT/RIGHT Adjusts the sound levels. FLASHBK (FLASHBACK) Returns to remove any on the LP702 installer's remote and what they do POWER Turns TV On or Off. Installer Remote Key Functions An overview of the keys on -screen display or menu. ENTER Press to view the Channel/Time display... to the last channel viewed. POWER CC TV/FM VOLUME FLSHBK MUTE CHANNEL 1 23 4 56 7 89 0 ENTER TIMER MENU ALARM SELECT CH PREVIEW ADJ ADJ remote control part number LP702 124-213-04 MUTE Turns sound Off and On, while the picture remains.
... some TVs. VOLUME LEFT/RIGHT Adjusts the sound levels. FLASHBK (FLASHBACK) Returns to remove any on the LP702 installer's remote and what they do POWER Turns TV On or Off. Installer Remote Key Functions An overview of the keys on -screen display or menu. ENTER Press to view the Channel/Time display... to the last channel viewed. POWER CC TV/FM VOLUME FLSHBK MUTE CHANNEL 1 23 4 56 7 89 0 ENTER TIMER MENU ALARM SELECT CH PREVIEW ADJ ADJ remote control part number LP702 124-213-04 MUTE Turns sound Off and On, while the picture remains.
Owner's Manual
Page 15
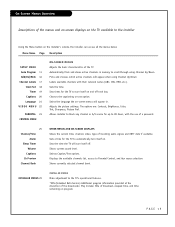
... basic characteristics of the broadcaster. Sets the time. Chooses the captioning or text option. Sets times for the TV to turn itself on the installer's remote, the installer can access all the menus below. On-Screen Menus Overview Descriptions of the menus and on-screen displays on the TV available to...
... basic characteristics of the broadcaster. Sets the time. Chooses the captioning or text option. Sets times for the TV to turn itself on the installer's remote, the installer can access all the menus below. On-Screen Menus Overview Descriptions of the menus and on-screen displays on the TV available to...
Owner's Manual
Page 16
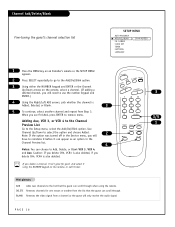
... Go to the Add/Del/Blnk option. 3 Using either the NUMBER keypad and ENTER or the Channel Up/Down arrows on the remote, or add it using the remote. Use Channel Up/Down to select the option and choose Added. 2 Note: If the option was turned off in the Channel... PREVIEW ADJ ADJ 3 3/5 1 Mini glossary ADD Adds new channels to the list that the guest can scroll through when using the NUMBER keypad on the remote, select a channel. (If adding a deleted channel, you delete a channel, it can scroll through . BLANK Removes the video signal from Step 3. PAGE 16 Caution: ...
... Go to the Add/Del/Blnk option. 3 Using either the NUMBER keypad and ENTER or the Channel Up/Down arrows on the remote, or add it using the remote. Use Channel Up/Down to select the option and choose Added. 2 Note: If the option was turned off in the Channel... PREVIEW ADJ ADJ 3 3/5 1 Mini glossary ADD Adds new channels to the list that the guest can scroll through when using the NUMBER keypad on the remote, select a channel. (If adding a deleted channel, you delete a channel, it can scroll through . BLANK Removes the video signal from Step 3. PAGE 16 Caution: ...
Owner's Manual
Page 17
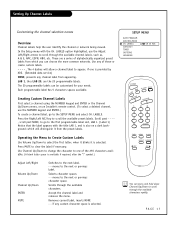
Use any of these or create custom labels. - - - - , The 4 dashes will distinguish it is also on an Installer's remote control. (To select a deleted channel, use the Adjust Left/Right arrows to the next or previous character space. LAB 1, thru LAB 20, are a series of ...
Use any of these or create custom labels. - - - - , The 4 dashes will distinguish it is also on an Installer's remote control. (To select a deleted channel, use the Adjust Left/Right arrows to the next or previous character space. LAB 1, thru LAB 20, are a series of ...
Owner's Manual
Page 19
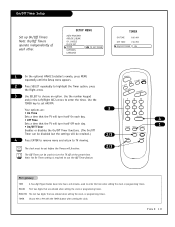
... SET TIMER CAPTIONS LANGUAGE TO SET TIMER TIMER ON TIME 9:00 AM OFF TIME 7:00 PM ON/OFF TIMER ON 1 On the optional HP602 Installer's remote, press MENU repeatedly until the Setup menu appears. 2 Press SELECT repeatedly to choose an option. Use the number keypad and/or the Left/Right ADJ...
... SET TIMER CAPTIONS LANGUAGE TO SET TIMER TIMER ON TIME 9:00 AM OFF TIME 7:00 PM ON/OFF TIMER ON 1 On the optional HP602 Installer's remote, press MENU repeatedly until the Setup menu appears. 2 Press SELECT repeatedly to choose an option. Use the number keypad and/or the Left/Right ADJ...
Owner's Manual
Page 21
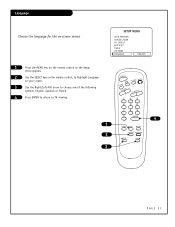
LABELS CLOCK SET TIMER CAPTIONS LANGUAGE ENGLISH 1 Press the MENU key on the remote control so the Setup menu appears. 2 Use the SELECT key on the remote control, to highlight Language on -screen menus SETUP MENU AUTO PROGRAM ADD/DEL/BLNK CH. POWER CC TV/FM VOLUME FLSHBK MUTE CHANNEL 1 23 4 56 7 89 0 ENTER 4 1 TIMER MENU ALARM 2 SELECT CH PREVIEW ADJ ADJ 3 PAGE 21 Language Choose the language for the on your screen. 3 Use the Right/Left ADJ arrow to choose one of the following options: English, Spanish or French. 4 Press ENTER to return to TV viewing.
LABELS CLOCK SET TIMER CAPTIONS LANGUAGE ENGLISH 1 Press the MENU key on the remote control so the Setup menu appears. 2 Use the SELECT key on the remote control, to highlight Language on -screen menus SETUP MENU AUTO PROGRAM ADD/DEL/BLNK CH. POWER CC TV/FM VOLUME FLSHBK MUTE CHANNEL 1 23 4 56 7 89 0 ENTER 4 1 TIMER MENU ALARM 2 SELECT CH PREVIEW ADJ ADJ 3 PAGE 21 Language Choose the language for the on your screen. 3 Use the Right/Left ADJ arrow to choose one of the following options: English, Spanish or French. 4 Press ENTER to return to TV viewing.

Owner's Manual
Page 22
...: Increases or decreases amount of all the above options back to their original, factory-set lev- TIMER MENU ALARM els. 2 Using SELECT on the installer's remote control, choose Contrast 2/A on your screen. PAGE 22 Your options are: • Contrast: Adjusts the level of difference between amounts of red and green in...
...: Increases or decreases amount of all the above options back to their original, factory-set lev- TIMER MENU ALARM els. 2 Using SELECT on the installer's remote control, choose Contrast 2/A on your screen. PAGE 22 Your options are: • Contrast: Adjusts the level of difference between amounts of red and green in...

Owner's Manual
Page 23
... on the next page. Installer Parental Control Menu If used . Block option.) Or leave unblocked, then choose allowable ratings. Block program "Content" based on the remote. You can also be retained if power is lost or power cord is the only way you can be preset and turned either forgotten the..., you can set the Hours option for all more restrictive ratings will not automatically block another content in the Content Blk option. On the installer's remote control, press and hold down MENU until the menu disappears (about 6 seconds).
... on the next page. Installer Parental Control Menu If used . Block option.) Or leave unblocked, then choose allowable ratings. Block program "Content" based on the remote. You can also be retained if power is lost or power cord is the only way you can be preset and turned either forgotten the..., you can set the Hours option for all more restrictive ratings will not automatically block another content in the Content Blk option. On the installer's remote control, press and hold down MENU until the menu disappears (about 6 seconds).

Owner's Manual
Page 24
... CHILDREN UNBLOCKED PRESS CC TO RETURN CONTENT BLOCK DIALOG LANGUAGE SEX SCENES VIOLENCE F VIOLENCE NO RATING UNBLOCKED PRESS CC TO RETURN Note: Use the installer's remote control to specify Parental Control settings. 1 Press MENU repeatedly until the Parental Control Menu appears. 2 With the Parental Control menu on-screen, use the "PG...
... CHILDREN UNBLOCKED PRESS CC TO RETURN CONTENT BLOCK DIALOG LANGUAGE SEX SCENES VIOLENCE F VIOLENCE NO RATING UNBLOCKED PRESS CC TO RETURN Note: Use the installer's remote control to specify Parental Control settings. 1 Press MENU repeatedly until the Parental Control Menu appears. 2 With the Parental Control menu on-screen, use the "PG...

Owner's Manual
Page 25
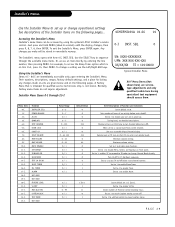
... 5 ---9 ---20 - - - 32 - - - 44 - - - CHANNEL BANK BANK 3 Channel Banks Menu Press SOURCE/BANK on or off . Turns selected option on an Installer remote equipped with those keys. SLEEP TIMER OFF PRESS TIMER Sleep Timer Menu Press TIMER. Accesses the Channel Banks menus: Bank 1, Bank 2, Bank 3, Bank 4. Sets a time... the TV will turn -off . Other Menus & On-Screen Displays Use the remote keys indicated below to access these menus and displays VOLUME Volume Display Press VOLUME. Ch 25 - ALARM MENU TIME NOW 3:11 PM 6:10 AM TIMER...
... 5 ---9 ---20 - - - 32 - - - 44 - - - CHANNEL BANK BANK 3 Channel Banks Menu Press SOURCE/BANK on or off . Turns selected option on an Installer remote equipped with those keys. SLEEP TIMER OFF PRESS TIMER Sleep Timer Menu Press TIMER. Accesses the Channel Banks menus: Bank 1, Bank 2, Bank 3, Bank 4. Sets a time... the TV will turn -off . Other Menus & On-Screen Displays Use the remote keys indicated below to access these menus and displays VOLUME Volume Display Press VOLUME. Ch 25 - ALARM MENU TIME NOW 3:11 PM 6:10 AM TIMER...

Owner's Manual
Page 26
Below is functional. You may want to customize your package by using a chart like the Zenith MBR3447, or a similar remote. or, you may leave any custom channel setups; Then, if someone selects an "unused" bank, that channel will be entered in the Setup menu) to ... yet run Auto Program. Note: Be advised that the TV is an example of TV channels Note: Channel banks set up requires an installer's remote with an installer remote - -press SOURCE/BANK (and repeat). See the "ADD/DEL/BLNK" menu page for a package. PAGE 26 The user then opts for more details...
Below is functional. You may want to customize your package by using a chart like the Zenith MBR3447, or a similar remote. or, you may leave any custom channel setups; Then, if someone selects an "unused" bank, that channel will be entered in the Setup menu) to ... yet run Auto Program. Note: Be advised that the TV is an example of TV channels Note: Channel banks set up requires an installer's remote with an installer remote - -press SOURCE/BANK (and repeat). See the "ADD/DEL/BLNK" menu page for a package. PAGE 26 The user then opts for more details...
Owner's Manual
Page 29
... the line number, then pressing MENU. Installer Menu Items 0-I through the available menu items. Or, access an item directly by using the optional LP702 installer's remote control. Set to 1 to enable Ghost Channel display. Set to 1 to enable auto turn on /off below and on -site are immediately accessible only upon...
... the line number, then pressing MENU. Installer Menu Items 0-I through the available menu items. Or, access an item directly by using the optional LP702 installer's remote control. Set to 1 to enable Ghost Channel display. Set to 1 to enable auto turn on /off below and on -site are immediately accessible only upon...

Owner's Manual
Page 31
...outlet controlled by applying AC power. Use ADJUST to Installer Menu depending on , unless there has been activity from either the remote or the control panel, and the SLEEP TIMER is displayed when direct accessing a channel not in the favorite channel list.... background color for the Channel-Time display. POWER MANAGE (Power Management) Determines hours of Installer Menu Items 0-I . Settings range from either the control panel or remote control. 2-I . PAGE 31 CH-TIME SIZE Value Range 0 - 7 0 - 7 Default Value 6 4 0 / 1 1 0 - 7 1 0 - 7 1 0 / 1 0 0 / 1 0 75-I ....
...outlet controlled by applying AC power. Use ADJUST to Installer Menu depending on , unless there has been activity from either the remote or the control panel, and the SLEEP TIMER is displayed when direct accessing a channel not in the favorite channel list.... background color for the Channel-Time display. POWER MANAGE (Power Management) Determines hours of Installer Menu Items 0-I . Settings range from either the control panel or remote control. 2-I . PAGE 31 CH-TIME SIZE Value Range 0 - 7 0 - 7 Default Value 6 4 0 / 1 1 0 - 7 1 0 - 7 1 0 / 1 0 0 / 1 0 75-I ....


