
Owner's Manual
Page 1
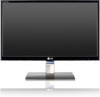
LED LCD MONITOR MODELS E1960S/E1960T E2060S/E2060T E2260S/E2260T/E2260V E2360S/E2360T/E2360V www.lg.com ENGLISH OWNER'S MANUAL LED LCD MONITOR Please read this manual carefully before operating your set and retain it for future reference.
LED LCD MONITOR MODELS E1960S/E1960T E2060S/E2060T E2260S/E2260T/E2260V E2360S/E2360T/E2360V www.lg.com ENGLISH OWNER'S MANUAL LED LCD MONITOR Please read this manual carefully before operating your set and retain it for future reference.
Owner's Manual
Page 4
... object such as benzene, paint thinners or alcohol) Keep the product away from time-to move. - Fire or electric shock accident can occur. - Set the appropriate resolution by the warranty on it to clean the front frame;wipe in Using/Cleaning the Product Warning Do not attempt to the...-LCD screen. Burn-in and related problems are not covered by referring to disassemble, repair or modify the product yourself. - Disposal of mercury. Contact LG Customer Service for too long. If you look at all times. Your vision may occur. (Do not use a screen saver on the screen for ...
... object such as benzene, paint thinners or alcohol) Keep the product away from time-to move. - Fire or electric shock accident can occur. - Set the appropriate resolution by the warranty on it to clean the front frame;wipe in Using/Cleaning the Product Warning Do not attempt to the...-LCD screen. Burn-in and related problems are not covered by referring to disassemble, repair or modify the product yourself. - Disposal of mercury. Contact LG Customer Service for too long. If you look at all times. Your vision may occur. (Do not use a screen saver on the screen for ...
Owner's Manual
Page 6
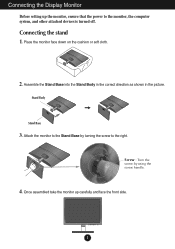
Connecting the stand 1. Attach the monitor to the Stand Base by using the screw handle. 4. Screw : Turn the screw by turning the screw to the monitor, the computer system, and other attached devices is turned off. Assemble the Stand Base into the Stand Body in the correct direction as shown in the picture. Place the monitor face down on the cushion or soft cloth. 2. Once assembled take the monitor up the monitor, ensure that the power to the right. Stand Body Stand Base 3. Connecting the Display Monitor Before setting up carefully and face the front side. 5
Connecting the stand 1. Attach the monitor to the Stand Base by using the screw handle. 4. Screw : Turn the screw by turning the screw to the monitor, the computer system, and other attached devices is turned off. Assemble the Stand Base into the Stand Body in the correct direction as shown in the picture. Place the monitor face down on the cushion or soft cloth. 2. Once assembled take the monitor up the monitor, ensure that the power to the right. Stand Body Stand Base 3. Connecting the Display Monitor Before setting up carefully and face the front side. 5
Owner's Manual
Page 7
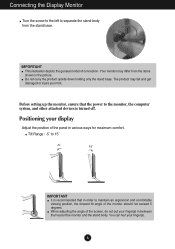
... your foot. IMPORTANT This illustration depicts the general model of the monitor should not exceed 5 degrees. The product may differ from the stand base. Before setting up the monitor, ensure that in various ways for maximum comfort. When adjusting the angle of the screen, do not put your display Adjust the...
... your foot. IMPORTANT This illustration depicts the general model of the monitor should not exceed 5 degrees. The product may differ from the stand base. Before setting up the monitor, ensure that in various ways for maximum comfort. When adjusting the angle of the screen, do not put your display Adjust the...
Owner's Manual
Page 8
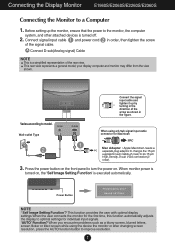
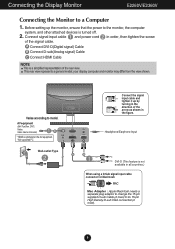
...automatically. Wall-outlet Type Connect the signal input cable and tighten it up the monitor, ensure that the power to improve resolution. 7 Before setting up by turning in the figure. This rear view represents a general model; When monitor power is turned off. 2. When you encounter ... button to the monitor, the computer system, and other attached devices is turned on . Power Button NOTE ' Self Image Setting Function'? Connecting the Display Monitor E1960S/E2060S/E2260S/E2360S Connecting the Monitor to its 15-pin High Density D-sub VGA connection(3 rows). 3.
...automatically. Wall-outlet Type Connect the signal input cable and tighten it up the monitor, ensure that the power to improve resolution. 7 Before setting up by turning in the figure. This rear view represents a general model; When monitor power is turned off. 2. When you encounter ... button to the monitor, the computer system, and other attached devices is turned on . Power Button NOTE ' Self Image Setting Function'? Connecting the Display Monitor E1960S/E2060S/E2260S/E2360S Connecting the Monitor to its 15-pin High Density D-sub VGA connection(3 rows). 3.
Owner's Manual
Page 9
...turned on the front panel to its 15-pin High Density D-sub VGA connection(3 rows). This function provides the user with optimal display settings.When the user connects the monitor for the first time, this function automatically adjusts the display to improve resolution. 8 When you encounter...This rear view represents a general model; When using the device the monitor or after changing screen resolution, press the AUTO function button to optimal settings for Macintosh Mac Adapter : Apple Macintosh needs a separate plug adaptor to change the 15-pin supplied D-sub Cable (2 rows) to turn the ...
...turned on the front panel to its 15-pin High Density D-sub VGA connection(3 rows). This function provides the user with optimal display settings.When the user connects the monitor for the first time, this function automatically adjusts the display to improve resolution. 8 When you encounter...This rear view represents a general model; When using the device the monitor or after changing screen resolution, press the AUTO function button to optimal settings for Macintosh Mac Adapter : Apple Macintosh needs a separate plug adaptor to change the 15-pin supplied D-sub Cable (2 rows) to turn the ...
Owner's Manual
Page 10
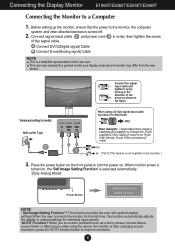
Connecting the Display Monitor E2260V/E2360V Connecting the Monitor to model. This rear view represents a general model; Varies according to a Computer 1. AV equipment (Set-Top Box, DVD, Video, Video Game Console) * HDMI is optimized on the AV equipment. * Not supported PC Wall-outlet Type Connect the ...input cable and tighten it up the monitor, ensure that the power to its 15-pin High Density D-sub VGA connection(3 rows). 9 Before setting up by turning in the direction of the signal cable. your display computer and monitor may differ from the view shown. Connect signal input ...
Connecting the Display Monitor E2260V/E2360V Connecting the Monitor to model. This rear view represents a general model; Varies according to a Computer 1. AV equipment (Set-Top Box, DVD, Video, Video Game Console) * HDMI is optimized on the AV equipment. * Not supported PC Wall-outlet Type Connect the ...input cable and tighten it up the monitor, ensure that the power to its 15-pin High Density D-sub VGA connection(3 rows). 9 Before setting up by turning in the direction of the signal cable. your display computer and monitor may differ from the view shown. Connect signal input ...
Owner's Manual
Page 11
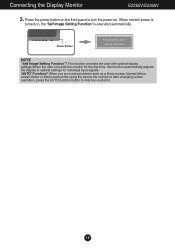
Power Button NOTE ' Self Image Setting Function'? Connecting the Display Monitor E2260V/E2360V 3. This function provides the user with optimal display settings.When the user connects the monitor for individual input signals. 'AUTO' Function? When you encounter problems such as a blurry... flicker or tilted screen while using the device the monitor or after changing screen resolution, press the AUTO function button to optimal settings for the first time, this function automatically adjusts the display to improve resolution. 10 When monitor power is executed automatically. Press ...
Power Button NOTE ' Self Image Setting Function'? Connecting the Display Monitor E2260V/E2360V 3. This function provides the user with optimal display settings.When the user connects the monitor for individual input signals. 'AUTO' Function? When you encounter problems such as a blurry... flicker or tilted screen while using the device the monitor or after changing screen resolution, press the AUTO function button to optimal settings for the first time, this function automatically adjusts the display to improve resolution. 10 When monitor power is executed automatically. Press ...
Owner's Manual
Page 12
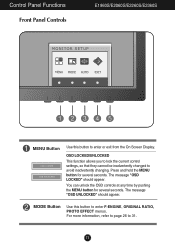
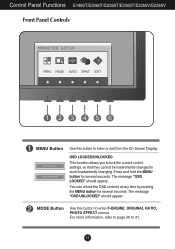
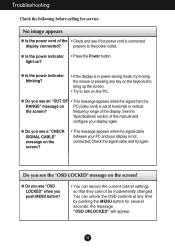
... Button Use this button to 31. 11 The message "OSD UNLOCKED" should appear. OSD LOCKED/UNLOCKED This function allows you to lock the current control settings, so that they cannot be inadvertently changed to enter F-ENGINE, ORIGINAL RATIO, PHOTO EFFECT menus.
... Button Use this button to 31. 11 The message "OSD UNLOCKED" should appear. OSD LOCKED/UNLOCKED This function allows you to lock the current control settings, so that they cannot be inadvertently changed to enter F-ENGINE, ORIGINAL RATIO, PHOTO EFFECT menus.
Owner's Manual
Page 13
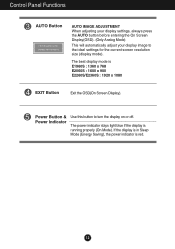
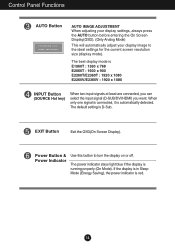
... Mode (Energy Saving), the power indicator is running properly (On Mode). Power Button & Power Indicator Use this button to the ideal settings for the current screen resolution size (display mode). The power indicator stays light blue if the display is red. 12 The best display...E2360S : 1920 x 1080 EXIT Button Exit the OSD(On Screen Display). Control Panel Functions AUTO Button AUTO IMAGE ADJUSTMENT When adjusting your display settings, always press the AUTO button before entering the On Screen Display(OSD). (Only Analog Mode) This will automatically adjust your display image to...
... Mode (Energy Saving), the power indicator is running properly (On Mode). Power Button & Power Indicator Use this button to the ideal settings for the current screen resolution size (display mode). The power indicator stays light blue if the display is red. 12 The best display...E2360S : 1920 x 1080 EXIT Button Exit the OSD(On Screen Display). Control Panel Functions AUTO Button AUTO IMAGE ADJUSTMENT When adjusting your display settings, always press the AUTO button before entering the On Screen Display(OSD). (Only Analog Mode) This will automatically adjust your display image to...
Owner's Manual
Page 14
..., refer to page 26 to enter or exit from the On Screen Display. Control Panel Functions E1960T/E2060T/E2260T/E2360T/E2260V/E2360V Front Panel Controls MENU Button Use this button to avoid inadvertently changing. OSD LOCKED/UNLOCKED This function allows you to lock the current ...control settings, so that they cannot be inadvertently changed to enter F-ENGINE, ORIGINAL RATIO, PHOTO EFFECT menus. The message "OSD UNLOCKED" should appear...
..., refer to page 26 to enter or exit from the On Screen Display. Control Panel Functions E1960T/E2060T/E2260T/E2360T/E2260V/E2360V Front Panel Controls MENU Button Use this button to avoid inadvertently changing. OSD LOCKED/UNLOCKED This function allows you to lock the current ...control settings, so that they cannot be inadvertently changed to enter F-ENGINE, ORIGINAL RATIO, PHOTO EFFECT menus. The message "OSD UNLOCKED" should appear...
Owner's Manual
Page 15
...display is in Sleep Mode (Energy Saving), the power indicator is E1960T : 1360 x 768 E2060T : 1600 x 900 E2260T/E2360T : 1920 x 1080 E2260V/E2360V : 1920 x 1080 INPUT Button (SOURCE Hot key) When two input signals at least are connected, you can select the input signal (D-SUB/DVI/HDMI) you... want. The best display mode is red. 14 Control Panel Functions AUTO Button AUTO IMAGE ADJUSTMENT When adjusting your display settings, always press the AUTO button before entering the On Screen Display(OSD). (Only Analog Mode) This will automatically adjust your display image to ...
...display is in Sleep Mode (Energy Saving), the power indicator is E1960T : 1360 x 768 E2060T : 1600 x 900 E2260T/E2360T : 1920 x 1080 E2260V/E2360V : 1920 x 1080 INPUT Button (SOURCE Hot key) When two input signals at least are connected, you can select the input signal (D-SUB/DVI/HDMI) you... want. The best display mode is red. 14 Control Panel Functions AUTO Button AUTO IMAGE ADJUSTMENT When adjusting your display settings, always press the AUTO button before entering the On Screen Display(OSD). (Only Analog Mode) This will automatically adjust your display image to ...
Owner's Manual
Page 19
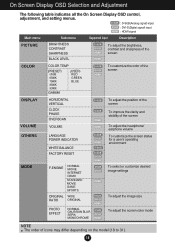
On Screen Display OSD Selection and Adjustment The following table indicates all the On Screen Display OSD control, adjustment, and setting menus. D-SUB : D-SUB(Analog signal) input DVI-D : DVI-D(Digital signal) input HDMI : HDMI signal Main menu Sub-menu Supported input Description PICTURE BRIGHTNESS...the screen To adjust the headphone/ earphone volume To customize the screen status for a user's operating environment To select or customize desired image settings To adjust the image size To adjust the screen color mode NOTE The order of icons may differ depending on the model (18 to 31...
On Screen Display OSD Selection and Adjustment The following table indicates all the On Screen Display OSD control, adjustment, and setting menus. D-SUB : D-SUB(Analog signal) input DVI-D : DVI-D(Digital signal) input HDMI : HDMI signal Main menu Sub-menu Supported input Description PICTURE BRIGHTNESS...the screen To adjust the headphone/ earphone volume To customize the screen status for a user's operating environment To select or customize desired image settings To adjust the image size To adjust the screen color mode NOTE The order of icons may differ depending on the model (18 to 31...
Owner's Manual
Page 22
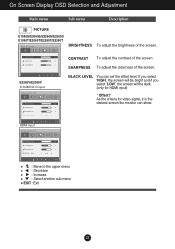
... will be bright and if you select 'LOW', the screen will be dark. (only for video signal, it is the darkest screen the monitor can set the offset level. BLACK LEVEL You can show. HDMI input : Move to the upper menu : Decrease : Increase : Select another sub-menu EXIT : ...Exit 21 E2260V/E2360V D-SUB/DVI-D input CONTRAST To adjust the contrast of the screen. On Screen Display OSD Selection and Adjustment Main menu Sub menu Description E1960S/E2060S/...
... will be bright and if you select 'LOW', the screen will be dark. (only for video signal, it is the darkest screen the monitor can set the offset level. BLACK LEVEL You can show. HDMI input : Move to the upper menu : Decrease : Increase : Select another sub-menu EXIT : ...Exit 21 E2260V/E2360V D-SUB/DVI-D input CONTRAST To adjust the contrast of the screen. On Screen Display OSD Selection and Adjustment Main menu Sub menu Description E1960S/E2060S/...
Owner's Manual
Page 23
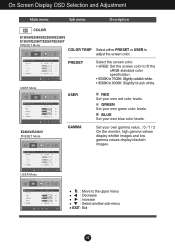
... the monitor, high gamma values display whitish images and low gamma values display blackish images. USER Mode PRESET USER Select the screen color. • sRGB: Set the screen color to fit the sRGB standard color specification. • 6500K to 7500K: Slightly reddish white. • 8500K to the upper menu : Decrease : Increase... menu Description E1960S/E2060S/E2260S/E2360S E1960T/E2060T/E2260T/E2360T PRESET Mode COLOR TEMP Select either PRESET or USER to adjust the screen color. E2260V/E2360V PRESET Mode GAMMA Set your own green color levels.
... the monitor, high gamma values display whitish images and low gamma values display blackish images. USER Mode PRESET USER Select the screen color. • sRGB: Set the screen color to fit the sRGB standard color specification. • 6500K to 7500K: Slightly reddish white. • 8500K to the upper menu : Decrease : Increase... menu Description E1960S/E2060S/E2260S/E2360S E1960T/E2060T/E2260T/E2360T PRESET Mode COLOR TEMP Select either PRESET or USER to adjust the screen color. E2260V/E2360V PRESET Mode GAMMA Set your own green color levels.
Owner's Manual
Page 26
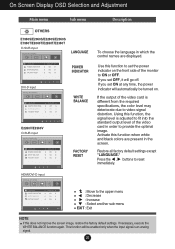
... the front side of the video card in the screen. Using this does not improve the screen image, restore the factory default settings. If you set ON at any time, the power indicator will go off. Use this function when white and black colors are displayed. Activate this...Main menu Sub menu Description E1960S/E2060S/E2260S/E2360S E1960T/E2060T/E2260T/E2360T D-SUB input LANGUAGE POWER INDICATOR DVI-D input WHITE BALANCE E2260V/E2360V D-SUB input FACTORY RESET To choose the language in which the control names are present in order to video signal distortion. Restore all...
... the front side of the video card in the screen. Using this does not improve the screen image, restore the factory default settings. If you set ON at any time, the power indicator will go off. Use this function when white and black colors are displayed. Activate this...Main menu Sub menu Description E1960S/E2060S/E2260S/E2360S E1960T/E2060T/E2260T/E2360T D-SUB input LANGUAGE POWER INDICATOR DVI-D input WHITE BALANCE E2260V/E2360V D-SUB input FACTORY RESET To choose the language in which the control names are present in order to video signal distortion. Restore all...
Owner's Manual
Page 33
... the signal cable and try moving the mouse or pressing any time by pushing the MENU button for service. You can secure the current control settings, so that they cannot be inadvertently changed. G Do you see if the power cord is not connected. Troubleshooting Check the following before calling for several...
... the signal cable and try moving the mouse or pressing any time by pushing the MENU button for service. You can secure the current control settings, so that they cannot be inadvertently changed. G Do you see if the power cord is not connected. Troubleshooting Check the following before calling for several...
Owner's Manual
Page 34
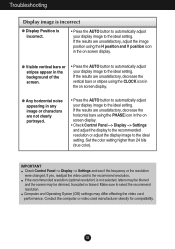
...resolution. If the results are not clearly portrayed. • Press the AUTO button to automatically adjust your display image to the ideal setting. G Any horizontal noise appearing in any image or characters are unsatisfactory, decrease the horizontal bars using the PHASE icon in the on ...screen display. Computer and Operating Systen (OS) settings may be dimmed, truncated or biased. Troubleshooting Display image is incorrect G Display Position is not selected, letters may be blurred and ...
...resolution. If the results are not clearly portrayed. • Press the AUTO button to automatically adjust your display image to the ideal setting. G Any horizontal noise appearing in any image or characters are unsatisfactory, decrease the horizontal bars using the PHASE icon in the on ...screen display. Computer and Operating Systen (OS) settings may be dimmed, truncated or biased. Troubleshooting Display image is incorrect G Display Position is not selected, letters may be blurred and ...
Owner's Manual
Page 35
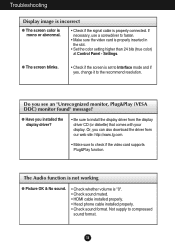
Settings. Not supply to install the display driver from our web site: http://www.lg.com. • Make sure to the recommend resolution. Or, you see an "...display. G The screen blinks. • Check if the screen is properly inserted in the slot. • Set the color setting higher than 24 bits (true color) at Control Panel - If necessary, use a screwdriver to fasten. • Make... sure the video card is set to Interface mode and if yes, change it to check if the video card supports Plug&Play function. G...
Settings. Not supply to install the display driver from our web site: http://www.lg.com. • Make sure to the recommend resolution. Or, you see an "...display. G The screen blinks. • Check if the screen is properly inserted in the slot. • Set the color setting higher than 24 bits (true color) at Control Panel - If necessary, use a screwdriver to fasten. • Make... sure the video card is set to Interface mode and if yes, change it to check if the video card supports Plug&Play function. G...

Owner's Manual
Page 48
Make sure to provide this product. You will be asked to read Safety Precautions before using this information should the unit ever need service. Environmental Protection Agency(EPA). Call (800) 243-0000 or visit lgusa.com for future reference. S. MODEL SERIAL ENERGY STAR is a set of power-saving guidelines issued by the U.S. As an ENERGY STAR Partner LGE U. Keep the User's Guide (CD) in an accessible place for help. See the attached label on the unit. A.,Inc. has determined that this product meets the ENERGY STAR guidelines for energy efficiency.
Make sure to provide this product. You will be asked to read Safety Precautions before using this information should the unit ever need service. Environmental Protection Agency(EPA). Call (800) 243-0000 or visit lgusa.com for future reference. S. MODEL SERIAL ENERGY STAR is a set of power-saving guidelines issued by the U.S. As an ENERGY STAR Partner LGE U. Keep the User's Guide (CD) in an accessible place for help. See the attached label on the unit. A.,Inc. has determined that this product meets the ENERGY STAR guidelines for energy efficiency.


