LG W2252TQ-TF.AUSVAPN Support and Manuals
Get Help and Manuals for this LG item
View All Support Options Below
Free LG W2252TQ-TF.AUSVAPN manuals!
Problems with LG W2252TQ-TF.AUSVAPN?
Ask a Question
Free LG W2252TQ-TF.AUSVAPN manuals!
Problems with LG W2252TQ-TF.AUSVAPN?
Ask a Question
Most Recent LG W2252TQ-TF.AUSVAPN Questions

Factory Default Settings
Hi, I purchased the Spyder monitor calibration software. It says to reset the monitor to the factory...
Hi, I purchased the Spyder monitor calibration software. It says to reset the monitor to the factory...
(Posted by linzilulu 12 years ago)
Popular LG W2252TQ-TF.AUSVAPN Manual Pages
Owner's Manual (English) - Page 1
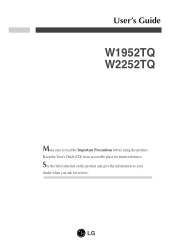
See the label attached on the product and give the information to read the Important Precautions before using the product.
Keep the User's Guide(CD) in an accessible place for service. User's Guide
W1952TQ W2252TQ
Make sure to your
dealer when you ask for future reference.
Owner's Manual (English) - Page 2
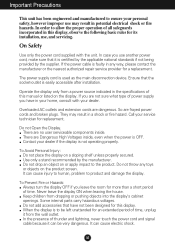
... Voltages inside . It can cause injury to human, problem to allow the proper operation of all safeguards incorporated in any toys or objects on or apply impact to the product. If you have not been designed for replacement. Contact your service technician for this manual or listed on a sloping shelf unless properly secured. Use...
Owner's Manual (English) - Page 4
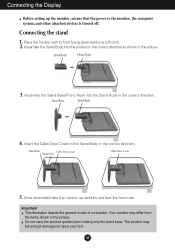
... the stand base. The product may differ from the items shown in the correct direction.
Connecting the Display
Before setting up carefully and face the front side
Important This illustration depicts the general model of connection. Place the monitor with its front facing downward on a soft cloth. 2. Assemble the Stand Base(Front...
Owner's Manual (English) - Page 7
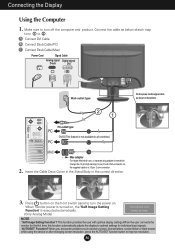
... the front switch panel to a 15 pin 2 row connector.
2. When you encounter problems such as below sketch map
form 1 to change the 15 pin high density (3 row) D-sub VGA connector on . When monitor power is turned on, the 'Self Image Setting Function' is needed to 2 . Connecting the Display
Using the Computer
1.
Connect...
Owner's Manual (English) - Page 9

... : 1440 x 900 W2252TQ : 1680 x 1050
Power Button
Use this button to amber. Power Indicator
This Indicator lights up as blue when the display is D-Sub. The default setting is operating normally(On ... functions in the On Screen Display. This will automatically adjust your display settings, always press the AUTO/SET button prior to entering the On Screen Display(OSD). A8
If the display...
Owner's Manual (English) - Page 11
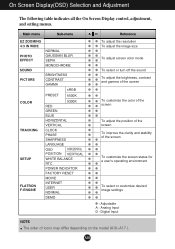
...all the On Screen Display control, adjustment, and setting menus.
EZ ZOOMING 4:3 IN WIDE
PHOTO EFFECT
NORMAL GAUSSIAN BLUR SEPIA MONOCHROME
PICTURE COLOR
TRACKING
SETUP
FLATRON F-ENGINE
BRIGHTNESS CONTRAST GAMMA
sRGB
PRESET 6500K
... operating environment
To select or customize desired image settings
: Adjustable A : Analog Input D : Digital Input
NOTE The order of icons may differ depending ...
Owner's Manual (English) - Page 12
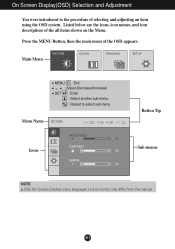
A11 Press the MENU Button, then the main menu of the all items shown on the monitor may differ from the manual. Main Menu
MENU : Exit : Adjust (Decrease/Increase)
SET : Enter : Select another sub-menu : Restart to the procedure of selecting and adjusting an item using the OSD system. On Screen Display(OSD...
Owner's Manual (English) - Page 14
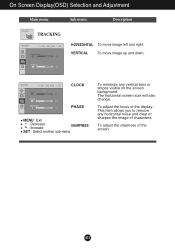
CLOCK
PHASE
MENU : Exit
: Decrease : Increase
SHARPNESS
SET : Select another sub-menu
To minimize any horizontal noise and clear or sharpen the image of characters. To adjust the clearness of the display. A13 ...
Owner's Manual (English) - Page 15
... and Adjustment
Main menu
Sub menu
Description
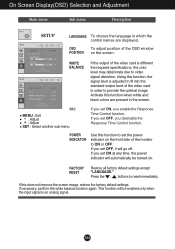
SETUP
SETUP
LANGUAGE To choose the language in which the control names are present in order to reset immediately. Using this function to set the power indicator on the front side of the video card is different the required specifications, the color level may deteriorate due to...
Owner's Manual (English) - Page 16
... if the forteManager is transferred to the one step low resolution. SOUND
Main menu
Sub menu
Description
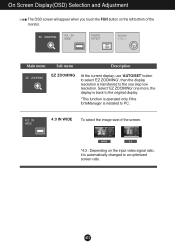
EZ ZOOMING
At the current display, use 'AUTO/SET' button to select 'EZ ZOOMING', then the display resolution is installed to an optimized screen ratio. WIDE
4:3
*4:3 : Depending on the left bottom of the screen.
Owner's Manual (English) - Page 17

... below cases: • DC power On • DC power Off • Main Button Menu On • Fun Button Menu On • Menu Off Use 'AUTO/SET' button to select sound (two kinds of Buzzer sound) or turn off the sound, and use 'MENU' button to the screen that the dark and...
Owner's Manual (English) - Page 18
...environment
(ambient illumination, image types etc).
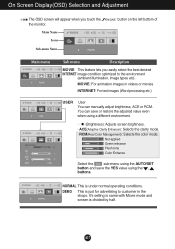
NORMAL This is divided by half.
You can manually adjust brightness, ACE or RCM. A17 MOVIE: For animation images in the shops.
Menu... tone 3 Color Enhance
Select the
sub-menu using the AUTO/SET
button and save the YES value using the ,
buttons. It's setting is same with Movie mode and screen is under normal operating conditions.
Owner's Manual (English) - Page 19

... saving mode, try again.
A18
You can secure the current control settings, so that they cannot be inadvertently changed. frequency range of the ... any time by pushing the MENU button for service. See the
'Specifications' section of this manual and
configure your display is out of horizontal ... Troubleshooting
Check the following before calling for several seconds: the message "OSD...
Owner's Manual (English) - Page 20
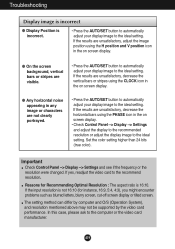
...Operation System), and resolution mentioned above may not be supported by the video card performance. Set the color setting higher than 24 bits (true color). If yes,... AUTO/SET button to automatically adjust your display image to the ideal setting. Important
Check Control Panel --> Display --> Settings and see if the frequency or the resolution were changed.
Troubleshooting
Display image...
Owner's Manual (English) - Page 21
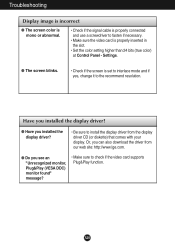
.... Have you installed the display driver?
● Have you installed the display driver?
• Be sure to check if the video card supports Plug&Play function. Troubleshooting
Display image is incorrect
● The screen color is mono or abnormal.
• Check if the signal cable is properly inserted in the slot.
• Set the color setting higher than...
LG W2252TQ-TF.AUSVAPN Reviews
We have not received any reviews for LG yet.