
Owner's Manual
Page 5
Please make sure the following items are missing, contact your monitor. User must use shielded signal interface cables (D-sub 15 pin cable, DVI-D cable) with your dealer. Thank for the product. 4 User's Guide/Cards 15-pin D-...
Please make sure the following items are missing, contact your monitor. User must use shielded signal interface cables (D-sub 15 pin cable, DVI-D cable) with your dealer. Thank for the product. 4 User's Guide/Cards 15-pin D-...

Owner's Manual
Page 6
... the general model of the stand base and turn the screw counterclockwise. When you desire to disintegrate the monitor from the items shown in the picture. Once assembled take the monitor up the monitor, ensure that the power to turn the screw clockwise to tighten. 3. The product may differ from the... stand base, use a coin to the monitor, the computer system, and other attached devices is turned off. 1. Do not carry the product upside down holding only the stand base. Use a coin ...
... the general model of the stand base and turn the screw counterclockwise. When you desire to disintegrate the monitor from the items shown in the picture. Once assembled take the monitor up the monitor, ensure that the power to turn the screw clockwise to tighten. 3. The product may differ from the... stand base, use a coin to the monitor, the computer system, and other attached devices is turned off. 1. Do not carry the product upside down holding only the stand base. Use a coin ...

Owner's Manual
Page 7
...the head of the panel in order to maintain an ergonomic and comfortable viewing position, the forward tilt angle of the monitor should not exceed 5 degrees. 6 Adjust the position of the monitor and the stand body. Tilt Range : -5˚ to 15˚ # Do not touch or press the screen... when adjusting the angle of the monitor. You can hurt your display -After installation, adjust the angle as shown below. 1. ERGONOMIC It is turned off. Connecting the Display Before setting up the monitor, ensure that the power to the monitor, the computer system, and other attached devices ...
...the head of the panel in order to maintain an ergonomic and comfortable viewing position, the forward tilt angle of the monitor should not exceed 5 degrees. 6 Adjust the position of the monitor and the stand body. Tilt Range : -5˚ to 15˚ # Do not touch or press the screen... when adjusting the angle of the monitor. You can hurt your display -After installation, adjust the angle as shown below. 1. ERGONOMIC It is turned off. Connecting the Display Before setting up the monitor, ensure that the power to the monitor, the computer system, and other attached devices ...

Owner's Manual
Page 8
... D-sub(Analog signal) Cable NOTE This is a simplified representation of the signal cable. Varies according to the monitor, the computer system, and other attached devices is turned off. 2. When monitor power is turned on . Connecting the Display Connecting with optimal display settings.When the user connects the... 2 row connector. DC-IN HDMI D-SUB DVI-D Headphone/Earphone Input A B PC PC Wall-outlet type 3. Before setting up the monitor, ensure that the power to model. When you encounter problems such as shown. This function provides the user with the PC 1.
... D-sub(Analog signal) Cable NOTE This is a simplified representation of the signal cable. Varies according to the monitor, the computer system, and other attached devices is turned off. 2. When monitor power is turned on . Connecting the Display Connecting with optimal display settings.When the user connects the... 2 row connector. DC-IN HDMI D-SUB DVI-D Headphone/Earphone Input A B PC PC Wall-outlet type 3. Before setting up the monitor, ensure that the power to model. When you encounter problems such as shown. This function provides the user with the PC 1.

Owner's Manual
Page 13
Listed below are the icons, icon names, and icon descriptions of the OSD appears. Menu Name Icons Submenus Exit Adjust (Decrease/Increase) Select another sub-menu Restart to the procedure of selecting and adjusting an item using the OSD system. Press the MENU Button, then the main menu of the all items shown on the monitor may differ from the manual. 12 On Screen Display(OSD) Selection and Adjustment You were introduced to select sub-menu Button Tip NOTE OSD (On Screen Display) menu languages on the Menu.
Listed below are the icons, icon names, and icon descriptions of the OSD appears. Menu Name Icons Submenus Exit Adjust (Decrease/Increase) Select another sub-menu Restart to the procedure of selecting and adjusting an item using the OSD system. Press the MENU Button, then the main menu of the all items shown on the monitor may differ from the manual. 12 On Screen Display(OSD) Selection and Adjustment You were introduced to select sub-menu Button Tip NOTE OSD (On Screen Display) menu languages on the Menu.

Owner's Manual
Page 14
...', the screen will be bright and if you select 'LOW', the screen will be dark. (only for video signal, it is the darkest screen the monitor can set the offset level. As the criteria for HDMI input) Exit : Exit : Decrease : Increase : Select another sub-menu : Restart to fit the sRGB...color levels. Set your own blue color levels. SHARPNESS To adjust the clearness of the screen. BLUE Set your own gamma value. : 0 / 1 / 2 On the monitor, high gamma values display whitish images and low gamma values display blackish images. 13 CONTRAST To adjust the contrast of the screen.
...', the screen will be bright and if you select 'LOW', the screen will be dark. (only for video signal, it is the darkest screen the monitor can set the offset level. As the criteria for HDMI input) Exit : Exit : Decrease : Increase : Select another sub-menu : Restart to fit the sRGB...color levels. Set your own blue color levels. SHARPNESS To adjust the clearness of the screen. BLUE Set your own gamma value. : 0 / 1 / 2 On the monitor, high gamma values display whitish images and low gamma values display blackish images. 13 CONTRAST To adjust the contrast of the screen.

Owner's Manual
Page 16
... is different the required specifications, the color level may deteriorate due to set OFF, it will automatically be turned on the front side of the monitor to reset immediately. If the output of the video card in order to select sub-menu FACTORY RESET To choose the language in which the...
... is different the required specifications, the color level may deteriorate due to set OFF, it will automatically be turned on the front side of the monitor to reset immediately. If the output of the video card in order to select sub-menu FACTORY RESET To choose the language in which the...

Owner's Manual
Page 17
On Screen Display(OSD) Selection and Adjustment You were introduced to select sub-menu Button Tip NOTE OSD (On Screen Display) menu languages on the Menu. Menu Name Icons Submenus Exit : Exit , : Move : Select another sub-menu : Restart to the procedure of the all items shown on the monitor may differ from the manual. 16 Listed below are the icons, icon names, and icon descriptions of selecting and adjusting an item using the OSD system. Press the MODE Button, then the main menu of the OSD appears.
On Screen Display(OSD) Selection and Adjustment You were introduced to select sub-menu Button Tip NOTE OSD (On Screen Display) menu languages on the Menu. Menu Name Icons Submenus Exit : Exit , : Move : Select another sub-menu : Restart to the procedure of the all items shown on the monitor may differ from the manual. 16 Listed below are the icons, icon names, and icon descriptions of selecting and adjusting an item using the OSD system. Press the MODE Button, then the main menu of the OSD appears.

Owner's Manual
Page 20
Exit : Exit , : Move : Select another sub-menu : Restart to original. * This function works only if input resolution is lower than monitor ratio (16:9). ORIGINAL Change the input image signal ratio to select sub-menu 19 On Screen Display(OSD) Selection and Adjustment Main menu Sub menu Description WIDE Switch to full screen mode according to input image signal.
Exit : Exit , : Move : Select another sub-menu : Restart to original. * This function works only if input resolution is lower than monitor ratio (16:9). ORIGINAL Change the input image signal ratio to select sub-menu 19 On Screen Display(OSD) Selection and Adjustment Main menu Sub menu Description WIDE Switch to full screen mode according to input image signal.

Owner's Manual
Page 24
... site: http://www.lge.com. • Make sure to check if the video card supports Plug&Play function. Do you see an "Unrecognized monitor, Plug&Play (VESA DDC) monitor found" message? Troubleshooting Display image is incorrect G The screen color is mono or abnormal. • Check if the signal cable is properly connected...
... site: http://www.lge.com. • Make sure to check if the video card supports Plug&Play function. Do you see an "Unrecognized monitor, Plug&Play (VESA DDC) monitor found" message? Troubleshooting Display image is incorrect G The screen color is mono or abnormal. • Check if the signal cable is properly connected...
Specification
Page 1
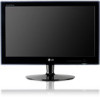
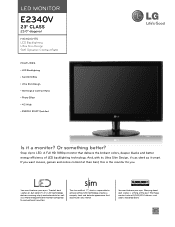
... and delicate appearance that delivers the brilliant colors, deeper blacks and better energy efficiency of the past. If you . LG's LED technology delivers amazing clarity and color detail as well as it a monitor? LED MONITOR E2340V 23" Class 23.0" diagonal HIGHLIGHTS LED Backlighting Ultra Slim Design 5M:1 Dynamic Contrast Ratio FEATURES • LED Backlighting...
... and delicate appearance that delivers the brilliant colors, deeper blacks and better energy efficiency of the past. If you . LG's LED technology delivers amazing clarity and color detail as well as it a monitor? LED MONITOR E2340V 23" Class 23.0" diagonal HIGHLIGHTS LED Backlighting Ultra Slim Design 5M:1 Dynamic Contrast Ratio FEATURES • LED Backlighting...
Specification
Page 2
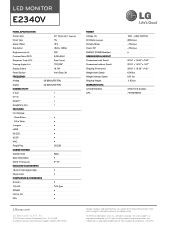
LED MONITOR E2340V PANEL SPECIFICATION Screen Size 23" Class (23.0" diagonal) Panel Type TN Aspect Ratio 16:9 Resolution 1920 x 1080p Brightness (cd/m2) 250 Contrast Ratio (DFC) 5,000,...D-Sub Signal Cable • Power Cord • COMPLIANCE & STANDARDS UL(cUL) • TUV-GS TUV-Type SEMKO • FCC-B, CE • EPA • LGusa.com LG Electronics U.S.A., Inc. 1000 Sylvan Avenue Englewood Cliffs, NJ 07632 Customer Service and Technical Support: (800) 243-0000 Power Voltage, Hz On Mode (Average) Standby Mode...
LED MONITOR E2340V PANEL SPECIFICATION Screen Size 23" Class (23.0" diagonal) Panel Type TN Aspect Ratio 16:9 Resolution 1920 x 1080p Brightness (cd/m2) 250 Contrast Ratio (DFC) 5,000,...D-Sub Signal Cable • Power Cord • COMPLIANCE & STANDARDS UL(cUL) • TUV-GS TUV-Type SEMKO • FCC-B, CE • EPA • LGusa.com LG Electronics U.S.A., Inc. 1000 Sylvan Avenue Englewood Cliffs, NJ 07632 Customer Service and Technical Support: (800) 243-0000 Power Voltage, Hz On Mode (Average) Standby Mode...


