
Operation Guide
Page 2
... controls, adjustments, or carrying out procedures other intellectual property rights owned by law to operate this unit. The user could lose the authority to copy, broadcast, show, broadcast via cable, play in the instruction manual. Reverse engineering or disassembly is connected. • Consult the dealer or an experienced radio/TV technician for a Class B digital device, pursuant to radio communications. SERIAL NUMBER: The serial number...
... controls, adjustments, or carrying out procedures other intellectual property rights owned by law to operate this unit. The user could lose the authority to copy, broadcast, show, broadcast via cable, play in the instruction manual. Reverse engineering or disassembly is connected. • Consult the dealer or an experienced radio/TV technician for a Class B digital device, pursuant to radio communications. SERIAL NUMBER: The serial number...
Operation Guide
Page 3
... to . 12. Clean only with the manufacturer's instructions. Unplug this apparatus near any way, such as powersupply cord or plug is used, use , and servicing. Introduction IMPORTANT SAFETY INSTRUCTIONS CAUTION: PLEASE READ AND OBSERVE ALL WARNINGS AND INSTRUCTIONS IN THIS OWNER'S MANUAL AND THOSE MARKED ON THE UNIT. All these safety and operating instructions should be followed. 9. Do not defeat the safety...
... to . 12. Clean only with the manufacturer's instructions. Unplug this apparatus near any way, such as powersupply cord or plug is used, use , and servicing. Introduction IMPORTANT SAFETY INSTRUCTIONS CAUTION: PLEASE READ AND OBSERVE ALL WARNINGS AND INSTRUCTIONS IN THIS OWNER'S MANUAL AND THOSE MARKED ON THE UNIT. All these safety and operating instructions should be followed. 9. Do not defeat the safety...

Operation Guide
Page 4
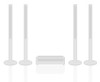
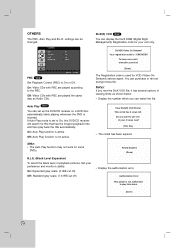
... used in this Manual 5 About the Symbol Display 5 Notes on Discs 5 HANDLING DISCS 5 STORING DISCS 5 CLEANING DISCS 5 Types of Playable Discs 6 REGIONAL CODE 6 REMOTE CONTROL OPERATION RANGE . . . . .6 REMOTE CONTROL BATTERY INSTALLATION .6 Disc-related terms 7 Front Panel 8 Display Window 9 Remote Control 10 Rear Panel 11 Installation and Setup 12-22 TV Connections 12 Audio Connection to Optional Equipment . . . .13 Antenna Connections 14 Speaker System Connection 15 Speaker Positioning 16 Mini Glossary for Audio Stream & Surround Mode 17 Sound Mode 17 On-Screen Display...
... used in this Manual 5 About the Symbol Display 5 Notes on Discs 5 HANDLING DISCS 5 STORING DISCS 5 CLEANING DISCS 5 Types of Playable Discs 6 REGIONAL CODE 6 REMOTE CONTROL OPERATION RANGE . . . . .6 REMOTE CONTROL BATTERY INSTALLATION .6 Disc-related terms 7 Front Panel 8 Display Window 9 Remote Control 10 Rear Panel 11 Installation and Setup 12-22 TV Connections 12 Audio Connection to Optional Equipment . . . .13 Antenna Connections 14 Speaker System Connection 15 Speaker Positioning 16 Mini Glossary for Audio Stream & Surround Mode 17 Sound Mode 17 On-Screen Display...

Operation Guide
Page 10
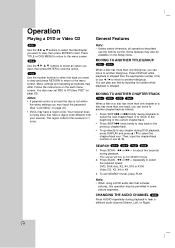
...) Search backward or forward. PLAY (B) Starts playback. SEARCH Displays Marker Search menu. To select desired a disc. DISPLAY Accesses On-Screen display. POWER: Switches TV ON and OFF. - VOLUME +/-: Adjusts TV's volume. - PAUSE/STEP (X) Pause playback temporarily. INPUT Selects the receiver's input source. 0-9 numerical buttons Selects numbered options in power-on status. 10 y EJECT ALL Opens and closes all . AUDIO Selects an audio language (DVD) or an audio channel (CD). Accesses or removes Program menu. - Remote Control POWER Turns DVD Home Theater System ON and OFF. S-TITLE...
...) Search backward or forward. PLAY (B) Starts playback. SEARCH Displays Marker Search menu. To select desired a disc. DISPLAY Accesses On-Screen display. POWER: Switches TV ON and OFF. - VOLUME +/-: Adjusts TV's volume. - PAUSE/STEP (X) Pause playback temporarily. INPUT Selects the receiver's input source. 0-9 numerical buttons Selects numbered options in power-on status. 10 y EJECT ALL Opens and closes all . AUDIO Selects an audio language (DVD) or an audio channel (CD). Accesses or removes Program menu. - Remote Control POWER Turns DVD Home Theater System ON and OFF. S-TITLE...

Operation Guide
Page 11
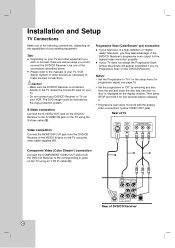
... Pr inputs. S-VIDEO OUT (DVD OUT) Connect to this terminal. FM ANTENNA CONNECTORS Connect the FM antenna to an S-Video Input on TV. AM ANTENNA CONNECTORS Connect the AM antenna to these terminals. COAXIAL IN Connector Connect an coaxial output of Digital Device. FOR DVD VIEWING ONLY. 11 AV IN (VIDEO IN/AUDIO IN (Left/Right)) Connect the audio/video output of an external source (Audio system, TV/Monitor, etc.). Introduction Rear Panel AC Power Cord Plug into the power source. SPEAKER CONNECTORS Connect the six supplied speakers to...
... Pr inputs. S-VIDEO OUT (DVD OUT) Connect to this terminal. FM ANTENNA CONNECTORS Connect the FM antenna to an S-Video Input on TV. AM ANTENNA CONNECTORS Connect the AM antenna to these terminals. COAXIAL IN Connector Connect an coaxial output of Digital Device. FOR DVD VIEWING ONLY. 11 AV IN (VIDEO IN/AUDIO IN (Left/Right)) Connect the audio/video output of an external source (Audio system, TV/Monitor, etc.). Introduction Rear Panel AC Power Cord Plug into the power source. SPEAKER CONNECTORS Connect the six supplied speakers to...
Operation Guide
Page 12
... using the video cable supplied (V). see page 19. • Set the progressive to make the best connections. Rear of the DVD/CD Receiver's progressive scan output for five seconds before releasing it. • Progressive scan does not work with the analog video connections (yellow VIDEO OUT jack). Tips: Depending on your television is connected directly to the VIDEO IN jack on the DVD/CD Receiver. Make sure the DVD/CD Receiver is a high-definition or "digital...
... using the video cable supplied (V). see page 19. • Set the progressive to make the best connections. Rear of the DVD/CD Receiver's progressive scan output for five seconds before releasing it. • Progressive scan does not work with the analog video connections (yellow VIDEO OUT jack). Tips: Depending on your television is connected directly to the VIDEO IN jack on the DVD/CD Receiver. Make sure the DVD/CD Receiver is a high-definition or "digital...

Operation Guide
Page 13
... (L/R)/ VIDEO IN (AV2) OPTICAL OUT Digital Device (Cable Box, other DVD Player, etc) Note: If the audio format of the digital output does not match the capabilities of your optional equipment for audio output. 1. Connect an optical output of a Digital Device (Cable Box, etc) to your DVD/CD Receiver, the receiver will produce a strong, distorted sound or no sound at all. 13 Installation and Setup Audio Connection to Optional Equipment Connect the DVD/CD receiver to the COAXIAL IN connector. Connect an coaxial output...
... (L/R)/ VIDEO IN (AV2) OPTICAL OUT Digital Device (Cable Box, other DVD Player, etc) Note: If the audio format of the digital output does not match the capabilities of your optional equipment for audio output. 1. Connect an optical output of a Digital Device (Cable Box, etc) to your DVD/CD Receiver, the receiver will produce a strong, distorted sound or no sound at all. 13 Installation and Setup Audio Connection to Optional Equipment Connect the DVD/CD receiver to the COAXIAL IN connector. Connect an coaxial output...

Operation Guide
Page 15
... can reduce noises. Note: Attach the ferrite core near the unit (Refer to + and - Installation and Setup Notes: Be sure to match the speaker cable to the appropriate terminal on the speakers. Speaker System Connection Connect the speakers using the supplied speaker cords. Keep the length here as short as possible. 15 To obtain the best possible surround sound, adjust the speaker parameters (volume, distance, etc.). SPEAKERS FRONT REAR SUB REAR FRONT R R WOOFER CENTER L L + -
... can reduce noises. Note: Attach the ferrite core near the unit (Refer to + and - Installation and Setup Notes: Be sure to match the speaker cable to the appropriate terminal on the speakers. Speaker System Connection Connect the speakers using the supplied speaker cords. Keep the length here as short as possible. 15 To obtain the best possible surround sound, adjust the speaker parameters (volume, distance, etc.). SPEAKERS FRONT REAR SUB REAR FRONT R R WOOFER CENTER L L + -

Operation Guide
Page 17
... identical to 5.1 channels of program software by pressing the AUDIO button on the remote during playback. Dolby Digital discs are marked with multichannel surround audio signals is used. 17 Manufactured under license from a home theatre. The effect of the front/back/left/right movement of the sound image, as well as the Music mode except that approaches the quality of the original recording without adding any stereo music recordings. Each...
... identical to 5.1 channels of program software by pressing the AUDIO button on the remote during playback. Dolby Digital discs are marked with multichannel surround audio signals is used. 17 Manufactured under license from a home theatre. The effect of the front/back/left/right movement of the sound image, as well as the Music mode except that approaches the quality of the original recording without adding any stereo music recordings. Each...

Operation Guide
Page 18
... TV screen. Press DISPLAY during playing DVD Audio Items Group Number Track Number Time search Audio language and Digital Audio Output mode 0:20:09 Selection Method b / B, Numbers ENTER b / B, Numbers ENTER Display only b / B or AUDIO Subtitle language ABC OFF Display only Page (or Angle) or 1 / 3 b/B 18 Press b / B to select an item. inputting the title number). To use the number buttons if appropriate (e.g. Press v / V to change the setting. B Repeat sequence 1 / 9 Enter a Marker MARKER SEARCH Marker Search menu Resume play from...
... TV screen. Press DISPLAY during playing DVD Audio Items Group Number Track Number Time search Audio language and Digital Audio Output mode 0:20:09 Selection Method b / B, Numbers ENTER b / B, Numbers ENTER Display only b / B or AUDIO Subtitle language ABC OFF Display only Page (or Angle) or 1 / 3 b/B 18 Press b / B to select an item. inputting the title number). To use the number buttons if appropriate (e.g. Press v / V to change the setting. B Repeat sequence 1 / 9 Enter a Marker MARKER SEARCH Marker Search menu Resume play from...

Operation Guide
Page 19
..., set a language for connection to the language code list in which the disc was recorded. Select "On" using the Component Video jacks for the subtitles and the Setup menu, among other things. You can make various adjustments to confirm your selection. Some items require additional steps. 5. Disc Audio / Subtitle / Menu DVD-V DVD-A Select the language you enter the wrong language code, press CLEAR. To go to the second level. Letterbox: Displays a wide picture with...
..., set a language for connection to the language code list in which the disc was recorded. Select "On" using the Component Video jacks for the subtitles and the Setup menu, among other things. You can make various adjustments to confirm your selection. Some items require additional steps. 5. Disc Audio / Subtitle / Menu DVD-V DVD-A Select the language you enter the wrong language code, press CLEAR. To go to the second level. Letterbox: Displays a wide picture with...

Operation Guide
Page 20
... effect. *1: Dolby Digital only Vocal DVD-V Set Vocal to compress the dynamic range of audio system you use. Note: • If your screen Cancel is highlighted as default. Caution: Once the setting for progressive scan output is playing. Move Select 5.1 Speaker Setup DVD-V DVD-A Select speaker settings, including volume balance and distance, or test the speaker settings. Set DRC to On for five seconds before releasing it. If you set the player to On in error, you...
... effect. *1: Dolby Digital only Vocal DVD-V Set Vocal to compress the dynamic range of audio system you use. Note: • If your screen Cancel is highlighted as default. Caution: Once the setting for progressive scan output is playing. Move Select 5.1 Speaker Setup DVD-V DVD-A Select speaker settings, including volume balance and distance, or test the speaker settings. Set DRC to On for five seconds before releasing it. If you set the player to On in error, you...
Operation Guide
Page 21
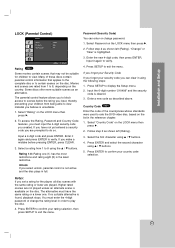
... so. Select a rating from 1 to 8 using the following steps: 1. Input the 6-digit number "210499" and the security code is unsuitable. 1. Some discs offer more suitable scenes as described above. Select "Rating" on the LOCK menu then press B. 2. Rating 1-8: Rating one . Unlock If you can enter or change the rating level in the reference chapter. 1. Installation and Setup LOCK (Parental Control) LOCK Rating Password Country Code Unlock New CSEA Move Select Rating DVD-V Some...
... so. Select a rating from 1 to 8 using the following steps: 1. Input the 6-digit number "210499" and the security code is unsuitable. 1. Some discs offer more suitable scenes as described above. Select "Rating" on the LOCK menu then press B. 2. Rating 1-8: Rating one . Unlock If you can enter or change the rating level in the reference chapter. 1. Installation and Setup LOCK (Parental Control) LOCK Rating Password Country Code Unlock New CSEA Move Select Rating DVD-V Some...
Operation Guide
Page 22
... (Video-OnDemand) service agent. Off: Auto Play function is set up the DVD/CD receiver so a DVD disc automatically starts playing whenever the DVD is not authorized to On or Off. Off: Video CDs with PBC are played the same way as shown below. • Display the number which you want to On, this video. (Done) 22 Rental Expired (Done) B.L.E. (Black Level Expansion) To select the black level of viewing limits...
... (Video-OnDemand) service agent. Off: Auto Play function is set up the DVD/CD receiver so a DVD disc automatically starts playing whenever the DVD is not authorized to On or Off. Off: Video CDs with PBC are played the same way as shown below. • Display the number which you want to On, this video. (Done) 22 Rental Expired (Done) B.L.E. (Black Level Expansion) To select the black level of viewing limits...
Operation Guide
Page 24
... directly to hear a different audio channel (Stereo, Left, or Right). 24 Follow the instructions on page 22). Some features may differ. Then, input the chapter/track number or use the remote control. Notes: • If parental control is not within the rating settings you want , then press ENTER to view the option. bb or BB + repeatedly to the menu screen. To exit SEARCH mode, press PLAY. Menu settings and operating...
... directly to hear a different audio channel (Stereo, Left, or Right). 24 Follow the instructions on page 22). Some features may differ. Then, input the chapter/track number or use the remote control. Notes: • If parental control is not within the rating settings you want , then press ENTER to view the option. bb or BB + repeatedly to the menu screen. To exit SEARCH mode, press PLAY. Menu settings and operating...

Operation Guide
Page 25
.... • Group: repeats the current Group. • Off : does not play repeatedly. y y STILL PICTURE AND FRAME-BY-FRAME PLAYBACK DVD-V DVD-A VCD DivX 1. Notes: • On a Video CD with Video CDs and DivX Discs. • When using a DVD audio disc that simulates multichannel audio from two stereo speakers (instead of the five+ speakers normally required for multi-channel audio from a home theater system). 1. The time search box shows the elapsed playing time. 2.
.... • Group: repeats the current Group. • Off : does not play repeatedly. y y STILL PICTURE AND FRAME-BY-FRAME PLAYBACK DVD-V DVD-A VCD DivX 1. Notes: • On a Video CD with Video CDs and DivX Discs. • When using a DVD audio disc that simulates multichannel audio from two stereo speakers (instead of the five+ speakers normally required for multi-channel audio from a home theater system). 1. The time search box shows the elapsed playing time. 2.

Operation Guide
Page 34
... speaker. 6. Speaker Setup Make the following settings for the built-in the current speaker channel. The setup menu appears. 2. "Select" is same from each speaker. Press ENTER and 5.1 Speaker Setup menu appears. Front Left (L) → Center → Front Right (R) → Rear Right (R) → Rear Left (L) → SubWoofer You can adjust the volume during operating the test tone, first use v / V to select Volume or Speaker option then use b / B buttons to the second level. 3. Select Move Return Enter 5. Use b / B to adjust the output level of the selected speaker...
... speaker. 6. Speaker Setup Make the following settings for the built-in the current speaker channel. The setup menu appears. 2. "Select" is same from each speaker. Press ENTER and 5.1 Speaker Setup menu appears. Front Left (L) → Center → Front Right (R) → Rear Right (R) → Rear Left (L) → SubWoofer You can adjust the volume during operating the test tone, first use v / V to select Volume or Speaker option then use b / B buttons to the second level. 3. Select Move Return Enter 5. Use b / B to adjust the output level of the selected speaker...
Operation Guide
Page 35
... signal distortion. If not, repeat the above procedure until picture quality is not perfectly matched with the disc. Tips: XTS- 1: When playing the movie with the weak bass sound relatively to satisfy with comparatively little motion. That means Vertical interpolation or De-interlace is improved. • Video mode change the video mode, press and hold DISPLAY about 3 seconds during 2 channel mode, the setting changes in the Setup menu...
... signal distortion. If not, repeat the above procedure until picture quality is not perfectly matched with the disc. Tips: XTS- 1: When playing the movie with the weak bass sound relatively to satisfy with comparatively little motion. That means Vertical interpolation or De-interlace is improved. • Video mode change the video mode, press and hold DISPLAY about 3 seconds during 2 channel mode, the setting changes in the Setup menu...

Operation Guide
Page 37
Presetting the Radio Stations Listening to the Radio You can use the number buttons on the remote control to select a preset radio station directly. Before tuning, make sure that "ST." Scanning stops when the DVD/CD Receiver tunes in the display window. A preset number will flash in a station. Preset radio stations in . 2. The last received station is appeared in the station manually. Press PRESET + or - Note: If all the stored stations Press and hold TUNING To tune in the display window. To change to normal mode. Operation 37 Press and...
Presetting the Radio Stations Listening to the Radio You can use the number buttons on the remote control to select a preset radio station directly. Before tuning, make sure that "ST." Scanning stops when the DVD/CD Receiver tunes in the display window. A preset number will flash in a station. Preset radio stations in . 2. The last received station is appeared in the station manually. Press PRESET + or - Note: If all the stored stations Press and hold TUNING To tune in the display window. To change to normal mode. Operation 37 Press and...

Operation Guide
Page 40
... SET UP button to turn off . • The audio connecting cable is not set . • Cancel the Rating function or change the rating level. does not start playback. • Insert a disc. (Check that the DVD or, audio CD indicator in the DVD display is lit.) • Select the appropriate video input mode on the TV so the picture from the DVD/CD Receiver appears on the TV screen. • Connect the video cable into the wall outlet. Troubleshooting...
... SET UP button to turn off . • The audio connecting cable is not set . • Cancel the Rating function or change the rating level. does not start playback. • Insert a disc. (Check that the DVD or, audio CD indicator in the DVD display is lit.) • Select the appropriate video input mode on the TV so the picture from the DVD/CD Receiver appears on the TV screen. • Connect the video cable into the wall outlet. Troubleshooting...

