

Installation Guide
Page 5
...Clone Programmer-both are subject to change without prior notice. Page 5 Table of Contents 5 TV Features Overview 6 Setup Checklist 7 User remote control 8 Optional Installer's remote control 9 Connections/Installation Overview 10 Step 1. TV Reception Set Up & Channel Search Auto Program: Select Antenna, or Cable service and...hook up the TV's features for the end user See the Setup Checklist on another identical LG TV. The installer remote allows access to and set up, you need an installer's remote such as a reference for finding the pages or sections to go to the Installer and ...
...Clone Programmer-both are subject to change without prior notice. Page 5 Table of Contents 5 TV Features Overview 6 Setup Checklist 7 User remote control 8 Optional Installer's remote control 9 Connections/Installation Overview 10 Step 1. TV Reception Set Up & Channel Search Auto Program: Select Antenna, or Cable service and...hook up the TV's features for the end user See the Setup Checklist on another identical LG TV. The installer remote allows access to and set up, you need an installer's remote such as a reference for finding the pages or sections to go to the Installer and ...

Installation Guide
Page 7
... your area. Select viewing source for the End User 9. See pages 25 through 49. Or, add the channel using the Add/Del/Blnk option in remote control. See pages 41 through 40. If you know that there is selected.) Reception Setup and Channel Search 8. See page 11. 5. Some broadcasters do not...
... your area. Select viewing source for the End User 9. See pages 25 through 49. Or, add the channel using the Add/Del/Blnk option in remote control. See pages 41 through 40. If you know that there is selected.) Reception Setup and Channel Search 8. See page 11. 5. Some broadcasters do not...

Installation Guide
Page 8
...picture remains. Audio Languages: Availability of the keys and their functions on the 6710V00108L user's remote supplied with the TV POWER Turns TV On or Off. User Remote Control A list of audio languages are determined only by each broadcaster and may not be available... of the TV as a source). POWER FLSHBK MUTE CC VOLUME CHANNEL 1 2 3 4 5 6 7 8 9 0 ENTER TIMER AUDIO ALARM CH PREVIEW Remote Control part number 6710V00108L FLASHBK (Flashback) Returns to digital) and the Aux Channel (Audio / Video source). some models.) Displays available analog TV channels, allows hotel...
...picture remains. Audio Languages: Availability of the keys and their functions on the 6710V00108L user's remote supplied with the TV POWER Turns TV On or Off. User Remote Control A list of audio languages are determined only by each broadcaster and may not be available... of the TV as a source). POWER FLSHBK MUTE CC VOLUME CHANNEL 1 2 3 4 5 6 7 8 9 0 ENTER TIMER AUDIO ALARM CH PREVIEW Remote Control part number 6710V00108L FLASHBK (Flashback) Returns to digital) and the Aux Channel (Audio / Video source). some models.) Displays available analog TV channels, allows hotel...

Installation Guide
Page 9
...CC TV/FM VOLUME FLSHBK MUTE CHANNEL 1 2 3 4 5 6 7 8 9 0 ENTER TIMER MENU ALARM AUDIO SELECT CH PREVIEW ADJ ADJ Remote Control part number 6710V00108M FLASHBK (FLASHBACK) Returns to remove menu. ALARM Press to digital) and the Aux Channel (Audio/Video source). ENTER Press to ...menus. CHANNEL PREVIEW (Not functional for the menus down arrow. TV/FM (Down Arrow) Use for digital channels - Installer Remote Control Keys descriptions and their functions for digital channels only. Press MENU repeatedly to change the selected option. AUDIO Selects available ...
...CC TV/FM VOLUME FLSHBK MUTE CHANNEL 1 2 3 4 5 6 7 8 9 0 ENTER TIMER MENU ALARM AUDIO SELECT CH PREVIEW ADJ ADJ Remote Control part number 6710V00108M FLASHBK (FLASHBACK) Returns to remove menu. ALARM Press to digital) and the Aux Channel (Audio/Video source). ENTER Press to ...menus. CHANNEL PREVIEW (Not functional for the menus down arrow. TV/FM (Down Arrow) Use for digital channels - Installer Remote Control Keys descriptions and their functions for digital channels only. Press MENU repeatedly to change the selected option. AUDIO Selects available ...
Installation Guide
Page 11
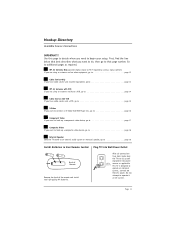
...up a component video device, go to additional pages as applicable. 60 Hz AC This TV is designed to page 18 Install Batteries in User Remote Control Plug TV into power 120 Volt sources as required. Hookup Directory Available Source Connections IMPORTANT!!! Page 11 Do not attempt to begin your ...setup. After all system equipment into Wall Power Outlet Back of Remote Remove the back of the remote and install two high-quality AA batteries. Use this page to decide where you want to do, then go to page ...
...up a component video device, go to additional pages as applicable. 60 Hz AC This TV is designed to page 18 Install Batteries in User Remote Control Plug TV into power 120 Volt sources as required. Hookup Directory Available Source Connections IMPORTANT!!! Page 11 Do not attempt to begin your ...setup. After all system equipment into Wall Power Outlet Back of Remote Remove the back of the remote and install two high-quality AA batteries. Use this page to decide where you want to do, then go to page ...

Installation Guide
Page 19
..., press POWER to turn the TV on. 2 Press MENU repeatedly until the Setup menu appears. 3 Using SELECT on the remote control, highlight Auto Program on the channel / time / audio display. Channel search for analog channels. Page 19 Auto Program finds channels being received by the ...
..., press POWER to turn the TV on. 2 Press MENU repeatedly until the Setup menu appears. 3 Using SELECT on the remote control, highlight Auto Program on the channel / time / audio display. Channel search for analog channels. Page 19 Auto Program finds channels being received by the ...
Installation Guide
Page 22
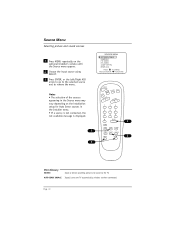
Notes • The selection of the sources appearing in the Source menu may vary depending on the optional Installer's remote until the Source menu appears. 2 Choose the input source using SELECT. 3 Press ENTER, or the Left/Right ADJ arrow to go to the selected source ...
Notes • The selection of the sources appearing in the Source menu may vary depending on the optional Installer's remote until the Source menu appears. 2 Choose the input source using SELECT. 3 Press ENTER, or the Left/Right ADJ arrow to go to the selected source ...

Installation Guide
Page 23
..., Treble, Balance, Audio Mode/Audio Language, Front Surround, SoundRite, Audio Pref. Analog-Digital Captions Menus Structures. Improves the quality color image on the optional Installer's remote, the user can access the menus/displays described below. The options are displayed not digital). Digital audio language selection. Channel/Time 24 Shows the current...
..., Treble, Balance, Audio Mode/Audio Language, Front Surround, SoundRite, Audio Pref. Analog-Digital Captions Menus Structures. Improves the quality color image on the optional Installer's remote, the user can access the menus/displays described below. The options are displayed not digital). Digital audio language selection. Channel/Time 24 Shows the current...

Installation Guide
Page 24
... details: Title, day, time, languages available, audio options available, video formats available, Closed captions options available, etc. Other Menus and On-Screen Displays Press the remote keys indicated below to scroll each digital captions language, if available. CHANNEL PREVIEW 5 ---9 ---20 - - - 32 - - - - CH TO SELECT, ENTER TO QUIT CC FOR PARENTAL CONTROL...
... details: Title, day, time, languages available, audio options available, video formats available, Closed captions options available, etc. Other Menus and On-Screen Displays Press the remote keys indicated below to scroll each digital captions language, if available. CHANNEL PREVIEW 5 ---9 ---20 - - - 32 - - - - CH TO SELECT, ENTER TO QUIT CC FOR PARENTAL CONTROL...

Installation Guide
Page 25
... 3-0, VCR3 (Ch 126-0) is also deleted. Add/Delete/Blank Channel Setup Fine-tune the channel selection list 1 Use the MENU key on the optional Installer's remote to access the Setup menu. 2 Use SELECT to highlight the Add/Del/Blnk option. 3 Using either the NUMBER keypad and ENTER or the Channel Up.../Down arrow on the remote, select a channel. (If adding a deleted channel, you are finished, press ENTER to remove menu. When you will have to use the NUMBER keypad and ENTER...
... 3-0, VCR3 (Ch 126-0) is also deleted. Add/Delete/Blank Channel Setup Fine-tune the channel selection list 1 Use the MENU key on the optional Installer's remote to access the Setup menu. 2 Use SELECT to highlight the Add/Del/Blnk option. 3 Using either the NUMBER keypad and ENTER or the Channel Up.../Down arrow on the remote, select a channel. (If adding a deleted channel, you are finished, press ENTER to remove menu. When you will have to use the NUMBER keypad and ENTER...
Installation Guide
Page 26
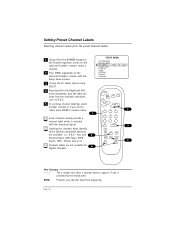
... Labels Selecting channel names from the preset Channel Labels 1 Using either the NUMBER keypad or the Channel Up/Down arrows on the optional Installer's remote, select a channel. 2 Press MENU repeatedly on ... Channels labels are available. if one is included with the broadcast signal. i.e., A &... E - Movies and so on the optional Installer's remote until the Setup menu appears. 3 Choose the Ch Labels option using SELECT. 4 Pressing either the Right/Left ADJ arrow repeatedly, pick the label...
... Labels Selecting channel names from the preset Channel Labels 1 Using either the NUMBER keypad or the Channel Up/Down arrows on the optional Installer's remote, select a channel. 2 Press MENU repeatedly on ... Channels labels are available. if one is included with the broadcast signal. i.e., A &... E - Movies and so on the optional Installer's remote until the Setup menu appears. 3 Choose the Ch Labels option using SELECT. 4 Pressing either the Right/Left ADJ arrow repeatedly, pick the label...
Installation Guide
Page 27
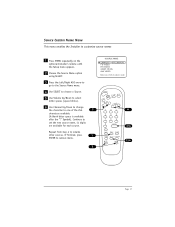
... space is available after the "!" Source Custom Name Menu This menu enables the Installer to customize source names 1 Press MENU repeatedly on the optional Installer's remote until the Setup menu appears. 2 Choose the Source Name option using SELECT. 3 Press the Left/Right ADJ arrow to go to the Source Name menu...
... space is available after the "!" Source Custom Name Menu This menu enables the Installer to customize source names 1 Press MENU repeatedly on the optional Installer's remote until the Setup menu appears. 2 Choose the Source Name option using SELECT. 3 Press the Left/Right ADJ arrow to go to the Source Name menu...

Installation Guide
Page 28
... SET AUTOMATIC AUTOMATIC OFF ON AUTOMATIC EASTERN CENTRAL MOUNTAIN PACIFIC MANUAL 10:43 AM TIMER Clock Auto/Manual Operating Modes Setup 1 On the optional Installer's remote, use MENU, SELECT, and the ADJ Left/Right arrows to choose and set up the Clock menu options. 2 Use the number keypad, or the Left...
... SET AUTOMATIC AUTOMATIC OFF ON AUTOMATIC EASTERN CENTRAL MOUNTAIN PACIFIC MANUAL 10:43 AM TIMER Clock Auto/Manual Operating Modes Setup 1 On the optional Installer's remote, use MENU, SELECT, and the ADJ Left/Right arrows to choose and set up the Clock menu options. 2 Use the number keypad, or the Left...

Installation Guide
Page 29
... CAPTIONS DEGAUSS LANGUAGE TO SET TIMER TIMER ON TIME 9:00 AM TIMER OFF TIME 7:00 PM TIMER ON/OFF TIMER ON 1 On the optional Installer's remote, press MENU repeatedly until the Setup menu appears. 2 Press SELECT repeatedly to highlight the Timer option, press the Left/Right ADJ arrow. 3 Use SELECT to...
... CAPTIONS DEGAUSS LANGUAGE TO SET TIMER TIMER ON TIME 9:00 AM TIMER OFF TIME 7:00 PM TIMER ON/OFF TIMER ON 1 On the optional Installer's remote, press MENU repeatedly until the Setup menu appears. 2 Press SELECT repeatedly to highlight the Timer option, press the Left/Right ADJ arrow. 3 Use SELECT to...

Installation Guide
Page 30
...captioning is available using the Caption 1 option. Page 30 Use 'Set by the broadcaster. Digital Captions Operating Modes Setup On the optional Installer's remote, use MENU, SELECT, and ADJ (Left/Right) arrows to choose Closed Captions / Text mode and set up digital captions, the installer ...must tune in appearance to analog captions e.g. Style: Set By Program Captions appear white text on the remote and select On - - same for the digital captions appearance options available. If digital captions are not available on . Press ENTER to ...
...captioning is available using the Caption 1 option. Page 30 Use 'Set by the broadcaster. Digital Captions Operating Modes Setup On the optional Installer's remote, use MENU, SELECT, and ADJ (Left/Right) arrows to choose Closed Captions / Text mode and set up digital captions, the installer ...must tune in appearance to analog captions e.g. Style: Set By Program Captions appear white text on the remote and select On - - same for the digital captions appearance options available. If digital captions are not available on . Press ENTER to ...

Installation Guide
Page 32
... the screen too often; Degauss the Screen Remove color impurities appearing on the screen 1 Press MENU repeatedly on the optional Installer's remote until the Setup menu appears. 2 Use SELECT on the remote control, to OFF mode auto- matically.) 4 Press ENTER to remove menu. SETUP MENU AUTO PROGRAM ADD/DEL/BLNK CH. the...
... the screen too often; Degauss the Screen Remove color impurities appearing on the screen 1 Press MENU repeatedly on the optional Installer's remote until the Setup menu appears. 2 Use SELECT on the remote control, to OFF mode auto- matically.) 4 Press ENTER to remove menu. SETUP MENU AUTO PROGRAM ADD/DEL/BLNK CH. the...

Installation Guide
Page 33
... Menus Choose English, Spanish, (Español) or French (Francais) for the on-screen menus 1 On the optional Installer's remote, press MENU repeatedly until the Setup menu appears. 2 Use SELECT on the remote control, to highlight the Language option on the menu. 3 Use the Left/Right ADJ arrow to choose one of...
... Menus Choose English, Spanish, (Español) or French (Francais) for the on-screen menus 1 On the optional Installer's remote, press MENU repeatedly until the Setup menu appears. 2 Use SELECT on the remote control, to highlight the Language option on the menu. 3 Use the Left/Right ADJ arrow to choose one of...

Installation Guide
Page 34
... ADJ ADJ 2 3 Page 34 light the audio menu option you want to scan the Audio Languages available for the end user 1 On the optional Installer's remote, press MENU repeatedly to go to the Audio menu. 2 Using SELECT on and off . • SoundRite: Turns the uniform volume feature on the... remote control, high- Not all programming is broadcast in stereo sound or has 2nd Audio SAP. Choose from English, Spanish or French Audio Language default. (Only ...
... ADJ ADJ 2 3 Page 34 light the audio menu option you want to scan the Audio Languages available for the end user 1 On the optional Installer's remote, press MENU repeatedly to go to the Audio menu. 2 Using SELECT on and off . • SoundRite: Turns the uniform volume feature on the... remote control, high- Not all programming is broadcast in stereo sound or has 2nd Audio SAP. Choose from English, Spanish or French Audio Language default. (Only ...

Installation Guide
Page 35
...: The broadcaster has control of sound. CUSTOM Your own audio menu settings. To hear audio, you must select an active language. 1 On the optional Installer's remote, 1 press AUDIO repeatedly to their original settings. This condition is being included on the selected channel. • As mentioned above, even if anoth- On more...
...: The broadcaster has control of sound. CUSTOM Your own audio menu settings. To hear audio, you must select an active language. 1 On the optional Installer's remote, 1 press AUDIO repeatedly to their original settings. This condition is being included on the selected channel. • As mentioned above, even if anoth- On more...

Installation Guide
Page 36
... Screen, Letter box. • Picture Preference: Choose either Custom or Preset: Custom = Allows you to set levels. 2 Using SELECT on the remote control, choose Contrast on all colors in the TV picture. • Tint: Adjusts the relative amounts of the picture when available from Step 2 ...to customize the picture's appearance 1 On the optional installer's remote, press the MENU key repeatedly until the Video menu appears. Choose the Preset option in the picture. • Sharpness: Raises or lowers the...
... Screen, Letter box. • Picture Preference: Choose either Custom or Preset: Custom = Allows you to set levels. 2 Using SELECT on the remote control, choose Contrast on all colors in the TV picture. • Tint: Adjusts the relative amounts of the picture when available from Step 2 ...to customize the picture's appearance 1 On the optional installer's remote, press the MENU key repeatedly until the Video menu appears. Choose the Preset option in the picture. • Sharpness: Raises or lowers the...


