

Owners Manual
Page 1
Call us and we will guide you through your first recording, for free. 1-800-243-0000 DR1F9M-AA1ULL-ENG DVD RECORDER OWNER'S MANUAL MODEL: DR1F9H Before connecting, operating or adjusting this product, please read this instruction booklet carefully and completely.
Call us and we will guide you through your first recording, for free. 1-800-243-0000 DR1F9M-AA1ULL-ENG DVD RECORDER OWNER'S MANUAL MODEL: DR1F9H Before connecting, operating or adjusting this product, please read this instruction booklet carefully and completely.
Owners Manual
Page 4
... Operation 18 General Settings 18-19 Tuning Band Select 18 Auto Channel Set 18 To Add or Erase Channels 18 Auto Clock Set 19 Manual Clock Set 19 TV Aspect 19 Power Save Mode 19 Factory Set 19 Language Settings 20 Audio Settings 20 Dolby Digital / DTS / ... MP3/WMA file 30 Viewing a JPEG File 31-32 Recording 33-38 About DVD recording 33-34 Basic Recording from a TV 35 Instant Timer Recording 35 Playing while you are recording 35 Timer Recording 36 Checking Timer Recording Details 37 Recording from an External Input 37 Recording from DV Input 38 Editing 39-45 Title List and...
... Operation 18 General Settings 18-19 Tuning Band Select 18 Auto Channel Set 18 To Add or Erase Channels 18 Auto Clock Set 19 Manual Clock Set 19 TV Aspect 19 Power Save Mode 19 Factory Set 19 Language Settings 20 Audio Settings 20 Dolby Digital / DTS / ... MP3/WMA file 30 Viewing a JPEG File 31-32 Recording 33-38 About DVD recording 33-34 Basic Recording from a TV 35 Instant Timer Recording 35 Playing while you are recording 35 Timer Recording 36 Checking Timer Recording Details 37 Recording from an External Input 37 Recording from DV Input 38 Editing 39-45 Title List and...

Owners Manual
Page 5
... listed below. RAM DVD-RAM disc -RWVR DVD-RW with VR recording mode -RWVideo DVD-RW with a clean cloth. Tip: Indicates tips and hints for two or three hours without operating it from the center out. Moisture Condensation Never operate this owner's manual is not available on your recorder. Introduction Introduction To ensure proper use of...
... listed below. RAM DVD-RAM disc -RWVR DVD-RW with VR recording mode -RWVideo DVD-RW with a clean cloth. Tip: Indicates tips and hints for two or three hours without operating it from the center out. Moisture Condensation Never operate this owner's manual is not available on your recorder. Introduction Introduction To ensure proper use of...

Owners Manual
Page 13
... the following connections, depending on your TV and other devices as necessary to the correct video input channel. - Please refer to the manuals of your TV, VCR, Stereo System or other equipment you could be distorted by the copy protection system. Tune the TV to make ... in jack on the TV using the video cable (V). The DVD image could connect the recorder. If your television is connected directly to the TV. Do not connect your recorder via your audio system. - Do not connect the recorder's AUDIO OUT jack to this channel. Hookup and Settings Connections ...
... the following connections, depending on your TV and other devices as necessary to the correct video input channel. - Please refer to the manuals of your TV, VCR, Stereo System or other equipment you could be distorted by the copy protection system. Tune the TV to make ... in jack on the TV using the video cable (V). The DVD image could connect the recorder. If your television is connected directly to the TV. Do not connect your recorder via your audio system. - Do not connect the recorder's AUDIO OUT jack to this channel. Hookup and Settings Connections ...
Owners Manual
Page 14
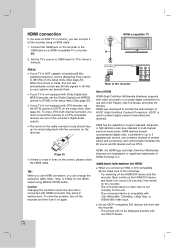
...compatible TV HDMI H Notes: If your TV is used to TV's Owner's manual). HDCP is not equipped with DTS decoder, set correctly for use HDMI connection, you can decode them. Caution Changing the resolution when the recorder is NOT capable of handling 96 kHz sampling frequency, set the [Dolby Digital]...then turn it for around 30 seconds, then switch on a single digital connection for this recorder to [PCM] on the setup menu (See page 20). HDMI was developed to this unit will work with DVD Players, Set-Top Boxes, and other AV devices. Not all HDCP-compatible DVI devices ...
...compatible TV HDMI H Notes: If your TV is used to TV's Owner's manual). HDCP is not equipped with DTS decoder, set correctly for use HDMI connection, you can decode them. Caution Changing the resolution when the recorder is NOT capable of handling 96 kHz sampling frequency, set the [Dolby Digital]...then turn it for around 30 seconds, then switch on a single digital connection for this recorder to [PCM] on the setup menu (See page 20). HDMI was developed to this unit will work with DVD Players, Set-Top Boxes, and other AV devices. Not all HDCP-compatible DVI devices ...

Owners Manual
Page 15
...DTS sound track. To see the audio format of the audio formats supported by your recorder (MPEG 2, Dolby Digital and DTS). Six Channel Digital Surround Sound via one or more of the current DVD in the on page 20.) Digital Multi-channel sound A digital multi-channel connection ... system, using the audio cables (A). To enjoy DTS multi channel surround, you need to activate the recorder's digital output. (See "Audio Settings" on -screen display, press AUDIO. - Check the receiver manual and the logos on the front of Digital Theater Systems, Inc. 15 Connect one of your amplifier....
...DTS sound track. To see the audio format of the audio formats supported by your recorder (MPEG 2, Dolby Digital and DTS). Six Channel Digital Surround Sound via one or more of the current DVD in the on page 20.) Digital Multi-channel sound A digital multi-channel connection ... system, using the audio cables (A). To enjoy DTS multi channel surround, you need to activate the recorder's digital output. (See "Audio Settings" on -screen display, press AUDIO. - Check the receiver manual and the logos on the front of Digital Theater Systems, Inc. 15 Connect one of your amplifier....

Owners Manual
Page 17
.... (See page 18) Ch. Displays Movie List menu for disc. Plays back Video CD or DVD-Video disc (page 25-28). Mode: Displays the menu to select the record mode. (See page 22) DV Input: Set the recorder to display the Home Menu screen. Press B to select a language then press ENTER. TV Auto... and Settings Auto Set Up After the POWER is pressed for the first time to turn on page 19) 2) Press ENTER to confirm your setting. [Manual]: 1) Enter the necessary information for date and time. Use v / V and ENTER buttons to choose Band, PBS channel, Time Zone, Daylight Savings options. (Details are on...
.... (See page 18) Ch. Displays Movie List menu for disc. Plays back Video CD or DVD-Video disc (page 25-28). Mode: Displays the menu to select the record mode. (See page 22) DV Input: Set the recorder to display the Home Menu screen. Press B to select a language then press ENTER. TV Auto... and Settings Auto Set Up After the POWER is pressed for the first time to turn on page 19) 2) Press ENTER to confirm your setting. [Manual]: 1) Enter the necessary information for date and time. Use v / V and ENTER buttons to choose Band, PBS channel, Time Zone, Daylight Savings options. (Details are on...

Owners Manual
Page 24
..., the symbol appears on the TV screen, indicating that the operation is pressed for operating the recorder. Displaying Disc Information on-screen You can select an item by pressing v / V and change...about the disc loaded on-screen. 1. The items displayed differ depending on -screen. Some DVDs require specific operation or allow only limited operation during playback. You can display various information ... subtitle (page 26) [Angle]: Selected angle/total number of On-Screen Display This manual gives basic instructions for 10 seconds, the on-screen display disappears. 24 Press DISPLAY ...
..., the symbol appears on the TV screen, indicating that the operation is pressed for operating the recorder. Displaying Disc Information on-screen You can select an item by pressing v / V and change...about the disc loaded on-screen. 1. The items displayed differ depending on -screen. Some DVDs require specific operation or allow only limited operation during playback. You can display various information ... subtitle (page 26) [Angle]: Selected angle/total number of On-Screen Display This manual gives basic instructions for 10 seconds, the on-screen display disappears. 24 Press DISPLAY ...

Owners Manual
Page 40
... press THUMBNAIL. Tip: You can change the thumbnail picture of what 's actually recorded on page 22). With DVD, you will often see "Auto Chapter" on the disc. Playlist: content refers to record the edits. During recording or playing back, at the point you may not be played. Changing Title ...the Delete, Add and Move functions, the start of the disc - Is editing a DVD like editing a video tape? You can also change this manual, you edit by making a 'Playlist' of the title on a DVD-Video disc do. No. Original: content refers to be exactly as chapters on the ...
... press THUMBNAIL. Tip: You can change the thumbnail picture of what 's actually recorded on page 22). With DVD, you will often see "Auto Chapter" on the disc. Playlist: content refers to record the edits. During recording or playing back, at the point you may not be played. Changing Title ...the Delete, Add and Move functions, the start of the disc - Is editing a DVD like editing a video tape? You can also change this manual, you edit by making a 'Playlist' of the title on a DVD-Video disc do. No. Original: content refers to be exactly as chapters on the ...
Owners Manual
Page 46
... you want then press ENTER or PLAY (N). Press MENU/LIST to start point of the title. But if the next title is displayed. Playing Your Recordings on regular DVD players only after finalization. Check the manual that always record at the starting point of the title. 5. The edited contents of titles on the other...
... you want then press ENTER or PLAY (N). Press MENU/LIST to start point of the title. But if the next title is displayed. Playing Your Recordings on regular DVD players only after finalization. Check the manual that always record at the starting point of the title. 5. The edited contents of titles on the other...


