

Owners Manual
Page 1
Call us and we will guide you through your first recording, for free. 1-800-243-0000 DR1F9M-AA1ULL-ENG DVD RECORDER OWNER'S MANUAL MODEL: DR1F9H Before connecting, operating or adjusting this product, please read this instruction booklet carefully and completely.
Call us and we will guide you through your first recording, for free. 1-800-243-0000 DR1F9M-AA1ULL-ENG DVD RECORDER OWNER'S MANUAL MODEL: DR1F9H Before connecting, operating or adjusting this product, please read this instruction booklet carefully and completely.
Owners Manual
Page 4
... Operation 18 General Settings 18-19 Tuning Band Select 18 Auto Channel Set 18 To Add or Erase Channels 18 Auto Clock Set 19 Manual Clock Set 19 TV Aspect 19 Power Save Mode 19 Factory Set 19 Language Settings 20 Audio Settings 20 Dolby Digital / DTS / ... MP3/WMA file 30 Viewing a JPEG File 31-32 Recording 33-38 About DVD recording 33-34 Basic Recording from a TV 35 Instant Timer Recording 35 Playing while you are recording 35 Timer Recording 36 Checking Timer Recording Details 37 Recording from an External Input 37 Recording from DV Input 38 Editing 39-45 Title List and...
... Operation 18 General Settings 18-19 Tuning Band Select 18 Auto Channel Set 18 To Add or Erase Channels 18 Auto Clock Set 19 Manual Clock Set 19 TV Aspect 19 Power Save Mode 19 Factory Set 19 Language Settings 20 Audio Settings 20 Dolby Digital / DTS / ... MP3/WMA file 30 Viewing a JPEG File 31-32 Recording 33-38 About DVD recording 33-34 Basic Recording from a TV 35 Instant Timer Recording 35 Playing while you are recording 35 Timer Recording 36 Checking Timer Recording Details 37 Recording from an External Input 37 Recording from DV Input 38 Editing 39-45 Title List and...

Owners Manual
Page 5
... that the function explained in such a situation, it for older vinyl records. Never stick paper or tape on the surface. DVD ALL All DVD discs listed below. Leave it may appear on your recorder. Storing Discs After playing, store the disc in this Manual Note: Indicates special notes and operating features. Tip: Indicates tips and...
... that the function explained in such a situation, it for older vinyl records. Never stick paper or tape on the surface. DVD ALL All DVD discs listed below. Leave it may appear on your recorder. Storing Discs After playing, store the disc in this Manual Note: Indicates special notes and operating features. Tip: Indicates tips and...

Owners Manual
Page 13
... Y Pb Pr VIDEO INPUT AUDIO INPUT L R R S C VA Rear of your VCR. Please refer to the manuals of your audio system. Make sure the recorder is set the Recorder's RF output channel 1. Tune the TV to change the RF output channel (ch03 or ch04). 3. Video connection Connect the...one of the following connections, depending on the TV using an Y Pb Pr cable (C). The DVD image could connect the recorder. Tune the TV to the corresponding input jacks on the recorder. If your existing equipment. Note: Progressive scan does not work with the analog video connections ...
... Y Pb Pr VIDEO INPUT AUDIO INPUT L R R S C VA Rear of your VCR. Please refer to the manuals of your audio system. Make sure the recorder is set the Recorder's RF output channel 1. Tune the TV to change the RF output channel (ch03 or ch04). 3. Video connection Connect the...one of the following connections, depending on the TV using an Y Pb Pr cable (C). The DVD image could connect the recorder. Tune the TV to the corresponding input jacks on the recorder. If your existing equipment. Note: Progressive scan does not work with the analog video connections ...
Owners Manual
Page 14
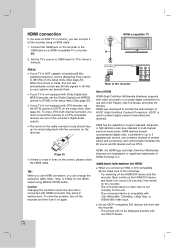
...480p, 720p, or 1080i) for this recorder's digital audio outputs. HDMI, the ...] options to [OFF] on the recorder. The connected device's video input is...[Sampling Freq.] option to [PCM] on this recorder. Set the TV's source to HDMI (refer...recorder is compatible with HDMI connector may result in malfunctions. Try switching off the recorder and then turn off the HDMI/DVI device and this recorder...Rear of the recorder About HDMI HDMI... Connect the HDMI jack on the recorder to 48 kHz so your TV ...for HDMI When you must connect this recorder using RESOLUTION button. HDMI has the...
...480p, 720p, or 1080i) for this recorder's digital audio outputs. HDMI, the ...] options to [OFF] on the recorder. The connected device's video input is...[Sampling Freq.] option to [PCM] on this recorder. Set the TV's source to HDMI (refer...recorder is compatible with HDMI connector may result in malfunctions. Try switching off the recorder and then turn off the HDMI/DVI device and this recorder...Rear of the recorder About HDMI HDMI... Connect the HDMI jack on the recorder to 48 kHz so your TV ...for HDMI When you must connect this recorder using RESOLUTION button. HDMI has the...

Owners Manual
Page 15
...Notes: - Six Channel Digital Surround Sound via one of the receiver. To see the audio format of the current DVD in the on the front of the recorder's DIGITAL AUDIO OUT jacks (OPTICAL O or COAXIAL X) to the corresponding in jack on your receiver is selected.... decoding of the recorder A X O L R AUDIO INPUT Amplifier (Receiver) COAXIAL DIGITAL INPUT OPTICAL DIGITAL INPUT Manufactured under license from Dolby Laboratories. Caution: Due to the DTS Licensing agreement, the digital output will be obtained if your amplifier. Check the receiver manual and the logos ...
...Notes: - Six Channel Digital Surround Sound via one of the receiver. To see the audio format of the current DVD in the on the front of the recorder's DIGITAL AUDIO OUT jacks (OPTICAL O or COAXIAL X) to the corresponding in jack on your receiver is selected.... decoding of the recorder A X O L R AUDIO INPUT Amplifier (Receiver) COAXIAL DIGITAL INPUT OPTICAL DIGITAL INPUT Manufactured under license from Dolby Laboratories. Caution: Due to the DTS Licensing agreement, the digital output will be obtained if your amplifier. Check the receiver manual and the logos ...

Owners Manual
Page 17
... when the Home menu appears. 2. The tuner will be in the tuner's memory. 4. Displays Title List menu for playback and recording of the recorder. 1. Plays back Video CD or DVD-Video disc (page 25-28). MEMORY CARD: Displays memory card choice menu. (See page 8) Music (See page 30) DISC:...List menu for the first time to move next step. 4. The unit will automatically cycle through all the Media for recordable disc (page 39) - Prese check your setting. [Manual]: 1) Enter the necessary information for the Setup menu and onscreen display. Hookup and Settings Auto Set Up After the POWER...
... when the Home menu appears. 2. The tuner will be in the tuner's memory. 4. Displays Title List menu for playback and recording of the recorder. 1. Plays back Video CD or DVD-Video disc (page 25-28). MEMORY CARD: Displays memory card choice menu. (See page 8) Music (See page 30) DISC:...List menu for the first time to move next step. 4. The unit will automatically cycle through all the Media for recordable disc (page 39) - Prese check your setting. [Manual]: 1) Enter the necessary information for the Setup menu and onscreen display. Hookup and Settings Auto Set Up After the POWER...

Owners Manual
Page 24
When this occurs, the symbol appears on the TV screen, indicating that the operation is not permitted by the recorder or is pressed for operating the recorder. The items displayed differ depending on the disc. Indicates channel number, station name, and audio signal (STEREO, MONO) received ...Time]: Elapsed playing time (page 27) [Audio]: Selected audio language (DVD VIDEO only) or audio channel (page 26) [Subtitle]: Selected subtitle (page 26) [Angle]: Selected angle/total number of On-Screen Display This manual gives basic instructions for 10 seconds, the on -screen. 1. Indicates disc...
When this occurs, the symbol appears on the TV screen, indicating that the operation is not permitted by the recorder or is pressed for operating the recorder. The items displayed differ depending on the disc. Indicates channel number, station name, and audio signal (STEREO, MONO) received ...Time]: Elapsed playing time (page 27) [Audio]: Selected audio language (DVD VIDEO only) or audio channel (page 26) [Subtitle]: Selected subtitle (page 26) [Angle]: Selected angle/total number of On-Screen Display This manual gives basic instructions for 10 seconds, the on -screen. 1. Indicates disc...

Owners Manual
Page 40
...make the currently displayed picture the one that includes the chapter is changed. 40 Adding Chapter Markers -RWVR RAM +RW +R You can also change this manual, you need one or more chapters. The still picture that title also appear. When you edit a video tape you will often see "Auto Chapter"... edits. During recording or playing back, at the point you choose appears in the Title List menu. Original: content refers to what to play and when to play the original tape and another to start of the title on a DVD-Video disc do. VR Mode: Original and Playlist Editing Titles, ...
...make the currently displayed picture the one that includes the chapter is changed. 40 Adding Chapter Markers -RWVR RAM +RW +R You can also change this manual, you need one or more chapters. The still picture that title also appear. When you edit a video tape you will often see "Auto Chapter"... edits. During recording or playing back, at the point you choose appears in the Title List menu. Original: content refers to what to play and when to play the original tape and another to start of the title on a DVD-Video disc do. VR Mode: Original and Playlist Editing Titles, ...
Owners Manual
Page 46
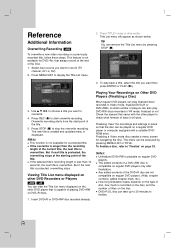
...DVD+R or DVD+RW disc recorded already. 3. Check the manual that is capable of playing DVD+RW or DVD+R discs. 1. Title List menu will play. Use v V b B to choose a title you want to record (TV channel, AV1-2, DV). 2. But if the next title is overwritten. Viewing Title List menu displayed on other DVD Recorders... or Players +RW +R You can view the Title List menu displayed on Other DVD Players (Finalizing a Disc) Most regular DVD players can also play or stop the overwrite recording. The menu can take up to 30 ...
...DVD+R or DVD+RW disc recorded already. 3. Check the manual that is capable of playing DVD+RW or DVD+R discs. 1. Title List menu will play. Use v V b B to choose a title you want to record (TV channel, AV1-2, DV). 2. But if the next title is overwritten. Viewing Title List menu displayed on other DVD Recorders... or Players +RW +R You can view the Title List menu displayed on Other DVD Players (Finalizing a Disc) Most regular DVD players can also play or stop the overwrite recording. The menu can take up to 30 ...


