
Owner's Manual
Page 6
... via Digital Audio Output 19 - Playing a file on a network server 37 - Repeat Playback 40 - Viewing content information 42 - Last Scene Memory 42 - Options while viewing a photo 43 - Playable Discs and symbols used in this manual 9 - Compatibility Notes 13 Remote control 14 Front panel 14 Rear panel 2 Connecting 15 Connecting to an Amplifier via 2 Channel Audio Output 20 Connecting to your photo to the Wallpaper 43 - Video/Audio (Left/Right) Connection 17 - Selecting a subtitle file 42 - About the "7" Symbol Display 10 - Resolution Setting 18 Connecting...
... via Digital Audio Output 19 - Playing a file on a network server 37 - Repeat Playback 40 - Viewing content information 42 - Last Scene Memory 42 - Options while viewing a photo 43 - Playable Discs and symbols used in this manual 9 - Compatibility Notes 13 Remote control 14 Front panel 14 Rear panel 2 Connecting 15 Connecting to an Amplifier via 2 Channel Audio Output 20 Connecting to your photo to the Wallpaper 43 - Video/Audio (Left/Right) Connection 17 - Selecting a subtitle file 42 - About the "7" Symbol Display 10 - Resolution Setting 18 Connecting...
Owner's Manual
Page 7
... Table of Contents 7 46 - Displaying content information on Discs 55 Using the LG Apps 73 - Setting up the remote to a USB storage device 64 Area Code List 65 Language code List 3 51 - Deleting file(s)/folder(s) 66 Trademarks and Licenses 51 - Moving file/folder 68 Audio Output Specifications 52 - Notes on - 6 Appendix screen 47 - Picture 59 - Changing the Picture Mode 61 - Copying file(s)/folder(s) to Network Services 5 5 Troubleshooting 57 Troubleshooting 6 57 - Copying file(s)/folder(s) from Gracenote 71 Specifications 72 Maintenance 4 Media Database...
... Table of Contents 7 46 - Displaying content information on Discs 55 Using the LG Apps 73 - Setting up the remote to a USB storage device 64 Area Code List 65 Language code List 3 51 - Deleting file(s)/folder(s) 66 Trademarks and Licenses 51 - Moving file/folder 68 Audio Output Specifications 52 - Notes on - 6 Appendix screen 47 - Picture 59 - Changing the Picture Mode 61 - Copying file(s)/folder(s) to Network Services 5 5 Troubleshooting 57 Troubleshooting 6 57 - Copying file(s)/folder(s) from Gracenote 71 Specifications 72 Maintenance 4 Media Database...

Owner's Manual
Page 12
... your home network. Refer to your display device. are using WOL embeded utility on your personal computer or smartphone via your home network. Secondary video and audio can play only BD-ROM or DVD 1 HDMI input jacks. discs labeled same as necessary for chosen format. digital connection and other compatibility issues For Dolby® Digital Plus, Dolby TrueHD and DTS-HD multi-channel audio playback: yy An amplifier/receiver with a built-in -picture, secondary audio and...
... your home network. Refer to your display device. are using WOL embeded utility on your personal computer or smartphone via your home network. Secondary video and audio can play only BD-ROM or DVD 1 HDMI input jacks. discs labeled same as necessary for chosen format. digital connection and other compatibility issues For Dolby® Digital Plus, Dolby TrueHD and DTS-HD multi-channel audio playback: yy An amplifier/receiver with a built-in -picture, secondary audio and...

Owner's Manual
Page 13
... exits the [Zoom] menu. Z (STOP): Stops playback. MUSIC ID: When connected to navigate BD-ROM menus. BACK (x): Exits the menu or resumes playback. The resume play function may not work depending on the search menu or a number when setting the password. Battery Installation Remove the battery cover on a disc. 0-9 numerical buttons: Selects numbered options in a menu or inputs letters in the menu. Direction buttons: Selects an option in the keypad menu. playback. B (OPEN/CLOSE): Opens and closes the disc tray. z (PLAY): Starts playback. They are also used for [MOVIE...
... exits the [Zoom] menu. Z (STOP): Stops playback. MUSIC ID: When connected to navigate BD-ROM menus. BACK (x): Exits the menu or resumes playback. The resume play function may not work depending on the search menu or a number when setting the password. Battery Installation Remove the battery cover on a disc. 0-9 numerical buttons: Selects numbered options in a menu or inputs letters in the menu. Direction buttons: Selects an option in the keypad menu. playback. B (OPEN/CLOSE): Opens and closes the disc tray. z (PLAY): Starts playback. They are also used for [MOVIE...
Owner's Manual
Page 16
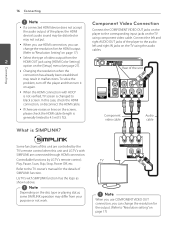
... problem, turn off the player and then turn it on the TV using component video cable. What is changed to black screen. Component Video Connection Connect the COMPONENT VIDEO OUT jacks on the player to "Resolution setting" on page 17) yy When the HDMI connection with SIMPLINK are connected through HDMI connection. Play, Pause, Scan, Skip, Stop, Power Off, etc. Rear of the unit Component video cable Audio cable Some functions of this unit are noises or lines on the [Setup] menu (see page 27). LG TV's with SIMPLINK function...
... problem, turn off the player and then turn it on the TV using component video cable. What is changed to black screen. Component Video Connection Connect the COMPONENT VIDEO OUT jacks on the player to "Resolution setting" on page 17) yy When the HDMI connection with SIMPLINK are connected through HDMI connection. Play, Pause, Scan, Skip, Stop, Power Off, etc. Rear of the unit Component video cable Audio cable Some functions of this unit are noises or lines on the [Setup] menu (see page 27). LG TV's with SIMPLINK function...

Owner's Manual
Page 21
... the player's network setting to clear the highlighted part. Select [OK] and press ENTER (b) to complete the network connection. 6. You can also test it on the screen. Select [OK] and press ENTER (b) to apply network settings. 2 Connecting 5. Preparation Before setting the wired network, you need to connect the broadband internet to select the IP mode between [Dynamic] and [Static]. Select [Connection Setting] option in the [Setup] menu. 2. Use W/S/A/D to your home network. 1. Use...
... the player's network setting to clear the highlighted part. Select [OK] and press ENTER (b) to complete the network connection. 6. You can also test it on the screen. Select [OK] and press ENTER (b) to apply network settings. 2 Connecting 5. Preparation Before setting the wired network, you need to connect the broadband internet to select the IP mode between [Dynamic] and [Static]. Select [Connection Setting] option in the [Setup] menu. 2. Use W/S/A/D to your home network. 1. Use...

Owner's Manual
Page 22
... electronic devices in the home. Wireless Network Setup For the wireless network connection, the player needs to your access point or wireless router for network communication. Adjust the [NETWORK] setting as below. Select [Connection Setting] option in wireless network connection. For best performance, a direct wired connection from the [Setup] menu. But, there may vary depending on the country. Setting up for detailed connection steps and network settings. Preparation Before setting the...
... electronic devices in the home. Wireless Network Setup For the wireless network connection, the player needs to your access point or wireless router for network communication. Adjust the [NETWORK] setting as below. Select [Connection Setting] option in wireless network connection. For best performance, a direct wired connection from the [Setup] menu. But, there may vary depending on the country. Setting up for detailed connection steps and network settings. Preparation Before setting the...

Owner's Manual
Page 23
... on the list, and then press ENTER (b). [Manual] - Use W/S to input the security code as a list. You do not 2 need to select an access point or wireless router on the [Connection Status] in [Manual]. [Push Button] - You need to connect on the screen. If your access point or wireless router use WEP security, enter the security code of your home network. And then, enter the PIN number on a setting menu of the...
... on the list, and then press ENTER (b). [Manual] - Use W/S to input the security code as a list. You do not 2 need to select an access point or wireless router on the [Connection Status] in [Manual]. [Push Button] - You need to connect on the screen. If your access point or wireless router use WEP security, enter the security code of your home network. And then, enter the PIN number on a setting menu of the...

Owner's Manual
Page 24
... use DSL service and yy Many network connection problems during set by interference from the access point as close as type of the access point, or problems at least 0.45 m (1.5 ft.) above the yy Some internet contents may require a higher floor may be limited depending on the policies and restrictions of your Infrastructure mode. yy Turn off and/ or disconnect the power cable of the home...
... use DSL service and yy Many network connection problems during set by interference from the access point as close as type of the access point, or problems at least 0.45 m (1.5 ft.) above the yy Some internet contents may require a higher floor may be limited depending on the policies and restrictions of your Infrastructure mode. yy Turn off and/ or disconnect the power cable of the home...

Owner's Manual
Page 25
... formatted in the USB device 1. Connecting yy A USB device which requires additional program installation when you have connected it fits into place. yy Regular back up to stop loading. 2. yy Some USB device may takes few minutes depending on the HOME menu, the player plays an audio file contained in the USB storage device automatically. Press HOME (n). 3. yy Video, audio and photo files can be used for the local storage for the file type selection will appear. yy USB device: USB device that supports...
... formatted in the USB device 1. Connecting yy A USB device which requires additional program installation when you have connected it fits into place. yy Regular back up to stop loading. 2. yy Some USB device may takes few minutes depending on the HOME menu, the player plays an audio file contained in the USB storage device automatically. Press HOME (n). 3. yy Video, audio and photo files can be used for the local storage for the file type selection will appear. yy USB device: USB device that supports...

Owner's Manual
Page 27
... disc playback will output as 2D mode like a normal BD-ROM disc playback. [On] Blu-ray 3D disc playback will output as 3D mode. Changes the background of the initial screen. 3 System Setting [720p] Outputs 720 lines of progressive video. [480p] Outputs 480 lines of progressive video. [480i] Outputs 480 lines of interlaced video. 1080p Display Mode When the resolution is connected to TVs providing display information (EDID), automatically selects the resolution best suited to match the video source format. 3D Mode Select the type...
... disc playback will output as 2D mode like a normal BD-ROM disc playback. [On] Blu-ray 3D disc playback will output as 3D mode. Changes the background of the initial screen. 3 System Setting [720p] Outputs 720 lines of progressive video. [480p] Outputs 480 lines of progressive video. [480i] Outputs 480 lines of interlaced video. 1080p Display Mode When the resolution is connected to TVs providing display information (EDID), automatically selects the resolution best suited to match the video source format. 3D Mode Select the type...

Owner's Manual
Page 28
... [Setup] menu and onscreen display. Disc Menu/Disc Audio/ Disc Subtitle Each disc has a variety of audio system you connect this unit's HDMI OUT or DIGITAL AUDIO OUT jack to the type of audio output options. Set the player's Audio options according to a device with twochannel digital stereo decoder. Use number buttons then press ENTER (b) to enter the corresponding 4-digit number according to the language code list on page 65. [PCM Multi-Ch] (HDMI only) Select if you connect this unit's HDMI OUT jack to a device with multi-channel digital decoder...
... [Setup] menu and onscreen display. Disc Menu/Disc Audio/ Disc Subtitle Each disc has a variety of audio system you connect this unit's HDMI OUT or DIGITAL AUDIO OUT jack to the type of audio output options. Set the player's Audio options according to a device with twochannel digital stereo decoder. Use number buttons then press ENTER (b) to enter the corresponding 4-digit number according to the language code list on page 65. [PCM Multi-Ch] (HDMI only) Select if you connect this unit's HDMI OUT jack to a device with multi-channel digital decoder...
Owner's Manual
Page 30
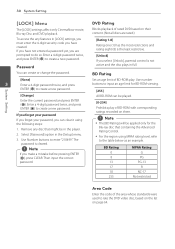
... change the password. Remove any features in the [Setup] menu. 3. Then input the correct password. BD Rating 0 8 13 17 MPAA Rating G PG PG-13 R 18 NC-17 255 Not restricted Area Code Enter the code of BD-ROM with corresponding ratings recorded on page 64. You can be played. [0-254] Prohibits play . 30 System Setting System Setting [LOCK] Menu DVD Rating The [LOCK] settings affect only CinemaNow movie, Blu-ray Disc and DVD playback...
... change the password. Remove any features in the [Setup] menu. 3. Then input the correct password. BD Rating 0 8 13 17 MPAA Rating G PG PG-13 R 18 NC-17 255 Not restricted Area Code Enter the code of BD-ROM with corresponding ratings recorded on page 64. You can be played. [0-254] Prohibits play . 30 System Setting System Setting [LOCK] Menu DVD Rating The [LOCK] settings affect only CinemaNow movie, Blu-ray Disc and DVD playback...

Owner's Manual
Page 33
,,Note All the downloaded videos from DivX VOD with this player's registration code can only be deleted after the formatting. ,,Note yy If you reset the player to its original factory settings using [Factory Set] option, you have to its original factory settings. [Internal HDD Format] Format the internal hard disk drive. Initialize [Factory Set] You can update the software by the user. All the content stored in Stop mode for the on this option to...
,,Note All the downloaded videos from DivX VOD with this player's registration code can only be deleted after the formatting. ,,Note yy If you reset the player to its original factory settings using [Factory Set] option, you have to its original factory settings. [Internal HDD Format] Format the internal hard disk drive. Initialize [Factory Set] You can update the software by the user. All the content stored in Stop mode for the on this option to...

Owner's Manual
Page 35
.... yy Connect an HDMI cable (Type A, High Speed HDMI™ Cable) between the player's HDMI output and TV's HDMI input. Press B (OPEN/CLOSE), and place a disc on your 3D-ready TV for infirm, child and pregnant the damaged USB device anymore. Press HOME (n), and set the [BD-LIVE connection] option on the [Setup] menu to : yy Check your TV is not recommended to adjust the display settings and focus on the disc tray. 4. Operating 35 Playing Blu-ray 3D disc Enjoying...
.... yy Connect an HDMI cable (Type A, High Speed HDMI™ Cable) between the player's HDMI output and TV's HDMI input. Press B (OPEN/CLOSE), and place a disc on your 3D-ready TV for infirm, child and pregnant the damaged USB device anymore. Press HOME (n), and set the [BD-LIVE connection] option on the [Setup] menu to : yy Check your TV is not recommended to adjust the display settings and focus on the disc tray. 4. Operating 35 Playing Blu-ray 3D disc Enjoying...

Owner's Manual
Page 46
... aspect Ratio h Picture Mode - Select an option using W/S. 3. While playback, press INFO/DISPLAY (m) to adjust the selected option value. yy If Blu-ray Disc interactive title is playing back, some setting information is displayed on the screen but prohibited to exit the On-Screen display. ,,Note yy If no button is pressed for accessing the Gracenote Media Database. current title number/total number of Gracenote technology 4 and is a licensee of titles b Chapter - selected audio language or channel e Subtitle - selected picture mode...
... aspect Ratio h Picture Mode - Select an option using W/S. 3. While playback, press INFO/DISPLAY (m) to adjust the selected option value. yy If Blu-ray Disc interactive title is playing back, some setting information is displayed on the screen but prohibited to exit the On-Screen display. ,,Note yy If no button is pressed for accessing the Gracenote Media Database. current title number/total number of Gracenote technology 4 and is a licensee of titles b Chapter - selected audio language or channel e Subtitle - selected picture mode...
Owner's Manual
Page 47
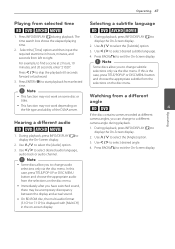
... or DISC MENU button and choose the appropriate audio from selected time. 1. Select the [Time] option and then input the required start playback from the selections on the file type and ability of the DLNA server. During playback, press INFO/DISPLAY (m) to select desired audio language, audio track or audio channel. 1. Use A/D to select the [Subtitle] option. 3. angle yy This function may not work on -screen display. Press BACK(x) to exit the On-Screen display. ,,Note Some discs allow you can change audio selections...
... or DISC MENU button and choose the appropriate audio from selected time. 1. Select the [Time] option and then input the required start playback from the selections on the file type and ability of the DLNA server. During playback, press INFO/DISPLAY (m) to select desired audio language, audio track or audio channel. 1. Use A/D to select the [Subtitle] option. 3. angle yy This function may not work on -screen display. Press BACK(x) to exit the On-Screen display. ,,Note Some discs allow you can change audio selections...
Owner's Manual
Page 59
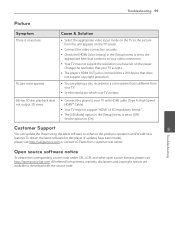
..., warranty disclaimers and copyright notices are playing a disc recorded in the [Setup] menu is different from the unit appears on the TV screen. Blu-ray 3D disc playback does not output 3D views. yy The [3D Mode] option in a color system that does not support copyright protection. Picture noise appears. Cause & Solution yy Select the appropriate video input mode on the player. Troubleshooting Customer Support 5 You can update the Player using the latest software to [On]. Troubleshooting 59 Picture...
..., warranty disclaimers and copyright notices are playing a disc recorded in the [Setup] menu is different from the unit appears on the TV screen. Blu-ray 3D disc playback does not output 3D views. yy The [3D Mode] option in a color system that does not support copyright protection. Picture noise appears. Cause & Solution yy Select the appropriate video input mode on the player. Troubleshooting Customer Support 5 You can update the Player using the latest software to [On]. Troubleshooting 59 Picture...
Owner's Manual
Page 61
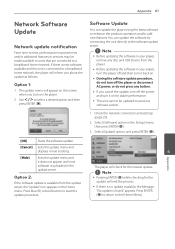
... not press any disc and USB Device from the update server, the "Update" icon appears in your player, turn the player off the power and turn it back on for the update will appear on the player. 2. Select [Software] option in the update server. Option 2: If the software update is uploaded in the [Setup] menu then press ENTER (b). 3. yy Before updating the software in the Home menu. yy If you...
... not press any disc and USB Device from the update server, the "Update" icon appears in your player, turn the player off the power and turn it back on for the update will appear on the player. 2. Select [Software] option in the update server. Option 2: If the software update is uploaded in the [Setup] menu then press ENTER (b). 3. yy Before updating the software in the Home menu. yy If you...

Owner's Manual
Page 73
... be made available by the Service Provider through any time, without prior notice, including, but not limited to Network Services guidelines below : 1. Appendix 73 About the internal hard disk Important Information drive The internal hard disk drive (HDD) is very delicate. All information, data, documents, communications, downloads, files, text, images, photographs, yy Install and use the player in excessively hot or humid...
... be made available by the Service Provider through any time, without prior notice, including, but not limited to Network Services guidelines below : 1. Appendix 73 About the internal hard disk Important Information drive The internal hard disk drive (HDD) is very delicate. All information, data, documents, communications, downloads, files, text, images, photographs, yy Install and use the player in excessively hot or humid...


