
Owners Manual
Page 3
... to view encrypted digital programming. et/ou d'une de ses sociétés affiliées. Patent Notice Le système TV Guide On Screen est fabriqués sous licence de Gemstar-TV Guide International, Inc. A security card provided by the cable operator), and data enhanced television service may ...require the use of the CableCARDTM TradeMark. License Notice Le système TV Guide On Screen est protégés par un ou plusieurs brevets émis aux Etats Unis, comme le 6,498,895, 6,418,556, 6,331,877; 6,239,794; ...
... to view encrypted digital programming. et/ou d'une de ses sociétés affiliées. Patent Notice Le système TV Guide On Screen est fabriqués sous licence de Gemstar-TV Guide International, Inc. A security card provided by the cable operator), and data enhanced television service may ...require the use of the CableCARDTM TradeMark. License Notice Le système TV Guide On Screen est protégés par un ou plusieurs brevets émis aux Etats Unis, comme le 6,498,895, 6,418,556, 6,331,877; 6,239,794; ...
Owners Manual
Page 6
... Clock Setup 46 On/Off Timer Setup 46 Sleep Timer / Auto Off 47 Option Menu Features Advanced 48 Cinema 3:2 Mode Setup 48 Low Power 48 LG Logo 49 Aspect Ratio Control 50 Caption 51 Caption / Text 51 Caption Option 52 ISM Method 53 Front Display 53 Auto Demo 54 Lock Menu... Main and Sub Picture Sizes for Twin Picture .112 POP (Picture-out-of-Picture: Channel Scan) . .112 APM 113 Bried Info 114 EZ Mute 115 Screen Setup for PC mode 116 External Control Device Setup 117~122 IR Codes 123~124 Programming the Remote 125 Programming Codes 126~127 Troubleshooting Checklist...
... Clock Setup 46 On/Off Timer Setup 46 Sleep Timer / Auto Off 47 Option Menu Features Advanced 48 Cinema 3:2 Mode Setup 48 Low Power 48 LG Logo 49 Aspect Ratio Control 50 Caption 51 Caption / Text 51 Caption Option 52 ISM Method 53 Front Display 53 Auto Demo 54 Lock Menu... Main and Sub Picture Sizes for Twin Picture .112 POP (Picture-out-of-Picture: Channel Scan) . .112 APM 113 Bried Info 114 EZ Mute 115 Screen Setup for PC mode 116 External Control Device Setup 117~122 IR Codes 123~124 Programming the Remote 125 Programming Codes 126~127 Troubleshooting Checklist...
Owners Manual
Page 7
...160 degrees. How does it can be also be viewed as pixels, which is defective. Several tiny, minute colored dots visible on the screen should be exchanged or returned. The tiny dots appearing does not mean that you are in the PDP manufacturing process. Thus a few ...are operating and cooling the PDP. over 16 million different colors. We hope you to achieve flat panel displays with excellent image quality and large screen sizes that a certain level of locations where conventional TVs will normally occur in a theater. A plasma display panel is a Plasma Display Panel (...
...160 degrees. How does it can be also be viewed as pixels, which is defective. Several tiny, minute colored dots visible on the screen should be exchanged or returned. The tiny dots appearing does not mean that you are in the PDP manufacturing process. Thus a few ...are operating and cooling the PDP. over 16 million different colors. We hope you to achieve flat panel displays with excellent image quality and large screen sizes that a certain level of locations where conventional TVs will normally occur in a theater. A plasma display panel is a Plasma Display Panel (...

Owners Manual
Page 12
...; IEEE 1394 mode. • Controls some video cassette • recorders or DVD players when you to navigate the on the screen. (Refer to p.113) LIGHT Illuminates the remote control buttons of screen information to the last channel viewed. DAY + FLASHBK APM CC AUTO DEMO M/C EJECT /VCR/DVD control buttons • Use for.... CHANNEL UP/DOWN Selects available channels found during Manual scan. APM (Adaptive Picture Mode) Concurrently, compare with the Daylight, Normal, Night Time and Custom on -screen menus and adjust the system settings to the...
...; IEEE 1394 mode. • Controls some video cassette • recorders or DVD players when you to navigate the on the screen. (Refer to p.113) LIGHT Illuminates the remote control buttons of screen information to the last channel viewed. DAY + FLASHBK APM CC AUTO DEMO M/C EJECT /VCR/DVD control buttons • Use for.... CHANNEL UP/DOWN Selects available channels found during Manual scan. APM (Adaptive Picture Mode) Concurrently, compare with the Daylight, Normal, Night Time and Custom on -screen menus and adjust the system settings to the...

Owners Manual
Page 13
...viewing from any menu. with new ones. Don't mix old or used batteries with -). • Install two 1.5V AA batteries. ADJUST Adjusts screen position, size, and phase in the Listings Grid. EZ PIC Adjusts the factory preset picture depending on the back side and install the batteries ... Starts the demonstration to the last TV. FAV Scrolls the Favorite channels. DTV (or RGB-PC), HDMI1/DVI, HDMI2 and IEEE1394 input sources, screen returns to explain the main features of time before your TV turns itself off .(Refer to p.114) Mark Selects the wanted functions. Installing Batteries...
...viewing from any menu. with new ones. Don't mix old or used batteries with -). • Install two 1.5V AA batteries. ADJUST Adjusts screen position, size, and phase in the Listings Grid. EZ PIC Adjusts the factory preset picture depending on the back side and install the batteries ... Starts the demonstration to the last TV. FAV Scrolls the Favorite channels. DTV (or RGB-PC), HDMI1/DVI, HDMI2 and IEEE1394 input sources, screen returns to explain the main features of time before your TV turns itself off .(Refer to p.114) Mark Selects the wanted functions. Installing Batteries...
Owners Manual
Page 20
To avoid picture noise (interference), leave an adequate distance between the VCR and TV - Use the ISM Method (on the screen. Connection Option 1 Set VCR output switch to 3 or 4 and then tune TV to the Video input. 2. If you know when the analog, cable, and ...area, ANTENNA please purchase a signal amplifier and install properly. • If the antenna needs to avoid having a fixed image remain on the screen for a long period of the screen may remain visible on the Option menu) feature to be split for assistance. the fixed images on cable and antenna Antenna Bronze Wire...
To avoid picture noise (interference), leave an adequate distance between the VCR and TV - Use the ISM Method (on the screen. Connection Option 1 Set VCR output switch to 3 or 4 and then tune TV to the Video input. 2. If you know when the analog, cable, and ...area, ANTENNA please purchase a signal amplifier and install properly. • If the antenna needs to avoid having a fixed image remain on the screen for a long period of the screen may remain visible on the Option menu) feature to be split for assistance. the fixed images on cable and antenna Antenna Bronze Wire...
Owners Manual
Page 21
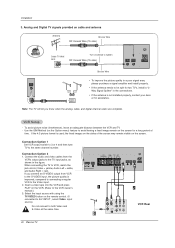
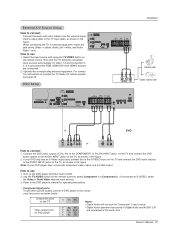
... in the figure. 2. Use the TV/VIDEO button on the remote control. Owner's Manual 21 When connecting the TV to operate the TV Guide On Screen system, see page 29. For connection instructions to external equipment, match the DMI/DVI jack colors (Video = yellow, Audio Left = white, and Audio Right = red...
... in the figure. 2. Use the TV/VIDEO button on the remote control. Owner's Manual 21 When connecting the TV to operate the TV Guide On Screen system, see page 29. For connection instructions to external equipment, match the DMI/DVI jack colors (Video = yellow, Audio Left = white, and Audio Right = red...
Owners Manual
Page 22
... Digital Over-the-air/Cable signals without an external digital set -top box connector. Then, make the corresponding audio connections. Use TV/VIDEO on the screen, contact with the cable service provider. IEEE-1394 HDMI 2 HDMI1 /DVI RS-232C INPUT (CONTROL/SERVICE) OUTPUT COMPONENT2 INPUT DVI INPUT DIGITAL AUDIO (OPTICAL) RGB...
... Digital Over-the-air/Cable signals without an external digital set -top box connector. Then, make the corresponding audio connections. Use TV/VIDEO on the screen, contact with the cable service provider. IEEE-1394 HDMI 2 HDMI1 /DVI RS-232C INPUT (CONTROL/SERVICE) OUTPUT COMPONENT2 INPUT DVI INPUT DIGITAL AUDIO (OPTICAL) RGB...
Owners Manual
Page 23
... connector, connect the PC's audio output to another resolution, change the refresh rate to AUDIO INPUT port located on the PC graphic card, change the screen scanning rate for this TV with an HDMI-to 1024x768, 60Hz. 2. Owner's Manual 23 Connect the PC to HDMI1/DVI port of this TV with...
... connector, connect the PC's audio output to another resolution, change the refresh rate to AUDIO INPUT port located on the PC graphic card, change the screen scanning rate for this TV with an HDMI-to 1024x768, 60Hz. 2. Owner's Manual 23 Connect the PC to HDMI1/DVI port of this TV with...
Owners Manual
Page 28
...Source Devices connected with HDMI1/DVI Input, output TV SET Resolution(480p, 720p, 1080i) and TV SET Display fit EIA/CEA-861-B Specification to Screen. When Source Devices connected with HDMI1/DVI Input, output PC Resolution(VGA, SVGA, XGA), Position and Size may become permanently imprinted on the ISM ...menu until the picture is in HDMI1/DVI Input. Notes: - The fixed image may not fit to Screen. Refer to adjust the screen Position of time. Use the Orbiter feature on the screen. In case that Video Resolution is not connected Cable or poor cable connection, "NO SIGNAL" OSD ...
...Source Devices connected with HDMI1/DVI Input, output TV SET Resolution(480p, 720p, 1080i) and TV SET Display fit EIA/CEA-861-B Specification to Screen. When Source Devices connected with HDMI1/DVI Input, output PC Resolution(VGA, SVGA, XGA), Position and Size may become permanently imprinted on the ISM ...menu until the picture is in HDMI1/DVI Input. Notes: - The fixed image may not fit to Screen. Refer to adjust the screen Position of time. Use the Orbiter feature on the screen. In case that Video Resolution is not connected Cable or poor cable connection, "NO SIGNAL" OSD ...
Owners Manual
Page 29
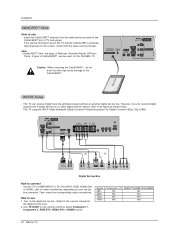
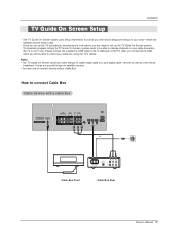
... Installation - Notes: • The TV Guide On Screen system provides listings for satellite services. • You may use . It does not ...34 (R) AUDIO (L) VIDEO TV VCR Cable Box Front Cable Box Rear Owner's Manual 29 The TV Guide On Screen system uses Setup information to connect Cable Box Cable Service with show listings and lineups in use to the G-LINK ...to manufacturer's instructions, you will be able to set up the TV Guide On Screen system. - To download program listings the TV Guide On Screen system needs to be able to control your cable box when the TV is not...
... Installation - Notes: • The TV Guide On Screen system provides listings for satellite services. • You may use . It does not ...34 (R) AUDIO (L) VIDEO TV VCR Cable Box Front Cable Box Rear Owner's Manual 29 The TV Guide On Screen system uses Setup information to connect Cable Box Cable Service with show listings and lineups in use to the G-LINK ...to manufacturer's instructions, you will be able to set up the TV Guide On Screen system. - To download program listings the TV Guide On Screen system needs to be able to control your cable box when the TV is not...
Owners Manual
Page 30
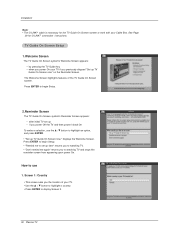
... initial TV set up -- if you to highlight an option, and press ENTER. • "Set up TV Guide On Screen now" on the Reminder Screen. Installation Note: • The G-LINKTM cable is necessary for G-LINKTM connection instructions. when you power On your TV if ...you the location of the TV Guide On Screen system. TV Guide On Screen Setup 1.Welcome Screen The TV Guide On Screen system's Welcome Screen appears: -- Screen 1: Country • This screen asks you previously skipped "Set up TV Guide On Screen now," displays the Welcome Screen. Press ENTER to begin Setup. • ...
... initial TV set up -- if you to highlight an option, and press ENTER. • "Set up TV Guide On Screen now" on the Reminder Screen. Installation Note: • The G-LINKTM cable is necessary for G-LINKTM connection instructions. when you power On your TV if ...you the location of the TV Guide On Screen system. TV Guide On Screen Setup 1.Welcome Screen The TV Guide On Screen system's Welcome Screen appears: -- Screen 1: Country • This screen asks you previously skipped "Set up TV Guide On Screen now," displays the Welcome Screen. Press ENTER to begin Setup. • ...

Owners Manual
Page 31
...F / G button to move to another field. • Press ENTER to display Screen 3. Installation 4. Screen 3: Do you have a Cable Box? • If you select Yes, you see Screen 5. • If you select No, you see Screen 12. Screen 4: Do you have Cable Service connected? • If you select Yes, you ...see Screen 4. • If you select No, you see Screen 12. 2. Screen 2: Enter ZIP or Postal Code Option 1 ...
...F / G button to move to another field. • Press ENTER to display Screen 3. Installation 4. Screen 3: Do you have a Cable Box? • If you select Yes, you see Screen 5. • If you select No, you see Screen 12. Screen 4: Do you have Cable Service connected? • If you select Yes, you ...see Screen 4. • If you select No, you see Screen 12. 2. Screen 2: Enter ZIP or Postal Code Option 1 ...
Owners Manual
Page 32
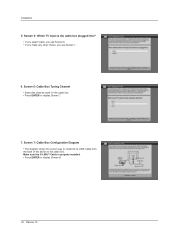
Screen 6: Cable Box Tuning Channel • Select the channel used for the cable box. • Press ENTER to display Screen 8. 32 Plasma TV Make sure the G-LINKTM Cable is the cable box plugged into? • If you select Cable, you see Screen 6. • If you make any other choice, you see Screen 7 . 6. Installation 5. Screen 5: Which TV input is properly installed. • Press ENTER to display Screen 7. 7. Screen 7: Cable Box Configuration Diagram • The diagram shows the correct way to install the G-LINK Cable from the back of the device to the cable box.
Screen 6: Cable Box Tuning Channel • Select the channel used for the cable box. • Press ENTER to display Screen 8. 32 Plasma TV Make sure the G-LINKTM Cable is the cable box plugged into? • If you select Cable, you see Screen 6. • If you make any other choice, you see Screen 7 . 6. Installation 5. Screen 5: Which TV input is properly installed. • Press ENTER to display Screen 7. 7. Screen 7: Cable Box Configuration Diagram • The diagram shows the correct way to install the G-LINK Cable from the back of the device to the cable box.

Owners Manual
Page 33
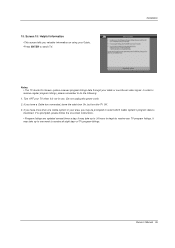
.... • If you select Test this code again, the same code is done, Screen 11 displays automatically. 11. 8. Screen 10: Cable Box Code Testing • When testing is tested again in Screen 10. Note: • Many Cable Boxes require testing more than one code. • If you... select No, a different code is tested in Screen 10. Screen 9: Cable Box Preparation • Follow the on-screen instructions, and press ENTER to display Screen 9. 9. Screen 8: Cable Box Brand Name • Use the D / E button to select a cable box brand....
.... • If you select Test this code again, the same code is done, Screen 11 displays automatically. 11. 8. Screen 10: Cable Box Code Testing • When testing is tested again in Screen 10. Note: • Many Cable Boxes require testing more than one code. • If you... select No, a different code is tested in Screen 10. Screen 9: Cable Box Preparation • Follow the on-screen instructions, and press ENTER to display Screen 9. 9. Screen 8: Cable Box Brand Name • Use the D / E button to select a cable box brand....

Owners Manual
Page 34
Screen 13: Are your basic settings correct? •If you select Yes, you see Screen 14. •If you select No, you see Screen 1. 14. Screen 12: Do you have an antenna connected? •If you select Yes, you see Screen 13. Note: •If you selected No in Screen 3 then you see Screen 13. 13. Screen 14: Congratulations •Press ENTER to receive a channel lineup and listings. •If you select No, you must select Yes in this screen to display Screen 15. 34 Plasma TV Installation 12.
Screen 13: Are your basic settings correct? •If you select Yes, you see Screen 14. •If you select No, you see Screen 1. 14. Screen 12: Do you have an antenna connected? •If you select Yes, you see Screen 13. Note: •If you selected No in Screen 3 then you see Screen 13. 13. Screen 14: Congratulations •Press ENTER to receive a channel lineup and listings. •If you select No, you must select Yes in this screen to display Screen 15. 34 Plasma TV Installation 12.
Owners Manual
Page 35
... your area, you may be prompted to select which Cable system's program data to download. Owner's Manual 35 Installation Notes: • The TV Guide On Screen system receives program listings data through your TV when it is not in your Guide. •Press ENTER to receive all eight days of TV... program listings. If you valuable information on -screen instructions. • Program listings are updated several times a day. It may take up to one Cable system in use. (Do not unplug the power ...
... your area, you may be prompted to select which Cable system's program data to download. Owner's Manual 35 Installation Notes: • The TV Guide On Screen system receives program listings data through your TV when it is not in your Guide. •Press ENTER to receive all eight days of TV... program listings. If you valuable information on -screen instructions. • Program listings are updated several times a day. It may take up to one Cable system in use. (Do not unplug the power ...

Owners Manual
Page 36
... (D/E), Number (0 ~ 9) button on the remote control. When the TV is turned on the TV, it was unplugged and then powered On. 36 Plasma TV The screen may be away on vacation, disconnect the power plug from the wall power outlet. • After turning on , the indicator will take up to a week... 3-4 seconds before the picture is seen. • When the TV is turned On, the TV Guide On Screen system is programmed to remember which mode it will blink green for the TV Guide On Screen system to be slightly delayed if the TV was last set to turn the TV off. 3. This...
... (D/E), Number (0 ~ 9) button on the remote control. When the TV is turned on the TV, it was unplugged and then powered On. 36 Plasma TV The screen may be away on vacation, disconnect the power plug from the wall power outlet. • After turning on , the indicator will take up to a week... 3-4 seconds before the picture is seen. • When the TV is turned On, the TV Guide On Screen system is programmed to remember which mode it will blink green for the TV Guide On Screen system to be slightly delayed if the TV was last set to turn the TV off. 3. This...

Owners Manual
Page 38
From this point on, the on-screen menus will be shown on the screen in the selected language. 4. Press EXIT button to return to TV viewing or press MENU button to return to select the OPTION menu. 2. The menus can be shown in the selected language. Press the G button and then use D / E button to select Language. 3. Operation TV Setup On-screen Menus Language Selection - Press the G button and then use D / E button to select your language. 1. First select your desired language. Press the MENU button and then use D / E button to the previous menu. 38 Plasma TV
From this point on, the on-screen menus will be shown on the screen in the selected language. 4. Press EXIT button to return to TV viewing or press MENU button to return to select the OPTION menu. 2. The menus can be shown in the selected language. Press the G button and then use D / E button to select Language. 3. Operation TV Setup On-screen Menus Language Selection - Press the G button and then use D / E button to select your language. 1. First select your desired language. Press the MENU button and then use D / E button to the previous menu. 38 Plasma TV

Owners Manual
Page 39
... Scan menu if the Lock System is turned on . 1. A password is required to gain access to the physical channel 2,3 or 4 in the TV Guide On Screen system Setup, cable channels(CATV or CADTV) will not be scanned by EZ Scan or Manual Scan. • When inserting the CableCARDTM, CATV, CADTV is...
... Scan menu if the Lock System is turned on . 1. A password is required to gain access to the physical channel 2,3 or 4 in the TV Guide On Screen system Setup, cable channels(CATV or CADTV) will not be scanned by EZ Scan or Manual Scan. • When inserting the CableCARDTM, CATV, CADTV is...


