Owners Manual
Page 1
... reference. P/NO : 38289U0527F (0707-REV08) Printed in Korea S. Retain it for energy efficiency. LCD TV MODELS: 32LC2D 32LC2DU 37LC2D 42LC2D PLASMA TV MODELS: 42PC3D 42PC3DC 42PC3DV 50PC3D 60PC1D 60PC1DC OWNER'S MANUAL Internet Home Page : http://www.lge.com http://www.lg.ca http://www.lgcommercial.com ENERGYSTAR is a set of the set . has determined that this...
... reference. P/NO : 38289U0527F (0707-REV08) Printed in Korea S. Retain it for energy efficiency. LCD TV MODELS: 32LC2D 32LC2DU 37LC2D 42LC2D PLASMA TV MODELS: 42PC3D 42PC3DC 42PC3DV 50PC3D 60PC1D 60PC1DC OWNER'S MANUAL Internet Home Page : http://www.lge.com http://www.lg.ca http://www.lgcommercial.com ENERGYSTAR is a set of the set . has determined that this...
Owners Manual
Page 3
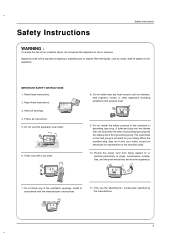
... not install near water. 6. Only use this apparatus to dripping or splashing and no objects filled with the manufacturer's instructions. 11. Heed all instructions. 5. Owner's Manual 2.
... not install near water. 6. Only use this apparatus to dripping or splashing and no objects filled with the manufacturer's instructions. 11. Heed all instructions. 5. Owner's Manual 2.
Owners Manual
Page 4
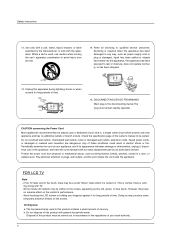
... not overload wall outlets. Protect the power cord from tip-over. 14. If the TV feels cold to the touch, there may be a small "flicker" when when it for long periods of this owner's manual to rain or moisture, does not operate normally, or has been dropped. 13. This...this apparatus during lightning storms or when unused for long periods of this product with an exact replacement part by the manufacturer, or sold with TV. - Some minute dot defects may be visible on the monitor's performance. - Periodically examine the cord of these conditions could result in any...
... not overload wall outlets. Protect the power cord from tip-over. 14. If the TV feels cold to the touch, there may be a small "flicker" when when it for long periods of this owner's manual to rain or moisture, does not operate normally, or has been dropped. 13. This...this apparatus during lightning storms or when unused for long periods of this product with an exact replacement part by the manufacturer, or sold with TV. - Some minute dot defects may be visible on the monitor's performance. - Periodically examine the cord of these conditions could result in any...
Owners Manual
Page 5
...35~36 37 38 39 40 41 41~42 43 43 Turning on the TV Volume Adjustment Channel Selection On Screen Menus Language Selection On Screen Menus Selection and Adjustment EZ Scan (Channel Search) Manual Scan Channel Edit DTV Signal Strength Input Source Input Label Auto Picture Control(...EZ Picture) Color Temperature Control XD Advanced-Cinema 3:2 Mode / Black Level Video Reset Audio Language Auto Sound Control(EZ Sound) Manual Sound Control (EZ Sound-User option) Balance TV Speakers On/Off ...
...35~36 37 38 39 40 41 41~42 43 43 Turning on the TV Volume Adjustment Channel Selection On Screen Menus Language Selection On Screen Menus Selection and Adjustment EZ Scan (Channel Search) Manual Scan Channel Edit DTV Signal Strength Input Source Input Label Auto Picture Control(...EZ Picture) Color Temperature Control XD Advanced-Cinema 3:2 Mode / Black Level Video Reset Audio Language Auto Sound Control(EZ Sound) Manual Sound Control (EZ Sound-User option) Balance TV Speakers On/Off ...
Owners Manual
Page 6
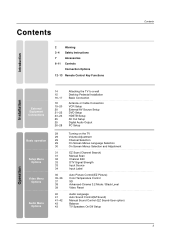
Contents Operation Time Menu Options Option Menu Features Lock Menu Options 44 44 45 45 46 47 48 49 49 50 51~52 Manual Clock Setup Auto Clock Setup On/Off Timer Setup Sleep Timer Auto Off Aspect Ratio Control Caption/Text Caption Option Low Power (42PC3D/3DC/3DV, 50PC3D, 60PC1D/1DC Only) ISM (Image Sticking Minimization) Method (42PC3D/3DC/3DV, 50PC3D, 60PC1D/1DC Only) Parental Lock Setup 53~58 59~60 61 62~63 64~65 65 66~67 External Control Device Setup IR Codes Programming the Remote Programming Codes Troubleshooting Checklist Maintenance Product Specifications Reference 6
Contents Operation Time Menu Options Option Menu Features Lock Menu Options 44 44 45 45 46 47 48 49 49 50 51~52 Manual Clock Setup Auto Clock Setup On/Off Timer Setup Sleep Timer Auto Off Aspect Ratio Control Caption/Text Caption Option Low Power (42PC3D/3DC/3DV, 50PC3D, 60PC1D/1DC Only) ISM (Image Sticking Minimization) Method (42PC3D/3DC/3DV, 50PC3D, 60PC1D/1DC Only) Parental Lock Setup 53~58 59~60 61 62~63 64~65 65 66~67 External Control Device Setup IR Codes Programming the Remote Programming Codes Troubleshooting Checklist Maintenance Product Specifications Reference 6
Owners Manual
Page 7
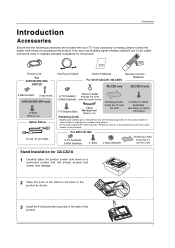
Power Cord 75Ω Round Cable Owner's Manual TV INPUT TV AUDIO POWER DAY - Stand Installation for detail information. [Polishing Cloth] Slightly wipe stained spot on surface ...(D-sub 15 pin cable) with the cleansing cloths for the product. Bolts 4-RING SPACER Polishing Cloth Polish the TV with your TV. If any accessory is stain or fingerprint on the exterior only with ferrite cores to maintain standard compliance for... following accessories are included with the cloth. Do not wipe roughly when removing stain. For 60PC1D/1DC 2-TV brackets 2-Wall brackets 4-
Power Cord 75Ω Round Cable Owner's Manual TV INPUT TV AUDIO POWER DAY - Stand Installation for detail information. [Polishing Cloth] Slightly wipe stained spot on surface ...(D-sub 15 pin cable) with the cleansing cloths for the product. Bolts 4-RING SPACER Polishing Cloth Polish the TV with your TV. If any accessory is stain or fingerprint on the exterior only with ferrite cores to maintain standard compliance for... following accessories are included with the cloth. Do not wipe roughly when removing stain. For 60PC1D/1DC 2-TV brackets 2-Wall brackets 4-
Owners Manual
Page 13
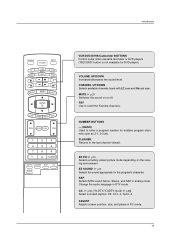
...G p.41 Selects the sound appropriate for DVD player). SAP Selects MTS sound: Mono, Stereo, and SAP in PC mode. 13 Introduction TV INPUT POWER TV AUDIO DVD MODE CABLE INPUT VCR STB BRIGHT - MUTE G p.29 Switches the sound on the viewing environment. ADJUST Adjusts screen position, ... preset picture mode depending on or off. Change the audio language in DTV mode. CHANNEL UP/DOWN Selects available channels found with EZ scan and Manual scan. FLASHBK Returns to scroll the Favorite channels. MENU BRIGHT + ENTER EXIT TIMER RATIO INFO VOL MUTE FAV CH 1 2 3 4 5 6 7 8 9...
...G p.41 Selects the sound appropriate for DVD player). SAP Selects MTS sound: Mono, Stereo, and SAP in PC mode. 13 Introduction TV INPUT POWER TV AUDIO DVD MODE CABLE INPUT VCR STB BRIGHT - MUTE G p.29 Switches the sound on the viewing environment. ADJUST Adjusts screen position, ... preset picture mode depending on or off. Change the audio language in DTV mode. CHANNEL UP/DOWN Selects available channels found with EZ scan and Manual scan. FLASHBK Returns to scroll the Favorite channels. MENU BRIGHT + ENTER EXIT TIMER RATIO INFO VOL MUTE FAV CH 1 2 3 4 5 6 7 8 9...
Owners Manual
Page 19
... cable 1 Connect the RF antenna out socket of the VCR to the Antenna socket on the set. 2 Connect the antenna cable to the VCR owner's manual.) VCR ANT IN OUT S-VIDEO (R) AUDIO (L) VIDEO OUTPUT SWITCH IN 34 VIDEO AUDIO ANT OUT 1 OPTICAL DIGITAL AUDIO ( ) VIDEOS-VIDEO VIDEOAUDIO AUDIO... OUT 1 Connect the AUDIO/VIDEO jacks between the VCR and TV. - Match the jack colors (Video = yellow, Audio Left = white, and Audio Right = red) 2 Insert a video tape into the VCR and press...
... cable 1 Connect the RF antenna out socket of the VCR to the Antenna socket on the set. 2 Connect the antenna cable to the VCR owner's manual.) VCR ANT IN OUT S-VIDEO (R) AUDIO (L) VIDEO OUTPUT SWITCH IN 34 VIDEO AUDIO ANT OUT 1 OPTICAL DIGITAL AUDIO ( ) VIDEOS-VIDEO VIDEOAUDIO AUDIO... OUT 1 Connect the AUDIO/VIDEO jacks between the VCR and TV. - Match the jack colors (Video = yellow, Audio Left = white, and Audio Right = red) 2 Insert a video tape into the VCR and press...
Owners Manual
Page 20
... equipment. The picture quality is improved; External AV Source Setup Camcorder Video Game Set 1 L AUDIO R VIDEO 1 Connect the AUDIO/VIDEO jacks between TV and external equipment. compared to normal composite (RCA cable) input. 2 Connect the audio outputs of the VCR to the SVIDEO input on the set ... OUT AV IN 1 OPTICAL DIGITAL AUDIO OUT S-VIDEO VIDEO (MONO) AUDIO 1 Connect the S-VIDEO output of the VCR to the VCR owner's manual.) 4 Select AV1 input source with using the INPUT button on the remote control. - Installation COMPONENT IN AV OUT AV IN 1 VIDEO AUDIO OPTICAL...
... equipment. The picture quality is improved; External AV Source Setup Camcorder Video Game Set 1 L AUDIO R VIDEO 1 Connect the AUDIO/VIDEO jacks between TV and external equipment. compared to normal composite (RCA cable) input. 2 Connect the audio outputs of the VCR to the SVIDEO input on the set ... OUT AV IN 1 OPTICAL DIGITAL AUDIO OUT S-VIDEO VIDEO (MONO) AUDIO 1 Connect the S-VIDEO output of the VCR to the VCR owner's manual.) 4 Select AV1 input source with using the INPUT button on the remote control. - Installation COMPONENT IN AV OUT AV IN 1 VIDEO AUDIO OPTICAL...
Owners Manual
Page 21
If connected to AV IN2, select AV 2 input source. 5 Refer to the DVD player's manual for operating instructions. To get the best picture quality, adjust the output resolution of the DVD to the HDMI IN 1(DVI) or 2 jack on the ... source with using the INPUT button on the remote control. 3 Refer to the DVD player's manual for operating instructions. VIDEO AUDIO COMPONENT IN AV OUT AV IN 1 OPTICAL DIGITAL AUDIO OUT S-VIDEO VIDEO ( ) AUDIO • TV can receive the video and audio signal simultaneously with using the INPUT button on the remote...
If connected to AV IN2, select AV 2 input source. 5 Refer to the DVD player's manual for operating instructions. To get the best picture quality, adjust the output resolution of the DVD to the HDMI IN 1(DVI) or 2 jack on the ... source with using the INPUT button on the remote control. 3 Refer to the DVD player's manual for operating instructions. VIDEO AUDIO COMPONENT IN AV OUT AV IN 1 OPTICAL DIGITAL AUDIO OUT S-VIDEO VIDEO ( ) AUDIO • TV can receive the video and audio signal simultaneously with using the INPUT button on the remote...
Owners Manual
Page 22
... IN VIDEO jacks on DVD player Y PB PR Y Pb OPTICAL Y B-Y DIGITALAUDIO Y OUT Cb Y PB Pr R-Y S-VIDEO VIDEO Cr PR ( ) AUDIO 22 Component ports on the TV Video output ports on the set. 2 Connect the audio outputs of the DVD to the component input ports as shown below. If connected to COMPONENT...
... IN VIDEO jacks on DVD player Y PB PR Y Pb OPTICAL Y B-Y DIGITALAUDIO Y OUT Cb Y PB Pr R-Y S-VIDEO VIDEO Cr PR ( ) AUDIO 22 Component ports on the TV Video output ports on the set. 2 Connect the audio outputs of the DVD to the component input ports as shown below. If connected to COMPONENT...
Owners Manual
Page 23
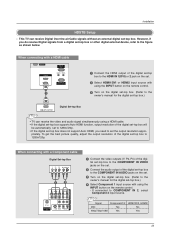
...-top box. (Refer to the RS-232C IN owner's manual for the digital set-top box.) HDMI-DTV OUTPUT Digital Set-top Box COMPONENT IN AV OUT AV IN 1 RGB IN (PC) AUDIO IN REMOTE (RGB/DVI) CONTROL IN • TV can receive Digital Over-the-air/Cable signals without an... the digital set . 2 Select HDMI1/DVI or HDMI2 input source with using the INPUT button on the digital set-top box. (Refer to the owner's manual for the digita(ClONTsROLe&StER-VtICoE) p box.) 4 Select Component 1 input source with a Component cable RS-232C IN (CONTROL & SERVICE) Digital Set-top Box B R (R) AUDIO (L) 1 2...
...-top box. (Refer to the RS-232C IN owner's manual for the digital set-top box.) HDMI-DTV OUTPUT Digital Set-top Box COMPONENT IN AV OUT AV IN 1 RGB IN (PC) AUDIO IN REMOTE (RGB/DVI) CONTROL IN • TV can receive Digital Over-the-air/Cable signals without an... the digital set . 2 Select HDMI1/DVI or HDMI2 input source with using the INPUT button on the digital set-top box. (Refer to the owner's manual for the digita(ClONTsROLe&StER-VtICoE) p box.) 4 Select Component 1 input source with a Component cable RS-232C IN (CONTROL & SERVICE) Digital Set-top Box B R (R) AUDIO (L) 1 2...
Owners Manual
Page 24
... AUDIO OPTICAL DIGITAL AUDIO OUT S-VIDEO VIDEO ( ) AUDIO When connecting with using the INPUT button on the digital set-top box. (Refer to the owner's manual for the d(PCi)gital set the output resolution appropriately. RGB IN 3 Turn on the remote control. RS-232C IN (CONTROL & SERVICE) • If the digital...
... AUDIO OPTICAL DIGITAL AUDIO OUT S-VIDEO VIDEO ( ) AUDIO When connecting with using the INPUT button on the digital set-top box. (Refer to the owner's manual for the d(PCi)gital set the output resolution appropriately. RGB IN 3 Turn on the remote control. RS-232C IN (CONTROL & SERVICE) • If the digital...
Owners Manual
Page 25
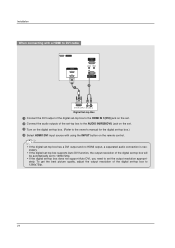
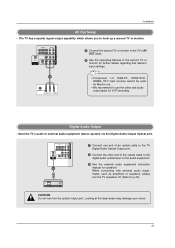
... AV OUT AV IN 1 VIDEO AUDIO OPTICAL DIGITAL AUDIO OUT S-VIDEO VIDEO (MONO) AUDIO 1 Connect the second TV or monitor to the TV's AV OUT jacks. 2 See the Operating Manual of the optical cable to the digital audio optical input on the audio equipment. 3 See the external audio equipment... instruction manual for VCR recording. Looking at the laser beam may damage your vision. 25 Digital Audio Output - The TV has a special signal output capability which allows you to external audio equipment (stereo system)...
... AV OUT AV IN 1 VIDEO AUDIO OPTICAL DIGITAL AUDIO OUT S-VIDEO VIDEO (MONO) AUDIO 1 Connect the second TV or monitor to the TV's AV OUT jacks. 2 See the Operating Manual of the optical cable to the digital audio optical input on the audio equipment. 3 See the external audio equipment... instruction manual for VCR recording. Looking at the laser beam may damage your vision. 25 Digital Audio Output - The TV has a special signal output capability which allows you to external audio equipment (stereo system)...
Owners Manual
Page 27
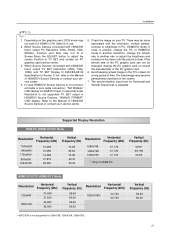
... *640x350 640x480 *720x400 800x600 1024x768 31.469 31.469 31.469 37.879 48.363 Vertical Frequency (Hz) 70.08 59.94 70.08 60.31 60.00 Resolution Horizontal Frequency (kHz) 1280x768 1360x768 1366x768 47.776 47.720 47.130 * Only for a long period of the PC graphic card ... with HDMI/DVI Input, output TV SET Resolution (480p, 720p, 1080i) and TV SET Display fit EIA/CEA-861-B Specification to 1280x768, 1360x768, 1366x768. 27 The synchronization input form for Horizontal and Vertical frequencies is present, change the PC or HDMI/DVI mode to the Manual of the PC graphic card. ...
... *640x350 640x480 *720x400 800x600 1024x768 31.469 31.469 31.469 37.879 48.363 Vertical Frequency (Hz) 70.08 59.94 70.08 60.31 60.00 Resolution Horizontal Frequency (kHz) 1280x768 1360x768 1366x768 47.776 47.720 47.130 * Only for a long period of the PC graphic card ... with HDMI/DVI Input, output TV SET Resolution (480p, 720p, 1080i) and TV SET Display fit EIA/CEA-861-B Specification to 1280x768, 1360x768, 1366x768. 27 The synchronization input form for Horizontal and Vertical frequencies is present, change the PC or HDMI/DVI mode to the Manual of the PC graphic card. ...

Owners Manual
Page 30
...Advanced Video Reset Lock System Set Password Block Channel Movie Rating TV Rating-Children TV Rating-General Input Block Audio Language EZ Sound Balance TV Speaker Aspect Ratio Caption/Text Caption Option Language ISM Method Low Power Auto Clock Manual Clock Off Timer On Timer Sleep Timer Auto Off •...; Your TV's OSD (On Screen Display) may differ slightly from what is shown in this manual. 30 Press the G button and then use D / E / F / G ...
...Advanced Video Reset Lock System Set Password Block Channel Movie Rating TV Rating-Children TV Rating-General Input Block Audio Language EZ Sound Balance TV Speaker Aspect Ratio Caption/Text Caption Option Language ISM Method Low Power Auto Clock Manual Clock Off Timer On Timer Sleep Timer Auto Off •...; Your TV's OSD (On Screen Display) may differ slightly from what is shown in this manual. 30 Press the G button and then use D / E / F / G ...
Owners Manual
Page 31
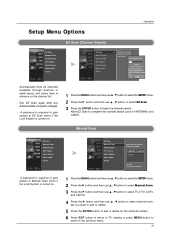
... button and then use D / E button to select the SETUP menu. 2 Press the G button and then use D / E button to select Manual Scan. 3 Press the G button and then use D / E button to select TV, DTV, CATV, and CADTV. 4 Press the G button and then use D / E button to select EZ Scan. 3 Press the ENTER button... Signal Input Source Input Label Set ID Select channel type and RF-channel number. Processing EZ scan... A password is required to gain access to Manual Scan menu if the Lock System is turned on the channel list. - Run EZ Scan again after any Antenna/Cable connection changes. - Allow ...
... button and then use D / E button to select the SETUP menu. 2 Press the G button and then use D / E button to select Manual Scan. 3 Press the G button and then use D / E button to select TV, DTV, CATV, and CADTV. 4 Press the G button and then use D / E button to select EZ Scan. 3 Press the ENTER button... Signal Input Source Input Label Set ID Select channel type and RF-channel number. Processing EZ scan... A password is required to gain access to Manual Scan menu if the Lock System is turned on the channel list. - Run EZ Scan again after any Antenna/Cable connection changes. - Allow ...
Owners Manual
Page 32
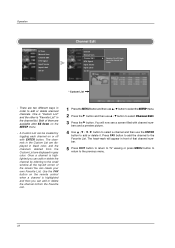
... Channel Edit DTV Signal Input Source Input Label Set ID Channel Edit EZ Scan Manual Scan Channel Edit DTV Signal Input Source Input Label Set ID G Selection ( G or ) leads you can add or delete the channel to/from the Custom ....You can be created by referring to the small window at the top-left corner of that channel number. 5 Press EXIT button to return to TV viewing or press MENU button to return to the previous menu. 32 bers and a preview picture. 4 Use D / E / F / G button to select a channel and then use D / E button...
... Channel Edit DTV Signal Input Source Input Label Set ID Channel Edit EZ Scan Manual Scan Channel Edit DTV Signal Input Source Input Label Set ID G Selection ( G or ) leads you can add or delete the channel to/from the Custom ....You can be created by referring to the small window at the top-left corner of that channel number. 5 Press EXIT button to return to TV viewing or press MENU button to return to the previous menu. 32 bers and a preview picture. 4 Use D / E / F / G button to select a channel and then use D / E button...
Owners Manual
Page 33
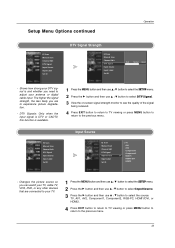
.... - DTV Signals: Only when the input signal is DTV or CADTV, this function is and whether you can watch your TV, cable TV, VCR, DVD, or any other devices that are to the previous menu. EZ Scan Manual Scan Channel Edit DTV Signal Input Source Input Label Set ID Input Source EZ Scan... Manual Scan Channel Edit DTV Signal Input Source Input Label Set ID TV AV1 AV2 Component1 Component2 G RGB-PC HDMI1/DVI HDMI2 - Shows how strong...
.... - DTV Signals: Only when the input signal is DTV or CADTV, this function is and whether you can watch your TV, cable TV, VCR, DVD, or any other devices that are to the previous menu. EZ Scan Manual Scan Channel Edit DTV Signal Input Source Input Label Set ID Input Source EZ Scan... Manual Scan Channel Edit DTV Signal Input Source Input Label Set ID TV AV1 AV2 Component1 Component2 G RGB-PC HDMI1/DVI HDMI2 - Shows how strong...
Owners Manual
Page 34
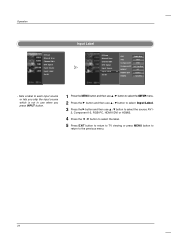
... Channel Edit DTV Signal Input Source Input Label Set ID Input Label EZ Scan Manual Scan Channel Edit DTV Signal Input Source Input Label Set ID AV1 Cable Box AV2 VCR Component1 DVD Component2 Set Top Box RGB-PC G HDMI1/... to select the source: AV1- 2, Component1-2, RGB-PC, HDMI1/DVI or HDMI2. 4 Press the F / G button to select the label. 5 Press EXIT button to return to TV viewing or press MENU button to return to the previous menu. 34
... Channel Edit DTV Signal Input Source Input Label Set ID Input Label EZ Scan Manual Scan Channel Edit DTV Signal Input Source Input Label Set ID AV1 Cable Box AV2 VCR Component1 DVD Component2 Set Top Box RGB-PC G HDMI1/... to select the source: AV1- 2, Component1-2, RGB-PC, HDMI1/DVI or HDMI2. 4 Press the F / G button to select the label. 5 Press EXIT button to return to TV viewing or press MENU button to return to the previous menu. 34

