
Owner's Manual
Page 26
... x 26 M4 x 28 Number of screws 4 4 To detach the stand, 1 Lay the TV with the 4 screws. Attach the protection cover tape. - When installing the wall mounting bracket, use the Protection cover. Model 42/50PW340 42/50PW350 42/50PW350U 42/50PW350R 50PZ200 60PZ200 Screw for assembly M4 x 26 M4 x 28 Number of... the TV. Protection cover tape Protection cover 26 ASSEMBLING AND PREPARING 3 Secure the TV and the stand with the screen side down on a flat surface. 2 Remove the 4 screws and pull the stand away from tilting forward.
... x 26 M4 x 28 Number of screws 4 4 To detach the stand, 1 Lay the TV with the 4 screws. Attach the protection cover tape. - When installing the wall mounting bracket, use the Protection cover. Model 42/50PW340 42/50PW350 42/50PW350U 42/50PW350R 50PZ200 60PZ200 Screw for assembly M4 x 26 M4 x 28 Number of... the TV. Protection cover tape Protection cover 26 ASSEMBLING AND PREPARING 3 Secure the TV and the stand with the screen side down on a flat surface. 2 Remove the 4 screws and pull the stand away from tilting forward.
Owner's Manual
Page 29
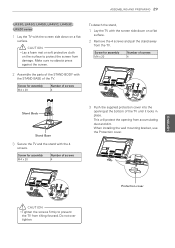
...of screws 4 To detach the stand, 1 Lay the TV with the screen side down on a flat surface. Protection cover When installing the wall mounting bracket, use the Protection cover. Make sure no objects press against the screen. 2 Assemble the parts of the STAND BODY with the STAND BASE .... ASSEMBLING AND PREPARING 29 LK330, LK430, LK450, LK451C, LK453C, LK520 series 1 Lay the TV with the screen side down on a flat surface. 2 Remove the 4 screws and pull the stand away from the TV. ENEGNLGISH CAUTION yyTighten the screws firmly to protect the screen from tilting forward. Screw for...
...of screws 4 To detach the stand, 1 Lay the TV with the screen side down on a flat surface. Protection cover When installing the wall mounting bracket, use the Protection cover. Make sure no objects press against the screen. 2 Assemble the parts of the STAND BODY with the STAND BASE .... ASSEMBLING AND PREPARING 29 LK330, LK430, LK450, LK451C, LK453C, LK520 series 1 Lay the TV with the screen side down on a flat surface. 2 Remove the 4 screws and pull the stand away from the TV. ENEGNLGISH CAUTION yyTighten the screws firmly to protect the screen from tilting forward. Screw for...
Owner's Manual
Page 31
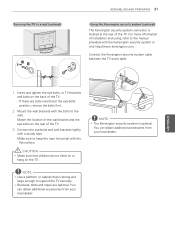
... (optional) ASSEMBLING AND PREPARING 31 Using the Kensington security system (optional) The Kensington security system connector is located at the eye-bolts position, remove the bolts first. 2 Mount the wall brackets with the bolts to keep the rope horizontal with the flat surface. yyBrackets, bolts and ropes are bolts inserted at the...
... (optional) ASSEMBLING AND PREPARING 31 Using the Kensington security system (optional) The Kensington security system connector is located at the eye-bolts position, remove the bolts first. 2 Mount the wall brackets with the bolts to keep the rope horizontal with the flat surface. yyBrackets, bolts and ropes are bolts inserted at the...


