
Specification (English)
Page 1
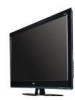
LCD TV 55LH40 55" Class Full HD 1080p 120Hz LCD TV (54.6" diagonal) Full HD 1080p performance, a robust feature set and Smart Energy Savings make the LH40 Series a standout. TV • TruMotion 120Hz • Intelligent Sensor Mode • Full HD 1080p HD Resolution • 70,000:1 Dynamic Contrast Ratio • 2.7ms Response Time (GTG) • ...
LCD TV 55LH40 55" Class Full HD 1080p 120Hz LCD TV (54.6" diagonal) Full HD 1080p performance, a robust feature set and Smart Energy Savings make the LH40 Series a standout. TV • TruMotion 120Hz • Intelligent Sensor Mode • Full HD 1080p HD Resolution • 70,000:1 Dynamic Contrast Ratio • 2.7ms Response Time (GTG) • ...

Owner's Manual (English)
Page 1
... to quality for ENERGY STAR in the "factory default (Home Use)" setting. Record it for future reference. The model and serial number of the TV is located on the back and one side of the TV. Model: Serial: This product qualifies for ENERGY STAR. 1-800-243-0000...-2623 CANADA LG Customer Information Center P/NO : SAC33601903 (0910-REV04) www.lgusa.com / www.lg.ca LCD TV OWNER'S MANUAL 32LH40 37LH40 42LH40 47LH40 55LH40 32LH41 37LH41 42LH41 47LH41 55LH41 37LH55 42LH55 47LH55 55LH55 32CL40 42CL40 47CL40 55LH400C Please read this manual carefully before operating your set and retain it...
... to quality for ENERGY STAR in the "factory default (Home Use)" setting. Record it for future reference. The model and serial number of the TV is located on the back and one side of the TV. Model: Serial: This product qualifies for ENERGY STAR. 1-800-243-0000...-2623 CANADA LG Customer Information Center P/NO : SAC33601903 (0910-REV04) www.lgusa.com / www.lg.ca LCD TV OWNER'S MANUAL 32LH40 37LH40 42LH40 47LH40 55LH40 32LH41 37LH41 42LH41 47LH41 55LH41 37LH55 42LH55 47LH55 55LH55 32CL40 42CL40 47CL40 55LH400C Please read this manual carefully before operating your set and retain it...
Owner's Manual (English)
Page 6
Channel Editing 50 Channel List 51 Favorite Channel Setup / Favorite Channel List . . 52 Brief Information 53 Input List 54 Input Label 55 AV Mode 56 Simple Manual 56 Key Lock 57 SIMPLINK 58 USB Entry Modes 60 Photo List 61 Music List 65 PICTURE CONTROL Picture...25 DVD Setup 28 VCR Setup 30 Other A/V Source Setup 32 PC Setup 33 USB Connection 40 Audio out Connection 41 WATCHING TV / CHANNEL CONTROL Remote Control Functions 42 Turning On TV 44 Channel Selection 44 Volume Adjustment 44 Initial Setting 45 On-Screen Menus Selection 46 Quick Menu 47 6 Channel Setup -
Channel Editing 50 Channel List 51 Favorite Channel Setup / Favorite Channel List . . 52 Brief Information 53 Input List 54 Input Label 55 AV Mode 56 Simple Manual 56 Key Lock 57 SIMPLINK 58 USB Entry Modes 60 Photo List 61 Music List 65 PICTURE CONTROL Picture...25 DVD Setup 28 VCR Setup 30 Other A/V Source Setup 32 PC Setup 33 USB Connection 40 Audio out Connection 41 WATCHING TV / CHANNEL CONTROL Remote Control Functions 42 Turning On TV 44 Channel Selection 44 Volume Adjustment 44 Initial Setting 45 On-Screen Menus Selection 46 Quick Menu 47 6 Channel Setup -
Owner's Manual (English)
Page 7
... Broadcasting System Captions 93 - Auto Clock Setup 95 Manual Clock Setup 96 Auto On/Off Time Setting 97 Sleep Timer Setting 98 PARENTAL CONTROL / RATINGS Set Password & Lock System 99 Channel Blocking 102 Movie & TV Rating 103 Downloadable Rating 108 External Input Blocking 109 APPENDIX Troubleshooting 110 Maintenance 112 Product Specifications 113 IR Codes...
... Broadcasting System Captions 93 - Auto Clock Setup 95 Manual Clock Setup 96 Auto On/Off Time Setting 97 Sleep Timer Setting 98 PARENTAL CONTROL / RATINGS Set Password & Lock System 99 Channel Blocking 102 Movie & TV Rating 103 Downloadable Rating 108 External Input Blocking 109 APPENDIX Troubleshooting 110 Maintenance 112 Product Specifications 113 IR Codes...
Owner's Manual (English)
Page 8
...more stable structure for an extended period. 8 This TV contains the detailed calibrations necessary for LCD, 1 or more detailed picture. Speakers are trademarks or registered trademarks... swells. "Dolby "and the double-D symbol are viewing. Detailed calibration requires a licensed technician. LG TV include a unique invisible speaker system, tuned by increasing the "sweet spot", giving a wider and... HDTV programs in strategic spots behind the front cabinet and use the 4:3 aspect ratio setting for a crisper picture. Advance 120Hz panel provides clearer, smoother images, even during fast...
...more stable structure for an extended period. 8 This TV contains the detailed calibrations necessary for LCD, 1 or more detailed picture. Speakers are trademarks or registered trademarks... swells. "Dolby "and the double-D symbol are viewing. Detailed calibration requires a licensed technician. LG TV include a unique invisible speaker system, tuned by increasing the "sweet spot", giving a wider and... HDTV programs in strategic spots behind the front cabinet and use the 4:3 aspect ratio setting for a crisper picture. Advance 120Hz panel provides clearer, smoother images, even during fast...

Owner's Manual (English)
Page 11
Illuminates blue when the set is switched on. PREPARATION 32/42/47CL40 CH CHANNEL ( , ) Buttons SPEAKER Intelligent Sensor Adjusts picture according to the surrounding conditions VOL ENTER MENU INPUT VOLUME (+, -) Buttons ENTER Button MENU Button INPUT Button Power/Standby Indicator Illuminates red in standby mode. Remote Control Sensor POWER Button 11
Illuminates blue when the set is switched on. PREPARATION 32/42/47CL40 CH CHANNEL ( , ) Buttons SPEAKER Intelligent Sensor Adjusts picture according to the surrounding conditions VOL ENTER MENU INPUT VOLUME (+, -) Buttons ENTER Button MENU Button INPUT Button Power/Standby Indicator Illuminates red in standby mode. Remote Control Sensor POWER Button 11
Owner's Manual (English)
Page 21
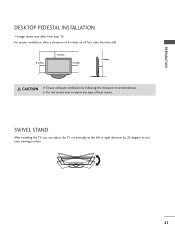
For proper ventilation, allow a clearance of heat source. SWIVEL STAND After installing the TV, you can adjust the TV set manually to suit your TV. PREPARATION DESKTOP PEDESTAL INSTALLATION I Image shown may differ from the wall. 4 inches 4 inches 4 inches 4 inches CAUTION G Ensure adequate ventilation by 20 degrees to the left or right direction by following the clearance recommendations. G Do not mount near or above any type of 4 inches on all four sides from your viewing position. 21
For proper ventilation, allow a clearance of heat source. SWIVEL STAND After installing the TV, you can adjust the TV set manually to suit your TV. PREPARATION DESKTOP PEDESTAL INSTALLATION I Image shown may differ from the wall. 4 inches 4 inches 4 inches 4 inches CAUTION G Ensure adequate ventilation by 20 degrees to the left or right direction by following the clearance recommendations. G Do not mount near or above any type of 4 inches on all four sides from your viewing position. 21
Owner's Manual (English)
Page 23
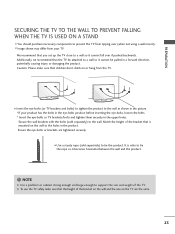
G To use the TV safely make sure that you set up the TV close to the wall. We recommend that children don't climb on the TV are tightened securely. Secure the wall brackets with the bolts (sold separately) to the wall as shown in the upper holes. It is mounted on ... pushed backwards. I Use a sturdy rope (sold separately) to a wall so it cannot be attached to support the size and weight of the TV. I Insert the eye-bolts (or TV brackets and bolts) to tighten the product to tie the product. Caution: Please make sure that the height of the bracket that the...
G To use the TV safely make sure that you set up the TV close to the wall. We recommend that children don't climb on the TV are tightened securely. Secure the wall brackets with the bolts (sold separately) to the wall as shown in the upper holes. It is mounted on ... pushed backwards. I Use a sturdy rope (sold separately) to a wall so it cannot be attached to support the size and weight of the TV. I Insert the eye-bolts (or TV brackets and bolts) to tighten the product to tie the product. Caution: Please make sure that the height of the bracket that the...

Owner's Manual (English)
Page 25
... 67.50 23.976 24.00 29.97 30.00 59.94 60.00 25 HD RECEIVER SETUP This TV can receive digital over-the-air/digital cable signals without an external digital set-top box. Match the jack colors (Y = green, PB = blue, and PR = red). Component Connection 1. Y PB PR L R EXTERNAL... SETUP Connect the audio output of the digital settop box to the owner's manual for the digital set-top box operation.) I Select the Component1 input source on the TV using the INPUT button on the TV. EXTERNAL EQUIPMENT SETUP I To prevent the equipment damage, never plug in any power cords until you ...
... 67.50 23.976 24.00 29.97 30.00 59.94 60.00 25 HD RECEIVER SETUP This TV can receive digital over-the-air/digital cable signals without an external digital set-top box. Match the jack colors (Y = green, PB = blue, and PR = red). Component Connection 1. Y PB PR L R EXTERNAL... SETUP Connect the audio output of the digital settop box to the owner's manual for the digital set-top box operation.) I Select the Component1 input source on the TV using the INPUT button on the TV. EXTERNAL EQUIPMENT SETUP I To prevent the equipment damage, never plug in any power cords until you ...

Owner's Manual (English)
Page 26
... 30.00 59.94 60.00 26 EXTERNAL EQUIPMENT SETUP ( ) HDMI Connection 1. In this case use I Turn on the digital set-top box. (Refer to the owner's manual for the digital set -top box to HDMI/DVI IN 1, 2, 3, or 4 jack on the remote control. AV IN 1 VIDEO L(MONO) AUDIO R 3 2...232C IN C (CONTROL&SERVICE) 1 ! How to connect EXTERNAL EQUIPMENT SETUP 1 Connect the digital set -top box.) I Select the HDMI1, HDMI2, HDMI3, or HDMI4 input source on the TV using the INPUT button on the TV. 2 No separate audio connection is necessary. How to use the latest cables that support HDMI version...
... 30.00 59.94 60.00 26 EXTERNAL EQUIPMENT SETUP ( ) HDMI Connection 1. In this case use I Turn on the digital set-top box. (Refer to the owner's manual for the digital set -top box to HDMI/DVI IN 1, 2, 3, or 4 jack on the remote control. AV IN 1 VIDEO L(MONO) AUDIO R 3 2...232C IN C (CONTROL&SERVICE) 1 ! How to connect EXTERNAL EQUIPMENT SETUP 1 Connect the digital set -top box.) I Select the HDMI1, HDMI2, HDMI3, or HDMI4 input source on the TV using the INPUT button on the TV. 2 No separate audio connection is necessary. How to use the latest cables that support HDMI version...

Owner's Manual (English)
Page 27
How to connect 1 Connect the DVI output of the digital set-top box to the HDMI/DVI IN 1, 2, or 3 jack on the TV. 2 Connect the digital set -top box.) I Select the HDMI1, HDMI2, or HDMI3 input source on the TV using the INPUT button on the remote control. How to use I Turn on the digital... set-top box. (Refer to HDMI cable or adapter is necessary...
How to connect 1 Connect the DVI output of the digital set-top box to the HDMI/DVI IN 1, 2, or 3 jack on the TV. 2 Connect the digital set -top box.) I Select the HDMI1, HDMI2, or HDMI3 input source on the TV using the INPUT button on the remote control. How to use I Turn on the digital... set-top box. (Refer to HDMI cable or adapter is necessary...

Owner's Manual (English)
Page 30
How to use I Insert a video tape into the VCR and press PLAY on the TV. RGB/DVI) 1 ANTENNA/ RS-232C IN CABLE IN (CONTROL&SERVICE) 2 Connect the antenna cable to the RF antenna in socket of the VCR to connect ( ) ... the ANTENNA/CABLE IN sock- UDIO IN OPTICAL DIGITAL AUDIO OUT et on the VCR. (Refer to the same channel number. I Set VCR output switch to 3 or 4 and then tune TV to the VCR owner's manual.) ANT OUT S-VIDEO VIDEO L R AUDIO ANT IN OUTPUT SWITCH Wall Jack 2 Antenna 30 EXTERNAL EQUIPMENT SETUP...
How to use I Insert a video tape into the VCR and press PLAY on the TV. RGB/DVI) 1 ANTENNA/ RS-232C IN CABLE IN (CONTROL&SERVICE) 2 Connect the antenna cable to the RF antenna in socket of the VCR to connect ( ) ... the ANTENNA/CABLE IN sock- UDIO IN OPTICAL DIGITAL AUDIO OUT et on the VCR. (Refer to the same channel number. I Set VCR output switch to 3 or 4 and then tune TV to the VCR owner's manual.) ANT OUT S-VIDEO VIDEO L R AUDIO ANT IN OUTPUT SWITCH Wall Jack 2 Antenna 30 EXTERNAL EQUIPMENT SETUP...

Owner's Manual (English)
Page 32
USB IN IN 4 Camcorder Video Game Set VIDEO L R 1 VIDEO L/MONO AUDIO R AV IN 2 32 Match the jack colors. (Video = yellow, Audio Left = white, and Audio Right = red) 2. How to use I Select the A V 2 input source on the TV using the INPUT button on the TV. I Operate the corresponding external equipment. I If connected to AV IN 1 input, select the A V 1 input source on the remote control. How to connect 1 Connect the AUDIO/VIDEO jacks between TV and external equipment. EXTERNAL EQUIPMENT SETUP EXTERNAL EQUIPMENT SETUP OTHER A/V SOURCE SETUP 1.
USB IN IN 4 Camcorder Video Game Set VIDEO L R 1 VIDEO L/MONO AUDIO R AV IN 2 32 Match the jack colors. (Video = yellow, Audio Left = white, and Audio Right = red) 2. How to use I Select the A V 2 input source on the TV using the INPUT button on the TV. I Operate the corresponding external equipment. I If connected to AV IN 1 input, select the A V 1 input source on the remote control. How to connect 1 Connect the AUDIO/VIDEO jacks between TV and external equipment. EXTERNAL EQUIPMENT SETUP EXTERNAL EQUIPMENT SETUP OTHER A/V SOURCE SETUP 1.

Owner's Manual (English)
Page 33
... audio output to the AUDIO IN (RGB/DVI) jack on the remote control. 2 1 AUDIO RGB OUTPUT ( ) 33 I Turn on the PC and the TV. EXTERNAL EQUIPMENT SETUP PC SETUP This TV provides Plug and Play capability, meaning that the PC adjusts automatically to use I Select the RGB-PC input source on the... TV using the INPUT button on the TV. 1 /DVI IN RGB IN (PC) AUDIO IN (RGB/DVI) OPTICAL DIGITAL AUDIO OUT ANTENNA/ RS-232C IN CABLE IN (CONTROL&SERVICE) 2. How to the...
... audio output to the AUDIO IN (RGB/DVI) jack on the remote control. 2 1 AUDIO RGB OUTPUT ( ) 33 I Turn on the PC and the TV. EXTERNAL EQUIPMENT SETUP PC SETUP This TV provides Plug and Play capability, meaning that the PC adjusts automatically to use I Select the RGB-PC input source on the... TV using the INPUT button on the TV. 1 /DVI IN RGB IN (PC) AUDIO IN (RGB/DVI) OPTICAL DIGITAL AUDIO OUT ANTENNA/ RS-232C IN CABLE IN (CONTROL&SERVICE) 2. How to the...

Owner's Manual (English)
Page 35
... adjust the brightness and contrast on the graphics card, DOS mode may be positioned on the screen properly. G Depending on the graphics card, some resolution settings may become permanently imprinted on the screen for Horizontal and Vertical frequencies is in use. G When selecting HDMI-PC..., set the "Input Label PC" in HDMI-PC 1920x1080, change the refresh rate to be noise associated with the resolution, vertical pattern, contrast or brightness. EXTERNAL ...
... adjust the brightness and contrast on the graphics card, DOS mode may be positioned on the screen properly. G Depending on the graphics card, some resolution settings may become permanently imprinted on the screen for Horizontal and Vertical frequencies is in use. G When selecting HDMI-PC..., set the "Input Label PC" in HDMI-PC 1920x1080, change the refresh rate to be noise associated with the resolution, vertical pattern, contrast or brightness. EXTERNAL ...

Owner's Manual (English)
Page 36
... EQUIPMENT SETUP Screen Setup for PC mode Selecting Resolution You can also be adjusted. You can use this function only when the PC resolution is set to 1024X768, 1280X768 or 1360X768.
... EQUIPMENT SETUP Screen Setup for PC mode Selecting Resolution You can also be adjusted. You can use this function only when the PC resolution is set to 1024X768, 1280X768 or 1360X768.

Owner's Manual (English)
Page 37
Select Auto Config.. 4 ENTER Select Y e s. 5 ENTER Start Auto Configuration. Select Screen (RGB-PC). To Set Yes No I If picture needs to be adjusted again after Auto adjustment in RGB-PC, you can adjust the Position, S i z e or P h a s e. 37... EQUIPMENT SETUP Auto Configure Automatically adjusts picture position and minimizes image instability. After adjustment, if the image is still not correct, try using the manual settings or a different resolution or refresh rate on the PC. Position Size Phase Reset Move Prev. PICTURE Move Enter E • Contrast 50 • ...
Select Auto Config.. 4 ENTER Select Y e s. 5 ENTER Start Auto Configuration. Select Screen (RGB-PC). To Set Yes No I If picture needs to be adjusted again after Auto adjustment in RGB-PC, you can adjust the Position, S i z e or P h a s e. 37... EQUIPMENT SETUP Auto Configure Automatically adjusts picture position and minimizes image instability. After adjustment, if the image is still not correct, try using the manual settings or a different resolution or refresh rate on the PC. Position Size Phase Reset Move Prev. PICTURE Move Enter E • Contrast 50 • ...

Owner's Manual (English)
Page 39
PICTURE Move Enter E • Contrast 50 • Brightness 50 • Sharpness 50 • Color 50 • Tint 0R G • Advanced Control • Picture Reset Screen (RGB-PC) 1 MENU 2 ENTER 3 ENTER 4 ENTER 5 ENTER Select PICTURE. SCREEN Resolution Auto Config. To Set Yes No 39 EXTERNAL EQUIPMENT SETUP Screen Reset (Reset to original factory values) Returns Position, S i z e, and Phase to the default factory settings. Select Screen (RGB-PC). Position Size Phase Reset Move Prev. Select Reset. This feature operates only in RGB-PC mode. Select Y e s.
PICTURE Move Enter E • Contrast 50 • Brightness 50 • Sharpness 50 • Color 50 • Tint 0R G • Advanced Control • Picture Reset Screen (RGB-PC) 1 MENU 2 ENTER 3 ENTER 4 ENTER 5 ENTER Select PICTURE. SCREEN Resolution Auto Config. To Set Yes No 39 EXTERNAL EQUIPMENT SETUP Screen Reset (Reset to original factory values) Returns Position, S i z e, and Phase to the default factory settings. Select Screen (RGB-PC). Position Size Phase Reset Move Prev. Select Reset. This feature operates only in RGB-PC mode. Select Y e s.

Owner's Manual (English)
Page 41
... of OPTICAL DIGITAL AUDIO OUT. 2 Connect the other end of the optical cable to the digital audio input on the back of TV to a Home Theater (or amp). 1. Off " in 2 the menu. (G p.87) CAUTION G Do not look into the optical output port. See the external audio equipment ... to enjoy digital broadcasting through 5.1-channel speakers, connect the OPTICAL DIGITAL AUDIO OUT terminal on the audio equipment. ( ) 3 Set the "TV Speaker option - Looking at the laser beam may block digital audio output. 41 NOTE G When connecting with ACP (Audio Copy Protection) function may damage your...
... of OPTICAL DIGITAL AUDIO OUT. 2 Connect the other end of the optical cable to the digital audio input on the back of TV to a Home Theater (or amp). 1. Off " in 2 the menu. (G p.87) CAUTION G Do not look into the optical output port. See the external audio equipment ... to enjoy digital broadcasting through 5.1-channel speakers, connect the OPTICAL DIGITAL AUDIO OUT terminal on the audio equipment. ( ) 3 Set the "TV Speaker option - Looking at the laser beam may block digital audio output. 41 NOTE G When connecting with ACP (Audio Copy Protection) function may damage your...

Owner's Manual (English)
Page 43
... two 1.5V AAA batteries. G p.52 MARK Select the input to mark or unmark a photo/music. UP/DOWN PAGE Moves from one full set of the screen. I Close cover. 43 G p.53 AV MODE Toggles through the programmed Favorite channels. INFO Displays channel information at the top of.... /DOWN FAV Scroll through preset Video and Audio modes. G p.71 Use to apply the Picture Wizard settings. WATCHING TV / CHANNEL CONTROL THUMBSTICK Navigates the on-screen menus and adjusts the system settings to your preference. (Up/Down/Left Right/ENTER) RETURN Allows the user to move return one . ...
... two 1.5V AAA batteries. G p.52 MARK Select the input to mark or unmark a photo/music. UP/DOWN PAGE Moves from one full set of the screen. I Close cover. 43 G p.53 AV MODE Toggles through the programmed Favorite channels. INFO Displays channel information at the top of.... /DOWN FAV Scroll through preset Video and Audio modes. G p.71 Use to apply the Picture Wizard settings. WATCHING TV / CHANNEL CONTROL THUMBSTICK Navigates the on-screen menus and adjusts the system settings to your preference. (Up/Down/Left Right/ENTER) RETURN Allows the user to move return one . ...


