Owner's Manual (English)
Page 2
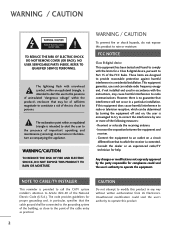
... 2 Any changes or modifications not expressly approved by turning the equipment off and on a circuit different from LG Electronics. WARNING / CAUTION TO REDUCE THE RISK OF ELECTRIC SHOCK DO NOT REMOVE COVER (OR BACK). NO USER SERVICEABLE PARTS INSIDE. FCC NOTICE Class B digital device This equipment has been tested and found to comply with the instructions, may be connected to...
... 2 Any changes or modifications not expressly approved by turning the equipment off and on a circuit different from LG Electronics. WARNING / CAUTION TO REDUCE THE RISK OF ELECTRIC SHOCK DO NOT REMOVE COVER (OR BACK). NO USER SERVICEABLE PARTS INSIDE. FCC NOTICE Class B digital device This equipment has been tested and found to comply with the instructions, may be connected to...
Owner's Manual (English)
Page 4
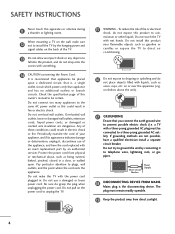
... electrician install a separate circuit breaker. on the power cord to unplug the TV. 15 WARNING - SAFETY INSTRUCTIONS 11 Never touch this owner's manual to be certain. that you connect the earth ground wire to plugs, wall outlets, and the point where the cord exits the appliance. Pay particular attention to prevent possible electric shock (i.e. Do not use of this apparatus or antenna during...
... electrician install a separate circuit breaker. on the power cord to unplug the TV. 15 WARNING - SAFETY INSTRUCTIONS 11 Never touch this owner's manual to be certain. that you connect the earth ground wire to plugs, wall outlets, and the point where the cord exits the appliance. Pay particular attention to prevent possible electric shock (i.e. Do not use of this apparatus or antenna during...

Owner's Manual (English)
Page 5
.... Do not spray water or other odors coming from the TV or hear strange sounds, unplug the power cord contact an authorized service center. 25 Do not press strongly upon the panel with respect to proper grounding of the mast and supporting structure, grounding of antenna discharge unit, connection to provide some protection against or put stress on it...
.... Do not spray water or other odors coming from the TV or hear strange sounds, unplug the power cord contact an authorized service center. 25 Do not press strongly upon the panel with respect to proper grounding of the mast and supporting structure, grounding of antenna discharge unit, connection to provide some protection against or put stress on it...
Owner's Manual (English)
Page 6
...Input List 43 Input Label 44 AV Mode 45 SIMPLINK 46 USB Entry Modes 48 Photo List 49 Music List 53 PICTURE CONTROL Picture Size (Aspect Ratio) Control 56 Preset Picture Settings - Preset 58 Color Tone - Eye Care 64 Advanced Control - Picture Mode - User Mode 60 - Picture Mode - Black (Darkness) Level 63 Advanced Control - Real Cinema 65 Picture Reset 66 Power Indicator 67 6 Auto Scan (Auto Tuning 40 - Preset 59 Manual Picture Adjustment - Expert Control 61 Picture Improvement Technology 62 Advanced Control - Picture Mode - Add / Delete Channel (Manual...
...Input List 43 Input Label 44 AV Mode 45 SIMPLINK 46 USB Entry Modes 48 Photo List 49 Music List 53 PICTURE CONTROL Picture Size (Aspect Ratio) Control 56 Preset Picture Settings - Preset 58 Color Tone - Eye Care 64 Advanced Control - Picture Mode - User Mode 60 - Picture Mode - Black (Darkness) Level 63 Advanced Control - Real Cinema 65 Picture Reset 66 Power Indicator 67 6 Auto Scan (Auto Tuning 40 - Preset 59 Manual Picture Adjustment - Expert Control 61 Picture Improvement Technology 62 Advanced Control - Picture Mode - Add / Delete Channel (Manual...

Owner's Manual (English)
Page 7
... Channel Blocking 89 Movie & TV Rating 90 Downloadable Rating 95 External Input Blocking 96 Key lock 97 APPENDIX Troubleshooting 98 Maintenance 100 Product Specifications 101 Programming the Remote Control 102 IR Codes 105 External Control Through RS-232C 107 7 User Mode 70 Clear Voice 71 Balance 72 TV Speakers On/Off Setup 73 Audio Reset 74 Stereo/SAP Broadcast Setup 75 Audio Language 76 On-Screen Menus Language Selection 77 Caption Mode - Caption Option 80 TIME SETTING Clock Setting - SOUND & LANGUAGE CONTROL Auto Volume...
... Channel Blocking 89 Movie & TV Rating 90 Downloadable Rating 95 External Input Blocking 96 Key lock 97 APPENDIX Troubleshooting 98 Maintenance 100 Product Specifications 101 Programming the Remote Control 102 IR Codes 105 External Control Through RS-232C 107 7 User Mode 70 Clear Voice 71 Balance 72 TV Speakers On/Off Setup 73 Audio Reset 74 Stereo/SAP Broadcast Setup 75 Audio Language 76 On-Screen Menus Language Selection 77 Caption Mode - Caption Option 80 TIME SETTING Clock Setting - SOUND & LANGUAGE CONTROL Auto Volume...
Owner's Manual (English)
Page 11
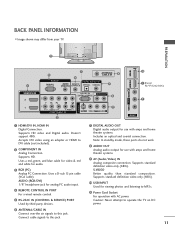
... operate the TV on DC power. 6 ANTENNA/CABLE IN Connect over-the air signals to MP3s. 11 Power Cord Socket For operation with amps and home theater systems. Includes an optical and coaxial connection. Supports HD video and Digital audio. Supports standard definition video only (480i). 10 USB INPUT Used for use with amps and home theater systems. 9 AV (Audio/Video) IN ( ) Analog composite connection. Accepts DVI video using an adapter or HDMI to this jack. Uses a red, green, and blue cable for video & red and white...
... operate the TV on DC power. 6 ANTENNA/CABLE IN Connect over-the air signals to MP3s. 11 Power Cord Socket For operation with amps and home theater systems. Includes an optical and coaxial connection. Supports HD video and Digital audio. Supports standard definition video only (480i). 10 USB INPUT Used for use with amps and home theater systems. 9 AV (Audio/Video) IN ( ) Analog composite connection. Accepts DVI video using an adapter or HDMI to this jack. Uses a red, green, and blue cable for video & red and white...
Owner's Manual (English)
Page 13
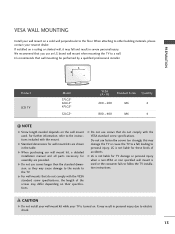
... used . It may fall , leading to a wall. PREPARATION VESA WALL MOUNTING Install your TV is turned on. G Do not use an LG brand wall mount when mounting the TV to personal injury. We recommend that do not comply with the VESA standard screw specifications. When attaching to follow the TV installation instructions. A B Product LCD TV Model 37LG5* 42LG5* 47LG5* 52LG5* VESA (A * B) Standard Screw Quantity 200 * 200 M6 4 800 * 400 M6 4 ! NOTE G Screw length needed depends on the wall mount used...
... used . It may fall , leading to a wall. PREPARATION VESA WALL MOUNTING Install your TV is turned on. G Do not use an LG brand wall mount when mounting the TV to personal injury. We recommend that do not comply with the VESA standard screw specifications. When attaching to follow the TV installation instructions. A B Product LCD TV Model 37LG5* 42LG5* 47LG5* 52LG5* VESA (A * B) Standard Screw Quantity 200 * 200 M6 4 800 * 400 M6 4 ! NOTE G Screw length needed depends on the wall mount used...
Owner's Manual (English)
Page 18
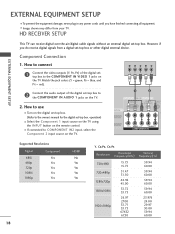
... input, select the Component 2 input source on the digital set-top box. (Refer to connect 1 Connect the video outputs (Y, PB, PR) of the digital set -top box or other digital external device. How to the COMPONENT IN VIDEO 1 jacks on the remote control. EXTERNAL EQUIPMENT SETUP EXTERNAL EQUIPMENT SETUP I To prevent the equipment damage, never plug in any power cords until you do receive digital signals from your TV. Component Connection 1. Match the jack colors (Y = green, PB = blue, and PR = red). 2 Connect the audio output of the digital settop box to use I Turn...
... input, select the Component 2 input source on the digital set-top box. (Refer to connect 1 Connect the video outputs (Y, PB, PR) of the digital set -top box or other digital external device. How to the COMPONENT IN VIDEO 1 jacks on the remote control. EXTERNAL EQUIPMENT SETUP EXTERNAL EQUIPMENT SETUP I To prevent the equipment damage, never plug in any power cords until you do receive digital signals from your TV. Component Connection 1. Match the jack colors (Y = green, PB = blue, and PR = red). 2 Connect the audio output of the digital settop box to use I Turn...

Owner's Manual (English)
Page 19
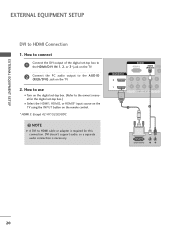
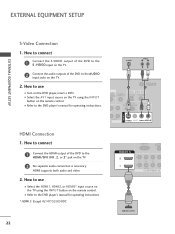
EXTERNAL EQUIPMENT SETUP HDMI Connection 1. How to use I Turn on the digital set -top box.) I Select the HDMI1, HDMI2, or HDMI3* input source on the TV using the INPUT button on the TV. 2 No separate audio connection is necessary. HDMI supports both audio and video. 2. How to connect 1 Connect the digital set-top box to the owner's manual for the digital set -top box. (Refer to HDMI/DVI IN1, 2, or 3* jack on the remote control. * HDMI 3: Except 42/47/52LG50DC HDMI-DTV Resolution...00 RGB IN RGB(PC) A (RG HDMI/DVI IN 2 1 2 Y 1 PB PR VIDEO COMPONENT 1 HDMI-DTV OUTPUT 19
EXTERNAL EQUIPMENT SETUP HDMI Connection 1. How to use I Turn on the digital set -top box.) I Select the HDMI1, HDMI2, or HDMI3* input source on the TV using the INPUT button on the TV. 2 No separate audio connection is necessary. HDMI supports both audio and video. 2. How to connect 1 Connect the digital set-top box to the owner's manual for the digital set -top box. (Refer to HDMI/DVI IN1, 2, or 3* jack on the remote control. * HDMI 3: Except 42/47/52LG50DC HDMI-DTV Resolution...00 RGB IN RGB(PC) A (RG HDMI/DVI IN 2 1 2 Y 1 PB PR VIDEO COMPONENT 1 HDMI-DTV OUTPUT 19
Owner's Manual (English)
Page 20
How to use I Turn on the digital set-top box. (Refer to the owner's manual for this connection. EXTERNAL EQUIPMENT SETUP EXTERNAL EQUIPMENT SETUP DVI to HDMI cable or adapter is necessary. DVI doesn't support audio, so a separate audio connection is required for the digital set -top box to the HDMI/DVI IN 1, 2, or 3* jack on the TV. 2 Connect the PC audio output to connect 1 Connect the DVI output of the digital set -top box.) I O (RGB/DVI) jack on the remote control. * HDMI 3: Except 42/47/52LG50DC...
How to use I Turn on the digital set-top box. (Refer to the owner's manual for this connection. EXTERNAL EQUIPMENT SETUP EXTERNAL EQUIPMENT SETUP DVI to HDMI cable or adapter is necessary. DVI doesn't support audio, so a separate audio connection is required for the digital set -top box to the HDMI/DVI IN 1, 2, or 3* jack on the TV. 2 Connect the PC audio output to connect 1 Connect the DVI output of the digital set -top box.) I O (RGB/DVI) jack on the remote control. * HDMI 3: Except 42/47/52LG50DC...
Owner's Manual (English)
Page 22
... SETUP EXTERNAL EQUIPMENT SETUP S-Video Connection 1. I Refer to the DVD player's manual for operating instructions. HDMI supports both audio and video. 2. I Select the A V 1 input source on the TV using the INPUT button on the TV. 2 No separate audio connection is necessary. I Refer to the DVD player's manual for operating instructions. * HDMI 3: Except 42/47/52LG50DC RGB(PC) AUDIO (RGB/D HDMI/DVI IN 2 1 2 Y 1 PB PR L VIDEO A COMPONENT IN 1 HDMI-DVD OUTPUT 22 S-VIDEO AUDIO L R ANTENNA/ CABLE IN 1 2 DIGITAL AUDIO OUT DIO REMOTE B/DVI) CONTROL IN OPTICAL...
... SETUP EXTERNAL EQUIPMENT SETUP S-Video Connection 1. I Refer to the DVD player's manual for operating instructions. HDMI supports both audio and video. 2. I Select the A V 1 input source on the TV using the INPUT button on the TV. 2 No separate audio connection is necessary. I Refer to the DVD player's manual for operating instructions. * HDMI 3: Except 42/47/52LG50DC RGB(PC) AUDIO (RGB/D HDMI/DVI IN 2 1 2 Y 1 PB PR L VIDEO A COMPONENT IN 1 HDMI-DVD OUTPUT 22 S-VIDEO AUDIO L R ANTENNA/ CABLE IN 1 2 DIGITAL AUDIO OUT DIO REMOTE B/DVI) CONTROL IN OPTICAL...

Owner's Manual (English)
Page 24
... remote control. How to use I Select the A V 1 input source on the TV using the INPUT button on the TV. 2 Connect the audio outputs of the TV. How to connect 1 Connect the S-VIDEO output of the VCR to the VCR owner's manual.) I If connected to connect 1 Connect the AUDIO/VIDEO jacks between TV and VCR. CAUTION G Do not connect to the AUDIO input jacks on the remote control. ANT IN S-VIDEO VIDEO L R ANT OUT OUTPUT SWITCH 1 ANTENNA/ CABLE IN DIGITAL AUDIO OUT AUDIO REMOTE (RGB/DVI) CONTROL IN OPTICAL COAXIAL RS-232C IN AUDIO OUT (CONTROL & SERVICE) L R AUDIO...
... remote control. How to use I Select the A V 1 input source on the TV using the INPUT button on the TV. 2 Connect the audio outputs of the TV. How to connect 1 Connect the S-VIDEO output of the VCR to the VCR owner's manual.) I If connected to connect 1 Connect the AUDIO/VIDEO jacks between TV and VCR. CAUTION G Do not connect to the AUDIO input jacks on the remote control. ANT IN S-VIDEO VIDEO L R ANT OUT OUTPUT SWITCH 1 ANTENNA/ CABLE IN DIGITAL AUDIO OUT AUDIO REMOTE (RGB/DVI) CONTROL IN OPTICAL COAXIAL RS-232C IN AUDIO OUT (CONTROL & SERVICE) L R AUDIO...

Owner's Manual (English)
Page 33
... the TV's audio to the digital audio input on the audio equipment. 3 Set the "TV Speaker option - See the external audio equipment instruction manual for operation. GB/DVI) RS-232C IN AUDIO OUT (CONTROL & SERVICE) L R AV IN 1 2 Set the "TV Speaker option - Off" in the AUDIO menu. (G p.73). How to connect AUDIO 1 Connect one end of the optical or coaxial cable to the TV's OPTICAL or COAXIAL port of DIGITAL AUDIO O U T. 2 Connect the other end of the optical or coaxial cable to external audio equipment via the Audio Output port...
... the TV's audio to the digital audio input on the audio equipment. 3 Set the "TV Speaker option - See the external audio equipment instruction manual for operation. GB/DVI) RS-232C IN AUDIO OUT (CONTROL & SERVICE) L R AV IN 1 2 Set the "TV Speaker option - Off" in the AUDIO menu. (G p.73). How to connect AUDIO 1 Connect one end of the optical or coaxial cable to the TV's OPTICAL or COAXIAL port of DIGITAL AUDIO O U T. 2 Connect the other end of the optical or coaxial cable to external audio equipment via the Audio Output port...
Owner's Manual (English)
Page 37
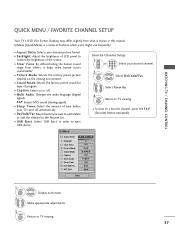
... format. Make appropriate adjustments. 3 Q. SAP: Selects MTS sound (Analog signal). I Multi Audio: Changes the audio language (Digital signal). I Sleep Timer: Select the amount of LCD panel to TV viewing. 37 I USB Eject: Select "USB Eject" in this manual. Q.Menu Aspect Ratio Backlight Clear Voice Picture Mode Sound Mode Caption Multi Audio Sleep Timer CH Del/Add/Fav USB Eject F 16:9 G 3 Off Vivid Standard Off English Off Add Eject Close 1Q. Q.Menu (Quick Menu) is shown in order to a favorite channel, press the F A V (Favorite) button repeatedly. I Caption...
... format. Make appropriate adjustments. 3 Q. SAP: Selects MTS sound (Analog signal). I Multi Audio: Changes the audio language (Digital signal). I Sleep Timer: Select the amount of LCD panel to TV viewing. 37 I USB Eject: Select "USB Eject" in this manual. Q.Menu Aspect Ratio Backlight Clear Voice Picture Mode Sound Mode Caption Multi Audio Sleep Timer CH Del/Add/Fav USB Eject F 16:9 G 3 Off Vivid Standard Off English Off Add Eject Close 1Q. Q.Menu (Quick Menu) is shown in order to a favorite channel, press the F A V (Favorite) button repeatedly. I Caption...
Owner's Manual (English)
Page 75
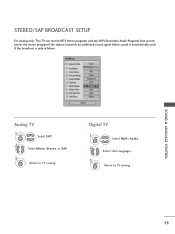
.... MENU Select Multi Audio. 2 Select other languages. 3 Q. MENU Return to TV viewing. MENU Return to TV viewing. SOUND & LANGUAGE CONTROL 75 MENU Select S A P. 2 Select Mono, Stereo, or S A P. 3 Q. Digital TV 1Q. STEREO/SAP BROADCAST SETUP For Analog only: This TV can receive MTS stereo programs and any SAP (Secondary Audio Program) that accompanies the stereo program if the station transmits an additional sound signal. Q.Menu Aspect Ratio Backlight Clear Voice Picture Mode Sound Mode Caption Multi Audio Sleep Timer CH Del/Add/Fav USB...
.... MENU Select Multi Audio. 2 Select other languages. 3 Q. MENU Return to TV viewing. MENU Return to TV viewing. SOUND & LANGUAGE CONTROL 75 MENU Select S A P. 2 Select Mono, Stereo, or S A P. 3 Q. Digital TV 1Q. STEREO/SAP BROADCAST SETUP For Analog only: This TV can receive MTS stereo programs and any SAP (Secondary Audio Program) that accompanies the stereo program if the station transmits an additional sound signal. Q.Menu Aspect Ratio Backlight Clear Voice Picture Mode Sound Mode Caption Multi Audio Sleep Timer CH Del/Add/Fav USB...

Owner's Manual (English)
Page 86
... Set Password Block Channel Movie Rating TV Rating-Children TV Rating-General Downloadable Rating Input Block LOCK Move Enter Lock System : Off Set Password Block Channel TV Rating-English TV Rating-French Downloadable Rating Input Block Enter Password **** Close 1 MENU ENTER Select L O C K. 21 2 3 456 789 0 Input the password. 86 I TV-Y7 (Children 7 years older) SET PASSWORD & LOCK SYSTEM Setting up Your Password Set up with the initial password "0-0-0-0". The Parental Control Function (V-Chip) is set up blocking schemes to allow all program viewing for -TV...
... Set Password Block Channel Movie Rating TV Rating-Children TV Rating-General Downloadable Rating Input Block LOCK Move Enter Lock System : Off Set Password Block Channel TV Rating-English TV Rating-French Downloadable Rating Input Block Enter Password **** Close 1 MENU ENTER Select L O C K. 21 2 3 456 789 0 Input the password. 86 I TV-Y7 (Children 7 years older) SET PASSWORD & LOCK SYSTEM Setting up Your Password Set up with the initial password "0-0-0-0". The Parental Control Function (V-Chip) is set up blocking schemes to allow all program viewing for -TV...
Owner's Manual (English)
Page 98
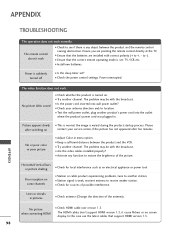
... or no screen display. The remote control doesn't work I Check to +, - Ensure you are installed with the broadcast. I Ensure that the correct remote operating mode is turned on contact your antenna direction and/or location. to receive weaker station. I Check HDMI cable over version 1.3. I Is the power cord inserted into the outlet where the product's power cord was plugged in. I Try another station. No picture when connecting HDMI I Check the power control settings. The video function does...
... or no screen display. The remote control doesn't work I Check to +, - Ensure you are installed with the broadcast. I Ensure that the correct remote operating mode is turned on contact your antenna direction and/or location. to receive weaker station. I Check HDMI cable over version 1.3. I Is the power cord inserted into the outlet where the product's power cord was plugged in. I Try another station. No picture when connecting HDMI I Check the power control settings. The video function does...

Owner's Manual (English)
Page 101
APPENDIX 101 PRODUCT SPECIFICATIONS MODELS Dimensions (Width x Height x Depth) With stand Without stand Weight With stand Without stand MODELS Dimensions (Width x Height x Depth) With stand Without stand Weight With stand Without stand Power requirement Television System Program Coverage External Antenna Impedance Environment condition Operating Temperature Operating Humidity Storage Temperature Storage Humidity 37LG50 (37LG50-UG) 36.8 x 26.9 x 11.5 inches 936.4 x 685.4 x 293.4 mm 36.8 x 24.1 x 3.4 inches 936.4 x 612.8 x 88.0 mm 40.3 pounds / 18.3 kg 34.3 pounds...
APPENDIX 101 PRODUCT SPECIFICATIONS MODELS Dimensions (Width x Height x Depth) With stand Without stand Weight With stand Without stand MODELS Dimensions (Width x Height x Depth) With stand Without stand Weight With stand Without stand Power requirement Television System Program Coverage External Antenna Impedance Environment condition Operating Temperature Operating Humidity Storage Temperature Storage Humidity 37LG50 (37LG50-UG) 36.8 x 26.9 x 11.5 inches 936.4 x 685.4 x 293.4 mm 36.8 x 24.1 x 3.4 inches 936.4 x 612.8 x 88.0 mm 40.3 pounds / 18.3 kg 34.3 pounds...

Owner's Manual (English)
Page 102
...The remote control button of other components without programming, turn off. 5 Press the MENU button to store the code. 6 Test the remote control functions to be found on the following pages. APPENDIX 102 Programming code numbers for the corresponding component can be programmed with the code. 4 Enter a code number using the number buttons on the remote control. Test the POWER and C H buttons to operate most remote-controllable devices. APPENDIX PROGRAMMING THE REMOTE CONTROL The provided universal remote control can be programmed, then press the corresponding mode button...
...The remote control button of other components without programming, turn off. 5 Press the MENU button to store the code. 6 Test the remote control functions to be found on the following pages. APPENDIX 102 Programming code numbers for the corresponding component can be programmed with the code. 4 Enter a code number using the number buttons on the remote control. Test the POWER and C H buttons to operate most remote-controllable devices. APPENDIX PROGRAMMING THE REMOTE CONTROL The provided universal remote control can be programmed, then press the corresponding mode button...
Owner's Manual (English)
Page 109
... indicated as decimal (1~ 99) on menu and as command. [Set ID] : Use the small character, if set ID to read mode, it will not send the status during the standby mode. Volume Control k 07. Color Temperature k e 00 ~ 01 18. Adjustment range is controlled. Remote Control Lock Mode k a 00 ~ 01 14. OK Acknowledgement [Command2][ ][Set ID][ ][OK][Data][x] The TV transmits ACK (acknowledgement) based on transmission /receiving protocol. [DATA] : To transmit...
... indicated as decimal (1~ 99) on menu and as command. [Set ID] : Use the small character, if set ID to read mode, it will not send the status during the standby mode. Volume Control k 07. Color Temperature k e 00 ~ 01 18. Adjustment range is controlled. Remote Control Lock Mode k a 00 ~ 01 14. OK Acknowledgement [Command2][ ][Set ID][ ][OK][Data][x] The TV transmits ACK (acknowledgement) based on transmission /receiving protocol. [DATA] : To transmit...


