
Owner's Manual (English)
Page 6
...44 Key Lock 45 MEDIAHOST MEDIAHOST Entry Modes 46 Photo List 47 Music List 51 PICTURE CONTROL Picture Size (Aspect Ratio) Control 53 Preset Picture Settings - Color Tone - User Mode 57 XD - User Mode 67 Balance 68 TV Speakers On/Off Setup 69 Stereo/SAP Broadcasts Setup 70 Audio... Setup 22 VCR Setup 24 Other A/V Source Setup 26 PC Setup 27 USB In Setup 32 Audio Out Setup 33 WATCHING TV / CHANNEL CONTROL Remote Control Functions 34 Turning On TV 36 Channel Selection 36 Volume Adjustment 36 On-Screen Menus Selection 37 Channel Setup - Add / Delete Channel (Manual Tuning 39...
...44 Key Lock 45 MEDIAHOST MEDIAHOST Entry Modes 46 Photo List 47 Music List 51 PICTURE CONTROL Picture Size (Aspect Ratio) Control 53 Preset Picture Settings - Color Tone - User Mode 57 XD - User Mode 67 Balance 68 TV Speakers On/Off Setup 69 Stereo/SAP Broadcasts Setup 70 Audio... Setup 22 VCR Setup 24 Other A/V Source Setup 26 PC Setup 27 USB In Setup 32 Audio Out Setup 33 WATCHING TV / CHANNEL CONTROL Remote Control Functions 34 Turning On TV 36 Channel Selection 36 Volume Adjustment 36 On-Screen Menus Selection 37 Channel Setup - Add / Delete Channel (Manual Tuning 39...

Owner's Manual (English)
Page 7
Auto Clock Setup 77 Manual Clock Setup 78 Auto On/Off Time Setting 79 Sleep Time Setting 80 Auto Shut-off Setting 81 PARENTAL CONTROL / RATINGS Set Password & Lock System 82 Channel Blocking 84 External Input Blocking 84 Movie & TV Rating 85 APPENDIX Troubleshooting 88 Maintenance 90 Product Specifications 91 Programming the Remote Control 93 IR Codes 97 External Control Through RS-232C 99 Open Source License 106 5 TIME SETTING Clock Setting -
Auto Clock Setup 77 Manual Clock Setup 78 Auto On/Off Time Setting 79 Sleep Time Setting 80 Auto Shut-off Setting 81 PARENTAL CONTROL / RATINGS Set Password & Lock System 82 Channel Blocking 84 External Input Blocking 84 Movie & TV Rating 85 APPENDIX Troubleshooting 88 Maintenance 90 Product Specifications 91 Programming the Remote Control 93 IR Codes 97 External Control Through RS-232C 99 Open Source License 106 5 TIME SETTING Clock Setting -
Owner's Manual (English)
Page 8
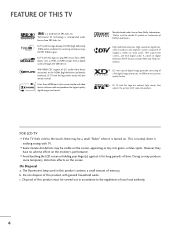
...LCD TV I If the TV feels cold to the HDMI (high-definition multimedia interface), LG TV with this logo displays Full HD (high-definition) 1080p native resolution by receiving and processing a Full HD 1080p signal. However, they have no adverse effect on the screen. On Disposal a. c. Disposal of LG... sensor that connect audio and video devices with one remote control. This is normal, there is a trademark of time. I Some minute dot defects may produce some temporary distortion effects on the monitor's performance. LG TV with general household waste. A subset of mercury....
...LCD TV I If the TV feels cold to the HDMI (high-definition multimedia interface), LG TV with this logo displays Full HD (high-definition) 1080p native resolution by receiving and processing a Full HD 1080p signal. However, they have no adverse effect on the screen. On Disposal a. c. Disposal of LG... sensor that connect audio and video devices with one remote control. This is normal, there is a trademark of time. I Some minute dot defects may produce some temporary distortion effects on the monitor's performance. LG TV with general household waste. A subset of mercury....

Owner's Manual (English)
Page 9
RATIO SIMPLINK FAV CH TV INPUT TV AUDIO POWER CAMBLOEDDEVD BRIGHT - TV Brackets, Twist Holder 2- TV Brackets, 2- BRIGHT + TIMER T The accssories can be cautions of the exterior. * Do not wipe roughly when removing stain. CD Manual 1.5V 1.5V VOL MUTE 1 Remote Control, Batteries EXIT Power Cord 75ohm ...Refer to p.16) Additional Cover 3- Please be different from the figures MENU ENTER shown here. D-sub 15 pin Cable For LCD TV models This feature is not available for the product exterior if there is missing, please contact the dealer where you purchased the ...
RATIO SIMPLINK FAV CH TV INPUT TV AUDIO POWER CAMBLOEDDEVD BRIGHT - TV Brackets, Twist Holder 2- TV Brackets, 2- BRIGHT + TIMER T The accssories can be cautions of the exterior. * Do not wipe roughly when removing stain. CD Manual 1.5V 1.5V VOL MUTE 1 Remote Control, Batteries EXIT Power Cord 75ohm ...Refer to p.16) Additional Cover 3- Please be different from the figures MENU ENTER shown here. D-sub 15 pin Cable For LCD TV models This feature is not available for the product exterior if there is missing, please contact the dealer where you purchased the ...

Owner's Manual (English)
Page 10
Power/Standby Indicator Illuminates red in standby mode. Illuminates white when the set is included with a cloth (If a polishing cloth is switched on. I Here shown may be somewhat different from your TV. Touch Pad ENTER INPUT Button ENTER VOLUME Button (F,G) Buttons POWER Button MENU Button CHANNEL (E,D) Buttons 8 Plasma TV Model PREPARATION Remote Control Sensor Program Display . . PREPARATION FRONT PANEL INFORMATION I NOTE: If your product has a protection tape attached, remove the tape. And then wipe the product with your product, use it).
Power/Standby Indicator Illuminates red in standby mode. Illuminates white when the set is included with a cloth (If a polishing cloth is switched on. I Here shown may be somewhat different from your TV. Touch Pad ENTER INPUT Button ENTER VOLUME Button (F,G) Buttons POWER Button MENU Button CHANNEL (E,D) Buttons 8 Plasma TV Model PREPARATION Remote Control Sensor Program Display . . PREPARATION FRONT PANEL INFORMATION I NOTE: If your product has a protection tape attached, remove the tape. And then wipe the product with your product, use it).

Owner's Manual (English)
Page 11
PREPARATION LCD TV Model 37/42/47/52LB5D 1 47LC7DF 1 2 3 CH CHANNEL (D,E)Buttons VOL VOLUME (F,G)Buttons ENTER MENU INPUT /I ENTER Button MENU Button INPUT Button POWER Button 2 3 1 Intelligent Eye Adjusts picture according to the surrounding conditions. 2 Remote Control Sensor 3 Power/Standby Indicator Illuminates red in standby mode. Illuminates green when the set is switched on. 9
PREPARATION LCD TV Model 37/42/47/52LB5D 1 47LC7DF 1 2 3 CH CHANNEL (D,E)Buttons VOL VOLUME (F,G)Buttons ENTER MENU INPUT /I ENTER Button MENU Button INPUT Button POWER Button 2 3 1 Intelligent Eye Adjusts picture according to the surrounding conditions. 2 Remote Control Sensor 3 Power/Standby Indicator Illuminates red in standby mode. Illuminates green when the set is switched on. 9
Owner's Manual (English)
Page 13
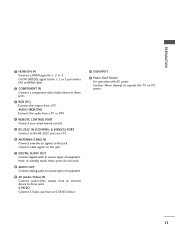
... TV on a PC. 6 ANTENNA/CABLE IN Connect over-the air signals to the RS-232C port on DC power. 11 PREPARATION 1 HDMI/DVI IN Connect a HDMI signal to various types of equipment. 9 AV (Audio/Video) IN Connect audio/video output from a PC or DTV. 4 REMOTE CONTROL PORT Connect your wired remote control. 5 RS-232C IN (CONTROL...
... TV on a PC. 6 ANTENNA/CABLE IN Connect over-the air signals to the RS-232C port on DC power. 11 PREPARATION 1 HDMI/DVI IN Connect a HDMI signal to various types of equipment. 9 AV (Audio/Video) IN Connect audio/video output from a PC or DTV. 4 REMOTE CONTROL PORT Connect your wired remote control. 5 RS-232C IN (CONTROL...

Owner's Manual (English)
Page 21
... the owner's manual for LCD TV model. HD RECEIVER SETUP This TV can receive Digital Over-the-air/Cable signals without an external digital set . COMPONENT IN 2 RS (CONTR 1 VIDEO AUDIO S-V ( ) EXTERNAL EQUIPMENT SETUP 2. I This part of the digital set top box to the COMPONENT IN VIDEO 1 jacks on the remote control. When connecting Component.../PB, CR/PR Resolution Horizontal Vertical Frequency(KHz) Frequency(Hz) 720 x 480i 720 x 480p 1280 x 720p 1920 x 1080i 1920 x 1080p 15.73 15.73 31.47 31.50 44.96 45.00 33.72 33.75 26.97 27.00 33.71 33.75 67.432 67.50 59.94 60...
... the owner's manual for LCD TV model. HD RECEIVER SETUP This TV can receive Digital Over-the-air/Cable signals without an external digital set . COMPONENT IN 2 RS (CONTR 1 VIDEO AUDIO S-V ( ) EXTERNAL EQUIPMENT SETUP 2. I This part of the digital set top box to the COMPONENT IN VIDEO 1 jacks on the remote control. When connecting Component.../PB, CR/PR Resolution Horizontal Vertical Frequency(KHz) Frequency(Hz) 720 x 480i 720 x 480p 1280 x 720p 1920 x 1080i 1920 x 1080p 15.73 15.73 31.47 31.50 44.96 45.00 33.72 33.75 26.97 27.00 33.71 33.75 67.432 67.50 59.94 60...

Owner's Manual (English)
Page 22
... IN RGB(PC) AUDIO (RGB/DV COMPONENT IN 2 1 1 VIDEO 1 HDMI-DTV OUTPUT HDMI-DTV mode Resolution Horizontal Frequency(KHz) Vertical Frequency(Hz) 720 x 480p 31.47 31.50 59.94 60.00 1280 x 720p 44.96 45.00 59.94 60.00 1920 x 1080i 33.72 33.75 59.94 60... HDMI1, HDMI2 or HDMI3 input source with using the INPUT button on the set -top box. (Refer to HDMI/DVI IN1, 2 or 3 jack on the remote control.
... IN RGB(PC) AUDIO (RGB/DV COMPONENT IN 2 1 1 VIDEO 1 HDMI-DTV OUTPUT HDMI-DTV mode Resolution Horizontal Frequency(KHz) Vertical Frequency(Hz) 720 x 480p 31.47 31.50 59.94 60.00 1280 x 720p 44.96 45.00 59.94 60.00 1920 x 1080i 33.72 33.75 59.94 60... HDMI1, HDMI2 or HDMI3 input source with using the INPUT button on the set -top box. (Refer to HDMI/DVI IN1, 2 or 3 jack on the remote control.
Owner's Manual (English)
Page 23
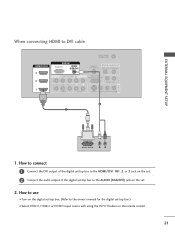
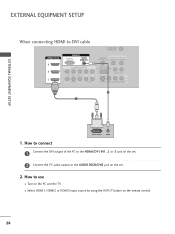
... box to DVI cable HDMI/DVI IN 3 2 RGB IN RGB(PC) AUDIO (RGB/DVI) COMPONENT IN 2 1 1 VIDEO AUDIO ANTENNA/ CABLE IN REMOTE DIGITAL AUDIO OUT CONTROL IN OPTICAL COAXIAL RS-232C IN (CONTROL & SERVICE) AUDIO OUT S-VIDEO VIDEO (MONO) AUDIO 2 1 AV IN 1 DVI-DTV OUTPUT L R 1. EXTERNAL EQUIPMENT SETUP When connecting HDMI to the...
... box to DVI cable HDMI/DVI IN 3 2 RGB IN RGB(PC) AUDIO (RGB/DVI) COMPONENT IN 2 1 1 VIDEO AUDIO ANTENNA/ CABLE IN REMOTE DIGITAL AUDIO OUT CONTROL IN OPTICAL COAXIAL RS-232C IN (CONTROL & SERVICE) AUDIO OUT S-VIDEO VIDEO (MONO) AUDIO 2 1 AV IN 1 DVI-DTV OUTPUT L R 1. EXTERNAL EQUIPMENT SETUP When connecting HDMI to the...

Owner's Manual (English)
Page 24
...Component Input ports To get better picture quality, connect a DVD player to the COMPONENT IN VIDEO1 jacks on the set . 2. Component ports on the TV Y PB PR Video output ports on the set . How to connect 1 Connect the video outputs (Y, PB, PR) of the DVD to the COMPONENT... player Y PB PR Y B-Y R-Y Y Cb Cr Y Pb Pr 22 How to use I If connected to the DVD player's manual for operating instructions. I Turn on the remote control. RGB IN Match the jack colors (Y = green, PB = blue, and PR = red). I Refer to COMPONENT IN 2 input, select Component 2 input source. I Select...
...Component Input ports To get better picture quality, connect a DVD player to the COMPONENT IN VIDEO1 jacks on the set . 2. Component ports on the TV Y PB PR Video output ports on the set . How to connect 1 Connect the video outputs (Y, PB, PR) of the DVD to the COMPONENT... player Y PB PR Y B-Y R-Y Y Cb Cr Y Pb Pr 22 How to use I If connected to the DVD player's manual for operating instructions. I Turn on the remote control. RGB IN Match the jack colors (Y = green, PB = blue, and PR = red). I Refer to COMPONENT IN 2 input, select Component 2 input source. I Select...
Owner's Manual (English)
Page 25
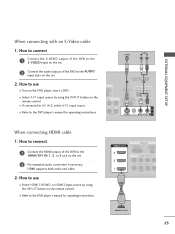
...I If connected to the DVD player's manual for operating instructions. EXTERNAL EQUIPMENT SETUP When connecting with an S-Video cable 1. I Turn on the remote control. How to the AUDIO input jacks on the set. 2 No separated audio connection is necessary. I Select HDMI1, HDMI2, or HDMI3 input source...of the DVD to use I Refer to AV IN2, select A V 2 input source. I Select A V 1 input source by using the INPUT button on the remote control. How to connect 1 Connect the S-VIDEO output of the DVD to the S -VIDEO input on the set . 2. I Refer to the HDMI/DVI IN 1, 2,...
...I If connected to the DVD player's manual for operating instructions. EXTERNAL EQUIPMENT SETUP When connecting with an S-Video cable 1. I Turn on the remote control. How to the AUDIO input jacks on the set. 2 No separated audio connection is necessary. I Select HDMI1, HDMI2, or HDMI3 input source...of the DVD to use I Refer to AV IN2, select A V 2 input source. I Select A V 1 input source by using the INPUT button on the remote control. How to connect 1 Connect the S-VIDEO output of the DVD to the S -VIDEO input on the set . 2. I Refer to the HDMI/DVI IN 1, 2,...

Owner's Manual (English)
Page 27
...(Refer to connect 1 Connect the S-VIDEO output of the set. NOTE G The picture quality is improved: compared to connect 1 Connect the AUDIO/VIDEO jacks between TV and VCR. AV IN 1 When connecting with a RCA cable ANT IN S-VIDEO VIDEO L R 1. ( ) EXTERNAL EQUIPMENT SETUP When connecting with an S-Video ...V 1 input source by using the INPUT button on the set . AUDIO S-VIDEO VIDEO (MONO) AUDIO I If connected to the S -VIDEO input on the remote control. In the event that you have a mono VCR, connect the audio cable from the VCR to the AUDIO L/MONO jack of the VCR to AV...
...(Refer to connect 1 Connect the S-VIDEO output of the set. NOTE G The picture quality is improved: compared to connect 1 Connect the AUDIO/VIDEO jacks between TV and VCR. AV IN 1 When connecting with a RCA cable ANT IN S-VIDEO VIDEO L R 1. ( ) EXTERNAL EQUIPMENT SETUP When connecting with an S-Video ...V 1 input source by using the INPUT button on the set . AUDIO S-VIDEO VIDEO (MONO) AUDIO I If connected to the S -VIDEO input on the remote control. In the event that you have a mono VCR, connect the audio cable from the VCR to the AUDIO L/MONO jack of the VCR to AV...

Owner's Manual (English)
Page 28
EXTERNAL EQUIPMENT SETUP EXTERNAL EQUIPMENT SETUP OTHER A/V SOURCE SETUP 1. I If connected to AV IN1 input, select A V 1 input source. I Operate the corresponding external equipment. How to connect 1 Connect the AUDIO/VIDEO jacks between TV and external equipment. VIDEO L/MONO AUDIO R Camcorder Video Game Set VIDEO L R USB IN S-VIDEO 1 AV IN 2 26 How to use I Select A V 2 input source by using the INPUT button on the remote control. Match the jack colors. (Video = yellow, Audio Left = white, and Audio Right = red) 2.
EXTERNAL EQUIPMENT SETUP EXTERNAL EQUIPMENT SETUP OTHER A/V SOURCE SETUP 1. I If connected to AV IN1 input, select A V 1 input source. I Operate the corresponding external equipment. How to connect 1 Connect the AUDIO/VIDEO jacks between TV and external equipment. VIDEO L/MONO AUDIO R Camcorder Video Game Set VIDEO L R USB IN S-VIDEO 1 AV IN 2 26 How to use I Select A V 2 input source by using the INPUT button on the remote control. Match the jack colors. (Video = yellow, Audio Left = white, and Audio Right = red) 2.
Owner's Manual (English)
Page 29
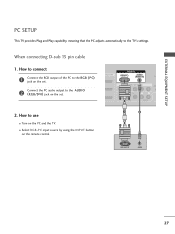
...RGB/DVI) CO COMPONENT IN (CO Connect the PC audio output to use I Turn on the remote control. 1 2 RGB OUTPUT AUDIO ( 27 How to connect RGB IN 1 Connect the RGB output of the PC to the TV's settings. EXTERNAL EQUIPMENT SETUP When connecting D-sub 15 pin cable 1. I Select RGB-PC input ...source by using the INPUT button on the PC and the TV. PC SETUP This TV provides Plug and Play capability, meaning that the PC adjusts...
...RGB/DVI) CO COMPONENT IN (CO Connect the PC audio output to use I Turn on the remote control. 1 2 RGB OUTPUT AUDIO ( 27 How to connect RGB IN 1 Connect the RGB output of the PC to the TV's settings. EXTERNAL EQUIPMENT SETUP When connecting D-sub 15 pin cable 1. I Select RGB-PC input ...source by using the INPUT button on the PC and the TV. PC SETUP This TV provides Plug and Play capability, meaning that the PC adjusts...
Owner's Manual (English)
Page 30
I Turn on the PC and the TV. How to DVI cable HDMI/DVI IN 3 2 RGB IN RGB(PC) AUDIO (RGB/DVI) COMPONENT IN 2 1 1 VIDEO AUDIO ANTENNA/ CABLE IN REMOTE DIGITAL AUDIO OUT CONTROL IN OPTICAL COAXIAL RS-232C IN (CONTROL & SERVICE) AUDIO OUT S-VIDEO VIDEO (MONO) AUDIO 2 1 AV IN 1 EXTERNAL EQUIPMENT SETUP DVI-PC OUTPUT... the PC to the HDMI/DVI IN1, 2 or 3 jack on the set. 2 Connect the PC audio output to the AUDIO (RGB/DVI) jack on the remote control. 28
I Turn on the PC and the TV. How to DVI cable HDMI/DVI IN 3 2 RGB IN RGB(PC) AUDIO (RGB/DVI) COMPONENT IN 2 1 1 VIDEO AUDIO ANTENNA/ CABLE IN REMOTE DIGITAL AUDIO OUT CONTROL IN OPTICAL COAXIAL RS-232C IN (CONTROL & SERVICE) AUDIO OUT S-VIDEO VIDEO (MONO) AUDIO 2 1 AV IN 1 EXTERNAL EQUIPMENT SETUP DVI-PC OUTPUT... the PC to the HDMI/DVI IN1, 2 or 3 jack on the set. 2 Connect the PC audio output to the AUDIO (RGB/DVI) jack on the remote control. 28

Owner's Manual (English)
Page 32
... PC mode Overview When the RGB input, of the set is connected to a PC Output, Select RGB-PC with using the INPUT button on the remote control.
... PC mode Overview When the RGB input, of the set is connected to a PC Output, Select RGB-PC with using the INPUT button on the remote control.
Owner's Manual (English)
Page 36
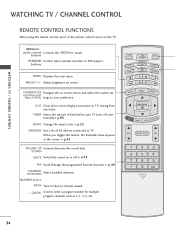
... available channels. MENU BRIGHT + TIMER RATIO SIMPLINK BACK APM CC AUTO DEMO M/C EJECT 34 WATCHING TV / CHANNEL CONTROL WATCHING TV / CHANNEL CONTROL REMOTE CONTROL FUNCTIONS When using the remote control, aim it at the screen. buttons MENU Displays the main menu. Adjust brightness on the TV. NUMBER button BACK Tune to the last channel viewed. - (DASH) Used to your...
... available channels. MENU BRIGHT + TIMER RATIO SIMPLINK BACK APM CC AUTO DEMO M/C EJECT 34 WATCHING TV / CHANNEL CONTROL WATCHING TV / CHANNEL CONTROL REMOTE CONTROL FUNCTIONS When using the remote control, aim it at the screen. buttons MENU Displays the main menu. Adjust brightness on the TV. NUMBER button BACK Tune to the last channel viewed. - (DASH) Used to your...

Owner's Manual (English)
Page 37
.... with +, - DAY + LIVE TV INPUT MODE DAY - I Install two 1.5V AA batteries. MODE Select the remote operating mode: TV, DVD, VCR, AUDIO, or STB. * If the mode of used batteries with new ones. DAY + I Use a remote control up to the MEDIAHOST mode. TV INPUT In AV 1-2, Component 1-2, RGB...linked automatically, only if these are connected). I Open the battery compartment cover on the remote control which is not used for type of sound for MEDIAHOST the selected product can control the TV. G p.54 SOUND Select the appropriate type of program. Change the audio language DTV mode...
.... with +, - DAY + LIVE TV INPUT MODE DAY - I Install two 1.5V AA batteries. MODE Select the remote operating mode: TV, DVD, VCR, AUDIO, or STB. * If the mode of used batteries with new ones. DAY + I Use a remote control up to the MEDIAHOST mode. TV INPUT In AV 1-2, Component 1-2, RGB...linked automatically, only if these are connected). I Open the battery compartment cover on the remote control which is not used for type of sound for MEDIAHOST the selected product can control the TV. G p.54 SOUND Select the appropriate type of program. Change the audio language DTV mode...
Owner's Manual (English)
Page 38
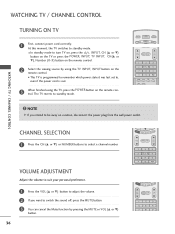
...standby mode. STB MEDIA HOST 2 Select the viewing source by pressing the MUTE or VOL (D or E) button. I In standby mode to be away on the remote control. The TV reverts to switch the sound off, press the MUTE button. 3 You can cancel the Mute function by using the... 1 Press the VOL (D or E) button to adjust the volume. 2 If you intend to turn TV on, press the , INPUT, CH (D or E) button on the TV or press the POWER, INPUT, TV INPUT, CH(D or E), Number (0~9) button on the remote control. NOTE STB MEDIA HOST BACK PICTURE SOUND SAP CC MARK USB EJECT G If you want...
...standby mode. STB MEDIA HOST 2 Select the viewing source by pressing the MUTE or VOL (D or E) button. I In standby mode to be away on the remote control. The TV reverts to switch the sound off, press the MUTE button. 3 You can cancel the Mute function by using the... 1 Press the VOL (D or E) button to adjust the volume. 2 If you intend to turn TV on, press the , INPUT, CH (D or E) button on the TV or press the POWER, INPUT, TV INPUT, CH(D or E), Number (0~9) button on the remote control. NOTE STB MEDIA HOST BACK PICTURE SOUND SAP CC MARK USB EJECT G If you want...

