
Owners Manual
Page 6
... WARNING / CAUTION 1 SAFETY INSTRUCTIONS 2 FEATURE OF THIS TV 6 PREPARATION Accessories 7 Front Panel Information 8 Back Panel Information 9 Attaching the TV to a Wall 10 Back Cover for Wire Arrangement 11 Desktop Pedestal Installation 12 VESA Wall Mounting 12 Antenna or Cable Connection 13 EXTERNAL EQUIPMENT SETUP HD... Picture Size (Aspect Ratio) Control 46 Preset Picture Settings - Color Tone - Add / Delete Channel (Manual Tuning 33 - Preset 47 Color Tone - Caption Option 68 4 TruM 54 TruM Demo 55 Picture Reset 56 SOUND & LANGUAGE CONTROL Auto Volume Leveler (Auto...
... WARNING / CAUTION 1 SAFETY INSTRUCTIONS 2 FEATURE OF THIS TV 6 PREPARATION Accessories 7 Front Panel Information 8 Back Panel Information 9 Attaching the TV to a Wall 10 Back Cover for Wire Arrangement 11 Desktop Pedestal Installation 12 VESA Wall Mounting 12 Antenna or Cable Connection 13 EXTERNAL EQUIPMENT SETUP HD... Picture Size (Aspect Ratio) Control 46 Preset Picture Settings - Color Tone - Add / Delete Channel (Manual Tuning 33 - Preset 47 Color Tone - Caption Option 68 4 TruM 54 TruM Demo 55 Picture Reset 56 SOUND & LANGUAGE CONTROL Auto Volume Leveler (Auto...
Owners Manual
Page 12
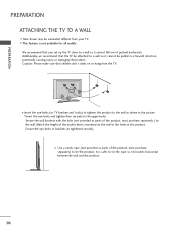
... the picture. *Insert the eye-bolts and tighten them securely in the upper holes. Additionally, we recommend that is mounted on or hang from your TV. Secure the wall brackets with the bolts (not provided as parts of the product, must purchase separately) to tie the product. It ... all models. PREPARATION PREPARATION ATTACHING THE TV TO A WALL I Use a sturdy rope (not provided as parts of the product, must purchase separately ) to the wall. Match the height of the bracket that the TV be attached to a wall so it becomes horizontal between the wall and the product. 10 Caution: Please...
... the picture. *Insert the eye-bolts and tighten them securely in the upper holes. Additionally, we recommend that is mounted on or hang from your TV. Secure the wall brackets with the bolts (not provided as parts of the product, must purchase separately) to tie the product. It ... all models. PREPARATION PREPARATION ATTACHING THE TV TO A WALL I Use a sturdy rope (not provided as parts of the product, must purchase separately ) to the wall. Match the height of the bracket that the TV be attached to a wall so it becomes horizontal between the wall and the product. 10 Caution: Please...

Owners Manual
Page 14
RGB /DVI 12 PREPARATION DESKTOP PEDESTAL INSTALLATION For proper ventilation, allow a clearance of 4inches on all four sides from the wall. 4 inches 4 inches 4 inches 4 inches PREPARATION VESA WALL MOUNTING This product accepts a VESA-compliant mounting interface pad. (optional) There 4 threaded holes are available for attaching the bracket. 42/47 inches: 600mm 52 inches: 800mm 400mm NOTE ANTENNA/ G Screw length needed depends on the wall mount used. For furCtAhBLeErINinformation, refer to the VESA Wall Mounting Instruction Guide.
RGB /DVI 12 PREPARATION DESKTOP PEDESTAL INSTALLATION For proper ventilation, allow a clearance of 4inches on all four sides from the wall. 4 inches 4 inches 4 inches 4 inches PREPARATION VESA WALL MOUNTING This product accepts a VESA-compliant mounting interface pad. (optional) There 4 threaded holes are available for attaching the bracket. 42/47 inches: 600mm 52 inches: 800mm 400mm NOTE ANTENNA/ G Screw length needed depends on the wall mount used. For furCtAhBLeErINinformation, refer to the VESA Wall Mounting Instruction Guide.


