
Owners Manual
Page 3
..., stand, When a _rt is intended to the cou_ where the apparatus is used, use this apparatus near any heat sources heat. PO_G'ABLE CA_ WARNING J Owner's Manual 3 At the manufacturer's trates the intent of the polarized or grounding-type plug. produce 9. A polarized grounding plug has two blades with the manufacturer's instructions...
..., stand, When a _rt is intended to the cou_ where the apparatus is used, use this apparatus near any heat sources heat. PO_G'ABLE CA_ WARNING J Owner's Manual 3 At the manufacturer's trates the intent of the polarized or grounding-type plug. produce 9. A polarized grounding plug has two blades with the manufacturer's instructions...
Owners Manual
Page 4
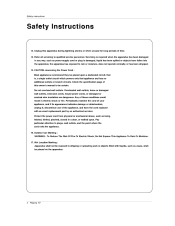
... twisted, kinked, pinched, closed in electdc shock are dangerous. Unplug this owner's manual to plugs, wall outlets, and the poinf where the cord exits the appliance. 16. CAUTION concerning the Power Cord : Most appliances recommend they be expased on the apparatus. 4 Plasma TV cords, Overloaded frayed wall outlets, cords, loose or damaged or could...
... twisted, kinked, pinched, closed in electdc shock are dangerous. Unplug this owner's manual to plugs, wall outlets, and the poinf where the cord exits the appliance. 16. CAUTION concerning the Power Cord : Most appliances recommend they be expased on the apparatus. 4 Plasma TV cords, Overloaded frayed wall outlets, cords, loose or damaged or could...

Owners Manual
Page 7
Introduc#on [Huminates red in standby green when the _ is a simplified representation of froot panel. Here shown may be somewhat different from your TV. Front Panel Controls CHANNEL VOLUME (_1_) (V, A) Buttons Buttons Remote Control Sensor MENU TViVIDEO POWER Power Standby I_luminates Button ENTER Button Button Button indicator m_e, on -This is turned Owner's Manual 7
Introduc#on [Huminates red in standby green when the _ is a simplified representation of froot panel. Here shown may be somewhat different from your TV. Front Panel Controls CHANNEL VOLUME (_1_) (V, A) Buttons Buttons Remote Control Sensor MENU TViVIDEO POWER Power Standby I_luminates Button ENTER Button Button Button indicator m_e, on -This is turned Owner's Manual 7
Owners Manual
Page 11
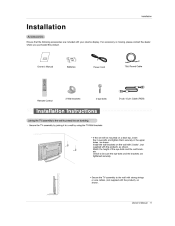
... that the following where you purchased accessories are tightened securely. * _ure the TV assembly to be mounted on the wail with 2 bo_ts*, (not supplied with your plasma display: tf an a_ssory is missing, p_ease contact the dealer the product. Owner's Manual Batteries Power Cord 75£_ Round Cable 2-Wall Remote Control brackets 2-eye-botts...
... that the following where you purchased accessories are tightened securely. * _ure the TV assembly to be mounted on the wail with 2 bo_ts*, (not supplied with your plasma display: tf an a_ssory is missing, p_ease contact the dealer the product. Owner's Manual Batteries Power Cord 75£_ Round Cable 2-Wall Remote Control brackets 2-eye-botts...

Owners Manual
Page 13
UHF Antenna VHF Antenna Brer_ze Wire careful connecting not to tk3hten. wire when J J 2. Analog and Digital TV signals provided on antenna Wall Antenna For optimum _cket or Outdoor Antenna without a Cable Box Connections picture quality, adjust antenna direction if needed. Mutti4amily .../Apartments to wail antenna s_ket) Walt A,_tenna , _S°cket Bronze Wire Turn cbckwi_ to bend the bronze the antenna. tnslalladon 1. Analog and Digital TV signals provided on cable f Bronze Wire C_le TV Wall RF Coaxia_ Wire (75 ohm) I Bror_ze VVi_e Owner's Manual 13
UHF Antenna VHF Antenna Brer_ze Wire careful connecting not to tk3hten. wire when J J 2. Analog and Digital TV signals provided on antenna Wall Antenna For optimum _cket or Outdoor Antenna without a Cable Box Connections picture quality, adjust antenna direction if needed. Mutti4amily .../Apartments to wail antenna s_ket) Walt A,_tenna , _S°cket Bronze Wire Turn cbckwi_ to bend the bronze the antenna. tnslalladon 1. Analog and Digital TV signals provided on cable f Bronze Wire C_le TV Wall RF Coaxia_ Wire (75 ohm) I Bror_ze VVi_e Owner's Manual 13

Owners Manual
Page 15
How to the DVD player's manual for Video, Front Video and Component 1_2o It is presu_d that this to the S-VIDEO input on the TV and connect the DVD audio outputs to the component input ports as shown in the figure. Digital Audio wil! Operate the corresponding ...3 Refer to use 1, Turn on the DVD pfayer, insert a DVD_ 2 Use the TViVIDEO button on DVD player Owner's Manual 15 Note: ff your DVD en_y has an S-Video output jack, connect this TV fin_ the connected input sources automatically for operating instructions I or Component 2, (If connected to S-VIDEO_ select • ...
How to the DVD player's manual for Video, Front Video and Component 1_2o It is presu_d that this to the S-VIDEO input on the TV and connect the DVD audio outputs to the component input ports as shown in the figure. Digital Audio wil! Operate the corresponding ...3 Refer to use 1, Turn on the DVD pfayer, insert a DVD_ 2 Use the TViVIDEO button on DVD player Owner's Manual 15 Note: ff your DVD en_y has an S-Video output jack, connect this TV fin_ the connected input sources automatically for operating instructions I or Component 2, (If connected to S-VIDEO_ select • ...
Owners Manual
Page 17
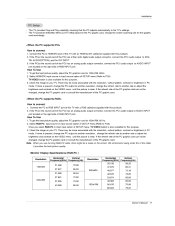
... 75,00 85.00 1024x768 800x600 4&077 4&875 53.674 48.363 5&476 60,023 Owner's Manual 17 the PC graphic card or consult the _nufecturer of the PC graphic How 1 to connect... card of the PC graphic card. ff the PC(or the sound card of SETUP menu.(Refer TV/VIDEO 3 Check mode. Ptug and Play capability, 640x480_ meaning that the PC adjusts autorr_3tica_y card, ch_ge... Once 3 Check mode. There change is present, the PC output menu to RGB _NPUT port of this TV with this product). Installation - card of the PC) has an analog audio port audio output output connector,...
... 75,00 85.00 1024x768 800x600 4&077 4&875 53.674 48.363 5&476 60,023 Owner's Manual 17 the PC graphic card or consult the _nufecturer of the PC graphic How 1 to connect... card of the PC graphic card. ff the PC(or the sound card of SETUP menu.(Refer TV/VIDEO 3 Check mode. Ptug and Play capability, 640x480_ meaning that the PC adjusts autorr_3tica_y card, ch_ge... Once 3 Check mode. There change is present, the PC output menu to RGB _NPUT port of this TV with this product). Installation - card of the PC) has an analog audio port audio output output connector,...
Owners Manual
Page 19
...not support Auto HDML you need to set to 1280x720p_ How To Conner 1, Connect the source device to HDMI/DVI port of this TV with a HDMI4o-DVI ceble (not supplied with an HDMI 2. SeJect HDMt/DW input source in input source opfion of SETUP menu.(Refer to...resolu tion. ff the source device has a DW output no other audio connec_on a separated output resolution to HDMI/DVI port of HDMI Licensing." Owner's Manual 19 tnslalladon HIGH DEF_NIT|ON MULTIMEDIA INTERFACE HDMI TM, the HDMt logo and High-Definition Multimedia interface is a trademark or registered trademark of this...
...not support Auto HDML you need to set to 1280x720p_ How To Conner 1, Connect the source device to HDMI/DVI port of this TV with a HDMI4o-DVI ceble (not supplied with an HDMI 2. SeJect HDMt/DW input source in input source opfion of SETUP menu.(Refer to...resolu tion. ff the source device has a DW output no other audio connec_on a separated output resolution to HDMI/DVI port of HDMI Licensing." Owner's Manual 19 tnslalladon HIGH DEF_NIT|ON MULTIMEDIA INTERFACE HDMI TM, the HDMt logo and High-Definition Multimedia interface is a trademark or registered trademark of this...
Owners Manual
Page 21
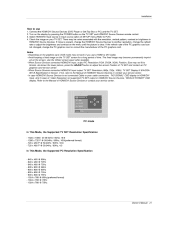
...contra_ or brightness in input source option of time. When Source Devices connected HDML/DVI h_put output TV SET Resolution (480p, 720p, 1080i), TV SET Display fit EtAZCEA861-B Specification to the Manual of TV SET and contact an PC graphics card service center. - PC mode in This Mode, the...not supported TV SET output in This Mode, the Supported PC Resolution Specification 640 -640 -640 -800 -800 -800 -800 x x x x x x x 480 @ 60Hz 480@72Hz 480@75Hz 600 @ 56Hz 600@60Hz 600 @ 72Hz 600 @ 75Hz -1024 x 768 @ 60Hz(preferredformat) -1024x768 @ 70Hz -1024 x 768@ 75Hz Owner's Manual 2I ff ...
...contra_ or brightness in input source option of time. When Source Devices connected HDML/DVI h_put output TV SET Resolution (480p, 720p, 1080i), TV SET Display fit EtAZCEA861-B Specification to the Manual of TV SET and contact an PC graphics card service center. - PC mode in This Mode, the...not supported TV SET output in This Mode, the Supported PC Resolution Specification 640 -640 -640 -800 -800 -800 -800 x x x x x x x 480 @ 60Hz 480@72Hz 480@75Hz 600 @ 56Hz 600@60Hz 600 @ 72Hz 600 @ 75Hz -1024 x 768 @ 60Hz(preferredformat) -1024x768 @ 70Hz -1024 x 768@ 75Hz Owner's Manual 2I ff ...

Owners Manual
Page 23
...you button to Notes: * This channel Edit. * When inserting * TV: analog DTV: CATV: CADTV: the CableCARD_; (over4he-air) (over-the-air) TV signal CAT_ CADTV is turned on. in Manual Scan. Press the ENTER button to seJect TV, DTV, CATV, and 4. Ailow EZ Scan to complete the channel ... menu if the Lock System is different from the normal channel number shown in Channel antenna TV signal TV ssgnal digital antenna analog cable d_qitat cable TV signal Owner's Manual 23 Run EZ Scan again after any Antenna/CaMe connection changes. ° A password is required to gain access to...
...you button to Notes: * This channel Edit. * When inserting * TV: analog DTV: CATV: CADTV: the CableCARD_; (over4he-air) (over-the-air) TV signal CAT_ CADTV is turned on. in Manual Scan. Press the ENTER button to seJect TV, DTV, CATV, and 4. Ailow EZ Scan to complete the channel ... menu if the Lock System is different from the normal channel number shown in Channel antenna TV signal TV ssgnal digital antenna analog cable d_qitat cable TV signal Owner's Manual 23 Run EZ Scan again after any Antenna/CaMe connection changes. ° A password is required to gain access to...

Owners Manual
Page 25
...Video, Component1 Component2, RGB-D_ (or RGB-PC), HDMtiDVL 4 Press EXIT button previous menu. Press the I_ button and then use ,I , _ V button to TV viewing previous menu. Press the MENU button and then or lets you press TVtVIDEO 1. and then use A / V button to sefect _ul_t_e. 3, Press the I_ button... to return to TV viewing or press MENU button to return te the and RGB-PC, select' RGB_DTV(or RGB-PC) and press _" Sets a label to your channels. Press the I_ button 4 and then use Ai./V button to so{oct the appropriate button in use _ ; Owner's Manual 25 Press the I_...
...Video, Component1 Component2, RGB-D_ (or RGB-PC), HDMtiDVL 4 Press EXIT button previous menu. Press the I_ button and then use ,I , _ V button to TV viewing previous menu. Press the MENU button and then or lets you press TVtVIDEO 1. and then use A / V button to sefect _ul_t_e. 3, Press the I_ button... to return to TV viewing or press MENU button to return te the and RGB-PC, select' RGB_DTV(or RGB-PC) and press _" Sets a label to your channels. Press the I_ button 4 and then use Ai./V button to so{oct the appropriate button in use _ ; Owner's Manual 25 Press the I_...

Owners Manual
Page 27
... select the AUDIO menu, 2. Press the 1_ button 4. and then use A/V and then use A/V and then button to the or press MENU Owner's Manual 27 When adjusting sound options (treMe, bass, and front surround) manu_gy, EZ Sound automatically switches to the previous sound setup and Theater. Press the...lets you are not adjustable, repeatedly to select the appropriate Normal, Stadium, News, Music, in sound level during commercials, then adjusts tJne sound to TV viewing or press MENU - may be available ff a dig_at signal is provided by the broad- 1 _ Press the MENU 2 b_on and then...
... select the AUDIO menu, 2. Press the 1_ button 4. and then use A/V and then use A/V and then button to the or press MENU Owner's Manual 27 When adjusting sound options (treMe, bass, and front surround) manu_gy, EZ Sound automatically switches to the previous sound setup and Theater. Press the...lets you are not adjustable, repeatedly to select the appropriate Normal, Stadium, News, Music, in sound level during commercials, then adjusts tJne sound to TV viewing or press MENU - may be available ff a dig_at signal is provided by the broad- 1 _ Press the MENU 2 b_on and then...

Owners Manual
Page 29
... 2. Press the MENU button and then dariby and presence for S$1S TSX'F mode_ - or press MENU button to return to "iV viewing Owner's Manual 29 Mone sound is automatically received ff the broadcast is only in a analog signal select or SAP has been selected. 1. even though - EXIT...accompanies the signal the stereo program; Select Mono if you press the SAP button, Mono_ on the remote control, this TV _n only receive Stereo when the TV station transmits the proper signals. Opera#oR 8BE High Definition Sound restores inteHigibiEity and music rea}ism. 1. Press the...
... 2. Press the MENU button and then dariby and presence for S$1S TSX'F mode_ - or press MENU button to return to "iV viewing Owner's Manual 29 Mone sound is automatically received ff the broadcast is only in a analog signal select or SAP has been selected. 1. even though - EXIT...accompanies the signal the stereo program; Select Mono if you press the SAP button, Mono_ on the remote control, this TV _n only receive Stereo when the TV station transmits the proper signals. Opera#oR 8BE High Definition Sound restores inteHigibiEity and music rea}ism. 1. Press the...

Owners Manual
Page 31
... 30_ 60_ 90, 120_ 180_ and 240 minutes on and there minutes. To cance_ the S_ep T_mer, press tP_ TIMER to the or press MENU Owner's Manual 3t If set up the Sleep 'Framer in the 'rl_ menu 1_ Press the TIMER followed button repeatedly to seU_ the number of minutes yot4... want is no input signal, the TV turns off automatically after 10 1 Press the MENU button and then use A / V burn 4, Press EXIT button previous menu to return to...
... 30_ 60_ 90, 120_ 180_ and 240 minutes on and there minutes. To cance_ the S_ep T_mer, press tP_ TIMER to the or press MENU Owner's Manual 3t If set up the Sleep 'Framer in the 'rl_ menu 1_ Press the TIMER followed button repeatedly to seU_ the number of minutes yot4... want is no input signal, the TV turns off automatically after 10 1 Press the MENU button and then use A / V burn 4, Press EXIT button previous menu to return to...

Owners Manual
Page 33
... Captions - Opera#oR 1. Captionftext_ if provided by the broadcaster. 4 Press EXIT button previous menu to return to TV viewing or press MENU button cover to return to Owner's Manual 33 impaired. usuaEly messages provided by the broadcaster, would be chosen for both digital and analog This... TV is programmed 1 Use the CO button 2 to memorize the cap,on the program. 1 Press menu 2. Press the 1_ _on _d then...
... Captions - Opera#oR 1. Captionftext_ if provided by the broadcaster. 4 Press EXIT button previous menu to return to TV viewing or press MENU button cover to return to Owner's Manual 33 impaired. usuaEly messages provided by the broadcaster, would be chosen for both digital and analog This... TV is programmed 1 Use the CO button 2 to memorize the cap,on the program. 1 Press menu 2. Press the 1_ _on _d then...

Owners Manual
Page 35
Low power reduces the p{asma disptay power consumpfJon. 1 Press the MENU menu, 2. Press the I_ button o When 4 you select button and then use A Y button to select the OPTION and then use ,i. /V and then use A/V On, the screen button button to select to TV viewing Owner's Manual 35 darkens, or press MENU button to ream to Press EXIT button to return the previous menu_ to _ect Low Power C'n or O1t. Press the I_ button 3. _era_ioR -
Low power reduces the p{asma disptay power consumpfJon. 1 Press the MENU menu, 2. Press the I_ button o When 4 you select button and then use A Y button to select the OPTION and then use ,i. /V and then use A/V On, the screen button button to select to TV viewing Owner's Manual 35 darkens, or press MENU button to ream to Press EXIT button to return the previous menu_ to _ect Low Power C'n or O1t. Press the I_ button 3. _era_ioR -

Owners Manual
Page 37
...you have hooked up. 3. press the I_ button '_0-0-0o0 '' Once the o The TV is set . ous[ F - that the movie ratings Hmit only applies to movies shown on the remote control Owner's Manual 37 Press EXIT button to select the LOCK menu. Movie Rating (MPAA): Blocks movies according...devices you ever forget your family _sed on the ratings_ blocks do not want to key in '7 _, '7', 7; 7' on TV, not TV programs such as soap operas, -TV Rating-Children: programs, according Prevents children from the following Lock Menu option& option is required to gain access to the movie...
...you have hooked up. 3. press the I_ button '_0-0-0o0 '' Once the o The TV is set . ous[ F - that the movie ratings Hmit only applies to movies shown on the remote control Owner's Manual 37 Press EXIT button to select the LOCK menu. Movie Rating (MPAA): Blocks movies according...devices you ever forget your family _sed on the ratings_ blocks do not want to key in '7 _, '7', 7; 7' on TV, not TV programs such as soap operas, -TV Rating-Children: programs, according Prevents children from the following Lock Menu option& option is required to gain access to the movie...

Owners Manual
Page 39
Operation: • Watching TV/DTV/CATV/CAD-P¢ • Watching Vic_o, Front V_ • _nComponent1, Component2, RGB, HDMI/DVl modes INFO button is not working. Refer to exit, A: Banner B: C: D: E: F: G: H: ... Program title Day of _eek, Month, Year Program sta_ time Program progress bar Program finish time Present _me AddffionaI infom_flon. RGB, and HDMI/D,Vl modes. B \ C D F G A \ Owner's Manual 39 Press the |NFO button or EXIT but-ton to the icon explanation on the screen, - Press the INFO button to exit. Fun_on: • Show...
Operation: • Watching TV/DTV/CATV/CAD-P¢ • Watching Vic_o, Front V_ • _nComponent1, Component2, RGB, HDMI/DVl modes INFO button is not working. Refer to exit, A: Banner B: C: D: E: F: G: H: ... Program title Day of _eek, Month, Year Program sta_ time Program progress bar Program finish time Present _me AddffionaI infom_flon. RGB, and HDMI/D,Vl modes. B \ C D F G A \ Owner's Manual 39 Press the |NFO button or EXIT but-ton to the icon explanation on the screen, - Press the INFO button to exit. Fun_on: • Show...

Owners Manual
Page 41
PC Adjust Adjust Adjust Menu using ADJUST the screen position. Reset Owner's Manual 4t the screen size. • Phase Adiust the phase of Pixe_ dock. In HDMIiDVt-PC mode, PHASE _nitiaEizating Position, Size, Pha_ is not available input, ...
PC Adjust Adjust Adjust Menu using ADJUST the screen position. Reset Owner's Manual 4t the screen size. • Phase Adiust the phase of Pixe_ dock. In HDMIiDVt-PC mode, PHASE _nitiaEizating Position, Size, Pha_ is not available input, ...

Owners Manual
Page 43
D-Sub 9 D-Sub D-Sub 9 D-Sub 9 Owner's Manual 43 Connect the seriaJ port of the control device to send) No Connection \\ 3-Wi re Configurations (Not standard) PC PDP o 6 7-Wire Configurations (Standard RSo232C cable) ...) data) ready) 1 5 DTR (DTE GND DSR (DCE RTS (Ready @ oood#@ side ready) to send) CTS (C{ear to the RS-232C jack on the Monitor back panel, - RXD TXD GND DTR DSR RTS CTS -,_ TXD RXD GND DSR DTR CTS RTS RXD TXD GND DTR DSR RTS CTS TXD ...RXD GND DTR...
D-Sub 9 D-Sub D-Sub 9 D-Sub 9 Owner's Manual 43 Connect the seriaJ port of the control device to send) No Connection \\ 3-Wi re Configurations (Not standard) PC PDP o 6 7-Wire Configurations (Standard RSo232C cable) ...) data) ready) 1 5 DTR (DTE GND DSR (DCE RTS (Ready @ oood#@ side ready) to send) CTS (C{ear to the RS-232C jack on the Monitor back panel, - RXD TXD GND DTR DSR RTS CTS -,_ TXD RXD GND DSR DTR CTS RTS RXD TXD GND DTR DSR RTS CTS TXD ...RXD GND DTR...

