Owners Manual
Page 2
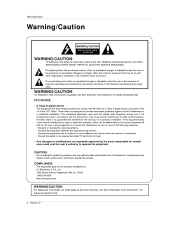
... THIS PRODUCT TO MOISTURE, 2 Plasma TV Consuff or retocate the receiving antenna, the separation between the equipment the equipment into an outlet on a circuit radioiTV the deaQer or an experienced uses and can be the of suffiThe _ightning flash with arrowhead symbol,voltage' within within an equilateral tdang_e is connected. technician • Any changes or modifications not expressly...
... THIS PRODUCT TO MOISTURE, 2 Plasma TV Consuff or retocate the receiving antenna, the separation between the equipment the equipment into an outlet on a circuit radioiTV the deaQer or an experienced uses and can be the of suffiThe _ightning flash with arrowhead symbol,voltage' within within an equilateral tdang_e is connected. technician • Any changes or modifications not expressly...
Owners Manual
Page 5
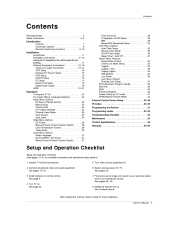
..., keep it handy for TV. Checklist ... EPG (Electronic Program Guide} Brief Info ...Mute ... Select viewing source for future reference, OwnePs Manual 5 See pages 25. 7, Fine-tune source image and sound to protect _ t_b_r_ ...External Equipment Connections ...Antenna or Cable Connection ...VCR Setup ...Exlerna_ _JV Source Setup ...DVD Setup ...HDSTB Setup ...PC Setup ...Monitor Out Setup ...Digital Audio Odtput ...HDMI ... Connection Options ...Remote Control Key Functions ...Installation Accessories InstaJtation ...hstructions ... Additiona_ features set 11 13~18 13~14 14...
..., keep it handy for TV. Checklist ... EPG (Electronic Program Guide} Brief Info ...Mute ... Select viewing source for future reference, OwnePs Manual 5 See pages 25. 7, Fine-tune source image and sound to protect _ t_b_r_ ...External Equipment Connections ...Antenna or Cable Connection ...VCR Setup ...Exlerna_ _JV Source Setup ...DVD Setup ...HDSTB Setup ...PC Setup ...Monitor Out Setup ...Digital Audio Odtput ...HDMI ... Connection Options ...Remote Control Key Functions ...Installation Accessories InstaJtation ...hstructions ... Additiona_ features set 11 13~18 13~14 14...

Owners Manual
Page 6
... the same types used to react with excellent image quaiity and large screen sizes that your ptasma display in a variety of _ocations _ere fit, The PDP cenventionaJ TVs wilt not Manufacturing Process: a few minute colored dots may be present on the screen should be exchanged or returned. What is a Plasma A plasma display pane[ is less than 5 160 _ - Inlroductien In uction Display Panel (PDP)? PDP is an...
... the same types used to react with excellent image quaiity and large screen sizes that your ptasma display in a variety of _ocations _ere fit, The PDP cenventionaJ TVs wilt not Manufacturing Process: a few minute colored dots may be present on the screen should be exchanged or returned. What is a Plasma A plasma display pane[ is less than 5 160 _ - Inlroductien In uction Display Panel (PDP)? PDP is an...
Owners Manual
Page 8
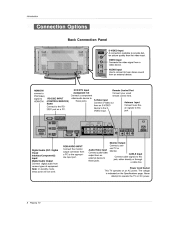
... cable signals to this I Digital Visual Audio (DVI: Digffal RGB/AUDIO INPUT Conned the monitor output connector from an external device, HDMI/DVI connect a RS-2320 INPUT DVt(Video), signat to H DMt/DVl DVD/DTV (Cempor_ Input 1-2) Remote Connect remote S-Video Connect Input S-Video out Control control Port here, your wired (CONTROL/SERVICE) PORT Connect to the RS232C port on a PC Connect a component video/audio device to these jacks. Output a sec- ond TV or Monitor. lnlroduction Back Connection Panel S-VIDEO ter picture Input quality to operate the TV on DC power...
... cable signals to this I Digital Visual Audio (DVI: Digffal RGB/AUDIO INPUT Conned the monitor output connector from an external device, HDMI/DVI connect a RS-2320 INPUT DVt(Video), signat to H DMt/DVl DVD/DTV (Cempor_ Input 1-2) Remote Connect remote S-Video Connect Input S-Video out Control control Port here, your wired (CONTROL/SERVICE) PORT Connect to the RS232C port on a PC Connect a component video/audio device to these jacks. Output a sec- ond TV or Monitor. lnlroduction Back Connection Panel S-VIDEO ter picture Input quality to operate the TV on DC power...
Owners Manual
Page 9
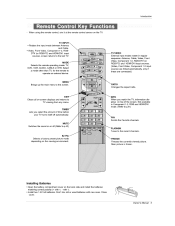
... than TV, for the remote operate an external to the r_ent channels, Selects depending a factory preset picture mode Freezes the currently-viewed is frozen. Not available in regular sequence:: Antenna, Cabte, Video, Front Video, Component 1-2, RGB DTV (or RGB-PC) and HDMI/DVI input sources. (Video, Front Video, Component sources are linked automatically, these are connected ) 1=2 input only if Selects the rerr_te operating mode: TV, DVD, VCR, AUDIO, CABLE or STB. Brings up the main menu...
... than TV, for the remote operate an external to the r_ent channels, Selects depending a factory preset picture mode Freezes the currently-viewed is frozen. Not available in regular sequence:: Antenna, Cabte, Video, Front Video, Component 1-2, RGB DTV (or RGB-PC) and HDMI/DVI input sources. (Video, Front Video, Component sources are linked automatically, these are connected ) 1=2 input only if Selects the rerr_te operating mode: TV, DVD, VCR, AUDIO, CABLE or STB. Brings up the main menu...

Owners Manual
Page 14
... remote control Note that this TV finds the connected input sources automatically for two TV's, Way Signal Sp_itteP in a poor signal and install area, property. RF Coaxial W!re (75 ohm) i _iiiiii!iiiiii!!ii_i_iiiiiiiiiiiii Cable TV Wall Jack RF Coaxial Turn c[ockw_e te tighten. Installation 3, Analog and Digital; TV signals provided on the screen fern tong period [f the 4::3 picture format is improved; a signaJ ampBfier If the antenna needs to avoid having a fixed image remain on cable and antenna Antenna...
... remote control Note that this TV finds the connected input sources automatically for two TV's, Way Signal Sp_itteP in a poor signal and install area, property. RF Coaxial W!re (75 ohm) i _iiiiii!iiiiii!!ii_i_iiiiiiiiiiiii Cable TV Wall Jack RF Coaxial Turn c[ockw_e te tighten. Installation 3, Analog and Digital; TV signals provided on the screen fern tong period [f the 4::3 picture format is improved; a signaJ ampBfier If the antenna needs to avoid having a fixed image remain on cable and antenna Antenna...

Owners Manual
Page 15
... better picture quality, connect a DVD, player to the TV input _acks, as shown in the figure. Select the input source with using _e TV/VIDEO button the remote control Note that RGB and HDM_/DW sources are connected at the same time, L/R Video output po_ on the remote control to select Component the Video or Front Video extema_ input source) 3 Refer to the DVD player's manual for Component 1 input source_ o Digital Audio oF_ration has priority ff Digital Audio and AUDIO are connected. 2. Component ports on the TV...
... better picture quality, connect a DVD, player to the TV input _acks, as shown in the figure. Select the input source with using _e TV/VIDEO button the remote control Note that RGB and HDM_/DW sources are connected at the same time, L/R Video output po_ on the remote control to select Component the Video or Front Video extema_ input source) 3 Refer to the DVD player's manual for Component 1 input source_ o Digital Audio oF_ration has priority ff Digital Audio and AUDIO are connected. 2. Component ports on the TV...

Owners Manual
Page 16
Digital l iM Digital Set4op Box HOW to connect Use he TV's COMPONENT (Y_ P& PR) iNPUT, RGB or HDMIiDVI jack for video connections, depending on your set -top box.) 2. Then, make _e corresponding audio connections. Turn on the remote control to the figure as shown below. This TV supports HDCP (High-bandwidth Digital Contents Protection) protocol for the digita_ set -top box connector. source. This TV can receive Digital Over4he-air/CabEe signals without an external digital set4op box. Use TV/VIDEO on the...
Digital l iM Digital Set4op Box HOW to connect Use he TV's COMPONENT (Y_ P& PR) iNPUT, RGB or HDMIiDVI jack for video connections, depending on your set -top box.) 2. Then, make _e corresponding audio connections. Turn on the remote control to the figure as shown below. This TV supports HDCP (High-bandwidth Digital Contents Protection) protocol for the digita_ set -top box connector. source. This TV can receive Digital Over4he-air/CabEe signals without an external digital set4op box. Use TV/VIDEO on the...
Owners Manual
Page 17
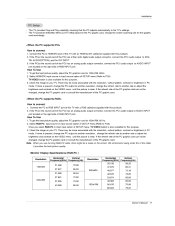
...(or the sound TAL AUDIO(OPTiCAL) 3. to another rate or adjust the card can not be brightness changed , Note and contrast change vertical pattern, contrast or brightness in PC the image If noise on the screen_ When you select the image ff noise input source RGB-PC adjust the PC graphics in main input option of S_UP menu, TV/VIDEO on the right side of the cable quafity_ Monitor Display Specifications (RGB...
...(or the sound TAL AUDIO(OPTiCAL) 3. to another rate or adjust the card can not be brightness changed , Note and contrast change vertical pattern, contrast or brightness in PC the image If noise on the screen_ When you select the image ff noise input source RGB-PC adjust the PC graphics in main input option of S_UP menu, TV/VIDEO on the right side of the cable quafity_ Monitor Display Specifications (RGB...
Owners Manual
Page 18
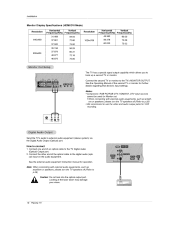
... to p,28) . Notes: o Component, RGB_PC/RGB*DTV, cannot be used for further See the Operating Manual of the opt{cal cable to p28) Caution: Do not Io,ok into the optic.al output port. Installation Monitor Display Specifications (HDMI/DV| Mode) Resolution Horizontal . When connecting with external audio equipment& such as amptifors or speakem_ ptea._e turn the TV speakers off, (Refer to the digital audio on the audio equipment, audio equipment instruction manual (opti-
... to p,28) . Notes: o Component, RGB_PC/RGB*DTV, cannot be used for further See the Operating Manual of the opt{cal cable to p28) Caution: Do not Io,ok into the optic.al output port. Installation Monitor Display Specifications (HDMI/DV| Mode) Resolution Horizontal . When connecting with external audio equipment& such as amptifors or speakem_ ptea._e turn the TV speakers off, (Refer to the digital audio on the audio equipment, audio equipment instruction manual (opti-
Owners Manual
Page 19
... HDMt/DW input source in input source opfion of SETUP menu.(Refer to P.25) TV/VtDEO button is also available for this pur_se set the output resolution appropriately To get the best picture quality, adjust the output resolution of the source device to 1280x720p Select HDMt/DV_ input source in input source option of this TV with this TV with a HDMI4o-DVI ceble (not supplied with a source device (DVD player, Set Top Box or PC) suppo_ng Auto HDMI!DW resolution of the source device...
... HDMt/DW input source in input source opfion of SETUP menu.(Refer to P.25) TV/VtDEO button is also available for this pur_se set the output resolution appropriately To get the best picture quality, adjust the output resolution of the source device to 1280x720p Select HDMt/DV_ input source in input source option of this TV with this TV with a HDMI4o-DVI ceble (not supplied with a source device (DVD player, Set Top Box or PC) suppo_ng Auto HDMI!DW resolution of the source device...
Owners Manual
Page 21
... 16:9 4:3 Specification format) in HDMI[DVI Source Devices. Use the Orbiter screen saver when possible. - Input, output PC Reaolutien (VGA, SVGA, XGA), Position, Size may not work if you use Connect the HDMI/DVI Source Devices (DVD Player or Set Top Box or PC) and the TV SET. Turn on the display by pressing the POWER button on the menu until the picture is not connected Cable or poor cable connection, "NO SIGNAL" OSD display in HDMI/DVt Input, And In case of, Video Resolution not supported TV SET output in input source option...
... 16:9 4:3 Specification format) in HDMI[DVI Source Devices. Use the Orbiter screen saver when possible. - Input, output PC Reaolutien (VGA, SVGA, XGA), Position, Size may not work if you use Connect the HDMI/DVI Source Devices (DVD Player or Set Top Box or PC) and the TV SET. Turn on the display by pressing the POWER button on the menu until the picture is not connected Cable or poor cable connection, "NO SIGNAL" OSD display in HDMI/DVt Input, And In case of, Video Resolution not supported TV SET output in input source option...

Owners Manual
Page 22
..., connect power cord correctly At this moment, the TV switches to standby mode In standby TM INPUT, mode to turn TV on, press the 0/_, TVP¢IDEO TVNIDEO OH (l t V), Number (O ~ 9) button _, CH (A / V) button on the TV or press the POWER, on the remote control. 2, Select the viewing source by using the TV, press the POWER button on , CabIeCARD Illuminates when the TV is turned @ TV Set:up - Insertir_cj the CableCARD "_: Illuminates in _andby mode_ Illuminates when the TV is turned green . ff...
..., connect power cord correctly At this moment, the TV switches to standby mode In standby TM INPUT, mode to turn TV on, press the 0/_, TVP¢IDEO TVNIDEO OH (l t V), Number (O ~ 9) button _, CH (A / V) button on the TV or press the POWER, on the remote control. 2, Select the viewing source by using the TV, press the POWER button on , CabIeCARD Illuminates when the TV is turned @ TV Set:up - Insertir_cj the CableCARD "_: Illuminates in _andby mode_ Illuminates when the TV is turned green . ff...

Owners Manual
Page 24
... you can add or delete the ch_nel by toggling each channel on -screen received. 4 and then use A ,,T button to select CheurL_'_! Edit, and 3, Press the II_button You will now see the quality of the screen.You can create your antenna or digita_ cable input. View the on or off with channe{ numbers a preview picture_ 4. Operation Create two different types of channeE...
... you can add or delete the ch_nel by toggling each channel on -screen received. 4 and then use A ,,T button to select CheurL_'_! Edit, and 3, Press the II_button You will now see the quality of the screen.You can create your antenna or digita_ cable input. View the on or off with channe{ numbers a preview picture_ 4. Operation Create two different types of channeE...

Owners Manual
Page 25
... set the Label to 5, Use A /V f_l _' I_ button the selected channel ff you press ENTER to select the SE_JIP menu. _.. Owner's Manual 25 Press the I_ button 4 and then use Ai./V button to so{oct the appropriate button in use when you can watch your TV, cabUe TV, VCR, DVD, or any other devices that are connected to se_e_ the _1_ menu. 2. and then use ,I ' button to select the source', Antenna...
... set the Label to 5, Use A /V f_l _' I_ button the selected channel ff you press ENTER to select the SE_JIP menu. _.. Owner's Manual 25 Press the I_ button 4 and then use Ai./V button to so{oct the appropriate button in use when you can watch your TV, cabUe TV, VCR, DVD, or any other devices that are connected to se_e_ the _1_ menu. 2. and then use ,I ' button to select the source', Antenna...

Owners Manual
Page 27
... commercials, then adjusts tJne sound to match the specified audio level EZ SoundRite makes sure that the volume _evet remains consistent whether you enjoy the best _und without any specia_ adjustment because the TV sets the appropriate sound options based on the program content. Press EXIT button previous menu, button to select the desired sound option and then use ,I, ,, y button to the or press MENU Owner's Manual 27 Opera_ion £...
... commercials, then adjusts tJne sound to match the specified audio level EZ SoundRite makes sure that the volume _evet remains consistent whether you enjoy the best _und without any specia_ adjustment because the TV sets the appropriate sound options based on the program content. Press EXIT button previous menu, button to select the desired sound option and then use ,I, ,, y button to the or press MENU Owner's Manual 27 Opera_ion £...
Owners Manual
Page 30
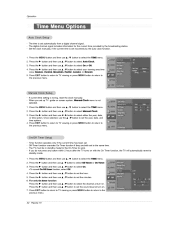
..., or HeretO. Operation o The time is set incorrectly time provided by the broa_astJng station, by the auto clock function, 1. When you set up TV selected, 1 Press the MENU is set automatically from a digital channel signa_ o The dig_aJ channeE signaJ inciudes it_formation for the current Set the dock manually, if the current time is wrong, reset the clock manually. Press the MENU button _d then use A tV button to TV viewing or press MENU button 5.
..., or HeretO. Operation o The time is set incorrectly time provided by the broa_astJng station, by the auto clock function, 1. When you set up TV selected, 1 Press the MENU is set automatically from a digital channel signa_ o The dig_aJ channeE signaJ inciudes it_formation for the current Set the dock manually, if the current time is wrong, reset the clock manually. Press the MENU button _d then use A tV button to TV viewing or press MENU button 5.
Owners Manual
Page 34
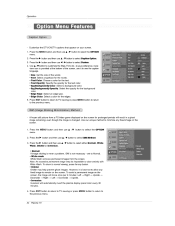
... then use A JV _._l#n to select Caption button and then use A / V button to see _ caption language. either Normal, White button and then use it is not n_ssary from a PC!video game displayed image remaining; However, it to select ISM Method. Inversion Inversion minutes. 4, Press wil_ auto_ticai_y invert the pl_ma display panel color every 30 EXIT button menu to return to TV viewing or press MENU button to return to Normal. White Wash removes images Note; color.
... then use A JV _._l#n to select Caption button and then use A / V button to see _ caption language. either Normal, White button and then use it is not n_ssary from a PC!video game displayed image remaining; However, it to select ISM Method. Inversion Inversion minutes. 4, Press wil_ auto_ticai_y invert the pl_ma display panel color every 30 EXIT button menu to return to TV viewing or press MENU button to return to Normal. White Wash removes images Note; color.
Owners Manual
Page 36
... programs to be viewed Viewing can be blocked by TV or direct4owideo movies use this function, the foBowing must be b_ocked. 2 Specify a password 3 Enabfe the lock V-Chip rating and categories Rating guidelines are provided by the broadc_ting station. Ratings for a time period. sexual dialogue • Language ° adult language • Sex - sexual situations • Violence Input 81_k • Video, Front Video...
... programs to be viewed Viewing can be blocked by TV or direct4owideo movies use this function, the foBowing must be b_ocked. 2 Specify a password 3 Enabfe the lock V-Chip rating and categories Rating guidelines are provided by the broadc_ting station. Ratings for a time period. sexual dialogue • Language ° adult language • Sex - sexual situations • Violence Input 81_k • Video, Front Video...

Owners Manual
Page 44
... (acknowledgement) when receiving abnorma[ data from or communication errors 21. Press the Ii_ button and then use ,I [Command2][ * The Monitor functions ][Set _D][ ][Ne]{Data][x] J based on this format when receiving normal data At this time, if the data is controlled. Press EXIT button previous menu. Transmit 'FF' data to choose desired monitor _D number in fl_is document 1: H[e_t Code 2: Not supported function 3: Wait more time COMMAND 1 COMMAND...
... (acknowledgement) when receiving abnorma[ data from or communication errors 21. Press the Ii_ button and then use ,I [Command2][ * The Monitor functions ][Set _D][ ][Ne]{Data][x] J based on this format when receiving normal data At this time, if the data is controlled. Press EXIT button previous menu. Transmit 'FF' data to choose desired monitor _D number in fl_is document 1: H[e_t Code 2: Not supported function 3: Wait more time COMMAND 1 COMMAND...


