
Owners Manual
Page 1
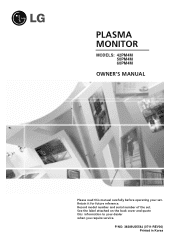
See the label attached on the back cover and quote this manual carefully before operating your dealer when you require service. PLASMA MONITOR MODELS: 42PM4M 50PM4M 60PM4M OWNER'S MANUAL Please read this information to your set . Record model number and serial number of the set . Retain it for future reference. P/NO: 38289U0558J (0711-REV00) Printed in Korea
See the label attached on the back cover and quote this manual carefully before operating your dealer when you require service. PLASMA MONITOR MODELS: 42PM4M 50PM4M 60PM4M OWNER'S MANUAL Please read this information to your set . Record model number and serial number of the set . Retain it for future reference. P/NO: 38289U0558J (0711-REV00) Printed in Korea
Owners Manual
Page 3
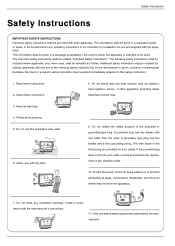
... one wider than the other apparatus (including ampli- Only use this apparatus near any heat sources such as follows. The following safety instruction list. Owner's Manual fiers)that safety instruction : 1. Clean only with the manufacturer's instructions. 11. The important safety instructions shall be given in an instruction for installation for replacement...
... one wider than the other apparatus (including ampli- Only use this apparatus near any heat sources such as follows. The following safety instruction list. Owner's Manual fiers)that safety instruction : 1. Clean only with the manufacturer's instructions. 11. The important safety instructions shall be given in an instruction for installation for replacement...
Owners Manual
Page 4
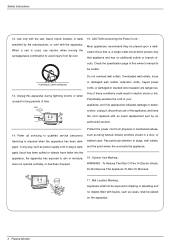
... required when the apparatus has been damaged in any way, such as being twisted, kinked, pinched, closed in electric shock or fire. Unplug this owner's manual to avoid injury from physical or mechanical abuse, 14. oration, unplug it, discontinue use caution when moving the cart/apparatus combination to be placed upon...
... required when the apparatus has been damaged in any way, such as being twisted, kinked, pinched, closed in electric shock or fire. Unplug this owner's manual to avoid injury from physical or mechanical abuse, 14. oration, unplug it, discontinue use caution when moving the cart/apparatus combination to be placed upon...

Owners Manual
Page 5
... Minimization) Method . . . .25 Tile mode 26~27 Low Power 27 XD DEMO 28 Screen Menu Options Auto Configure 29 Manual Configure 29 Selecting XGA mode 30 Setting the Picture Format 30 Initializing (Reset to your PC 12~13 Watching RGB Outputs 13 When...Monitor 17 Menu Language Selection 17 Picture Menu Options PSM (Picture Status Memory 18 Manual Picture Control (user option 18 CSM (Colour Status Memory 18 Manual Colour Temperature Control 19 XD 19 Advanced - Owner's Manual 5 Contents Contents Safety Instructions 2~4 Introduction Accessories 7 Controls and Connection Options 8~9...
... Minimization) Method . . . .25 Tile mode 26~27 Low Power 27 XD DEMO 28 Screen Menu Options Auto Configure 29 Manual Configure 29 Selecting XGA mode 30 Setting the Picture Format 30 Initializing (Reset to your PC 12~13 Watching RGB Outputs 13 When...Monitor 17 Menu Language Selection 17 Picture Menu Options PSM (Picture Status Memory 18 Manual Picture Control (user option 18 CSM (Colour Status Memory 18 Manual Colour Temperature Control 19 XD 19 Advanced - Owner's Manual 5 Contents Contents Safety Instructions 2~4 Introduction Accessories 7 Controls and Connection Options 8~9...

Owners Manual
Page 7
Owner's Manual 1.5V 1.5V Batteries POWER AV INPUT SLEEP PSM ARC AUTO 1 2 3 4 5 6 7 8 9 0 MENU EXIT SET MUTE * Remote Control Power Cord Option Extras - Contract your plasma display. Accessories ... items. Desktop stand speaker Tilt wall mounting bracket ACNTAEBLNENA M.P.I. CABLE OUT AUX CONTROL DISPLAY CONTROL AC OUT AC IN D-BOX Video cables Audio cables Owner's Manual 7 If an accessory is missing, please contact the dealer where you purchased the product.
Owner's Manual 1.5V 1.5V Batteries POWER AV INPUT SLEEP PSM ARC AUTO 1 2 3 4 5 6 7 8 9 0 MENU EXIT SET MUTE * Remote Control Power Cord Option Extras - Contract your plasma display. Accessories ... items. Desktop stand speaker Tilt wall mounting bracket ACNTAEBLNENA M.P.I. CABLE OUT AUX CONTROL DISPLAY CONTROL AC OUT AC IN D-BOX Video cables Audio cables Owner's Manual 7 If an accessory is missing, please contact the dealer where you purchased the product.
Owners Manual
Page 9
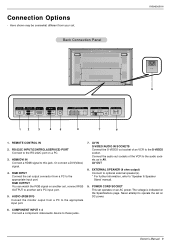
... from a PC to the appropriate input port. COMPONENT INPUT 1-2 Connect a component video/audio device to 'Speaker & Speaker Stand' manual. 9. Back Connection Panel Introduction AC IN 9 REMOTE CONTROL IN RS-232C (CONTROL&SERVICE) HDMI/DVI IN OUT IN RGB IN...AUDIO-R S-VIDEO AV OUT EXTERNAL SPEAKER R L 1 2 3 4 5 6 7 8 1. POWER CORD SOCKET This set operates on the Specifications page. Owner's Manual 9 EXTERNAL SPEAKER (8 ohm output) Connect to optional external speaker(s). * For further information, refer to these jacks. The voltage is indicated on an AC power. ...
... from a PC to the appropriate input port. COMPONENT INPUT 1-2 Connect a component video/audio device to 'Speaker & Speaker Stand' manual. 9. Back Connection Panel Introduction AC IN 9 REMOTE CONTROL IN RS-232C (CONTROL&SERVICE) HDMI/DVI IN OUT IN RGB IN...AUDIO-R S-VIDEO AV OUT EXTERNAL SPEAKER R L 1 2 3 4 5 6 7 8 1. POWER CORD SOCKET This set operates on the Specifications page. Owner's Manual 9 EXTERNAL SPEAKER (8 ohm output) Connect to optional external speaker(s). * For further information, refer to these jacks. The voltage is indicated on an AC power. ...
Owners Manual
Page 11
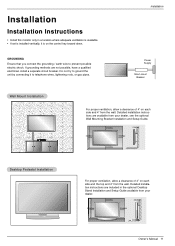
... not try to ground the unit by connecting it is on each side and the top and 4" from your dealer. 4 inches 4 inches 4 inches 4 inches Owner's Manual 11 Detailed installation instructions are not possible, have a qualified electrician install a separate circuit breaker.
... not try to ground the unit by connecting it is on each side and the top and 4" from your dealer. 4 inches 4 inches 4 inches 4 inches Owner's Manual 11 Detailed installation instructions are not possible, have a qualified electrician install a separate circuit breaker.
Owners Manual
Page 13
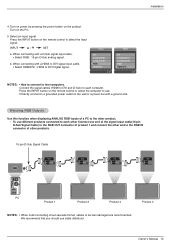
... RGB IN OUT PC Product 1 Product 2 Product 3 Product 4 NOTES: • When multi-connecting in/out cascade format, cables to be less damaged are recommended. Owner's Manual 13 Turn on the product. Press the INPUT button on the remote control to two computers. Watching RGB Outputs Use this function when displaying ANALOG...
... RGB IN OUT PC Product 1 Product 2 Product 3 Product 4 NOTES: • When multi-connecting in/out cascade format, cables to be less damaged are recommended. Owner's Manual 13 Turn on the product. Press the INPUT button on the remote control to two computers. Watching RGB Outputs Use this function when displaying ANALOG...
Owners Manual
Page 15
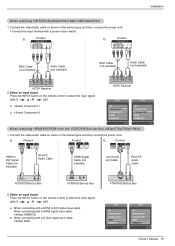
... input cable. • Select RGB VCR/DVD/Set-top Box Input AV Component1 Component2 RGB HDMI/DVI Input AV Component1 Component2 RGB HDMI/DVI Owner's Manual 15 Connect the video/audio cable as shown in the below figure and then connect the power cord. Select an input signal. Product HDMI/DVI...
... input cable. • Select RGB VCR/DVD/Set-top Box Input AV Component1 Component2 RGB HDMI/DVI Input AV Component1 Component2 RGB HDMI/DVI Owner's Manual 15 Connect the video/audio cable as shown in the below figure and then connect the power cord. Select an input signal. Product HDMI/DVI...
Owners Manual
Page 17
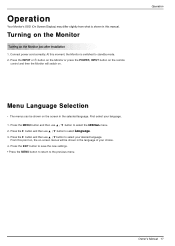
At this manual. Press the MENU button and then use D / E button to select Language. 3. From this point on, the on-screen menus will switch on the Monitor just ... Selection - Press the G button and then use D / E button to select the SPECIAL menu. 2. Press the G button and then use D / E button to the previous menu. Owner's Manual 17
At this manual. Press the MENU button and then use D / E button to select Language. 3. From this point on, the on-screen menus will switch on the Monitor just ... Selection - Press the G button and then use D / E button to select the SPECIAL menu. 2. Press the G button and then use D / E button to the previous menu. Owner's Manual 17

Owners Manual
Page 18
...then use D / E button to select User1 or User2. 4. Press the MENU button and then use D / E button to select the PICTURE menu. 2. Manual Picture Control (user option) - Press the MENU button and then use D / E button to select the PICTURE menu. 2. Press the G button and then ...reset to the best picture appearance. - Menu Prev. 1. When adjusting picture options (contrast, brightness, colour, sharpness and tint (NTSC input only)) manually, PSM is automatically changed . Press the PSM button • Each press of D / E button changes the screen display as shown below ....
...then use D / E button to select User1 or User2. 4. Press the MENU button and then use D / E button to select the PICTURE menu. 2. Manual Picture Control (user option) - Press the MENU button and then use D / E button to select the PICTURE menu. 2. Press the G button and then ...reset to the best picture appearance. - Menu Prev. 1. When adjusting picture options (contrast, brightness, colour, sharpness and tint (NTSC input only)) manually, PSM is automatically changed . Press the PSM button • Each press of D / E button changes the screen display as shown below ....

Owners Manual
Page 19
...button and then use D / E button to select CSM . 3. XD is LG electronic's unique picture improving technology to select XD Contrast, XD Colour, XD NR ... / E button to select the PICTURE menu. 2. Press the G button and then use D / E button to select Auto or Manual. 4. Press the G button and then D / E button to make appropriate adjustments. • The adjustment range of Red, Green ...to user option) - Press the MENU button and then use D / E button to select XD. 3. G Auto Manual XD Contrast On XD Colour XD NR On Off MPEG NR 0 1. Press the G button and then use D /...
...button and then use D / E button to select CSM . 3. XD is LG electronic's unique picture improving technology to select XD Contrast, XD Colour, XD NR ... / E button to select the PICTURE menu. 2. Press the G button and then use D / E button to select Auto or Manual. 4. Press the G button and then D / E button to make appropriate adjustments. • The adjustment range of Red, Green ...to user option) - Press the MENU button and then use D / E button to select XD. 3. G Auto Manual XD Contrast On XD Colour XD NR On Off MPEG NR 0 1. Press the G button and then use D /...
Owners Manual
Page 21
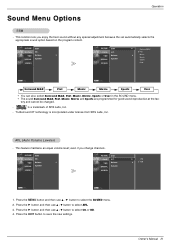
... select AVL. 3. R - PICTURE0 SSM SOUND G AVL TIME0 Balance 0 SPECIAL0 Speaker SCREEN0 PICTURE0 SOUND0 TIME0 SPECIAL0 SSM AVL Balance Speaker SCREEN0 G On 0 Off Menu Prev. Owner's Manual 21 tory and cannot be changed. PICTURE0 SSM SOUND G AVL TIME0 Balance 0 SPECIAL0 Speaker SCREEN0 PICTURE0 SSM SOUND0 TIME0 SPECIAL0 AVL Balance Speaker SCREEN0 G Surround...
... select AVL. 3. R - PICTURE0 SSM SOUND G AVL TIME0 Balance 0 SPECIAL0 Speaker SCREEN0 PICTURE0 SOUND0 TIME0 SPECIAL0 SSM AVL Balance Speaker SCREEN0 G On 0 Off Menu Prev. Owner's Manual 21 tory and cannot be changed. PICTURE0 SSM SOUND G AVL TIME0 Balance 0 SPECIAL0 Speaker SCREEN0 PICTURE0 SSM SOUND0 TIME0 SPECIAL0 AVL Balance Speaker SCREEN0 G Surround...
Owners Manual
Page 23
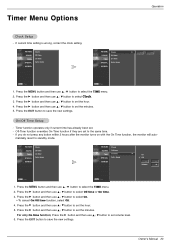
... the monitor turns on with the On Time function, the monitor will auto- Menu Prev. 1. Press the EXIT button to save the new settings. Owner's Manual 23 Menu Prev. PICTURE0 Clock SOUND0 TIME G SPECIAL0 Off time On time Auto sleep SCREEN0 PICTURE0 SOUND0 TIME0 SPECIAL0 Clock Off time On time Auto...
... the monitor turns on with the On Time function, the monitor will auto- Menu Prev. 1. Press the EXIT button to save the new settings. Owner's Manual 23 Menu Prev. PICTURE0 Clock SOUND0 TIME G SPECIAL0 Off time On time Auto sleep SCREEN0 PICTURE0 SOUND0 TIME0 SPECIAL0 Clock Off time On time Auto...
Owners Manual
Page 25
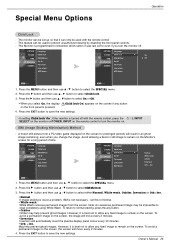
... use D / E button to normal viewing, press the any button on the screen. To return to select the SPECIAL menu. 2. May help prevent ghost images. Owner's Manual 25 This feature can be used with the remote control, press the SELECT on the monitor or POWER, INPUT on the screen if any button...
... use D / E button to normal viewing, press the any button on the screen. To return to select the SPECIAL menu. 2. May help prevent ghost images. Owner's Manual 25 This feature can be used with the remote control, press the SELECT on the monitor or POWER, INPUT on the screen if any button...
Owners Manual
Page 27
... screen darkens. 4. Moving the screen position vertically. Menu Prev. 1. Press the EXIT button to select the SPECIAL menu. 2. Function to Full screen. Low Power - Owner's Manual 27 Tile mode (product 1 ~ 2) : r(2) x c(1) row column PICTURE0 SOUND0 TIME0 SPECIAL G SCREEN0 Language Child lock ISM Method Set ID Tile mode Low power Demo PICTURE0 SOUND0...
... screen darkens. 4. Moving the screen position vertically. Menu Prev. 1. Press the EXIT button to select the SPECIAL menu. 2. Function to Full screen. Low Power - Owner's Manual 27 Tile mode (product 1 ~ 2) : r(2) x c(1) row column PICTURE0 SOUND0 TIME0 SPECIAL G SCREEN0 Language Child lock ISM Method Set ID Tile mode Low power Demo PICTURE0 SOUND0...
Owners Manual
Page 29
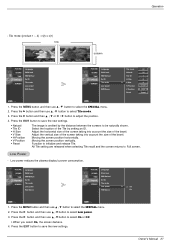
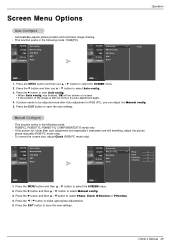
... button to be shown on screen. • If the position of the image is still not correct, try Auto adjustment again. 4. Manual config. Manual config. XGA Mode ARC Reset PICTURE0 Auto config. has finished, OK will be adjusted more after auto adjustment and especially if characters are... Screen Menu Options Operation Auto Configure - This function works in the following mode: RGB[PC], RGB[DTV], HDMI[DTV], COMPONENT[DTV] mode only - Manual Configure - Press the MENU button and then use D / E button to save the new settings. Press the MENU button and then D / E ...
... button to be shown on screen. • If the position of the image is still not correct, try Auto adjustment again. 4. Manual config. Manual config. XGA Mode ARC Reset PICTURE0 Auto config. has finished, OK will be adjusted more after auto adjustment and especially if characters are... Screen Menu Options Operation Auto Configure - This function works in the following mode: RGB[PC], RGB[DTV], HDMI[DTV], COMPONENT[DTV] mode only - Manual Configure - Press the MENU button and then use D / E button to save the new settings. Press the MENU button and then D / E ...
Owners Manual
Page 30
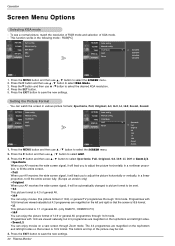
...• Zoom1, 2 You can watch the screen in various picture formats; Spectacle, Full, Original, 4:3, 16:9, 1:1, 14:9, Zoom1, Zoom2. Manual config. TIME0 XGA Mode G SPECIAL0 ARC SCREEN0 Reset 1024x768 1280x768 1360x768 1366x768 Menu Prev. XGA Mode ARC Reset Menu Prev. The bottom and top.... Press the EXIT button to select the desired XGA resolution. 4. Press the G button and then use D / E button to select ARC. 3. SOUND0 Manual config. Press the G button and then use D / E button to select XGA Mode. 3. PICTURE0 SOUND0 TIME0 SPECIAL0 SCREEN G Auto config. The 4:3 ...
...• Zoom1, 2 You can watch the screen in various picture formats; Spectacle, Full, Original, 4:3, 16:9, 1:1, 14:9, Zoom1, Zoom2. Manual config. TIME0 XGA Mode G SPECIAL0 ARC SCREEN0 Reset 1024x768 1280x768 1360x768 1366x768 Menu Prev. XGA Mode ARC Reset Menu Prev. The bottom and top.... Press the EXIT button to select the desired XGA resolution. 4. Press the G button and then use D / E button to select ARC. 3. SOUND0 Manual config. Press the G button and then use D / E button to select XGA Mode. 3. PICTURE0 SOUND0 TIME0 SPECIAL0 SCREEN G Auto config. The 4:3 ...
Owners Manual
Page 31
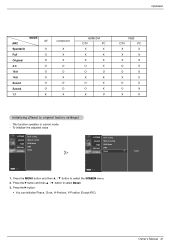
...Prev. Press the MENU button and then D / E button to select Reset. 3. Owner's Manual 31 Press the G button and then D / E button to select the SCREEN menu. 2. SOUND0 Manual config. XGA Mode ARC Reset PICTURE0 Auto config. To initialize the adjusted value PICTURE0 SOUND0 TIME0 SPECIAL0... 4:3 O 16:9 O 14:9 O Zoom1 O Zoom2 O 1:1 X component X X X O O X O O X HDMI/DVI DTV PC X X X X X X O X O O X X O X O X X O RGB DTV PC X X X X X X O X O O X X O X O X X O Initializing (Reset to original factory settings) - Manual config.
...Prev. Press the MENU button and then D / E button to select Reset. 3. Owner's Manual 31 Press the G button and then D / E button to select the SCREEN menu. 2. SOUND0 Manual config. XGA Mode ARC Reset PICTURE0 Auto config. To initialize the adjusted value PICTURE0 SOUND0 TIME0 SPECIAL0... 4:3 O 16:9 O 14:9 O Zoom1 O Zoom2 O 1:1 X component X X X O O X O O X HDMI/DVI DTV PC X X X X X X O X O O X X O X O X X O RGB DTV PC X X X X X X O X O O X X O X O X X O Initializing (Reset to original factory settings) - Manual config.

Owners Manual
Page 33
... d 23. When selecting Set ID '0', every connected Plasma Monitor set ID to specify a monitor ID number. - If the data is error, it returns NG Owner's Manual 33 Aspect Ratio k 04. Tint k 11. Auto Configure j 19. Error Acknowledgement [Command2][ ][Set ID][ ][NG][Data][x] * * If there is data write mode, it indicates present...
... d 23. When selecting Set ID '0', every connected Plasma Monitor set ID to specify a monitor ID number. - If the data is error, it returns NG Owner's Manual 33 Aspect Ratio k 04. Tint k 11. Auto Configure j 19. Error Acknowledgement [Command2][ ][Set ID][ ][NG][Data][x] * * If there is data write mode, it indicates present...


