
Owner's Manual
Page 4
... a particular installation. NO USER SERVICEABLE PARTS INSIDE. These limits are designed to Part 15 of the National Electric Code (U.S.A.). Any changes or modifications not expressly approved by turning the equipment off and on a circuit different from LG Electronics. REFER TO QUALIFIED SERVICE PERSONNEL. Reorient or relocate the receiving antenna. - CAUTION Do not attempt to operate the equipment. NOTE TO CABLE/TV INSTALLER This reminder...
... a particular installation. NO USER SERVICEABLE PARTS INSIDE. These limits are designed to Part 15 of the National Electric Code (U.S.A.). Any changes or modifications not expressly approved by turning the equipment off and on a circuit different from LG Electronics. REFER TO QUALIFIED SERVICE PERSONNEL. Reorient or relocate the receiving antenna. - CAUTION Do not attempt to operate the equipment. NOTE TO CABLE/TV INSTALLER This reminder...
Owner's Manual
Page 5
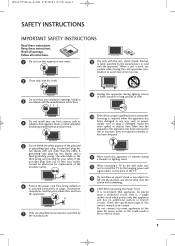
... do not drop onto the screen with the apparatus. MFL34797048-en-8-ING 9/8/2008 3:53 PM Page 3 SAFETY INSTRUCTIONS IMPORTANT SAFETY INSTRUCTIONS Read these instructions. Install in accordance with the manufacturer's instructions. 9 Unplug this apparatus or antenna during lighting storms or when unused for your outlet, consult an electrician for replacement of the polarized or grounding-type plug. Servicing is damaged, liquid has...
... do not drop onto the screen with the apparatus. MFL34797048-en-8-ING 9/8/2008 3:53 PM Page 3 SAFETY INSTRUCTIONS IMPORTANT SAFETY INSTRUCTIONS Read these instructions. Install in accordance with the manufacturer's instructions. 9 Unplug this apparatus or antenna during lighting storms or when unused for your outlet, consult an electrician for replacement of the polarized or grounding-type plug. Servicing is damaged, liquid has...

Owner's Manual
Page 6
... objects filled with the power cord plugged in. on the front panel of the appliance, and have a qualified electrician install a separate circuit breaker. An outdoor antenna system should not be connected to rain, moisture or other odors coming from direct sunlight. 4 20 ANTENNAS Outdoor antenna grounding If an outdoor antenna is turned off, unplugged and all cables have been removed. Do not clean with...
... objects filled with the power cord plugged in. on the front panel of the appliance, and have a qualified electrician install a separate circuit breaker. An outdoor antenna system should not be connected to rain, moisture or other odors coming from direct sunlight. 4 20 ANTENNAS Outdoor antenna grounding If an outdoor antenna is turned off, unplugged and all cables have been removed. Do not clean with...
Owner's Manual
Page 7
... Hg lamp used LCD TV) The fluorescent lamp used on a stand 19 Antenna or Cable Connection 20 EXTERNAL EQUIPMENT SETUP HD Receiver Setup 21 DVD Setup 22 VCR Setup 23 PC Setup 24 WATCHING TV Turning On TV 25 Channel Setup 25 Initial Setting 26 Quick Menu 27 On-Screen Menus Selection 27 USB Entry Modes 30 Photo List 31 Music List 33 APPENDIX Troubleshooting 35 Maintenance 36 Product Specifications 37 Open Source Software Notice 39 HOW TO USE THE OWNER'S MANUAL ON...
... Hg lamp used LCD TV) The fluorescent lamp used on a stand 19 Antenna or Cable Connection 20 EXTERNAL EQUIPMENT SETUP HD Receiver Setup 21 DVD Setup 22 VCR Setup 23 PC Setup 24 WATCHING TV Turning On TV 25 Channel Setup 25 Initial Setting 26 Quick Menu 27 On-Screen Menus Selection 27 USB Entry Modes 30 Photo List 31 Music List 33 APPENDIX Troubleshooting 35 Maintenance 36 Product Specifications 37 Open Source Software Notice 39 HOW TO USE THE OWNER'S MANUAL ON...

Owner's Manual
Page 8
... P.14) Screw for stand fixing Protection Cover (Refer to P.18) 32/37/42/47/52LG60, 42/47LGX (Only 32/37LG60) (Only 42LG60, 42LGX) or 32LG60: 3EA 4EA 37LG60: 4EA 2EA 1EA 4EA Bolts for all models.) Remote Control, Batteries Option Extras Power Cord D-sub 15 pin Cable When using the VGA (D-sub 15 pin cable) PC connection, the user must use shielded signal interface cables with ferrite...
... P.14) Screw for stand fixing Protection Cover (Refer to P.18) 32/37/42/47/52LG60, 42/47LGX (Only 32/37LG60) (Only 42LG60, 42LGX) or 32LG60: 3EA 4EA 37LG60: 4EA 2EA 1EA 4EA Bolts for all models.) Remote Control, Batteries Option Extras Power Cord D-sub 15 pin Cable When using the VGA (D-sub 15 pin cable) PC connection, the user must use shielded signal interface cables with ferrite...
Owner's Manual
Page 9
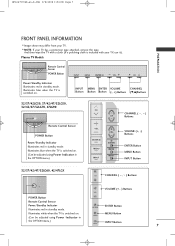
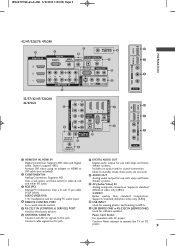
..., remove the tape. I Image shown may differ from your TV. Plasma TV Models Remote Control Sensor POWER Button Power/Standby Indicator Illuminates red in standby mode. ENTER ENTER Button Illuminates white when the TV is switched on . (Can be adjusted using Power Indicator in standby mode. Illuminates blue when the TV is switched on . (Can be adjusted using Power Indicator in the OPTION menu.) CH CHANNEL ( , ) CH Buttons VOL ENTER MENU INPUT VOL ENTER MENU INPUT VOLUME (+, -) Buttons ENTER Button MENU Button INPUT Button 32...
..., remove the tape. I Image shown may differ from your TV. Plasma TV Models Remote Control Sensor POWER Button Power/Standby Indicator Illuminates red in standby mode. ENTER ENTER Button Illuminates white when the TV is switched on . (Can be adjusted using Power Indicator in standby mode. Illuminates blue when the TV is switched on . (Can be adjusted using Power Indicator in the OPTION menu.) CH CHANNEL ( , ) CH Buttons VOL ENTER MENU INPUT VOL ENTER MENU INPUT VOLUME (+, -) Buttons ENTER Button MENU Button INPUT Button 32...
Owner's Manual
Page 11
...6 ANTENNA/CABLE IN Power Cord Socket Connect over-the air signals to this jack. DVI cable (not included) Note: In standby mode, these ports do not work. 2 COMPONENT IN 8 AUDIO OUT Analog Connection. Analog audio output for use with amps and home Uses a red, green, and blue cable for video & red theater systems. and white for use with AC power. Supports standard Analog PC Connection. Supports standard definition video only (480i). 4 REMOTE CONTROL PORT 10 USB INPUT For a wired remote control. Caution: Never attempt to MP3s. 5 RS-232C IN (CONTROL & SERVICE) PORT 11 USB...
...6 ANTENNA/CABLE IN Power Cord Socket Connect over-the air signals to this jack. DVI cable (not included) Note: In standby mode, these ports do not work. 2 COMPONENT IN 8 AUDIO OUT Analog Connection. Analog audio output for use with amps and home Uses a red, green, and blue cable for video & red theater systems. and white for use with AC power. Supports standard Analog PC Connection. Supports standard definition video only (480i). 4 REMOTE CONTROL PORT 10 USB INPUT For a wired remote control. Caution: Never attempt to MP3s. 5 RS-232C IN (CONTROL & SERVICE) PORT 11 USB...

Owner's Manual
Page 12
.... Control USB menu (PHOTO LIST and MUSIC LIST.) Control the SIMPLINK compatible devices. When you select and set of AV devices connected to your TV or any menu. FLASHBK Tune to enter a program number for multiple program channels such as 2-1, 2-2, etc. VCR/DVD, USB, SIMPLINK Control buttons Control video cassette recorders or DVD players. Don't mix old or used batteries with -). Installing Batteries I Open the battery compartment cover on the mode. PREPARATION TV POWER DVD STB VCR Q. MENU Displays the main menu. MFL34797048...
.... Control USB menu (PHOTO LIST and MUSIC LIST.) Control the SIMPLINK compatible devices. When you select and set of AV devices connected to your TV or any menu. FLASHBK Tune to enter a program number for multiple program channels such as 2-1, 2-2, etc. VCR/DVD, USB, SIMPLINK Control buttons Control video cassette recorders or DVD players. Don't mix old or used batteries with -). Installing Batteries I Open the battery compartment cover on the mode. PREPARATION TV POWER DVD STB VCR Q. MENU Displays the main menu. MFL34797048...
Owner's Manual
Page 17
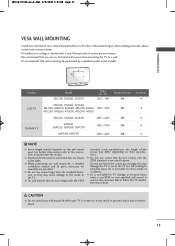
... Page 15 PREPARATION VESA WALL MOUNTING Install your TV is turned on. Do not use screws that do not comply with the VESA standard screw specifications. If installed on a ceiling or slanted wall, it may result in severe personal injury. NOTE G Screw length needed depends on a solid wall perpendicular to follow the TV installation instructions. CAUTION G Do not install your wall mount kit while your wall mount on the wall mount used or the consumer...
... Page 15 PREPARATION VESA WALL MOUNTING Install your TV is turned on. Do not use screws that do not comply with the VESA standard screw specifications. If installed on a ceiling or slanted wall, it may result in severe personal injury. NOTE G Screw length needed depends on a solid wall perpendicular to follow the TV installation instructions. CAUTION G Do not install your wall mount kit while your wall mount on the wall mount used or the consumer...
Owner's Manual
Page 23
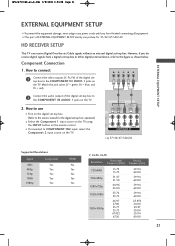
Component Connection 1. How to use picture for the digital set-top box. Match the jack colors (Y = green, PB = blue, and PR = red). 2 Connect the audio output of the digital set-top box to the owner's manual for 37/42/47/52LG50. I Select the Component 1 input source on the TV using the INPUT button on the TV. 2. However, if you have finished connecting all equipment. HD RECEIVER SETUP This TV can receive Digital Over-the-air/Cable signals without an external digital set-top...
Component Connection 1. How to use picture for the digital set-top box. Match the jack colors (Y = green, PB = blue, and PR = red). 2 Connect the audio output of the digital set-top box to the owner's manual for 37/42/47/52LG50. I Select the Component 1 input source on the TV using the INPUT button on the TV. 2. However, if you have finished connecting all equipment. HD RECEIVER SETUP This TV can receive Digital Over-the-air/Cable signals without an external digital set-top...
Owner's Manual
Page 25
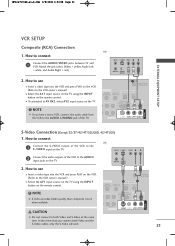
... Video and S-Video at the same time. ANT OUT OUTPUT SWITCH ANTENNA/ CABLE IN D1IGITAL AUDIO OU2T AUDIO REMOTE (RGB/DVI) CONTROL IN OPTICAL COAXIAL ! MFL34797048-en-8-ING 9/8/2008 3:54 PM Page 23 EXTERNAL EQUIPMENT SETUP VCR SETUP Composite (RCA) Connection 1. Match the jack colors (Video = yellow, Audio Left = white, and Audio Right = red) i.e) ANT IN S-VIDEO VIDEO L R ANT OUT OUTPUT SWITCH 2. How to use I Select the A V 1 input source on the TV using the INPUT button on the VCR. (Refer to connect 1 Connect the AUDIO/VIDEO jacks between TV and VCR. Use...
... Video and S-Video at the same time. ANT OUT OUTPUT SWITCH ANTENNA/ CABLE IN D1IGITAL AUDIO OU2T AUDIO REMOTE (RGB/DVI) CONTROL IN OPTICAL COAXIAL ! MFL34797048-en-8-ING 9/8/2008 3:54 PM Page 23 EXTERNAL EQUIPMENT SETUP VCR SETUP Composite (RCA) Connection 1. Match the jack colors (Video = yellow, Audio Left = white, and Audio Right = red) i.e) ANT IN S-VIDEO VIDEO L R ANT OUT OUTPUT SWITCH 2. How to use I Select the A V 1 input source on the TV using the INPUT button on the VCR. (Refer to connect 1 Connect the AUDIO/VIDEO jacks between TV and VCR. Use...
Owner's Manual
Page 26
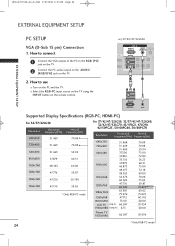
How to connect 1 Connect the VGA output of the PC to the R GB (P C) jack on the TV. 2 Connect the PC audio output to use I IN (CO 2 Y 1 PB PR L R VIDEO AUDIO COMPONENT IN 1 2 EXTERNAL EQUIPMENT SETUP RGB OUTPUT AUDIO Supported Display Specifications (RGB-PC, HDMI-PC) For 32/37/42LG30 Resolution 640x350 Horizontal Vertical Frequency(KHz) Frequency(Hz) 31.469 70.08 720x400 31.469 70.08 640x480 31.469 59.94 800x600...
How to connect 1 Connect the VGA output of the PC to the R GB (P C) jack on the TV. 2 Connect the PC audio output to use I IN (CO 2 Y 1 PB PR L R VIDEO AUDIO COMPONENT IN 1 2 EXTERNAL EQUIPMENT SETUP RGB OUTPUT AUDIO Supported Display Specifications (RGB-PC, HDMI-PC) For 32/37/42LG30 Resolution 640x350 Horizontal Vertical Frequency(KHz) Frequency(Hz) 31.469 70.08 720x400 31.469 70.08 640x480 31.469 59.94 800x600...
Owner's Manual
Page 27
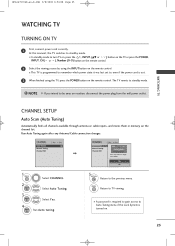
... 1 MENU Select CHANNEL. 2 ENTER 3 ENTER Select Auto Tuning. I In standby mode to turn TV on, press the , INPUT, (DE or ) button on the TV or press the POWER, INPUT, CH( or ), Number (0~9) button on the remote control. 2 Select the viewing source by using the TV, press the POWER button on the remote control. Run Auto Tuning again after any Antenna/Cable connection changes. Select Y e s. 4 ENTER Run Auto tuning. 5RETURN Return to TV viewing. MENU Return to the previous menu. I This TV is programmed...
... 1 MENU Select CHANNEL. 2 ENTER 3 ENTER Select Auto Tuning. I In standby mode to turn TV on, press the , INPUT, (DE or ) button on the TV or press the POWER, INPUT, CH( or ), Number (0~9) button on the remote control. 2 Select the viewing source by using the TV, press the POWER button on the remote control. Run Auto Tuning again after any Antenna/Cable connection changes. Select Y e s. 4 ENTER Run Auto tuning. 5RETURN Return to TV viewing. MENU Return to the previous menu. I This TV is programmed...
Owner's Manual
Page 28
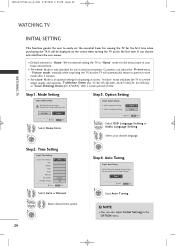
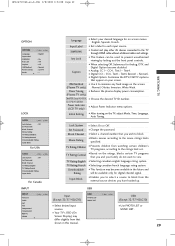
... Home Enter RETURN Exit 1 Select H o me Mode. 2 ENTER Step2. Audio Language Setting F English G French Enter RETURN Exit 1 Select OSD Language Setting or Audio Language Setting. 2 Select your home environment. I You can also be displayed on the screen when turning the TV on for the best picture in retail environments. Step1. Customers can change channel map. Picture mode" manually while inspecting the TV, but the TV will be activated from the user menus. Time Setting Current Time Setting...
... Home Enter RETURN Exit 1 Select H o me Mode. 2 ENTER Step2. Audio Language Setting F English G French Enter RETURN Exit 1 Select OSD Language Setting or Audio Language Setting. 2 Select your home environment. I You can also be displayed on the screen when turning the TV on for the best picture in retail environments. Step1. Customers can change channel map. Picture mode" manually while inspecting the TV, but the TV will be activated from the user menus. Time Setting Current Time Setting...
Owner's Manual
Page 30
... Auto Sleep : Off 28 Aspect Ratio Picture Mode Screen (RGB-PC) TruMotion Demo Local Dimming (47LG90 only) Local Dimming Demo (47LG90 only) I Select the desired picture format: Set by areas of the selected picture modes return to the default factory settings. I After analyzing the signal of the input video by program, 4:3, 16:9, Zoom1, Zoom2, Just Scan. I Use this feature to see Local Dimming Demo. Select your viewing area observes Daylight Saving time. I Use this feature to improve the contrast ratio. I Adjust the screen Resolution, Auto...
... Auto Sleep : Off 28 Aspect Ratio Picture Mode Screen (RGB-PC) TruMotion Demo Local Dimming (47LG90 only) Local Dimming Demo (47LG90 only) I Select the desired picture format: Set by areas of the selected picture modes return to the default factory settings. I After analyzing the signal of the input video by program, 4:3, 16:9, Zoom1, Zoom2, Just Scan. I Use this feature to see Local Dimming Demo. Select your viewing area observes Daylight Saving time. I Use this feature to improve the contrast ratio. I Adjust the screen Resolution, Auto...
Owner's Manual
Page 31
... cables and settings. Power Saving I Reduces the plasma display power consumption. (Plasma TV only) Set ID (Except 42/47LGX, I Choose the desired TV ID number. 32/37/42/47/52LG60) Power Indicator (LCD TV only) I Select On or Off. Lock System Set Password Block Channel Movie Rating TV Rating-Children TV Rating-General TV Rating-English TV Rating-French Downloadable Rating Input Block I Adjust Power Indicator menu options. I Use PHOTO LIST or MUSIC LIST. I Select desired input sources. INPUT USB INPUT Antenna Cable...
... cables and settings. Power Saving I Reduces the plasma display power consumption. (Plasma TV only) Set ID (Except 42/47LGX, I Choose the desired TV ID number. 32/37/42/47/52LG60) Power Indicator (LCD TV only) I Select On or Off. Lock System Set Password Block Channel Movie Rating TV Rating-Children TV Rating-General TV Rating-English TV Rating-French Downloadable Rating Input Block I Adjust Power Indicator menu options. I Use PHOTO LIST or MUSIC LIST. I Select desired input sources. INPUT USB INPUT Antenna Cable...
Owner's Manual
Page 32
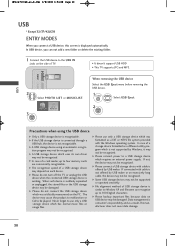
.... G Please connect power to 100 English characters. If connected with cable is not supported by USB maker. G The recognition speed of a card reader, up to a USB storage device which has normal music files or image files. G Please do not turn off the TV or unplug the USB device when the connected USB storage device is not recognizable. G Please use only a USB storage device which requires an external power supply. The...
.... G Please connect power to 100 English characters. If connected with cable is not supported by USB maker. G The recognition speed of a card reader, up to a USB storage device which has normal music files or image files. G Please do not turn off the TV or unplug the USB device when the connected USB storage device is not recognizable. G Please use only a USB storage device which requires an external power supply. The...
Owner's Manual
Page 34
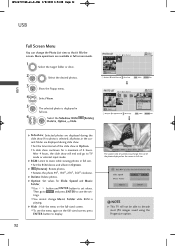
... external input mode. ENTER Cancel ! If no photo is displayed in full size. G B G M: Listen to set values. G (Rotate): Rotate photos. I To see the menu again on the full-sized screen, press ENTER button to save the set the time interval between slides. tings. I Use button and ENTER button to music while viewing photos in full size. MFL34797048-en-8-ING 9/8/2008 3:54 PM Page 32 USB Full Screen Menu You can change...
... external input mode. ENTER Cancel ! If no photo is displayed in full size. G B G M: Listen to set values. G (Rotate): Rotate photos. I To see the menu again on the full-sized screen, press ENTER button to save the set the time interval between slides. tings. I Use button and ENTER button to music while viewing photos in full size. MFL34797048-en-8-ING 9/8/2008 3:54 PM Page 32 USB Full Screen Menu You can change...
Owner's Manual
Page 37
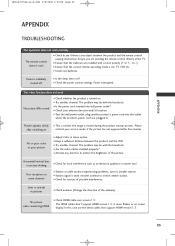
... picture when connecting HDMI I Try another channel. In this case use the latest cables that the batteries are pointing the remote control directly at the TV. I Check HDMI cable over version 1.3. The problem may be with correct polarity (+ to another product's power cord into wall power outlet? I Check the power control settings. I Station signal is suddenly turned off I Check antenna (Change the direction of the picture. I Install new batteries. I Test the wall power outlet, plug another station. The remote control doesn't work...
... picture when connecting HDMI I Try another channel. In this case use the latest cables that the batteries are pointing the remote control directly at the TV. I Check HDMI cable over version 1.3. The problem may be with correct polarity (+ to another product's power cord into wall power outlet? I Check the power control settings. I Station signal is suddenly turned off I Check antenna (Change the direction of the picture. I Install new batteries. I Test the wall power outlet, plug another station. The remote control doesn't work...
Owner's Manual
Page 38
... in menu option. I Check HDMI cable over version 2.0. No sound when connecting HDMI or USB I Please be sure not to protect against possible damage from inside the product I A change in PC mode. (Only PC mode applied) I Are the audio cables installed properly? Vertical bar or stripe on background & Horizontal Noise & Incorrect position I Work the Auto configure or adjust clock, phase, or H/V position. (Option) Screen color is unstable I Sound muted...
... in menu option. I Check HDMI cable over version 2.0. No sound when connecting HDMI or USB I Please be sure not to protect against possible damage from inside the product I A change in PC mode. (Only PC mode applied) I Are the audio cables installed properly? Vertical bar or stripe on background & Horizontal Noise & Incorrect position I Work the Auto configure or adjust clock, phase, or H/V position. (Option) Screen color is unstable I Sound muted...


