
Owners Manual
Page 5
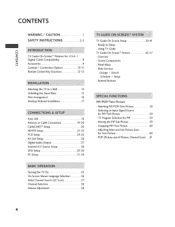
...Selecting an Input Signal Source for Twin Picture 60 - Swapping PIP/Twin Picture 60 - Using TV Guide TV Guide On Screen _uFeature Overview - Remind Features 39-41 42-57 PIP/POP/Twin Picture - Watching PIP/POP/Twin Picture 58 - Adjusting Main and Sub... (EZ Scan 37 Channel Selection 38 Volume Adjustment 38 4 TV Program Selection for U.S.A. / m z Digital Cable Compatibility 8 -4 Accessories 9 Controls / Connection Options 10-11 Remote Control Key Functions 12-13 Attaching the TV to a Wall 14 Unfolding the Stand Base 15 Wire Arrangement...
...Selecting an Input Signal Source for Twin Picture 60 - Swapping PIP/Twin Picture 60 - Using TV Guide TV Guide On Screen _uFeature Overview - Remind Features 39-41 42-57 PIP/POP/Twin Picture - Watching PIP/POP/Twin Picture 58 - Adjusting Main and Sub... (EZ Scan 37 Channel Selection 38 Volume Adjustment 38 4 TV Program Selection for U.S.A. / m z Digital Cable Compatibility 8 -4 Accessories 9 Controls / Connection Options 10-11 Remote Control Key Functions 12-13 Attaching the TV to a Wall 14 Unfolding the Stand Base 15 Wire Arrangement...
Owners Manual
Page 6
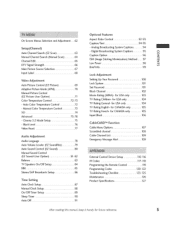
...107 Scrambled channel 108 Cable Channel List 109 Emergency Message Alert 109 External Control Device Setup IR Codes 110-116 117-118 Programming the Remote Control 9 Programming Codes 120-122 Troubleshooting Checklist Maintenance 123-125 126 Product Specifications 127 After reading this manual keep it handy for ...Volume Leveler (EZ SoundRite 79 Auto Sound Control (EZ Sound 80 Manual Sound Control (EZ Sound-User Option Balance 81-82 83 TV Speakers On/Off Setup 84 BBE 85 Stereo/SAP Broadcasts Setup 86 _me Setting Auto Clock Setup 87 Manual Clock Setup 88 On/...
...107 Scrambled channel 108 Cable Channel List 109 Emergency Message Alert 109 External Control Device Setup IR Codes 110-116 117-118 Programming the Remote Control 9 Programming Codes 120-122 Troubleshooting Checklist Maintenance 123-125 126 Product Specifications 127 After reading this manual keep it handy for ...Volume Leveler (EZ SoundRite 79 Auto Sound Control (EZ Sound 80 Manual Sound Control (EZ Sound-User Option Balance 81-82 83 TV Speakers On/Off Setup 84 BBE 85 Stereo/SAP Broadcasts Setup 86 _me Setting Auto Clock Setup 87 Manual Clock Setup 88 On/...

Owners Manual
Page 11
Front Panel Controls O C 8 Z iiiiiii__iii_iiiii_ii_ i_ii__iiiiiiiiiiiii!i Remote Control Sensor Power Standby Indicator llIuminates red in standby mode. POWER gutton iTV GUIDE Button INPUT Button [MENU [Button VOLUME CHANNEL (V,A)Buttons I0 CONTROLS Here shown may be somewhat different from your TV. When the TV is turned on, the indicator blinks white and then illuminates white before the picture is displayed.
Front Panel Controls O C 8 Z iiiiiii__iii_iiiii_ii_ i_ii__iiiiiiiiiiiii!i Remote Control Sensor Power Standby Indicator llIuminates red in standby mode. POWER gutton iTV GUIDE Button INPUT Button [MENU [Button VOLUME CHANNEL (V,A)Buttons I0 CONTROLS Here shown may be somewhat different from your TV. When the TV is turned on, the indicator blinks white and then illuminates white before the picture is displayed.
Owners Manual
Page 12
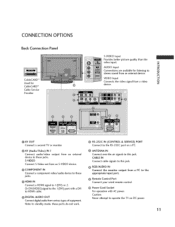
...the air signals to this jack. @ RGB/AUDIO IN Connect the monitor output appropriate input port. from a PC to the @ Remote Control Port Connect your wired remote control, @ Power Cord Socket For operation with a DVI to these jacks. HDMI IN Connect a HDMI signal to these jacks. ...DIGITAL AUDIO OUT Connect digital audio from an S-VIDEO device. Connect a second TV or monitor, ® RS-232C IN (CONTROL & SERVICE) PORT...
...the air signals to this jack. @ RGB/AUDIO IN Connect the monitor output appropriate input port. from a PC to the @ Remote Control Port Connect your wired remote control, @ Power Cord Socket For operation with a DVI to these jacks. HDMI IN Connect a HDMI signal to these jacks. ...DIGITAL AUDIO OUT Connect digital audio from an S-VIDEO device. Connect a second TV or monitor, ® RS-232C IN (CONTROL & SERVICE) PORT...
Owners Manual
Page 13
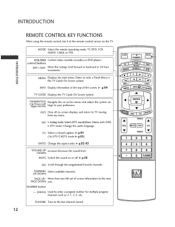
...top of screen information PAGE DOWN one full set of the screen. _ p.99 TV GUIDE Displays the TV Guide On Screen system. EXIT Clear all on the TV. Move from any menu. INFO Display information at the remote control sensor on -screen displays and return to your preference. Enters or exits a... Favorite channels. MUTE Switch the sound on -screen menus and adiust the system settings to TV viewing from one . NUMBER button to the next _(DASH) Used to the last channel viewed. MODE Select the remote operating mode: TV_DVD, VCR, AUDIO, CABLE or STB. VCR/DVD control bu_ons DAY+/DA...
...top of screen information PAGE DOWN one full set of the screen. _ p.99 TV GUIDE Displays the TV Guide On Screen system. EXIT Clear all on the TV. Move from any menu. INFO Display information at the remote control sensor on -screen displays and return to your preference. Enters or exits a... Favorite channels. MUTE Switch the sound on -screen menus and adiust the system settings to TV viewing from one . NUMBER button to the next _(DASH) Used to the last channel viewed. MODE Select the remote operating mode: TV_DVD, VCR, AUDIO, CABLE or STB. VCR/DVD control bu_ons DAY+/DA...
Owners Manual
Page 22
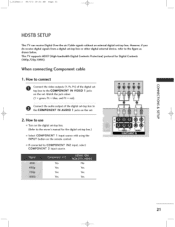
... source. How to use Turn on the digital set m -4 C 2. green, PB -- t,_,_512Deno,_Z 06/9/2 10:21 _ Page 2] HDSTB SETUP This TV can receive Digital Over-the-air/Cable do receive digital signals from a digital set -top box or other digital external device, refer box. Digital Contents...source with using the INPUT bu_on on the set -top box. (Refer to the COMPONENT IN AUDIO 1 jacks on the remote control. blue, and PR -- If connected to the figure as This TV supports HDCP (High-bandwidth (480p,720p, 10801). signals without an external digital set -top shown below.
... source. How to use Turn on the digital set m -4 C 2. green, PB -- t,_,_512Deno,_Z 06/9/2 10:21 _ Page 2] HDSTB SETUP This TV can receive Digital Over-the-air/Cable do receive digital signals from a digital set -top box or other digital external device, refer box. Digital Contents...source with using the INPUT bu_on on the set -top box. (Refer to the COMPONENT IN AUDIO 1 jacks on the remote control. blue, and PR -- If connected to the figure as This TV supports HDCP (High-bandwidth (480p,720p, 10801). signals without an external digital set -top shown below.
Owners Manual
Page 26
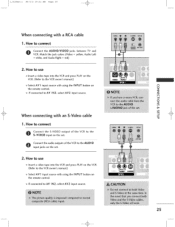
...the set, 2. How to AV IN2, select AV2 input source. 2S m N -4 O Z m -4 When connecting with using the INPUT button on N O the remote control, Z Z If connected to the VCR owner's manuak) Select AVI input source with a P.CA cable 1. If connected to connect O onnect the AUDIO/VIDEO jacks ...between TV and VCR. t,_,_5lr2Den°,_! 06/9/2 10:21 _ Page 29 When connecting with using the INPUT button on the remote control. Ho_ to use m Insert a video _pe into the VCR and press PLAY on...
...the set, 2. How to AV IN2, select AV2 input source. 2S m N -4 O Z m -4 When connecting with using the INPUT button on N O the remote control, Z Z If connected to the VCR owner's manuak) Select AVI input source with a P.CA cable 1. If connected to connect O onnect the AUDIO/VIDEO jacks ...between TV and VCR. t,_,_5lr2Den°,_! 06/9/2 10:21 _ Page 29 When connecting with using the INPUT button on the remote control. Ho_ to use m Insert a video _pe into the VCR and press PLAY on...

Owners Manual
Page 29
How to AV IN2 input, select AV2 Z input source. Match the iack colors. (Video = yellow, Audio Left = white, and Audio Right = r_) Camcorder N 2. Operate the corresponding external equipment. m c Video Game S_ 28 If connected to connect O Connect the AUDIO/VIDEO jacks between TV and external equipment. t,_,_51,2Deno,_! 06/9/2 10:21 _ Page 28 CONNECTIONS & SETUP EXTERNAL _V SOURCE SETUP 1. Howto use 0 Z Z SelectAV1 input source with usingthe m INPUT button on the remote control.
How to AV IN2 input, select AV2 Z input source. Match the iack colors. (Video = yellow, Audio Left = white, and Audio Right = r_) Camcorder N 2. Operate the corresponding external equipment. m c Video Game S_ 28 If connected to connect O Connect the AUDIO/VIDEO jacks between TV and external equipment. t,_,_51,2Deno,_! 06/9/2 10:21 _ Page 28 CONNECTIONS & SETUP EXTERNAL _V SOURCE SETUP 1. Howto use 0 Z Z SelectAV1 input source with usingthe m INPUT button on the remote control.
Owners Manual
Page 30
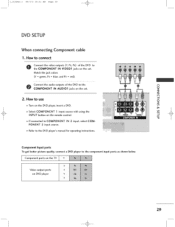
Component Input ports To get better picture quality, connect a DVD player to the DVD player's manual for ope_ting instructions. }; I Component ports on the TV Video output ports on the remote control. Refer to the component input ports as shown below. H_ to connect cable CthoennCeOctMPthOeNvEiNdeTo ouItNputVs ID(EYO, 1PB,PjaRc)ksofonthetheDVseDt. Select COMPONENT...
Component Input ports To get better picture quality, connect a DVD player to the DVD player's manual for ope_ting instructions. }; I Component ports on the TV Video output ports on the remote control. Refer to the component input ports as shown below. H_ to connect cable CthoennCeOctMPthOeNvEiNdeTo ouItNputVs ID(EYO, 1PB,PjaRc)ksofonthetheDVseDt. Select COMPONENT...
Owners Manual
Page 36
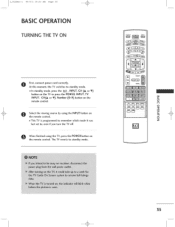
...INPUT button on the remote control. 0 This TV is programmed to remember which mode it was z last set to standby mode. 35 In standby mode, press the _/I, INPUT, CH (A or T) button on the TV or press the POWE}_ INPU_ TV _NPUT, CH(A or T), Num_r (_9) button on the remote control. i N 0... m 0 Select the viewing source, by using the TV, press the POWER button on the remote control. The TV reverts to , even if you turn the TV off. At this moment the TV switches to ...
...INPUT button on the remote control. 0 This TV is programmed to remember which mode it was z last set to standby mode. 35 In standby mode, press the _/I, INPUT, CH (A or T) button on the TV or press the POWE}_ INPU_ TV _NPUT, CH(A or T), Num_r (_9) button on the remote control. i N 0... m 0 Select the viewing source, by using the TV, press the POWER button on the remote control. The TV reverts to , even if you turn the TV off. At this moment the TV switches to ...
Owners Manual
Page 41
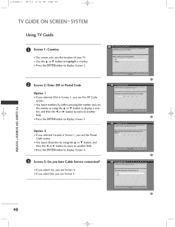
... display Screen 2. O Screen 2: Enter ZIP or Postal Code Option 1 if you selected USA in Screen |, you the location of your TV. You input characters by either pressing the number keys on -4 the remote or using the A or T button, and -4 then the 4 or _ button to move to another c i field. You input numbers by... then the _1 or _ button to move to another field. Press the ENTER button to display Screen 3. t,_,_5lr2Den°,_Z 06/9/2 10:21 _ Page 40 TV GUIDE ON SCREEN'MSYSTEM Using TV Guide O Screen 1: Country This screen asks you see the ZIP Code screen.
... display Screen 2. O Screen 2: Enter ZIP or Postal Code Option 1 if you selected USA in Screen |, you the location of your TV. You input characters by either pressing the number keys on -4 the remote or using the A or T button, and -4 then the 4 or _ button to move to another c i field. You input numbers by... then the _1 or _ button to move to another field. Press the ENTER button to display Screen 3. t,_,_5lr2Den°,_Z 06/9/2 10:21 _ Page 40 TV GUIDE ON SCREEN'MSYSTEM Using TV Guide O Screen 1: Country This screen asks you see the ZIP Code screen.
Owners Manual
Page 43
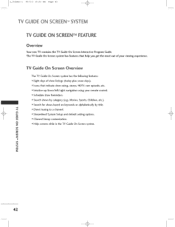
... a channel. Icons that help you get the most out of show listings (today plus seven days). TV Guide On Screen Overview The TV Guide On Screen system has the following features: Eight days of your remote control. t_ m m Z -4 m 42 Search for shows based on keywords or alphabetically by category (e.g, Movies, Sports, Children, etc.). i m ®...
... a channel. Icons that help you get the most out of show listings (today plus seven days). TV Guide On Screen Overview The TV Guide On Screen system has the following features: Eight days of your remote control. t_ m m Z -4 m 42 Search for shows based on keywords or alphabetically by category (e.g, Movies, Sports, Children, etc.). i m ®...

Owners Manual
Page 46
t,_,_51,2Deno,_! 06/9/2 10:21 _ Page 49 Main Services Access Listings by pressing the TV GUIDE button on the front panel of show listings Read show descriptions Tune directly to a show currently airing Set a show to Remind Lock and Unlock ... to close the screen. With Listings highlighted, press the INFO button to display a Help screen_ Press the _NFO button again to : View 8 days of your remote or on your TV. Listings is always the first Service displayed in the Guide.
t,_,_51,2Deno,_! 06/9/2 10:21 _ Page 49 Main Services Access Listings by pressing the TV GUIDE button on the front panel of show listings Read show descriptions Tune directly to a show currently airing Set a show to Remind Lock and Unlock ... to close the screen. With Listings highlighted, press the INFO button to display a Help screen_ Press the _NFO button again to : View 8 days of your remote or on your TV. Listings is always the first Service displayed in the Guide.
Owners Manual
Page 66
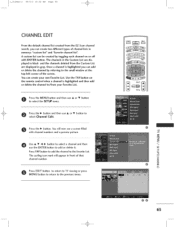
... add or delete the channel to the previous menu_ 6S You will appear in front of that channel number: i Z Z Press EXIT button to return to TV viewing or press MENU button to return to /from your own Favorite List. The channels in the Custom List are displayed in gray. A custom list... in black and the channels deleted from the EZ Scan channel search, you can add or delete the channel by toggEng each channel on the remote control when a channel is highlighted you can create two different types of channel lists in memory: "custom list" and "favorite channel list". You can create...
... add or delete the channel to the previous menu_ 6S You will appear in front of that channel number: i Z Z Press EXIT button to return to TV viewing or press MENU button to return to /from your own Favorite List. The channels in the Custom List are displayed in gray. A custom list... in black and the channels deleted from the EZ Scan channel search, you can add or delete the channel by toggEng each channel on the remote control when a channel is highlighted you can create two different types of channel lists in memory: "custom list" and "favorite channel list". You can create...

Owners Manual
Page 87
...as the original one and when you press the SAP button, Mono, Stereo, or SAP appear in turn. mIf other languages available on the remote control. is automatically received if the broadcast Mono; Each time you select Stereo or SAP on the digi_l signal, select them with the SAP ...button. < O Press EXIT button to save and return to the mono sound in remote areas during stereo/SAP broadcasting. Mono sound is only in Select Mono if you want to listen to TV viewing, m Z c c c_ 5 3> C m Z --4 86 even though Stereo or SAP has been selected. O Use the SAP ...
...as the original one and when you press the SAP button, Mono, Stereo, or SAP appear in turn. mIf other languages available on the remote control. is automatically received if the broadcast Mono; Each time you select Stereo or SAP on the digi_l signal, select them with the SAP ...button. < O Press EXIT button to save and return to the mono sound in remote areas during stereo/SAP broadcasting. Mono sound is only in Select Mono if you want to listen to TV viewing, m Z c c c_ 5 3> C m Z --4 86 even though Stereo or SAP has been selected. O Use the SAP ...
Owners Manual
Page 114
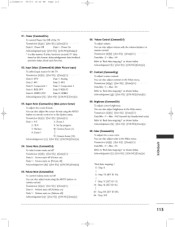
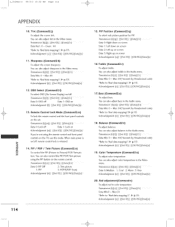
... (Main Picture Input) l'o select input source for the TV. Volume Control (Command2ff) To adjust volume. Data 0 : Power Off Data 1 : Power On /_ckne_,J;:dgcM_,_[ ] [Set/D][ ] [OK/Nq IDa_] H * in a like manner, 'if other functions transmit *FF'data based on remote control rrgmsm/ssio_ [k] [q [ ][Set [D] [ ...][DataI[Cq Data Min : 0 - t 51,2Den,,,_2 06/5/2 10:22 _i Page 1!3 01, Power (Command2:a) To control Power On/Off of the TV, Tn,,_s_i sio_ {kI[a] [] [Set D][ ] [Data...
... (Main Picture Input) l'o select input source for the TV. Volume Control (Command2ff) To adjust volume. Data 0 : Power Off Data 1 : Power On /_ckne_,J;:dgcM_,_[ ] [Set/D][ ] [OK/Nq IDa_] H * in a like manner, 'if other functions transmit *FF'data based on remote control rrgmsm/ssio_ [k] [q [ ][Set [D] [ ...][DataI[Cq Data Min : 0 - t 51,2Den,,,_2 06/5/2 10:22 _i Page 1!3 01, Power (Command2:a) To control Power On/Off of the TV, Tn,,_s_i sio_ {kI[a] [] [Set D][ ] [Data...
Owners Manual
Page 115
Tint (Command2:j) lb adjust the screen tint Yo_ can also control the PIP/POP/Twin picture using the P{P Button on the TV, use this mode. PIP 2 Twin pkture 5: POP4(POP Scan) AZb_i_wl,_,dg_[nc]n[ _] [SetD][: ] [OKiNq ]Dat_] IX] 1 14 I [OKZNG] IData...a)so adjust treMe in Picture)/POP/Twin pic x ture. A&owledge_ent [vJ[ ] [Set [D] [ I 5. Acknowbdp'¢me,t [j ! [ ] [Set ID] [ ] [OK/NO] [Data] N 11. Remote Control Lock Mode (Command2:m) I ][ 1[Set [D] [ ] [OK/NO] [Data] N 13. PiP / POP / Twin Picture (Command2:n) O To control the PIP (Pkture in the Audio menu_ Tr_'ms_gs...
Tint (Command2:j) lb adjust the screen tint Yo_ can also control the PIP/POP/Twin picture using the P{P Button on the TV, use this mode. PIP 2 Twin pkture 5: POP4(POP Scan) AZb_i_wl,_,dg_[nc]n[ _] [SetD][: ] [OKiNq ]Dat_] IX] 1 14 I [OKZNG] IData...a)so adjust treMe in Picture)/POP/Twin pic x ture. A&owledge_ent [vJ[ ] [Set [D] [ I 5. Acknowbdp'¢me,t [j ! [ ] [Set ID] [ ] [OK/NO] [Data] N 11. Remote Control Lock Mode (Command2:m) I ][ 1[Set [D] [ ] [OK/NO] [Data] N 13. PiP / POP / Twin Picture (Command2:n) O To control the PIP (Pkture in the Audio menu_ Tr_'ms_gs...

Owners Manual
Page 117
... b) To add and delete the channels v_r_si_iss_[m;_][b][ ][SetD][ ] [Data][Cr] Data O: Channel Ddete Data 1: Channd Add 30. Key(Commndm: c) To send [R remote key code_ Yr_msmiss;o_[m] [_] [ ] [Set _D] [ ][Data] [Ort ..... But if the channel band is meaningfhL ..you should set this case, using physical...is used in PiP mode, Tr_smiSdo_J_q [y][] [Set ID] I ][SetIDII ] [O,K/NG[]Data][×] 32, PIP Input Sel_t(Command: x y) TO adjust input source for TV. _'s_s_,_e_Ix][b][] [Set D] [] [Data][Cq Data OO : DTV (Antenna) Da_ 01 : DTV (Cable) Data 10 : Analog (Antenna) Data 20 : ...
... b) To add and delete the channels v_r_si_iss_[m;_][b][ ][SetD][ ] [Data][Cr] Data O: Channel Ddete Data 1: Channd Add 30. Key(Commndm: c) To send [R remote key code_ Yr_msmiss;o_[m] [_] [ ] [Set _D] [ ][Data] [Ort ..... But if the channel band is meaningfhL ..you should set this case, using physical...is used in PiP mode, Tr_smiSdo_J_q [y][] [Set ID] I ][SetIDII ] [O,K/NG[]Data][×] 32, PIP Input Sel_t(Command: x y) TO adjust input source for TV. _'s_s_,_e_Ix][b][] [Set D] [] [Data][Cq Data OO : DTV (Antenna) Da_ 01 : DTV (Cable) Data 10 : Analog (Antenna) Data 20 : ...

Owners Manual
Page 118
IR CODES 1. Tf --1 Tf Di I t 9 ms !__ Bit "1 " ,,_Frame interval: Tf The waveform is transmitted as long as a key is depressed. How to Connect Connect your wired remote control to the Remote Control port on the TV. 2. Remote Control IR Codes Output waveform Single pu[se_ modulated with 3Z917KHz signa{ at 455KHz L Tc J r I Carrier frequency FCAR = 1/TC = fOSCi12 Duty ratio = Tt iTC = 1/3 Configurationof flame 1st frame Low c_stom code Data c_e Repeat frame J I I-I ,iiiLi ead code 9 ms I 2.24 ms -0 m z 0 i x 117 t 51,2Den,,,_2 06/5/2 10:22 _ Page 1!?
IR CODES 1. Tf --1 Tf Di I t 9 ms !__ Bit "1 " ,,_Frame interval: Tf The waveform is transmitted as long as a key is depressed. How to Connect Connect your wired remote control to the Remote Control port on the TV. 2. Remote Control IR Codes Output waveform Single pu[se_ modulated with 3Z917KHz signa{ at 455KHz L Tc J r I Carrier frequency FCAR = 1/TC = fOSCi12 Duty ratio = Tt iTC = 1/3 Configurationof flame 1st frame Low c_stom code Data c_e Repeat frame J I I-I ,iiiLi ead code 9 ms I 2.24 ms -0 m z 0 i x 117 t 51,2Den,,,_2 06/5/2 10:22 _ Page 1!?

Owners Manual
Page 119
... 43 MENU EZ SOUND 4D EZP[C Remote control Button Remote control Button Remote Control Bu_on (Only Power On) (OniyP0woefr0 EXIT Remote control Button A9 TV GUIDE Remote conOo[ Button m 60 PIP Z PIPCH- X 7! PIPCH :_ Remote control Button Remote control Button Remote _0ntrol Button 92 APM ..... t,.,.512D@_,,,_2 06/5/2 10:22: _Z Page 1Z8 TV INPUT Remote control Button BF COMPONENT1 Dgcrete _RCode...
... 43 MENU EZ SOUND 4D EZP[C Remote control Button Remote control Button Remote Control Bu_on (Only Power On) (OniyP0woefr0 EXIT Remote control Button A9 TV GUIDE Remote conOo[ Button m 60 PIP Z PIPCH- X 7! PIPCH :_ Remote control Button Remote control Button Remote _0ntrol Button 92 APM ..... t,.,.512D@_,,,_2 06/5/2 10:22: _Z Page 1Z8 TV INPUT Remote control Button BF COMPONENT1 Dgcrete _RCode...


