

Owners Manual
Page 4
O Use only with the carl stand, tdpod, bracket, or table specified by _ ISCONNECTING DEVICE FROM MAINS Mains plug is the disconnecting device. Check the specification manual to dripping or splashing and no additional outlets or branch circuits. an authorized servicer. t_ -4 -< Z -4 Outdoor Use Marking : C _ WARNING - Wet Location Marking : Apparatus shall not ...
O Use only with the carl stand, tdpod, bracket, or table specified by _ ISCONNECTING DEVICE FROM MAINS Mains plug is the disconnecting device. Check the specification manual to dripping or splashing and no additional outlets or branch circuits. an authorized servicer. t_ -4 -< Z -4 Outdoor Use Marking : C _ WARNING - Wet Location Marking : Apparatus shall not ...
Owners Manual
Page 6
... Control 9 Programming Codes 120-122 Troubleshooting Checklist Maintenance 123-125 126 Product Specifications 127 After reading this manual keep it handy for CANADA only ........ 105 TV Rating French- Manual Color Temperature Control 73 XD 74 Advanced 75-76 - for future reference. S Black Level 76 Video... Audio Language 78 Auto Volume Leveler (EZ SoundRite 79 Auto Sound Control (EZ Sound 80 Manual Sound Control (EZ Sound-User Option Balance 81-82 83 TV Speakers On/Off Setup 84 BBE 85 Stereo/SAP Broadcasts Setup 86 _me Setting Auto Clock ...
... Control 9 Programming Codes 120-122 Troubleshooting Checklist Maintenance 123-125 126 Product Specifications 127 After reading this manual keep it handy for CANADA only ........ 105 TV Rating French- Manual Color Temperature Control 73 XD 74 Advanced 75-76 - for future reference. S Black Level 76 Video... Audio Language 78 Auto Volume Leveler (EZ SoundRite 79 Auto Sound Control (EZ Sound 80 Manual Sound Control (EZ Sound-User Option Balance 81-82 83 TV Speakers On/Off Setup 84 BBE 85 Stereo/SAP Broadcasts Setup 86 _me Setting Auto Clock ...

Owners Manual
Page 10
... Polishthe _r_n with the cloth, * Slightly wip stained s_t on the _rior on[ y with the polishing doth for the product. D-sub 15 pin Cable 9 Owner's Manual Batteries D Remote Control i Z O c -4 O Z Power Cord 2-Bolts (Refer to maintain standard compliance for the product extedor if them is missing, please con- Please _._ cautions of the...
... Polishthe _r_n with the cloth, * Slightly wip stained s_t on the _rior on[ y with the polishing doth for the product. D-sub 15 pin Cable 9 Owner's Manual Batteries D Remote Control i Z O c -4 O Z Power Cord 2-Bolts (Refer to maintain standard compliance for the product extedor if them is missing, please con- Please _._ cautions of the...
Owners Manual
Page 22
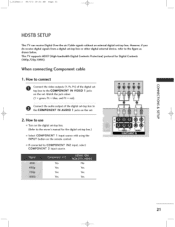
... Z on the remote control. green, PB -- red). -4 O Z O Connect the audio output of the digital set O Z top box to the owner's manual for Digital Contents When connecting Component cab[e to connect N Connect the video outputs (Y, Ps, PR) of the digital set-top box to the COMPONENT IN... AUDIO 1 jacks on the set m -4 C 2. If connected to the figure as This TV supports HDCP (High-bandwidth (480p,720p, 10801). However, if you to COMPONENT IN2 input, select COMPONENT 2 input source. Match the iack colors m t_ (Y...
... Z on the remote control. green, PB -- red). -4 O Z O Connect the audio output of the digital set O Z top box to the owner's manual for Digital Contents When connecting Component cab[e to connect N Connect the video outputs (Y, Ps, PR) of the digital set-top box to the COMPONENT IN... AUDIO 1 jacks on the set m -4 C 2. If connected to the figure as This TV supports HDCP (High-bandwidth (480p,720p, 10801). However, if you to COMPONENT IN2 input, select COMPONENT 2 input source. Match the iack colors m t_ (Y...
Owners Manual
Page 23
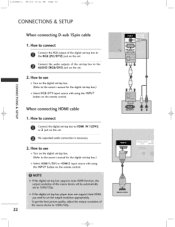
... to connect O onnect the RGI3 output of the digi_l set-top box to use Turn on the digital set-top box. (Refer to the owner's manual for the digital set , O CAoUnDnIeOct t(hReGBa/DuVdiIo) outpjauctks onofthtehe sest.et-top box to HDMI IN 1 (DVI) or 2 jack on the remote control... set -top box.) Z Z m ni_Select RGB-DTV input source with using the INPUT N -4 button on the digital set-top box_ N 0 (Refer to the owner's manual for the digital set -top box to the 2. How to use Turn on the remote control. Z When connecting HDMI cable m c 1. How to connect O onnect the...
... to connect O onnect the RGI3 output of the digi_l set-top box to use Turn on the digital set-top box. (Refer to the owner's manual for the digital set , O CAoUnDnIeOct t(hReGBa/DuVdiIo) outpjauctks onofthtehe sest.et-top box to HDMI IN 1 (DVI) or 2 jack on the remote control... set -top box.) Z Z m ni_Select RGB-DTV input source with using the INPUT N -4 button on the digital set-top box_ N 0 (Refer to the owner's manual for the digital set -top box to the 2. How to use Turn on the remote control. Z When connecting HDMI cable m c 1. How to connect O onnect the...
Owners Manual
Page 24
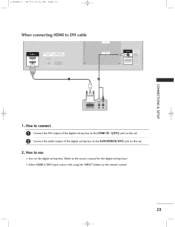
How to connect O Connect the DVI output of the digital set-top box to the owner's manual for the digital set . t,_,_51,2Deno,_Z 06/9/2 10:21 _ Page 23 When connecting HDM[ to the HDMI IN 1 (DVi) jack on the set -top box.) 01_Select HDM[1/DV[ input source with using the INPUT button on the set 2. How to use Turn on the digit[ set-top box. (Refer to the AUDIO(RGB/DVI) jack on the remote control. 23 Connect the audio output of the digital setotop box to DVJ cable N O Z Z m t_ -4 O Z m -4 c 1.
How to connect O Connect the DVI output of the digital set-top box to the owner's manual for the digital set . t,_,_51,2Deno,_Z 06/9/2 10:21 _ Page 23 When connecting HDM[ to the HDMI IN 1 (DVi) jack on the set -top box.) 01_Select HDM[1/DV[ input source with using the INPUT button on the set 2. How to use Turn on the digit[ set-top box. (Refer to the AUDIO(RGB/DVI) jack on the remote control. 23 Connect the audio output of the digital setotop box to DVJ cable N O Z Z m t_ -4 O Z m -4 c 1.
Owners Manual
Page 25
...manufactures and in socket of time. This phenomenon is used; How to use Set VCR output switch to 3 or 4 and then tune TV to the VCR owner% manual.) 24 t,_,_5lr2Den°,_! 06/9/2 10:21 _ Page 24 CONNECTIONS & SETUP VCR SETUP To avoid picture noise (interference), leave an adequate... distance between the VCR and TV Use the ISM feature in the Option menu to avoid having a fixed image remain on the screen for...
...manufactures and in socket of time. This phenomenon is used; How to use Set VCR output switch to 3 or 4 and then tune TV to the VCR owner% manual.) 24 t,_,_5lr2Den°,_! 06/9/2 10:21 _ Page 24 CONNECTIONS & SETUP VCR SETUP To avoid picture noise (interference), leave an adequate... distance between the VCR and TV Use the ISM feature in the Option menu to avoid having a fixed image remain on the screen for...
Owners Manual
Page 26
If connected to connect O onnect the AUDIO/VIDEO jacks between TV and VCR. m N -4 O Z m -4 When connecting with a P.CA cable 1. How to use insert a video tape into the VCR and press PLAY on the VCR. (Refer to the VCR owner's manual,) Select AV1 input source with using the INPUT button on N O the remote control, Z Z If...
If connected to connect O onnect the AUDIO/VIDEO jacks between TV and VCR. m N -4 O Z m -4 When connecting with a P.CA cable 1. How to use insert a video tape into the VCR and press PLAY on the VCR. (Refer to the VCR owner's manual,) Select AV1 input source with using the INPUT button on N O the remote control, Z Z If...

Owners Manual
Page 28
See the external audio equipment N O instruction manual for operation. t,_,_51.2Deno,_! 06/9/2 10:21 _ Page 2'7 DIGITAL AUDIO OUTPUT Send the TV's audio to the digital audio (optical) input on the audio equipment 0 Set the "TV Speaker option o Off" in the AUDIO menu. (_ p.84). Z Z m t_ -4 O Z m -4 C 27 How to connect O CAuodninoec(tOpotniceale) ndOuotfpaunt oppotirct.al cable to the TV Digital Connect the other end of the optical cable to external audio equipment via the Digital Audio Output (Optical) port, 1.
See the external audio equipment N O instruction manual for operation. t,_,_51.2Deno,_! 06/9/2 10:21 _ Page 2'7 DIGITAL AUDIO OUTPUT Send the TV's audio to the digital audio (optical) input on the audio equipment 0 Set the "TV Speaker option o Off" in the AUDIO menu. (_ p.84). Z Z m t_ -4 O Z m -4 C 27 How to connect O CAuodninoec(tOpotniceale) ndOuotfpaunt oppotirct.al cable to the TV Digital Connect the other end of the optical cable to external audio equipment via the Digital Audio Output (Optical) port, 1.
Owners Manual
Page 30
O Connect the audio outputs of the DVD to the DVD player's manual for ope_ting instructions. }; I Component ports on the TV Video output ports on the remote control. Select COMPONENT 1 input source with using the INPUT button on DVD player 29 Refer to the COMPONENT IN ...
O Connect the audio outputs of the DVD to the DVD player's manual for ope_ting instructions. }; I Component ports on the TV Video output ports on the remote control. Select COMPONENT 1 input source with using the INPUT button on DVD player 29 Refer to the COMPONENT IN ...
Owners Manual
Page 31
... to use N f_Turn on the set . N -4 iiiiiIifi connected to AV IN2, select AM2 input source_ z f_ Refer to the DVD player's manual for ope_ting instructions. O Z f_Select AV1 input source with using the INPUT button on Z m the remote control. No separated audio connection is necessary....connect O onnect the S-VIDEO output of the DVD to the S-VIDEO input on the remote control i,l_Refer to the DVD player's manual for operating instructions. 30 Cinopnunt ejcatcktsheonauthdeio soeut.tputs of the DVD to connect O onnect the HDMI output of the DVD totheAUDIO 2. ...
... to use N f_Turn on the set . N -4 iiiiiIifi connected to AV IN2, select AM2 input source_ z f_ Refer to the DVD player's manual for ope_ting instructions. O Z f_Select AV1 input source with using the INPUT button on Z m the remote control. No separated audio connection is necessary....connect O onnect the S-VIDEO output of the DVD to the S-VIDEO input on the remote control i,l_Refer to the DVD player's manual for operating instructions. 30 Cinopnunt ejcatcktsheonauthdeio soeut.tputs of the DVD to connect O onnect the HDMI output of the DVD totheAUDIO 2. ...
Owners Manual
Page 57
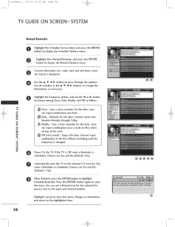
...to close the menu. Use the & V _ _ button to close the menu, change the information, as follows : Once - O Power On the TV, if the TV is Off, when a Reminder is displayed. Reminds for the time, channel, input combination once a week on this selected day of the week. Off (not... (Default = No) O When finished, press the ENTER button to highlight Schedule Reminder. Current information (Le. t,_,_51,2D0e6n/o9,/_2Z10:21_ Page56 TV GUIDE ON SCREEN SYSTEM Manual Reminder Highlight the Schedule Service label, and press the MENU button to display the Remind Options menu. Highlight New...
...to close the menu. Use the & V _ _ button to close the menu, change the information, as follows : Once - O Power On the TV, if the TV is Off, when a Reminder is displayed. Reminds for the time, channel, input combination once a week on this selected day of the week. Off (not... (Default = No) O When finished, press the ENTER button to highlight Schedule Reminder. Current information (Le. t,_,_51,2D0e6n/o9,/_2Z10:21_ Page56 TV GUIDE ON SCREEN SYSTEM Manual Reminder Highlight the Schedule Service label, and press the MENU button to display the Remind Options menu. Highlight New...
Owners Manual
Page 63
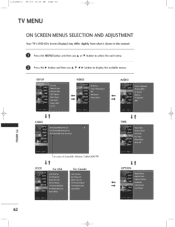
O Press the MENU button and then use A or Y button to select the each menu, O Press the !_ button and then use A Y 4 _ button to display the available menus. t 51,2Deno,,2 06/5/2 $0:22: _ Page 62 TV MENU ON SCREENMENUS SELECTION AND ADJUSTMENT Your TV's OSD (On Screen Display) may differ slightly from what is shown in this manual. SETUP VIDEO AUDIO It CABLE m Z c !t LOCK In case of Scientific Atlanta CableCARDTM For USA For Canada tt TIME It OPTION 62
O Press the MENU button and then use A or Y button to select the each menu, O Press the !_ button and then use A Y 4 _ button to display the available menus. t 51,2Deno,,2 06/5/2 $0:22: _ Page 62 TV MENU ON SCREENMENUS SELECTION AND ADJUSTMENT Your TV's OSD (On Screen Display) may differ slightly from what is shown in this manual. SETUP VIDEO AUDIO It CABLE m Z c !t LOCK In case of Scientific Atlanta CableCARDTM For USA For Canada tt TIME It OPTION 62
Owners Manual
Page 65
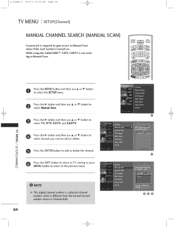
r Y button to m O Press the _ button and then use A or Y button to Manual Scan menu if the Lock System is turned on, While using the CableCARD "_, CATV, CADTV is required to gain access to O serleescst thTeV,_ DTbVut,tonCAaTnVd... enaun, d then use A or Y button Pserelescst thMean_uabl uStttoanrt and then use A or Y button to Z select channel you want to TV viewing or press r"- t 51,2Deno,,2 06/5/2 $0:22: _ Page 64 TV MENU I SETUP(Charme[) MANUAL CHANNEL SEARCH(MANUAL SCAN) A password is not working in Manual Scan. MENU button to return to the previous menu. 64 @@@
r Y button to m O Press the _ button and then use A or Y button to Manual Scan menu if the Lock System is turned on, While using the CableCARD "_, CATV, CADTV is required to gain access to O serleescst thTeV,_ DTbVut,tonCAaTnVd... enaun, d then use A or Y button Pserelescst thMean_uabl uStttoanrt and then use A or Y button to Z select channel you want to TV viewing or press r"- t 51,2Deno,,2 06/5/2 $0:22: _ Page 64 TV MENU I SETUP(Charme[) MANUAL CHANNEL SEARCH(MANUAL SCAN) A password is not working in Manual Scan. MENU button to return to the previous menu. 64 @@@
Owners Manual
Page 72
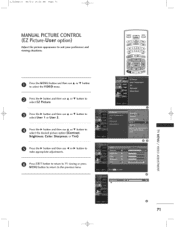
...then use @ or _ button to select the desired picture option (Contrast Brightness, Color, Sharpness, or Tint). O Press EXIT button to return to TV viewing or press MENU button to return to select User 1 or User 2. O ress the _ button and then use A or Y button to make appropriate... adjustments. t,.,.51,2Deno,,2 06/5/2 10:22: _ Page 71 MANUAL PICTURECONTROL (EZ Picture-User option) Adjust the picture appearance viewing situations. O Press the _ button and then use A or Y button to select EZ Picture....
...then use @ or _ button to select the desired picture option (Contrast Brightness, Color, Sharpness, or Tint). O Press EXIT button to return to TV viewing or press MENU button to return to select User 1 or User 2. O ress the _ button and then use A or Y button to make appropriate... adjustments. t,.,.51,2Deno,,2 06/5/2 10:22: _ Page 71 MANUAL PICTURECONTROL (EZ Picture-User option) Adjust the picture appearance viewing situations. O Press the _ button and then use A or Y button to select EZ Picture....
Owners Manual
Page 74
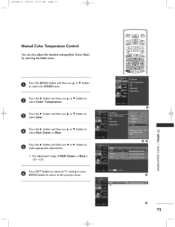
... appropriate adjustments. _D 0 The adjustment range of RGB, Green, or Blue is -20~ +20. C Z PMrEeNssUEXbITuttobnutttoonrettourrnetutornthteo TprVevvioieuwsinmg eonru.press T t,..51,2Deno,,2 06/5/2 10:22: _ Page 73 Manual Color Temperature Control You can also adjust the detailed settings(Red, by selecting the User menu. use A or T button to -4 E m Z c O Press the _ button and then...
... appropriate adjustments. _D 0 The adjustment range of RGB, Green, or Blue is -20~ +20. C Z PMrEeNssUEXbITuttobnutttoonrettourrnetutornthteo TprVevvioieuwsinmg eonru.press T t,..51,2Deno,,2 06/5/2 10:22: _ Page 73 Manual Color Temperature Control You can also adjust the detailed settings(Red, by selecting the User menu. use A or T button to -4 E m Z c O Press the _ button and then...
Owners Manual
Page 75
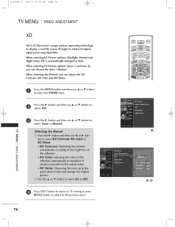
...you can adjust the XD Contrast_ XD color and XD Noise. t,..51,2Deno,,2 06/5/2 $0:22: _ Page 74 TV MENU I and User 2), you can choose the Auto / Manual. O Ptoressesltehcet tMheENVUIDEbOuttomnenaun.d then use A or T button Press the I_ button and then use A or Y ...button to Auto. improving technology an advanced digital When selecting EZ Picture options (Daylight, Normal and Night time), XD is LG Electronic's unique picture to...
...you can adjust the XD Contrast_ XD color and XD Noise. t,..51,2Deno,,2 06/5/2 $0:22: _ Page 74 TV MENU I and User 2), you can choose the Auto / Manual. O Ptoressesltehcet tMheENVUIDEbOuttomnenaun.d then use A or T button Press the I_ button and then use A or Y ...button to Auto. improving technology an advanced digital When selecting EZ Picture options (Daylight, Normal and Night time), XD is LG Electronic's unique picture to...
Owners Manual
Page 82
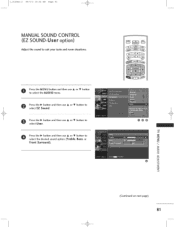
t 51,2Deno,,2 06/5/2 $0:22: _ Page 81 MANUAL SOUND CONTROL (EZ SOUND-User option) Adjust the sound to select the desired sound option (Treble, [lass, or Front Surround). @@@ -4 m z C C 0 C z (Continued on next page) 81 O Press the _ button and then use A or Y button to suit your taste and room situations. Press the _ button and then use A or Y button to select U set. O Ptoressseletchte thMeENAUUDIObuttonmenaun.d then use & or Y button Press the _ button and then use A or Y button to select EZ Sound.
t 51,2Deno,,2 06/5/2 $0:22: _ Page 81 MANUAL SOUND CONTROL (EZ SOUND-User option) Adjust the sound to select the desired sound option (Treble, [lass, or Front Surround). @@@ -4 m z C C 0 C z (Continued on next page) 81 O Press the _ button and then use A or Y button to suit your taste and room situations. Press the _ button and then use A or Y button to select U set. O Ptoressseletchte thMeENAUUDIObuttonmenaun.d then use & or Y button Press the _ button and then use A or Y button to select EZ Sound.
Owners Manual
Page 83
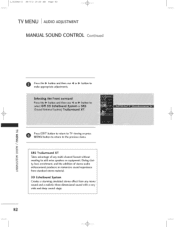
... any mono sound and a realistic three-dimensional sound with a very wide and deep sound stage. 82 Dialog clari- t,..51,2Deno,,2 06/5/2 10:22: _ Page 82 TV MENU ) AUDIO ADJUSTMENT MANUAL SOUND CONTROL O Press the _ button and then use _l or t_ button to add extra speakers or equipment.
... any mono sound and a realistic three-dimensional sound with a very wide and deep sound stage. 82 Dialog clari- t,..51,2Deno,,2 06/5/2 10:22: _ Page 82 TV MENU ) AUDIO ADJUSTMENT MANUAL SOUND CONTROL O Press the _ button and then use _l or t_ button to add extra speakers or equipment.
Owners Manual
Page 88
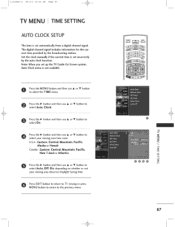
Note: When you set incorrectly by the broadcasting station. O Press EXIT button to return to TV viewing or press MENU button to return to select On. TV Guide On Screen system, Auto Clock menu is set automatically from a digital channel signal. nd then use A or Y button to select your... viewing area observes Daylight Saving time. Set the clock manually if the current time is set up the....
Note: When you set incorrectly by the broadcasting station. O Press EXIT button to return to TV viewing or press MENU button to return to select On. TV Guide On Screen system, Auto Clock menu is set automatically from a digital channel signal. nd then use A or Y button to select your... viewing area observes Daylight Saving time. Set the clock manually if the current time is set up the....

