
Owner's Manual (English)
Page 3
.... Record model number and serial number of these files, you will need to your set . P/NO : MFL34797023 (0709-REV00) Printed in an electronic version. LCD TV PLASMA TV OWNER'S MANUAL LCD TV MODEL 32LB9D PLASMA TV MODELS 42PB4DA 50PB4DA 60PB4DA Please read these LG TV sets is located on the CD-ROM provided in Korea www...
.... Record model number and serial number of these files, you will need to your set . P/NO : MFL34797023 (0709-REV00) Printed in an electronic version. LCD TV PLASMA TV OWNER'S MANUAL LCD TV MODEL 32LB9D PLASMA TV MODELS 42PB4DA 50PB4DA 60PB4DA Please read these LG TV sets is located on the CD-ROM provided in Korea www...

Owner's Manual (English)
Page 4
.../CAUTION TO REDUCE THE RISK OF FIRE AND ELECTRIC SHOCK, DO NOT EXPOSE THIS PRODUCT TO RAIN OR MOISTURE. NOTE TO CABLE/TV INSTALLER This reminder is intended to alert the user to Article 820-40 of important operating and maintenance (servicing) instructions in the...between the equipment and receiver. - Any changes or modifications not expressly approved by turning the equipment off and on a circuit different from LG Electronics. These limits are designed to provide reasonable protection against harmful interference in particular, specifies that the cable ground shall be determined by...
.../CAUTION TO REDUCE THE RISK OF FIRE AND ELECTRIC SHOCK, DO NOT EXPOSE THIS PRODUCT TO RAIN OR MOISTURE. NOTE TO CABLE/TV INSTALLER This reminder is intended to alert the user to Article 820-40 of important operating and maintenance (servicing) instructions in the...between the equipment and receiver. - Any changes or modifications not expressly approved by turning the equipment off and on a circuit different from LG Electronics. These limits are designed to provide reasonable protection against harmful interference in particular, specifies that the cable ground shall be determined by...
Owner's Manual (English)
Page 7
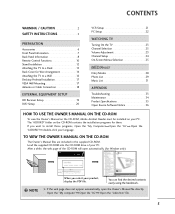
...Antenna or Cable Connection 18 EXTERNAL EQUIPMENT SETUP HD Receiver Setup 19 DVD Setup 20 VCR Setup 21 PC Setup 22 WATCHING TV Turning On the TV 23 Channel Selection 23 Volume Adjustment 23 Channel Setup 24 On-Screen Menus Selection 25 MEDIAHOST MEDIA Entry Modes 28 HOST ...Information 7 Back Panel Information 8 Remote Control Functions 10 Stand Installation 12 Attaching the TV to a Desk 13 Back Cover for Wire Arrangement 14 Attaching the TV to install those programs, Open the "My Computer" Open the "LG" Open the "ACRORD" double-click your PC. Load the supplied CD-ROM ...
...Antenna or Cable Connection 18 EXTERNAL EQUIPMENT SETUP HD Receiver Setup 19 DVD Setup 20 VCR Setup 21 PC Setup 22 WATCHING TV Turning On the TV 23 Channel Selection 23 Volume Adjustment 23 Channel Setup 24 On-Screen Menus Selection 25 MEDIAHOST MEDIA Entry Modes 28 HOST ...Information 7 Back Panel Information 8 Remote Control Functions 10 Stand Installation 12 Attaching the TV to a Desk 13 Back Cover for Wire Arrangement 14 Attaching the TV to install those programs, Open the "My Computer" Open the "LG" Open the "ACRORD" double-click your PC. Load the supplied CD-ROM ...

Owner's Manual (English)
Page 8
... Bolts (Refer to p.13) with the polishing cloth for all models) For 42/50 inches For 60 inches 2- MENU TV INPUT MEDIA HOST BACK C AUTO DEMO APM M/C EJECT TIMER RATIO SIMPLINK STB BRIGHT - TV Bracket 2- MENU TV INPUT TIMER MEDIA HOST BRIGHT + RATIO SIMPLINK STB BRIGHT - If an accessory ...75ohm Round Cable Option Extras Polishing Cloth * Slightly wipe stained spot on the exterior only with the twist holder. For Plasma TV models (This feature is not available for the product exterior if there is missing, please contact the dealer where you purchased the ...
... Bolts (Refer to p.13) with the polishing cloth for all models) For 42/50 inches For 60 inches 2- MENU TV INPUT MEDIA HOST BACK C AUTO DEMO APM M/C EJECT TIMER RATIO SIMPLINK STB BRIGHT - TV Bracket 2- MENU TV INPUT TIMER MEDIA HOST BRIGHT + RATIO SIMPLINK STB BRIGHT - If an accessory ...75ohm Round Cable Option Extras Polishing Cloth * Slightly wipe stained spot on the exterior only with the twist holder. For Plasma TV models (This feature is not available for the product exterior if there is missing, please contact the dealer where you purchased the ...
Owner's Manual (English)
Page 9
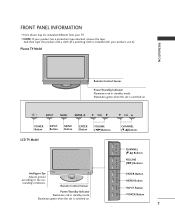
...Illuminates red in standby mode. Illuminates green when the set is switched on . ENTER Button MENU Button INPUT Button POWER Button 7 Plasma TV Model PREPARATION Remote Control Sensor Power/Standby Indicator Illuminates red in standby mode. FRONT PANEL INFORMATION I NOTE: If your product has... INPUT MENU ENTER VOL CH INPUT MENU ENTER VOL CH POWER Button INPUT Button MENU Button ENTER Button VOLUME (F,G)Buttons LCD TV Model VOL CH CH CHANNEL (E,D)Buttons CHANNEL (E,D) Buttons VOLUME (F,G) Buttons VOL ENTER MENU INPUT ENTER MENU INPUT Intelligent Eye ...
...Illuminates red in standby mode. Illuminates green when the set is switched on . ENTER Button MENU Button INPUT Button POWER Button 7 Plasma TV Model PREPARATION Remote Control Sensor Power/Standby Indicator Illuminates red in standby mode. FRONT PANEL INFORMATION I NOTE: If your product has... INPUT MENU ENTER VOL CH INPUT MENU ENTER VOL CH POWER Button INPUT Button MENU Button ENTER Button VOLUME (F,G)Buttons LCD TV Model VOL CH CH CHANNEL (E,D)Buttons CHANNEL (E,D) Buttons VOLUME (F,G) Buttons VOL ENTER MENU INPUT ENTER MENU INPUT Intelligent Eye ...

Owner's Manual (English)
Page 11
.... 7 DIGITAL AUDIO OUT Connect digital audio to 1, 2 or 3. Or DVI (VIDEO) signal to the 1, 2 or 3 port with AC power. Caution: Never attempt to operate the TV on a PC. 6 ANTENNA/CABLE IN Connect over-the air signals to these jacks. PREPARATION 1 HDMI/DVI IN Connect a HDMI signal to various types of equipment...
.... 7 DIGITAL AUDIO OUT Connect digital audio to 1, 2 or 3. Or DVI (VIDEO) signal to the 1, 2 or 3 port with AC power. Caution: Never attempt to operate the TV on a PC. 6 ANTENNA/CABLE IN Connect over-the air signals to these jacks. PREPARATION 1 HDMI/DVI IN Connect a HDMI signal to various types of equipment...

Owner's Manual (English)
Page 12
... 2-2, etc. SIMPLINK See a list of time before your preference. NUMBER button BACK Tune to the last channel viewed. - (DASH) Used to TV viewing from any menu. buttons MENU Displays the main menu. RATIO Change the aspect ratio. CHANNEL UP/DOWN Select available channels. MENU BRIGHT + TIMER ...the SimpLink menu appears at the remote control sensor on -screen menus and adjust the system set(Up/Down/Left Right/ENTER) tings to TV. TV INPUT STB MEDIA HOST BRIGHT - BRIGHT +/- VOLUME UP Increase/decrease the sound level. /DOWN MUTE Switch the sound on screen. MEDIAHOST ...
... 2-2, etc. SIMPLINK See a list of time before your preference. NUMBER button BACK Tune to the last channel viewed. - (DASH) Used to TV viewing from any menu. buttons MENU Displays the main menu. RATIO Change the aspect ratio. CHANNEL UP/DOWN Select available channels. MENU BRIGHT + TIMER ...the SimpLink menu appears at the remote control sensor on -screen menus and adjust the system set(Up/Down/Left Right/ENTER) tings to TV. TV INPUT STB MEDIA HOST BRIGHT - BRIGHT +/- VOLUME UP Increase/decrease the sound level. /DOWN MUTE Switch the sound on screen. MEDIAHOST ...

Owner's Manual (English)
Page 13
... Adjust the factory preset picture depend on the mode. CC Select the Caption On/Off. I Install two 1.5V AA batteries. TV INPUT STB MEDIA HOST TV INPUT STB MEDIA HOST BRIGHT - Change the audio language DTV mode. Installing Batteries Remote control effective range I Use a remote control...SOUND Select the appropriate type of program. Don't mix old or used for type of sound for MEDIAHOST the selected product can control the TV. TV INPUT In AV 1-2, Component 1-2, RGB-PC, HDMI1, HDMI2 and HDMI3 input sources, screen returns to 7 meters distanBACK ce and BACK 30...
... Adjust the factory preset picture depend on the mode. CC Select the Caption On/Off. I Install two 1.5V AA batteries. TV INPUT STB MEDIA HOST TV INPUT STB MEDIA HOST BRIGHT - Change the audio language DTV mode. Installing Batteries Remote control effective range I Use a remote control...SOUND Select the appropriate type of program. Don't mix old or used for type of sound for MEDIAHOST the selected product can control the TV. TV INPUT In AV 1-2, Component 1-2, RGB-PC, HDMI1, HDMI2 and HDMI3 input sources, screen returns to 7 meters distanBACK ce and BACK 30...

Owner's Manual (English)
Page 15
PREPARATION ATTACHING THE TV TO A DESK (Only 32LB9D model) The TV must be attached to a desk so it cannot be pulled in a forward/backward direction, potentially causing injury or damaging the product. 1-Screw (provided as parts of the product) Stand Desk WARNING G This apparatus must be securely attached to the floor/wall per installation instructions. Tipping, shaking, or rocking the machine may cause injury/death. 13
PREPARATION ATTACHING THE TV TO A DESK (Only 32LB9D model) The TV must be attached to a desk so it cannot be pulled in a forward/backward direction, potentially causing injury or damaging the product. 1-Screw (provided as parts of the product) Stand Desk WARNING G This apparatus must be securely attached to the floor/wall per installation instructions. Tipping, shaking, or rocking the machine may cause injury/death. 13

Owner's Manual (English)
Page 16
PREPARATION PREPARATION BACK COVER FOR WIRE ARRANGEMENT I Here shown may be somewhat different from your TV. CABLE MANAGEMENT 2 Connect the cables as shown. 14 To connect an additional equipment, see the EXTERNAL EQUIPMENT SETUP section. 3 Install the CABLE MANAGEMENT as necessary. Plasma TV Model 1 Hold the CABLE MANAGEMENT with both hands and pull it backward as shown.
PREPARATION PREPARATION BACK COVER FOR WIRE ARRANGEMENT I Here shown may be somewhat different from your TV. CABLE MANAGEMENT 2 Connect the cables as shown. 14 To connect an additional equipment, see the EXTERNAL EQUIPMENT SETUP section. 3 Install the CABLE MANAGEMENT as necessary. Plasma TV Model 1 Hold the CABLE MANAGEMENT with both hands and pull it backward as shown.

Owner's Manual (English)
Page 17
... section. 2 Install the CABLE MANAGEMENT as shown. (Insert it out as necessary. NOTE G Do not hold the CABLE MANAGEMENT when moving the product. - PREPARATION LCD TV Model 1 Connect the cables as holding the loops on the both sides of the cable management.) 3 Bundle the cables using the supplied TWISTER HOLDER. (This...
... section. 2 Install the CABLE MANAGEMENT as shown. (Insert it out as necessary. NOTE G Do not hold the CABLE MANAGEMENT when moving the product. - PREPARATION LCD TV Model 1 Connect the cables as holding the loops on the both sides of the cable management.) 3 Bundle the cables using the supplied TWISTER HOLDER. (This...

Owner's Manual (English)
Page 18
... loosen the bolts. Caution: Please make sure that you set up the TV close to a wall so it cannot fall over if pushed backwards. Plasma TV Model 42/50 inches 60 inches LCD TV Model I Insert the eye-bolts (or TV brackets and bolts) to tighten the product to the wall as parts of... I Use a sturdy rope (not provided as shown in the product. Ensure the eye-bolts or brackets are tightened securely. PREPARATION PREPARATION ATTACHING THE TV TO A WALL I This feature is safer to tie the rope so it becomes horizontal between the wall and the product. 16 We recommend that ...
... loosen the bolts. Caution: Please make sure that you set up the TV close to a wall so it cannot fall over if pushed backwards. Plasma TV Model 42/50 inches 60 inches LCD TV Model I Insert the eye-bolts (or TV brackets and bolts) to tighten the product to the wall as parts of... I Use a sturdy rope (not provided as shown in the product. Ensure the eye-bolts or brackets are tightened securely. PREPARATION PREPARATION ATTACHING THE TV TO A WALL I This feature is safer to tie the rope so it becomes horizontal between the wall and the product. 16 We recommend that ...

Owner's Manual (English)
Page 19
Plasma TV Model LCD TV Model 4 inches 4 inches 4 inches 4 inches 4 inches 4 inches 4 inches 4 inches CAUTION G Ensure adequate ventilation by following the clearance recommendations. For further information, refer to the VESA ... the wall mount used. VESA WALL MOUNTING This product accepts a VESA-compliant mounting interface pad. (optional) There 4 threaded holes are available for attaching the bracket. Plasma TV Model 600 mm LCD TV Model 200 mm 400 mm 100 mm R R !
Plasma TV Model LCD TV Model 4 inches 4 inches 4 inches 4 inches 4 inches 4 inches 4 inches 4 inches CAUTION G Ensure adequate ventilation by following the clearance recommendations. For further information, refer to the VESA ... the wall mount used. VESA WALL MOUNTING This product accepts a VESA-compliant mounting interface pad. (optional) There 4 threaded holes are available for attaching the bracket. Plasma TV Model 600 mm LCD TV Model 200 mm 400 mm 100 mm R R !

Owner's Manual (English)
Page 20
.... 18 R Wall Antenna Socket Outdoor Antenna (VHF, UHF) 2. I If the antenna is not installed properly, contact your dealer for two TV's, install a 2-Way Signal Splitter. R PREPARATION PREPARATION ANTENNA OR CABLE CONNECTION R 1. For optimum picture quality, adjust antenna direction if needed. ...a Cable Box Connections. I To improve the picture quality in a poor signal area, please purchase a signal amplifier and install properly. Cable Cable TV Wall Jack Multi-family Dwellings/Apartments (Connect to wall antenna socket) RF Coaxial Wire (75 ohm) R ANTENNA/ CABLE IN ( ) ( )...
.... 18 R Wall Antenna Socket Outdoor Antenna (VHF, UHF) 2. I If the antenna is not installed properly, contact your dealer for two TV's, install a 2-Way Signal Splitter. R PREPARATION PREPARATION ANTENNA OR CABLE CONNECTION R 1. For optimum picture quality, adjust antenna direction if needed. ...a Cable Box Connections. I To improve the picture quality in a poor signal area, please purchase a signal amplifier and install properly. Cable Cable TV Wall Jack Multi-family Dwellings/Apartments (Connect to wall antenna socket) RF Coaxial Wire (75 ohm) R ANTENNA/ CABLE IN ( ) ( )...

Owner's Manual (English)
Page 21
... top box to 2 the COMPONENT IN AUDIO 1 jacks on the digital set -top box or other digital external device, refer to the owner's manual for Plasma TV model. Match the jack colors (Y = green, PB = blue, and PR = red). Y PB PR L R Signal 480i 480p 720p 1080i 1080p Component 1/2 ...of EXTERNAL EQUIPMENT SETUP mainly use I Turn on the set . How to use picture for the digital set -top box. HD RECEIVER SETUP This TV can receive Digital Over-the-air/Cable signals without an external digital set -top box. However, if you have finished connecting all equipment. operation) 1...
... top box to 2 the COMPONENT IN AUDIO 1 jacks on the digital set -top box or other digital external device, refer to the owner's manual for Plasma TV model. Match the jack colors (Y = green, PB = blue, and PR = red). Y PB PR L R Signal 480i 480p 720p 1080i 1080p Component 1/2 ...of EXTERNAL EQUIPMENT SETUP mainly use I Turn on the set . How to use picture for the digital set -top box. HD RECEIVER SETUP This TV can receive Digital Over-the-air/Cable signals without an external digital set -top box. However, if you have finished connecting all equipment. operation) 1...

Owner's Manual (English)
Page 23
... to the VCR owner's manual.) I Select A V 1 input source by using the INPUT button on the VCR. (Refer to connect 1 Connect the AUDIO/VIDEO jacks between TV and VCR. How to use I Insert a video tape into the VCR and press PLAY on the remote control. Match the jack colors (Video = yellow, Audio...
... to the VCR owner's manual.) I Select A V 1 input source by using the INPUT button on the VCR. (Refer to connect 1 Connect the AUDIO/VIDEO jacks between TV and VCR. How to use I Insert a video tape into the VCR and press PLAY on the remote control. Match the jack colors (Video = yellow, Audio...

Owner's Manual (English)
Page 24
....720 47.130 22 70.08 70.08 59.94 60.31 60.00 59.87 59.799 59.65 * RGB-PC mode only * LCD TV only 2 1 DVI-PC OUTPUT L R ! How to connect 1 Connect the RGB output of the PC to the AUDIO (RGB/DVI) jack on the remote control. I Select... the set. 2 Connect the PC audio output to the HDMI/DVI I Turn on the PC and the TV. I Turn on the set . How to the AUDIO (RGB/DVI) jack on the PC and the TV. NOTE G Depending on the remote control. When connecting HDMI to find best picture in a little time. EXTERNAL...
....720 47.130 22 70.08 70.08 59.94 60.31 60.00 59.87 59.799 59.65 * RGB-PC mode only * LCD TV only 2 1 DVI-PC OUTPUT L R ! How to connect 1 Connect the RGB output of the PC to the AUDIO (RGB/DVI) jack on the remote control. I Select... the set. 2 Connect the PC audio output to the HDMI/DVI I Turn on the PC and the TV. I Turn on the set . How to the AUDIO (RGB/DVI) jack on the PC and the TV. NOTE G Depending on the remote control. When connecting HDMI to find best picture in a little time. EXTERNAL...

Owner's Manual (English)
Page 25
... 2 Select the viewing source by pressing the MUTE or VOL (D or E) button. CHANNEL SELECTION 1 Press the CH (D or E) or NUMBER buttonsTVtINoPUT select a channel number. The TV reverts to standby mode. I In standby mode to be away on the remote control. NOTE BACK PICTURE SOUND SAP CC MARK USB EJECT G If you... want to , even if the power cord is out. I This TV is programmed to remember which power state it was last set to switch the sound off, press the MUTE button. 3 You can cancel the Mute...
... 2 Select the viewing source by pressing the MUTE or VOL (D or E) button. CHANNEL SELECTION 1 Press the CH (D or E) or NUMBER buttonsTVtINoPUT select a channel number. The TV reverts to standby mode. I In standby mode to be away on the remote control. NOTE BACK PICTURE SOUND SAP CC MARK USB EJECT G If you... want to , even if the power cord is out. I This TV is programmed to remember which power state it was last set to switch the sound off, press the MUTE button. 3 You can cancel the Mute...
Owner's Manual (English)
Page 26
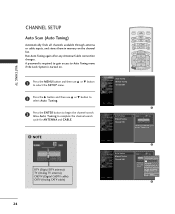
... EJECT 3 Press the ENTER button to stop the current scan and start ANALOG ANTENNA channel scan. NOTE 2 DTV (Digital DTV antenna) TV (Analog TV antenna) CADTV (Digital CADTV cable) CATV (Analog CATV cable) Auto Tuning Manual Tuning Channel Edit Processing Auto Tuning... Next MENU Prev 3... SOUND MARK USB EJE 24 TV INPUT STB MEDIA HOST BRIGHT - BACK CC Auto Tuning Manual Tuning Channel Edit BACK PICTURE SOUND SAP MARK USB EJECT 1 G Selection ( G ...
... EJECT 3 Press the ENTER button to stop the current scan and start ANALOG ANTENNA channel scan. NOTE 2 DTV (Digital DTV antenna) TV (Analog TV antenna) CADTV (Digital CADTV cable) CATV (Analog CATV cable) Auto Tuning Manual Tuning Channel Edit Processing Auto Tuning... Next MENU Prev 3... SOUND MARK USB EJE 24 TV INPUT STB MEDIA HOST BRIGHT - BACK CC Auto Tuning Manual Tuning Channel Edit BACK PICTURE SOUND SAP MARK USB EJECT 1 G Selection ( G ...

Owner's Manual (English)
Page 27
...button to select the each menu. 2 Press the G button and then use D E F G button to display the available menus. I All available TV channels are searched and stored automatically. I Black Level (Low, High) Adjusting the contrast and the brightness of the screen using the black level of three... desired picture format. : Set by program, 4:3, 16:9, Zoom1, Zoom2, Just Scan. ON-SCREEN MENUS SELECTION Your TV's OSD (On Screen Display) may differ slightly from what is LG Electronic's unique picture improving tech- I It is shown in the Picture Mode menu based on the program category: Intelligent...
...button to select the each menu. 2 Press the G button and then use D E F G button to display the available menus. I All available TV channels are searched and stored automatically. I Black Level (Low, High) Adjusting the contrast and the brightness of the screen using the black level of three... desired picture format. : Set by program, 4:3, 16:9, Zoom1, Zoom2, Just Scan. ON-SCREEN MENUS SELECTION Your TV's OSD (On Screen Display) may differ slightly from what is LG Electronic's unique picture improving tech- I It is shown in the Picture Mode menu based on the program category: Intelligent...


