Owners Manual
Page 1
operating LED TV MODELS 32LV24QQ-UA 42LV44QQ-UA 47LV44QQ-UA 55LV44QQ-UA P/NO : 194716001150 wwwJg,com iiiii LED TV Please read this manual carefully before your set and retain it for future reference.
operating LED TV MODELS 32LV24QQ-UA 42LV44QQ-UA 47LV44QQ-UA 55LV44QQ-UA P/NO : 194716001150 wwwJg,com iiiii LED TV Please read this manual carefully before your set and retain it for future reference.
Owners Manual
Page 6
Channel Selection 27 Accessories 8) Volume Adjustment 27 Initial Setting 28 Front Panel Information 9 Back Panel Information 10 Stand Instructions 12 Desktop Pedestal Installation 13 Swivel Stand 13 Securing the TV to the Wall to ...
Channel Selection 27 Accessories 8) Volume Adjustment 27 Initial Setting 28 Front Panel Information 9 Back Panel Information 10 Stand Instructions 12 Desktop Pedestal Installation 13 Swivel Stand 13 Securing the TV to the Wall to ...
Owners Manual
Page 13
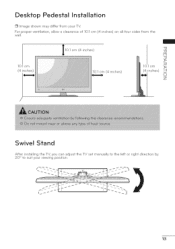
For proper ventilation, allow a clearance of 10.1 cm (4 inches) on all four sides from your viewing position. 13 Desktop Pedestal Installation [] Image shown may differ from the wall. 10.1 cm (4 inches) 10.1 cm (4 inches) 10.1 cm (4 inches) Swivel Stand After installing the TV, you can adjust the TV set manually to the left or right direction by 20 ° to suit your TV.
For proper ventilation, allow a clearance of 10.1 cm (4 inches) on all four sides from your viewing position. 13 Desktop Pedestal Installation [] Image shown may differ from the wall. 10.1 cm (4 inches) 10.1 cm (4 inches) 10.1 cm (4 inches) Swivel Stand After installing the TV, you can adjust the TV set manually to the left or right direction by 20 ° to suit your TV.
Owners Manual
Page 14
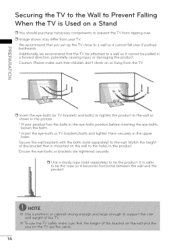
...) to the wall. Ensure the eye-bolts or brackets are tightened securely. [] Use a sturdy rope (sold separately) to tie the product. We recommend that you set up the TV close to a wall so it cannot fall over . [] Image shown may differ from the TV. 0 Z [] Insert the eye-bolts (or TV brackets...
...) to the wall. Ensure the eye-bolts or brackets are tightened securely. [] Use a sturdy rope (sold separately) to tie the product. We recommend that you set up the TV close to a wall so it cannot fall over . [] Image shown may differ from the TV. 0 Z [] Insert the eye-bolts (or TV brackets...
Owners Manual
Page 16
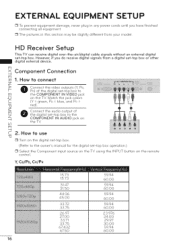
... 23.976 24.00 29.97 30.00 59.94 60.00 16 HD Receiver Setup This TV can receive digital over-the-air/digital set -top box to connect Z _> Connect the video outputs (Y, PB, r-- EXTERNAL EQUIPMENT SETUP [] To prevent equipment damage, never plug in this section may be ...slightly different from a digital an external digital set -top box. (Refer to the -4 COMPONENT IN AUDIO jack on the digital set -top box or other Fq X Component -4 Connection Fq 7O 1. cable signals without signals from your model. PR) of...
... 23.976 24.00 29.97 30.00 59.94 60.00 16 HD Receiver Setup This TV can receive digital over-the-air/digital set -top box to connect Z _> Connect the video outputs (Y, PB, r-- EXTERNAL EQUIPMENT SETUP [] To prevent equipment damage, never plug in this section may be ...slightly different from a digital an external digital set -top box. (Refer to the -4 COMPONENT IN AUDIO jack on the digital set -top box or other Fq X Component -4 Connection Fq 7O 1. cable signals without signals from your model. PR) of...
Owners Manual
Page 17
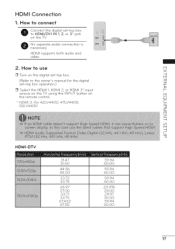
... for the digital K3 set -top box to connect Connect the digital set -top box operation.) Z _> [] Select the HDMI 1, HDMI 2, or HDMI 3 _ input F- No separate audio connection is necessary. HDMI supports both audio and video. 2. source on the TV using the INPUT button on the TV. i) HDM/ 3: For 42LV4400, 47LV4400, C 55LV4400 -13 Z Frl...
... for the digital K3 set -top box to connect Connect the digital set -top box operation.) Z _> [] Select the HDMI 1, HDMI 2, or HDMI 3 _ input F- No separate audio connection is necessary. HDMI supports both audio and video. 2. source on the TV using the INPUT button on the TV. i) HDM/ 3: For 42LV4400, 47LV4400, C 55LV4400 -13 Z Frl...

Owners Manual
Page 18
...the TV. c DVD Setup Component Connection 1. How to the COMPONENT the TV. How to connect Connect the video outputs (Y, PB, PR) of the digital set -top box operation.) [] Select the HDMI 1 or HDMI 2 input source on the TV using the INPUT button on the remote control. How to HDMI ...Connection 1. Connect the audio output of the digital set -top box. (Refer to the COMPONENT IN VIDEO jack on the DVD player, insert a DVD. [] Select the Component control. DVI to connect CtoonHnDecMt I/...
...the TV. c DVD Setup Component Connection 1. How to the COMPONENT the TV. How to connect Connect the video outputs (Y, PB, PR) of the digital set -top box operation.) [] Select the HDMI 1 or HDMI 2 input source on the TV using the INPUT button on the remote control. How to HDMI ...Connection 1. Connect the audio output of the digital set -top box. (Refer to the COMPONENT IN VIDEO jack on the DVD player, insert a DVD. [] Select the Component control. DVI to connect CtoonHnDecMt I/...
Owners Manual
Page 19
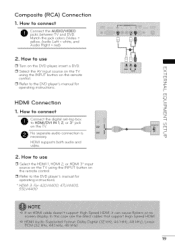
Match the jack colors (Video = yellow, Audio Left = white, and Audio Right = red) 2. No separate audio connection is necessary. For 42LV4400, 55LV4400 47LV4400, _HN_C M i_ sM :: 19 HDMI Connection 1. HDMI supports both audio and video. Fq £} C -13 Z Fq Z i!@iiii!ii!ii!ii!ii!... the TV using the INPUT button on the remote control. [] Refer to the DVD player's manual for operating instructions. How to connect Connect the digital set-top box to HDMI/DVI IN 1, 2, or 3* jack on the remote control. [] Refer to the DVD player's manual for operating instructions. * HDMI 3.. How ...
Match the jack colors (Video = yellow, Audio Left = white, and Audio Right = red) 2. No separate audio connection is necessary. For 42LV4400, 55LV4400 47LV4400, _HN_C M i_ sM :: 19 HDMI Connection 1. HDMI supports both audio and video. Fq £} C -13 Z Fq Z i!@iiii!ii!ii!ii!ii!... the TV using the INPUT button on the remote control. [] Refer to the DVD player's manual for operating instructions. How to connect Connect the digital set-top box to HDMI/DVI IN 1, 2, or 3* jack on the remote control. [] Refer to the DVD player's manual for operating instructions. * HDMI 3.. How ...
Owners Manual
Page 20
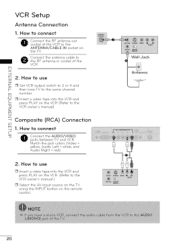
... on the remote control. 2O Wall Jack Antenna Match the jack colors (Video = yellow, Audio Left = white, and Audio Right = red) 2. How fo use 7O Z _> [] Set VCR output switch to the ANTENNA/CABLE the TV. then tune TV to the RF antenna in socket of the VCR to 3 or 4 and r-- How...
... on the remote control. 2O Wall Jack Antenna Match the jack colors (Video = yellow, Audio Left = white, and Audio Right = red) 2. How fo use 7O Z _> [] Set VCR output switch to the ANTENNA/CABLE the TV. then tune TV to the RF antenna in socket of the VCR to 3 or 4 and r-- How...

Owners Manual
Page 21
... the AV input source on the TV using the INPUT button on the remote control. [] Operate the corresponding equipment. external USB Connection 1. Frl Video Game Set O C -13 Z Fq Z --t 09 Fq ---t C 21 Match the jack colors. (Video = yellow, Audio Left = white, and Audio Right = red) 2. How to connect CUoSnBnecINt jatchke oUnSBthedesviidcee otfo...
... the AV input source on the TV using the INPUT button on the remote control. [] Operate the corresponding equipment. external USB Connection 1. Frl Video Game Set O C -13 Z Fq Z --t 09 Fq ---t C 21 Match the jack colors. (Video = yellow, Audio Left = white, and Audio Right = red) 2. How to connect CUoSnBnecINt jatchke oUnSBthedesviidcee otfo...
Owners Manual
Page 22
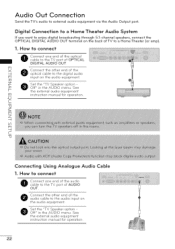
...Send the TV's audio to a Home Theater (or amp). 1. Fq X -4 O opotincnael ct catbhle otothetrhe ednidgitaolf tahuedio Fq input on the audio equipment. 0 Set the "TV Speaker option Off" in the AUDIO menu. See r-- See the external audio equipment instruction manual for operation. _D C q3 Z Fq Z -4 ... connect the OPTICAL DIGITAL AUDIO OUT terminal on the back of the audio cable to the audio input on the audio equipment. 7O Z Set the "TV Speaker option - 3> Off" in the AUDIO menu. How fo connect O caobnlenectto tohnee TVendporotf tohfe OoPpTtiIcCaAl L DIGITAL AUDIO ...
...Send the TV's audio to a Home Theater (or amp). 1. Fq X -4 O opotincnael ct catbhle otothetrhe ednidgitaolf tahuedio Fq input on the audio equipment. 0 Set the "TV Speaker option Off" in the AUDIO menu. See r-- See the external audio equipment instruction manual for operation. _D C q3 Z Fq Z -4 ... connect the OPTICAL DIGITAL AUDIO OUT terminal on the back of the audio cable to the audio input on the audio equipment. 7O Z Set the "TV Speaker option - 3> Off" in the AUDIO menu. How fo connect O caobnlenectto tohnee TVendporotf tohfe OoPpTtiIcCaAl L DIGITAL AUDIO ...
Owners Manual
Page 23
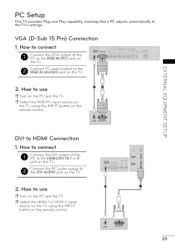
... (APUCDIaOu)dio jacokutpount thteo tThVe. Connect the PC audio output to the DVI AUDIO jack on the TV. Z Fq Z --t 09 Fq ---t C DVI to the TV's settings. How to connect Connect the DVI output of the PC to use [] Turn on the PC and the TV [] Select the HDMI 1 or HDMI 2 input...
... (APUCDIaOu)dio jacokutpount thteo tThVe. Connect the PC audio output to the DVI AUDIO jack on the TV. Z Fq Z --t 09 Fq ---t C DVI to the TV's settings. How to connect Connect the DVI output of the PC to use [] Turn on the PC and the TV [] Select the HDMI 1 or HDMI 2 input...

Owners Manual
Page 26
Left/Right/ © ENTER) T Z © -H © T _> Z Z Fq r-- © 0 Z -4 SO O 26 THUMBS-q-ICK Navigates the on-screen menus and adjusts the system (Up/Down/ settings to your preference.
Left/Right/ © ENTER) T Z © -H © T _> Z Z Fq r-- © 0 Z -4 SO O 26 THUMBS-q-ICK Navigates the on-screen menus and adjusts the system (Up/Down/ settings to your preference.
Owners Manual
Page 28
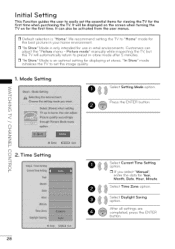
...screen when turning the TV on for the first time. Mode Setting © T Z © -H © T ]> Z Z Fq r-- © 0 2. Daylight Saving After all settings are completed, press the ENTER button. 28 setting the TV to set the essential items for viewing the TV for the first time when..., Month, Date, Hour, Minute. 0 _ _ Select Time Zone option. _ _ Sopetlieocnt. Time Z -q 7O O Setting Select Setting Mode option. We recommend the best picture in your home environment. Initial Setting This Function guides the user to preset in-store mode after 5 minutes. [] "In Store" Mode is an optimal...
...screen when turning the TV on for the first time. Mode Setting © T Z © -H © T ]> Z Z Fq r-- © 0 2. Daylight Saving After all settings are completed, press the ENTER button. 28 setting the TV to set the essential items for viewing the TV for the first time when..., Month, Date, Hour, Minute. 0 _ _ Select Time Zone option. _ _ Sopetlieocnt. Time Z -q 7O O Setting Select Setting Mode option. We recommend the best picture in your home environment. Initial Setting This Function guides the user to preset in-store mode after 5 minutes. [] "In Store" Mode is an optimal...
Owners Manual
Page 29
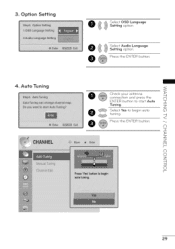
Press the ENTER button. Check your antenna connection and press the © ENTER button to begin auto © tuning. e@ Press the ENTER button. © -T- _> Z Z FTq F-- © 0 Z -q X3 O r_ 29 Option Setting 4. Z Select Yes to start Auto -T- Tuning. 3. Auto Tuning _ SSeelteticntg OoSpDtionL. anguage Select Audio Language Setting option.
Press the ENTER button. Check your antenna connection and press the © ENTER button to begin auto © tuning. e@ Press the ENTER button. © -T- _> Z Z FTq F-- © 0 Z -q X3 O r_ 29 Option Setting 4. Z Select Yes to start Auto -T- Tuning. 3. Auto Tuning _ SSeelteticntg OoSpDtionL. anguage Select Audio Language Setting option.
Owners Manual
Page 31
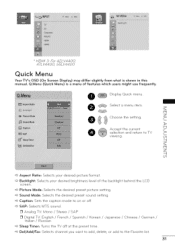
...setting. * HDMI 3: For 42LV4400, 47LV4400, ££LV4400 Quick Menu Your TV's OSD (On Screen Display) may differ slightly from what is a menu of the backlight screen. C > C7 0 Accept the current Q selection and return to the Favorite list. 31 behind the LCD _> Picture Mode: Selects the desired preset picture setting.... _> Sound Mode: Selects the desired preset sound setting. _> Caption= Sets the caption mode to on or off. _> SAP: Selects MTS sound. [] Analog TV: Mono ...
...setting. * HDMI 3: For 42LV4400, 47LV4400, ££LV4400 Quick Menu Your TV's OSD (On Screen Display) may differ slightly from what is a menu of the backlight screen. C > C7 0 Accept the current Q selection and return to the Favorite list. 31 behind the LCD _> Picture Mode: Selects the desired preset picture setting.... _> Sound Mode: Selects the desired preset sound setting. _> Caption= Sets the caption mode to on or off. _> SAP: Selects MTS sound. [] Analog TV: Mono ...
Owners Manual
Page 32
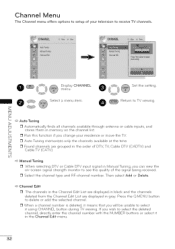
... or cable inputs, and L_ stores them in the Channel Edit menu. 32 If you change your television to receive TV channels. 0 C_ Dmiesnpula.y CHANNEL Set the _@ setting. Channel Menu The Channel menu offers options to setup of DTV, TV, Cable DTV (CADTV) and Z Cable TV (CATV). --j 6O _> Manual Tuning [] When selecting...
... or cable inputs, and L_ stores them in the Channel Edit menu. 32 If you change your television to receive TV channels. 0 C_ Dmiesnpula.y CHANNEL Set the _@ setting. Channel Menu The Channel menu offers options to setup of DTV, TV, Cable DTV (CADTV) and Z Cable TV (CATV). --j 6O _> Manual Tuning [] When selecting...
Owners Manual
Page 33
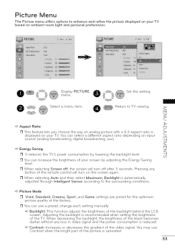
... is automatically adjusted through Intelligent Sensor according to the surrounding conditions. _> Picture Mode [] Vivid, Standard, Cinema, Sport, and Game settings are preset for the optimum picture quality at the factory. [] You can use Contrast when the bright part of your screen by...lowering the backlight level. 09 [] You can select a different aspect ratio depending on ambient room light and personal preferences. • O@ Set the _@ setting. 0 Select a menu item. Return to TV viewing. Adjusting the backlight is saturated. 33 Picture Menu The Picture menu offers options to...
... is automatically adjusted through Intelligent Sensor according to the surrounding conditions. _> Picture Mode [] Vivid, Standard, Cinema, Sport, and Game settings are preset for the optimum picture quality at the factory. [] You can use Contrast when the bright part of your screen by...lowering the backlight level. 09 [] You can select a different aspect ratio depending on ambient room light and personal preferences. • O@ Set the _@ setting. 0 Select a menu item. Return to TV viewing. Adjusting the backlight is saturated. 33 Picture Menu The Picture menu offers options to...
Owners Manual
Page 34
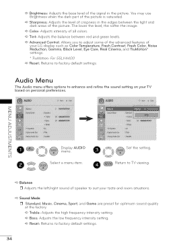
... C bO -4 Z bO Display AUDIO menu. Return to TV viewing. _> Balance [] Adjusts the left/right sound of speaker to factory default settings. Set the setting. The lower the level, the softer the image. _> Color: Adjusts intensity of all colors. _> Tint: Adjusts the balance between the light ..., and Game are preset for optimum at the factory. _> Treble: Adjusts the high frequency intensity setting. _> Bass: Adjusts the low frequency intensity setting. _> Reset: Returns to suit your LG display such as Color Temperature, Fresh Contrast, Fresh Color, Noise Reduction, Gamma, Black Level, Eye...
... C bO -4 Z bO Display AUDIO menu. Return to TV viewing. _> Balance [] Adjusts the left/right sound of speaker to factory default settings. Set the setting. The lower the level, the softer the image. _> Color: Adjusts intensity of all colors. _> Tint: Adjusts the balance between the light ..., and Game are preset for optimum at the factory. _> Treble: Adjusts the high frequency intensity setting. _> Bass: Adjusts the low frequency intensity setting. _> Reset: Returns to suit your LG display such as Color Temperature, Fresh Contrast, Fresh Color, Noise Reduction, Gamma, Black Level, Eye...
Owners Manual
Page 35
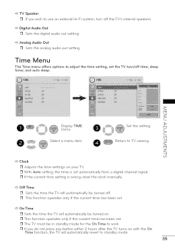
...Fi system, turn /off the TV's internal speakers. _> Digital Audio Out [] Sets the digital audio out setting. _> Analog Audio Out [] Sets the analog audio out setting. Z Fq Z 09 _> Clock [] Adjusts the time settings on with the On Time function, the TV will automatically revert to adjust the time... 2 hours after the TV turns on your TV. [] With Auto setting, the time is wrong, reset the clock manually. time, sleep • ©® Z Fq Z C ]> Set the L_ _@ setting. channel signal. Off Time [] Sets the time the TV will automatically be turned off. [] This function ...
...Fi system, turn /off the TV's internal speakers. _> Digital Audio Out [] Sets the digital audio out setting. _> Analog Audio Out [] Sets the analog audio out setting. Z Fq Z 09 _> Clock [] Adjusts the time settings on with the On Time function, the TV will automatically revert to adjust the time... 2 hours after the TV turns on your TV. [] With Auto setting, the time is wrong, reset the clock manually. time, sleep • ©® Z Fq Z C ]> Set the L_ _@ setting. channel signal. Off Time [] Sets the time the TV will automatically be turned off. [] This function ...


