
Owners Manual
Page 4
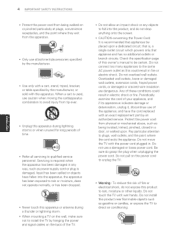
... owner's manual to unplug the TV. Do not touch the TV with the power cord plugged in fire or electric shock. Check the specification page of these conditions could result in . CAUTION concerning the Power Cord: It is , a single outlet circuit which powers only that appliances be certain. Protect the power cord from physical or mechanical abuse, such as power-supply cord or plug is used, use...
... owner's manual to unplug the TV. Do not touch the TV with the power cord plugged in fire or electric shock. Check the specification page of these conditions could result in . CAUTION concerning the Power Cord: It is , a single outlet circuit which powers only that appliances be certain. Protect the power cord from physical or mechanical abuse, such as power-supply cord or plug is used, use...
Owners Manual
Page 8
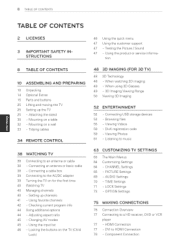
... - Locking the buttons on a wail 33 - CHANNEL Settings 65 - Component Connection Using the input list 46 - Mounting on for the first time 40 Watching TV 40 Managing channeis 40 - Tidying cables 34 REMOTE CONTROL 38 WATCHING TV 38 Connecting to the AC/DC adapter 39 Turning the TV on a table 32 - Using the product or service informa- Viewing Photos 61 - Viewing Videos 58 - TIME Settings 71 - Attaching the stand 30 - Setting up the TV 25 - Connecting an antenna or...
... - Locking the buttons on a wail 33 - CHANNEL Settings 65 - Component Connection Using the input list 46 - Mounting on for the first time 40 Watching TV 40 Managing channeis 40 - Tidying cables 34 REMOTE CONTROL 38 WATCHING TV 38 Connecting to the AC/DC adapter 39 Turning the TV on a table 32 - Using the product or service informa- Viewing Photos 61 - Viewing Videos 58 - TIME Settings 71 - Attaching the stand 30 - Setting up the TV 25 - Connecting an antenna or...
Owners Manual
Page 17
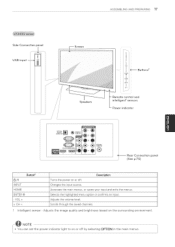
... main menus. Changes the input source. Scrolls through the saved channels. 1 Intelligent sensor - Selects the highlighted menu option or confirms an input. Speakers v B_ D I_ %EIR DI INPUT I INPUT HOME ENTER ® VOL + vCHA ' DeSCription Turns the power on or off . Accesses the main menus, or saves your input and exits the menus. d)/I D_ Butt°ns2 Remote control and intelligent 1 sensors Power indicator _, RAUGDBI/ODVII)N Rear Connection (See p.75) panel Button 2 ....
... main menus. Changes the input source. Scrolls through the saved channels. 1 Intelligent sensor - Selects the highlighted menu option or confirms an input. Speakers v B_ D I_ %EIR DI INPUT I INPUT HOME ENTER ® VOL + vCHA ' DeSCription Turns the power on or off . Accesses the main menus, or saves your input and exits the menus. d)/I D_ Butt°ns2 Remote control and intelligent 1 sensors Power indicator _, RAUGDBI/ODVII)N Rear Connection (See p.75) panel Button 2 ....
Owners Manual
Page 18
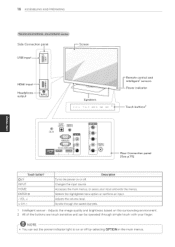
... an input. 18 ASSEMBLING AND PREPARING Side Connection panel Screen Speakers Remote control and intelligent 1 sensors Power indicator J Touch buttons 2 ,® DC-IN OP/_CAL DIGITAL AUDJOOUT N (RGB/DVI) AUDIOIN L_ "_ &NTENNA/ _:'_CABLE,N Rear Connection (See p.75) panel Touch button 2 /I INPUT HOME ENTER ® - VOL + v CH A Description Turns the power on or off by selecting OPTION in the main menus. Changes the input source. Adjusts the image quality and brightness based on or off . Accesses...
... an input. 18 ASSEMBLING AND PREPARING Side Connection panel Screen Speakers Remote control and intelligent 1 sensors Power indicator J Touch buttons 2 ,® DC-IN OP/_CAL DIGITAL AUDJOOUT N (RGB/DVI) AUDIOIN L_ "_ &NTENNA/ _:'_CABLE,N Rear Connection (See p.75) panel Touch button 2 /I INPUT HOME ENTER ® - VOL + v CH A Description Turns the power on or off by selecting OPTION in the main menus. Changes the input source. Adjusts the image quality and brightness based on or off . Accesses...
Owners Manual
Page 19
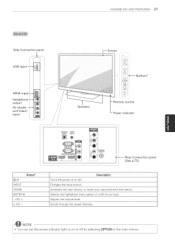
... L'O_ _ Rear Connection panel (See p.75) Touch button_ VII INPUT HOME ENTER® - Changes the input source. VOL + vCHA Description Turns the power on the surrounding environment. 2 All of the buttons are touch sensitive and can be operated through the saved channels. 1 Intelligent sensor - Accesses the main menus, or saves your finger. @ NOTE You can set the power indicator light to on or off . Adjusts the volume level. Scrolls...
... L'O_ _ Rear Connection panel (See p.75) Touch button_ VII INPUT HOME ENTER® - Changes the input source. VOL + vCHA Description Turns the power on the surrounding environment. 2 All of the buttons are touch sensitive and can be operated through the saved channels. 1 Intelligent sensor - Accesses the main menus, or saves your finger. @ NOTE You can set the power indicator light to on or off . Adjusts the volume level. Scrolls...
Owners Manual
Page 21
... in the main menus. ASSEMBLING AND PREPARING 21 Side Connection panel een Buttons 2 output | AV tAudio _ and Video) I_ input // // // / / / / Speakers OPllCDAILGITAL AUDIOIN AUODO_ (RGS/DV]} /, h F '_i Remote control Power indicator \V ANTENNA/ CABLEIN ® Rear Connection (See p.75) panel £ Button2ji ¸ @/I INPUT HOME ENTER ® VOL + v CH A _!£iiiLiiiLikDescriptio r!!l 7 7 7 7 7 7 7 7 7 7 7 7 i Turns the power on or off . Changes the input source. Selects the highlighted menu option or confirms an input. Accesses the main menus, or...
... in the main menus. ASSEMBLING AND PREPARING 21 Side Connection panel een Buttons 2 output | AV tAudio _ and Video) I_ input // // // / / / / Speakers OPllCDAILGITAL AUDIOIN AUODO_ (RGS/DV]} /, h F '_i Remote control Power indicator \V ANTENNA/ CABLEIN ® Rear Connection (See p.75) panel £ Button2ji ¸ @/I INPUT HOME ENTER ® VOL + v CH A _!£iiiLiiiLikDescriptio r!!l 7 7 7 7 7 7 7 7 7 7 7 7 i Turns the power on or off . Changes the input source. Selects the highlighted menu option or confirms an input. Accesses the main menus, or...
Owners Manual
Page 22
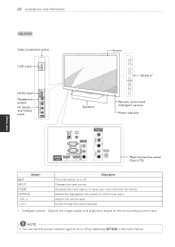
... through the saved channels. 1 Intelligent sensor - 22 ASSEMBLING AND PREPARING Side Connection panel Screen ©÷1 ©rot -II Buttons z Speakers Remote control and intelligent 1 sensors Power indicator OPTICBAGLITAL AUDIOIN AUOBOUT N (RGB!DVI} L/_ _ ANTENNA/ CABLEIN ® Rear Connection (See p.75) panel \ ...)... :Ji Y BUtton2 i ¸Y Y Y Y:LYLYLY D,escripti0n !! VOL + Adjusts the volume level. Adjusts the image quality and brightness based on the surrounding environment. --@ NOTE o You can set the power indicator light to on or...
... through the saved channels. 1 Intelligent sensor - 22 ASSEMBLING AND PREPARING Side Connection panel Screen ©÷1 ©rot -II Buttons z Speakers Remote control and intelligent 1 sensors Power indicator OPTICBAGLITAL AUDIOIN AUOBOUT N (RGB!DVI} L/_ _ ANTENNA/ CABLEIN ® Rear Connection (See p.75) panel \ ...)... :Ji Y BUtton2 i ¸Y Y Y Y:LYLYLY D,escripti0n !! VOL + Adjusts the volume level. Adjusts the image quality and brightness based on the surrounding environment. --@ NOTE o You can set the power indicator light to on or...
Owners Manual
Page 24
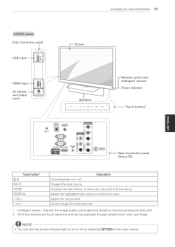
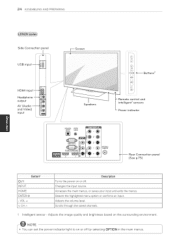
... " 2 1 Remote control and intelligent 1 sensors Power indicator -- Accesses the main menus, or saves your input and exits the menus. Changes the input source. You can set the power indicator light to on or off . VOL + v CH A Description Turns the power on the surrounding environment. Adjusts the volume level. Scrolls through the saved channels. 1 Intelligent sensor - Selects the highlighted menu option or confirms an input. 24 ASSEMBLING AND PREPARING Side Connection panel Screen USB in HDMI in...
... " 2 1 Remote control and intelligent 1 sensors Power indicator -- Accesses the main menus, or saves your input and exits the menus. Changes the input source. You can set the power indicator light to on or off . VOL + v CH A Description Turns the power on the surrounding environment. Adjusts the volume level. Scrolls through the saved channels. 1 Intelligent sensor - Selects the highlighted menu option or confirms an input. 24 ASSEMBLING AND PREPARING Side Connection panel Screen USB in HDMI in...
Owners Manual
Page 25
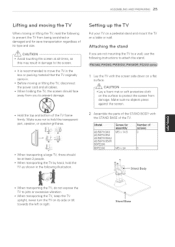
... by hand, hold the transparent part, speaker, or speaker grill area. "LLLLLLLLL'ZLL_-_I\_.L_;j Stand Base When transporting the TV, keep the TV upright, never turn the TV on a table or wall. ASSEMBLING AND PREPARING 25 Lifting and moving the TV Setting up the TV When moving or lifting the TV, disconnect the power cord and all times, as shown in the...
... by hand, hold the transparent part, speaker, or speaker grill area. "LLLLLLLLL'ZLL_-_I\_.L_;j Stand Base When transporting the TV, keep the TV upright, never turn the TV on a table or wall. ASSEMBLING AND PREPARING 25 Lifting and moving the TV Setting up the TV When moving or lifting the TV, disconnect the power cord and all times, as shown in the...

Owners Manual
Page 45
... also access the input source list / by selecting INPUT in Game mode, functions related to each input source. In!uut List l _:, M0w ® E_t_ !! Play media files from a DVD or other external devices, or through a digital set-top box. When you are finished, press EXIT. Uses the optimized image and sound settings for playing games. Uses the optimized image and sound settings for the HDMI input will be optimized for a cinematic look. When playing a video game using PtayStation or Xbox. Using the input list...
... also access the input source list / by selecting INPUT in Game mode, functions related to each input source. In!uut List l _:, M0w ® E_t_ !! Play media files from a DVD or other external devices, or through a digital set-top box. When you are finished, press EXIT. Uses the optimized image and sound settings for playing games. Uses the optimized image and sound settings for the HDMI input will be optimized for a cinematic look. When playing a video game using PtayStation or Xbox. Using the input list...

Owners Manual
Page 52
..., make it is safe to remove. -_ CAUTION * Do not turn the TV off or remove a USB storage device while the USB storage device is 32 GB or less. * If a USB external hard disk with a power adapter. * If the TV does not recognize a connected USB storage device, replace the cable and try again. 52 ENTERTAINMENT ENTERTAINMENT (Depending on model) Connecting USB storage devices Connect USB storage devices such as a NTFS...
..., make it is safe to remove. -_ CAUTION * Do not turn the TV off or remove a USB storage device while the USB storage device is 32 GB or less. * If a USB external hard disk with a power adapter. * If the TV does not recognize a connected USB storage device, replace the cable and try again. 52 ENTERTAINMENT ENTERTAINMENT (Depending on model) Connecting USB storage devices Connect USB storage devices such as a NTFS...
Owners Manual
Page 56
... the Navigation buttons to scroll to movie list option and press ENTER. If you change the audio language. You can be played sequentially MENU. DescriPtion Picture Size Selects your desired picture format for SMt subtitles and can be selected. When set to default, contents are displayed in the language set in full screen mode according to the profile level 4.1. The TV may not smoothly play the video files...
... the Navigation buttons to scroll to movie list option and press ENTER. If you change the audio language. You can be played sequentially MENU. DescriPtion Picture Size Selects your desired picture format for SMt subtitles and can be selected. When set to default, contents are displayed in the language set in full screen mode according to the profile level 4.1. The TV may not smoothly play the video files...

Owners Manual
Page 65
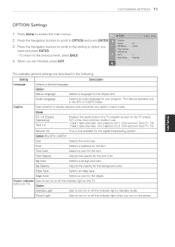
... Ratio Picture Wizard Changes the image size to the previous level, press BACK. 4 When you want and press ENTER. - Energy Saving Reduces the power consumption by Picture Wizard, operate Picture Reset when Picture Mode is adjusted automatically corresponding to the surroundings when selecting Auto using the Intelligent sensor feature. CUSTOMIZING SETTINGS 6:_ PICTURE Settings 1 Press Home to access the main menus. 2 Press the Navigation buttons to scroll to CHANNEL and press...
... Ratio Picture Wizard Changes the image size to the previous level, press BACK. 4 When you want and press ENTER. - Energy Saving Reduces the power consumption by Picture Wizard, operate Picture Reset when Picture Mode is adjusted automatically corresponding to the surroundings when selecting Auto using the Intelligent sensor feature. CUSTOMIZING SETTINGS 6:_ PICTURE Settings 1 Press Home to access the main menus. 2 Press the Navigation buttons to scroll to CHANNEL and press...
Owners Manual
Page 73
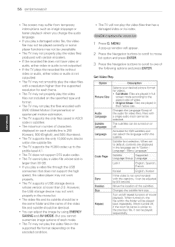
Caption Sets whether to display captions and customize your program. Mode CC 1-4 (Closed Captioning) Text 1-4 DisDlavs the audio portion of a TV program as text on or off the indicator light in the following. Field 1 data channels: two Captions (CC1, CC2) and two Text (T1, T2). - Selects an edge type. Power Light Sets to turn on or off the indicator light when you want and press ENTER. - Audio Language .Selects an audio language...
Caption Sets whether to display captions and customize your program. Mode CC 1-4 (Closed Captioning) Text 1-4 DisDlavs the audio portion of a TV program as text on or off the indicator light in the following. Field 1 data channels: two Captions (CC1, CC2) and two Text (T1, T2). - Selects an edge type. Power Light Sets to turn on or off the indicator light when you want and press ENTER. - Audio Language .Selects an audio language...
Owners Manual
Page 74
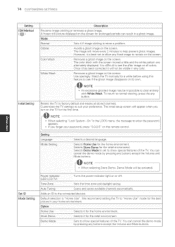
... on the screen. Color Wash Removes a ghost image on the screen. The color block with White Wash. Once it has been corrected it for the home environment. use sparingly. Watch the TV normally for the best p_cture in any button. The initial setup screen will appear when you forget your preference. Default selection is never a problem. Demo Mode Sets to normal viewing, press the any color. The image...
... on the screen. Color Wash Removes a ghost image on the screen. The color block with White Wash. Once it has been corrected it for the home environment. use sparingly. Watch the TV normally for the best p_cture in any button. The initial setup screen will appear when you forget your preference. Default selection is never a problem. Demo Mode Sets to normal viewing, press the any color. The image...

Owners Manual
Page 77
... the HDMI cable as shown in the following illustration. -@ NOTE * Use the latest High Speed HDMI TM Cable with the DVI-HDMI cable as shown in the following illustration. To transmit an audio signal, connect an audio cable. PW350 series LV3500 series LV3500 series I PW350 series DVI to HDMI Connection Transmits the digital video signal from an external device to the TV and select an appropriate input mode. MAKING CONNECTIONS "77 * This part of MAKING CONNECTIONS mainly uses picture...
... the HDMI cable as shown in the following illustration. -@ NOTE * Use the latest High Speed HDMI TM Cable with the DVI-HDMI cable as shown in the following illustration. To transmit an audio signal, connect an audio cable. PW350 series LV3500 series LV3500 series I PW350 series DVI to HDMI Connection Transmits the digital video signal from an external device to the TV and select an appropriate input mode. MAKING CONNECTIONS "77 * This part of MAKING CONNECTIONS mainly uses picture...
Owners Manual
Page 84
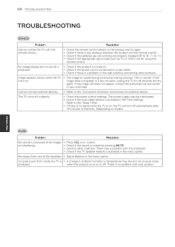
.... Cannot control the TV with your local area. • Refer to a wall outlet. • Check if there is )roduced. Cannot connect externat devices. • Check if the product is turned on model) Problem , ReSolution No sound is produced while images are still working and properly installed (_+/t,o _+), v-i to ,, x. • Check if the appropriate input mode such as TV or VCR is set for 30...
.... Cannot control the TV with your local area. • Refer to a wall outlet. • Check if there is )roduced. Cannot connect externat devices. • Check if the product is turned on model) Problem , ReSolution No sound is produced while images are still working and properly installed (_+/t,o _+), v-i to ,, x. • Check if the appropriate input mode such as TV or VCR is set for 30...
Owners Manual
Page 85
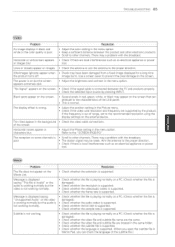
... is playing normally on the screen. Check if the video card resolution and frequency are located in the same folder. Adjust the Phase setting in the Picture menu. TROUBLESHOOTING 85 PrOblem , ResOlUtion An image displays in black and white or the color quality is wrong. Check the video cable connections. The file does not appear on but the audio is supported. Subtitle is local interferences such as an electrical appliance or power...
... is playing normally on the screen. Check if the video card resolution and frequency are located in the same folder. Adjust the Phase setting in the Picture menu. TROUBLESHOOTING 85 PrOblem , ResOlUtion An image displays in black and white or the color quality is wrong. Check the video cable connections. The file does not appear on but the audio is supported. Subtitle is local interferences such as an electrical appliance or power...
Owners Manual
Page 86
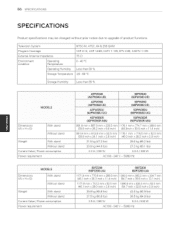
... to upgrade of product functions. Television System Program Coverage External Antenna Impedance Environment condition Operating Temperature Operating Humidity Storage Temperature NTSC-M, ATSC, 64 & 256 QAM VHF 2-13, UHF 14-69, CATV 1-135, DTV 2-69, CADTV 1-135 75 0 - 40 °C Less than 80 % -20- 60 °C Storage Humidity Less than 85 % MODELS Dimensions (W x H x D) With stand Without stand Weight With stand Without stand Current Value / Power consumption Power...
... to upgrade of product functions. Television System Program Coverage External Antenna Impedance Environment condition Operating Temperature Operating Humidity Storage Temperature NTSC-M, ATSC, 64 & 256 QAM VHF 2-13, UHF 14-69, CATV 1-135, DTV 2-69, CADTV 1-135 75 0 - 40 °C Less than 80 % -20- 60 °C Storage Humidity Less than 85 % MODELS Dimensions (W x H x D) With stand Without stand Weight With stand Without stand Current Value / Power consumption Power...

Owners Manual
Page 99
... ASCII code '0x0D' [] : ASCII code 'space (0x20)' * In this format when receiving normal data. based on this format when receiving Data1: Illegal Code Data2: Not supported function Data3: Wait more time * In this model, set will not send the status during the standby mode. * Data Format [Command 2] : Use as command. [Set ID] : Use the small character, if set transmits ACK (acknowledgement) viable functions or communication errors. EXTERNAL CONTROL DEVICE SETUP 99 Transmission / Receiving protocol...
... ASCII code '0x0D' [] : ASCII code 'space (0x20)' * In this format when receiving normal data. based on this format when receiving Data1: Illegal Code Data2: Not supported function Data3: Wait more time * In this model, set will not send the status during the standby mode. * Data Format [Command 2] : Use as command. [Set ID] : Use the small character, if set transmits ACK (acknowledgement) viable functions or communication errors. EXTERNAL CONTROL DEVICE SETUP 99 Transmission / Receiving protocol...


