
Owners Manual
Page 1
Life's Good LCD TV OWNER'S MANUAL 32LH250H 37LH250H 42LH250H 32LH25SH 37LH25SH 42LH255H please read this manual carefully your set . Changing the factory default settings or enabling other features may increase power consumption that could exceed the limits necessary to quality for ...
Life's Good LCD TV OWNER'S MANUAL 32LH250H 37LH250H 42LH250H 32LH25SH 37LH25SH 42LH255H please read this manual carefully your set . Changing the factory default settings or enabling other features may increase power consumption that could exceed the limits necessary to quality for ...
Owners Manual
Page 4
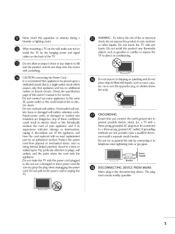
... - To reduce the risk of these conditions could result in a door, or walked upon a dedicated circuit; on or over the apparatus (e.g. Never touch this owner's manual to dripping or splashing and do grasp the plug when unplugging the power cord. a TV with something. Do not pull on the back of your...
... - To reduce the risk of these conditions could result in a door, or walked upon a dedicated circuit; on or over the apparatus (e.g. Never touch this owner's manual to dripping or splashing and do grasp the plug when unplugging the power cord. a TV with something. Do not pull on the back of your...
Owners Manual
Page 6
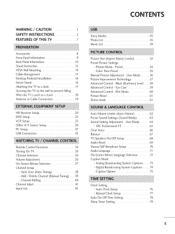
.../SAP Broadcast Setup 70 Audio Language 71 On-Screen Menus Language Selection 72 Caption Mode - Color Tone Preset 55 Manual Picture Adjustment - Auto Clock Setup 76 - User Mode .......... 56 Picture Improvement Technology 57 Advanced Control- Sound Setting Adjustment - Add /... Reset 61 Demo mode 61 Auto Volume Leveler (Auto Volume 62 Preset Sound Settings (Sound Mode 63; Analog Broadcasting System Captions ....... 73; - Manual Clock Setup 77 Auto On/Off Time Setting 78 Sleep Timer Setting 79 5 Auto Scan (Auto Tuning 3;8 - CONTENTS WARNING / CAUTION 1 SAFETY...
.../SAP Broadcast Setup 70 Audio Language 71 On-Screen Menus Language Selection 72 Caption Mode - Color Tone Preset 55 Manual Picture Adjustment - Auto Clock Setup 76 - User Mode .......... 56 Picture Improvement Technology 57 Advanced Control- Sound Setting Adjustment - Add /... Reset 61 Demo mode 61 Auto Volume Leveler (Auto Volume 62 Preset Sound Settings (Sound Mode 63; Analog Broadcasting System Captions ....... 73; - Manual Clock Setup 77 Auto On/Off Time Setting 78 Sleep Timer Setting 79 5 Auto Scan (Auto Tuning 3;8 - CONTENTS WARNING / CAUTION 1 SAFETY...
Owners Manual
Page 9
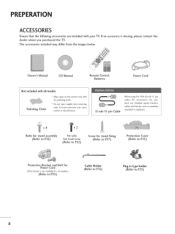
... following accessories are included with ferrite cores to maintain standards compliance. is not available for Power Cord (This feature is missing, please contact the Owner's Manual CD Manual Remote Control, Batteries Power Cord Not included with all models.) (Refer to R1S) Cable Holder (Refer to R15) Plug in type holder (Refer to...
... following accessories are included with ferrite cores to maintain standards compliance. is not available for Power Cord (This feature is missing, please contact the Owner's Manual CD Manual Remote Control, Batteries Power Cord Not included with all models.) (Refer to R1S) Cable Holder (Refer to R15) Plug in type holder (Refer to...

Owners Manual
Page 17
For proper ventilation, allow a clearance of 4 inches on all four sides from your viewing position. 16 PREPARATION DESKTOP PEDESTALINSTALLATION Image shown may differ from the wall. 4 inches 0 z 4 inches 4 inches SWIVELSTAND After installing the TV, you can adjust the TV set manually to the left or right direction by 90 degrees to suit your TV.
For proper ventilation, allow a clearance of 4 inches on all four sides from your viewing position. 16 PREPARATION DESKTOP PEDESTALINSTALLATION Image shown may differ from the wall. 4 inches 0 z 4 inches 4 inches SWIVELSTAND After installing the TV, you can adjust the TV set manually to the left or right direction by 90 degrees to suit your TV.

Owners Manual
Page 21
... video outputs (Y, PB, PR) of the digital set -top box. (Refer to the COMPONENT IN VIDEO jacks on the TV. top box to the owner's manual for the digital set -top box. EXTERNAL EQUIPMENT SETUP To prevent the equipment damage, never plug in any power cords until you do receive digital...
... video outputs (Y, PB, PR) of the digital set -top box. (Refer to the COMPONENT IN VIDEO jacks on the TV. top box to the owner's manual for the digital set -top box. EXTERNAL EQUIPMENT SETUP To prevent the equipment damage, never plug in any power cords until you do receive digital...

Owners Manual
Page 22
How to the owner's manual for the digital set-top box.) m Select HDMI1 or HDMI2 input source with usingthelNPUT c button on the digital set-top box. z (Refer to use m Turn on the remote control. m K9 c 2. HDMI Connection 1. HDMI-DTV 31.47 3].47 44.96 45.00 33.72 33.75 63432 6350 2300 26.97 33.75 33.71 59.94 60.00 59.94 60.00 59.94 60.00 59.939 60.00 24.00 23.976 30.00 29.97 21 How to connect m O oronHnDecMt I the2 djaigckitalonsetht-etopTV.box to HDMI /DVI IN 1 x m z O No separate audio connection is necessary. HDMI supports both audio and video.
How to the owner's manual for the digital set-top box.) m Select HDMI1 or HDMI2 input source with usingthelNPUT c button on the digital set-top box. z (Refer to use m Turn on the remote control. m K9 c 2. HDMI Connection 1. HDMI-DTV 31.47 3].47 44.96 45.00 33.72 33.75 63432 6350 2300 26.97 33.75 33.71 59.94 60.00 59.94 60.00 59.94 60.00 59.939 60.00 24.00 23.976 30.00 29.97 21 How to connect m O oronHnDecMt I the2 djaigckitalonsetht-etopTV.box to HDMI /DVI IN 1 x m z O No separate audio connection is necessary. HDMI supports both audio and video.

Owners Manual
Page 24
Component Input ports To get better picture quality, connect a DVD player to the DVD player's manual for operating instructions. Component ports on the TV Video output ports on the remote control. Select the Component input source on the TV using the ...
Component Input ports To get better picture quality, connect a DVD player to the DVD player's manual for operating instructions. Component ports on the TV Video output ports on the remote control. Select the Component input source on the TV using the ...

Owners Manual
Page 25
..., and Audio Right = red). c HDMI Connection 1. How to connect O Connect the HDMI output of the DVD to the DVD player's manual for operating instructions. 24 How to the DVD player's manual for operating instructions. Refer to use c Turn on the remote control. r=- How to use Select the HDMI1 or HDMI2 input source...
..., and Audio Right = red). c HDMI Connection 1. How to connect O Connect the HDMI output of the DVD to the DVD player's manual for operating instructions. 24 How to the DVD player's manual for operating instructions. Refer to use c Turn on the remote control. r=- How to use Select the HDMI1 or HDMI2 input source...
Owners Manual
Page 26
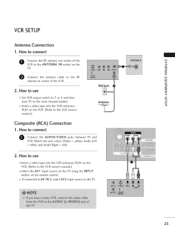
... AUDIO/VIDEO jacks between TV and VCR. Antenna -q c Insert a video tape into the VCR and press PLAY on the VCR. (Refer to the VCR owner's manual.) Select the AV ] input source on the TV using the INPUT button on the remote control. How to AV IN 2, select AV2 input source on... z >. Match the jack colors (Video = yellow, Audio Left = white, and Audio Right = red) 2. VCR SETUP Antenna Connection 1. XD c Wall Jack 2. How to the VCR owner's manual.) Composite (RCA) Connection 1.
... AUDIO/VIDEO jacks between TV and VCR. Antenna -q c Insert a video tape into the VCR and press PLAY on the VCR. (Refer to the VCR owner's manual.) Select the AV ] input source on the TV using the INPUT button on the remote control. How to AV IN 2, select AV2 input source on... z >. Match the jack colors (Video = yellow, Audio Left = white, and Audio Right = red) 2. VCR SETUP Antenna Connection 1. XD c Wall Jack 2. How to the VCR owner's manual.) Composite (RCA) Connection 1.

Owners Manual
Page 31
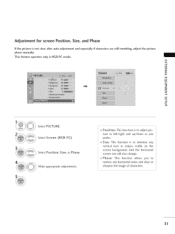
... again after Auto adjustment in RGB-PC, you can adjust the Position, Phase. After adjustment, if the image is still not correct, try using the manual settings or a different resolution or refresh rate on the PC. Select Y e s. Select Screen (RGB-PC). Select Auto config.. EXTERNALEQUIPMENT SETUP Auto Configure Automatically adjusts picture...
... again after Auto adjustment in RGB-PC, you can adjust the Position, Phase. After adjustment, if the image is still not correct, try using the manual settings or a different resolution or refresh rate on the PC. Select Y e s. Select Screen (RGB-PC). Select Auto config.. EXTERNALEQUIPMENT SETUP Auto Configure Automatically adjusts picture...
Owners Manual
Page 32
... screen size will also change. Size: This function is not clear after auto adjustment and especially if characters are still trembling, adjust the picture phase manually. Position: This function is to adjust picture to remove any vertical bars or stripes visible on the screen background.
... screen size will also change. Size: This function is not clear after auto adjustment and especially if characters are still trembling, adjust the picture phase manually. Position: This function is to adjust picture to remove any vertical bars or stripes visible on the screen background.

Owners Manual
Page 38
Select a menu item. ON-SCREENMENUS SELECTION Your TV's OSD (On Screen Display) may differ slightly from that shown in this manual. El= z n- Return to the pop up menu. Enter to TV viewing. 37 Z z 0 TT z 0 _i_i_i_i_i_i_i_i_i_i_i_i_i_i_i_i_i_i_i_i_i_i_i_i_i_i_i_i_i_i_i_ Display each menu.
Select a menu item. ON-SCREENMENUS SELECTION Your TV's OSD (On Screen Display) may differ slightly from that shown in this manual. El= z n- Return to the pop up menu. Enter to TV viewing. 37 Z z 0 TT z 0 _i_i_i_i_i_i_i_i_i_i_i_i_i_i_i_i_i_i_i_i_i_i_i_i_i_i_i_i_i_i_i_ Display each menu.

Owners Manual
Page 39
..., and stores them in memory on the channel list. 38 Select Y e s. Return to the previous menu. t'h "l- Run Auto tuning. When setting the Auto tuning or Manual tuning, the number of maximum channel you change depending on the channel list. It is 740. The TV will ask for a password if parental control...
..., and stores them in memory on the channel list. 38 Select Y e s. Return to the previous menu. t'h "l- Run Auto tuning. When setting the Auto tuning or Manual tuning, the number of maximum channel you change depending on the channel list. It is 740. The TV will ask for a password if parental control...
Owners Manual
Page 40
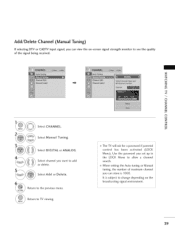
Add/Delete Channel (Manual Tuning) If selecting DTV or CADTV input signal, you can view the on-screen signal strength monitor to see the quality of maximum channel you ... or ANALOG. Select channel you set up in the LOCK Menu to add or delete. Use the password you want to allow a channel search. Select Manual Tuning. Return to TV viewing. t'h :[: Z -q t'h :l: Z Z rT1 N O Z -q O The TV will ask for a password if parental control has been activated (LOCK Menu). When setting the Auto tuning...
Add/Delete Channel (Manual Tuning) If selecting DTV or CADTV input signal, you can view the on-screen signal strength monitor to see the quality of maximum channel you ... or ANALOG. Select channel you set up in the LOCK Menu to add or delete. Use the password you want to allow a channel search. Select Manual Tuning. Return to TV viewing. t'h :[: Z -q t'h :l: Z Z rT1 N O Z -q O The TV will ask for a password if parental control has been activated (LOCK Menu). When setting the Auto tuning...

Owners Manual
Page 55
You can use a preset, change each setting manually. Select Vivid, Standard, Natural, Cinema, Sport or Game. Vivid: This is the mode to realize fast response speed in a fast gaming screen. Preset There are ...
You can use a preset, change each setting manually. Select Vivid, Standard, Natural, Cinema, Sport or Game. Vivid: This is the mode to realize fast response speed in a fast gaming screen. Preset There are ...

Owners Manual
Page 57
USER MODE Adjust the picture appearance to the previous menu. "O N C m N O Z Select PICTURE. Select Vivid, Standard, Natural, Cinema, Sport or Game. Select Backlight, Contrast, Brightness, Sharpness, Color, or Tint. O Select Picture Mode. Return to suit your preference and viewing situations. Return to TV viewing. 56 Make appropriate adjustments. PICTURE CONTROL MANUAL PICTURE ADJUSTMENT-
USER MODE Adjust the picture appearance to the previous menu. "O N C m N O Z Select PICTURE. Select Vivid, Standard, Natural, Cinema, Sport or Game. Select Backlight, Contrast, Brightness, Sharpness, Color, or Tint. O Select Picture Mode. Return to suit your preference and viewing situations. Return to TV viewing. 56 Make appropriate adjustments. PICTURE CONTROL MANUAL PICTURE ADJUSTMENT-

Owners Manual
Page 77
... time is set automatically from a digital channel signal. The digital channel signal includes information for the current time provided by the broadcasting Set the clock manually if the current time is set incorrectly by the auto clock function. Select your viewing area observes Daylight Saving time). station. 0 c Z _D z c rrl N © Z -.-t ©...
... time is set automatically from a digital channel signal. The digital channel signal includes information for the current time provided by the broadcasting Set the clock manually if the current time is set incorrectly by the auto clock function. Select your viewing area observes Daylight Saving time). station. 0 c Z _D z c rrl N © Z -.-t ©...
Owners Manual
Page 78
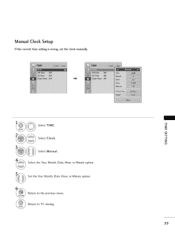
Select TIME. Select the Year, Month, Date, Hour, or Minute option. m m Select Clock. i z Select Manual. Set the Year, Month, Date, Hour, or Minute option. Return to TV viewing. 77 Return to the previous menu. Manual Clock Setup If the current time setting is wrong, set the clock manually.
Select TIME. Select the Year, Month, Date, Hour, or Minute option. m m Select Clock. i z Select Manual. Set the Year, Month, Date, Hour, or Minute option. Return to TV viewing. 77 Return to the previous menu. Manual Clock Setup If the current time setting is wrong, set the clock manually.
Owners Manual
Page 88
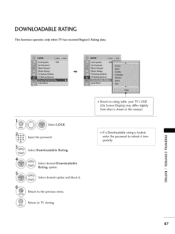
Input the password. Select Downloadable Rating. DOWNLOADABLE RATING This function operates only when TV has received Region5 Rating data. __ \ME y Se ,ect LOCK. Select desired option and block it tem- Return to unlock it . Based on rating table, your TV's OSD (On Screen Display) may differ slightly from what is shown in this manual. 0_If a Downloadable rating is locked, enter the password to TV viewing. porarily. _D m z 0 z _D 0 _D i z 87 Return to the previous menu. Select desired Downloadable Rating option.
Input the password. Select Downloadable Rating. DOWNLOADABLE RATING This function operates only when TV has received Region5 Rating data. __ \ME y Se ,ect LOCK. Select desired option and block it tem- Return to unlock it . Based on rating table, your TV's OSD (On Screen Display) may differ slightly from what is shown in this manual. 0_If a Downloadable rating is locked, enter the password to TV viewing. porarily. _D m z 0 z _D 0 _D i z 87 Return to the previous menu. Select desired Downloadable Rating option.


