Specification (English)
Page 1
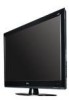
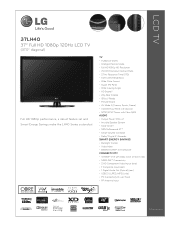
LCD TV 37LH40 37" Full HD 1080p 120Hz LCD TV (37.0" diagonal) Full HD 1080p performance, a robust feature set and Smart Energy Savings make the LH40 Series a standout. TV • TruMotion 120Hz • Intelligent Sensor Mode • Full HD 1080p HD Resolution • 70,000:1... Compliant CONNECTIVITY • 4 HDMI™ V.1.3 with Deep Color (3 rear/1 side) • SIMPLINK™ Connectivity • 2 HD Component Video Inputs (rear) • 1 Composite Input (rear) • 1 Digital Audio Out (Optical) (rear) • USB 2.0 (JPEG, MP3) (side) • PC Connectivity (D-sub 15pin) •...
LCD TV 37LH40 37" Full HD 1080p 120Hz LCD TV (37.0" diagonal) Full HD 1080p performance, a robust feature set and Smart Energy Savings make the LH40 Series a standout. TV • TruMotion 120Hz • Intelligent Sensor Mode • Full HD 1080p HD Resolution • 70,000:1... Compliant CONNECTIVITY • 4 HDMI™ V.1.3 with Deep Color (3 rear/1 side) • SIMPLINK™ Connectivity • 2 HD Component Video Inputs (rear) • 1 Composite Input (rear) • 1 Digital Audio Out (Optical) (rear) • USB 2.0 (JPEG, MP3) (side) • PC Connectivity (D-sub 15pin) •...
Specification (English)
Page 2
... Picture Wizard • Backlight Control • Smart Energy Saving • Mechanical Power Off • 1080p Source Input - PC 1 PC Audio Input 1 RS-232c In (Control/Service) 1 CABINET/ACCESSORIES Cabinet Color Glossy Black Swivel Stand (degrees) 20º...09/11/09 LG Electronics U.S.A., Inc. 1000 Sylvan Avenue Englewood Cliffs, NJ 07632 Customer Service and Technical Support: (800) 243-0000 LCD TV 37LH40 37" Full HD 1080p 120Hz LCD TV (37.0" diagonal) LGusa.com LCD SPECIFICATION Screen Size (Class) 37" Class (37.0" diagonal) Native ...
... Picture Wizard • Backlight Control • Smart Energy Saving • Mechanical Power Off • 1080p Source Input - PC 1 PC Audio Input 1 RS-232c In (Control/Service) 1 CABINET/ACCESSORIES Cabinet Color Glossy Black Swivel Stand (degrees) 20º...09/11/09 LG Electronics U.S.A., Inc. 1000 Sylvan Avenue Englewood Cliffs, NJ 07632 Customer Service and Technical Support: (800) 243-0000 LCD TV 37LH40 37" Full HD 1080p 120Hz LCD TV (37.0" diagonal) LGusa.com LCD SPECIFICATION Screen Size (Class) 37" Class (37.0" diagonal) Native ...

Owner's Manual (English)
Page 6
...Demo Mode 81 Channel Editing 50 Channel List 51 Favorite Channel Setup / Favorite Channel List . . 52 Brief Information 53 Input List 54 Input Label 55 AV Mode 56 Simple Manual 56 Key Lock 57 SIMPLINK 58 USB Entry Modes 60 Photo List 61 Music ... Picture Wizard 70 Preset Picture Settings (Picture Mode 72 Manual Picture Adjustment - CONTENTS WARNING / CAUTION 2 SAFETY INSTRUCTIONS 3 FEATURE OF THIS TV 8 PREPARATION Accessories 9 Front Panel Information 10 Back Panel Information 12 Stand Instruction 14 VESA Wall Mounting 18 Cable Management 19 Desktop Pedestal Installation...
...Demo Mode 81 Channel Editing 50 Channel List 51 Favorite Channel Setup / Favorite Channel List . . 52 Brief Information 53 Input List 54 Input Label 55 AV Mode 56 Simple Manual 56 Key Lock 57 SIMPLINK 58 USB Entry Modes 60 Photo List 61 Music ... Picture Wizard 70 Preset Picture Settings (Picture Mode 72 Manual Picture Adjustment - CONTENTS WARNING / CAUTION 2 SAFETY INSTRUCTIONS 3 FEATURE OF THIS TV 8 PREPARATION Accessories 9 Front Panel Information 10 Back Panel Information 12 Stand Instruction 14 VESA Wall Mounting 18 Cable Management 19 Desktop Pedestal Installation...
Owner's Manual (English)
Page 7
User Mode 85 Balance 86 TV Speakers On/Off Setup 87 Audio Reset 88 Stereo/SAP Broadcasts Setup 89 Audio Language 90 On-Screen Menus Language Selection 91 Caption Mode - Caption ... Auto On/Off Time Setting 97 Sleep Timer Setting 98 PARENTAL CONTROL / RATINGS Set Password & Lock System 99 Channel Blocking 102 Movie & TV Rating 103 Downloadable Rating 108 External Input Blocking 109 APPENDIX Troubleshooting 110 Maintenance 112 Product Specifications 113 IR Codes 115 External Control Through RS-232C 116 Open Source License...
User Mode 85 Balance 86 TV Speakers On/Off Setup 87 Audio Reset 88 Stereo/SAP Broadcasts Setup 89 Audio Language 90 On-Screen Menus Language Selection 91 Caption Mode - Caption ... Auto On/Off Time Setting 97 Sleep Timer Setting 98 PARENTAL CONTROL / RATINGS Set Password & Lock System 99 Channel Blocking 102 Movie & TV Rating 103 Downloadable Rating 108 External Input Blocking 109 APPENDIX Troubleshooting 110 Maintenance 112 Product Specifications 113 IR Codes 115 External Control Through RS-232C 116 Open Source License...
Owner's Manual (English)
Page 10
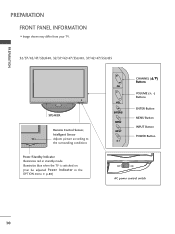
G p.80) CH VOL ENTER MENU INPUT CHANNEL (D,E) Buttons VOLUME (+, -) Buttons ENTER Button MENU Button INPUT Button POWER Button OFF ON AC power control switch 10 Illuminates blue when the TV is switched on. (Can be adjusted Power Indicator in standby mode. PREPARATION PREPARATION FRONT PANEL INFORMATION I Image shown may differ from your TV. 32/37/42/47/55LH40, 32/37/42/47/55LH41, 37/42/47/55LH55 SPEAKER Remote Control Sensor, Intelligent Sensor Adjusts picture according to the surrounding conditions Power/Standby Indicator Illuminates red in the OPTION menu.
G p.80) CH VOL ENTER MENU INPUT CHANNEL (D,E) Buttons VOLUME (+, -) Buttons ENTER Button MENU Button INPUT Button POWER Button OFF ON AC power control switch 10 Illuminates blue when the TV is switched on. (Can be adjusted Power Indicator in standby mode. PREPARATION PREPARATION FRONT PANEL INFORMATION I Image shown may differ from your TV. 32/37/42/47/55LH40, 32/37/42/47/55LH41, 37/42/47/55LH55 SPEAKER Remote Control Sensor, Intelligent Sensor Adjusts picture according to the surrounding conditions Power/Standby Indicator Illuminates red in the OPTION menu.
Owner's Manual (English)
Page 11
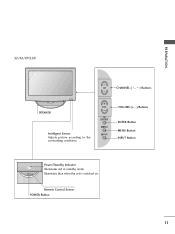
Remote Control Sensor POWER Button 11 Illuminates blue when the set is switched on. PREPARATION 32/42/47CL40 CH CHANNEL ( , ) Buttons SPEAKER Intelligent Sensor Adjusts picture according to the surrounding conditions VOL ENTER MENU INPUT VOLUME (+, -) Buttons ENTER Button MENU Button INPUT Button Power/Standby Indicator Illuminates red in standby mode.
Remote Control Sensor POWER Button 11 Illuminates blue when the set is switched on. PREPARATION 32/42/47CL40 CH CHANNEL ( , ) Buttons SPEAKER Intelligent Sensor Adjusts picture according to the surrounding conditions VOL ENTER MENU INPUT VOLUME (+, -) Buttons ENTER Button MENU Button INPUT Button Power/Standby Indicator Illuminates red in standby mode.

Owner's Manual (English)
Page 13
... to this jack. Uses a red, green, and blue cable for video & red and white for audio. 8 USB INPUT Used for viewing photos and listening to operate the TV on DC power. 13 Caution: Never attempt to MP3s. 9 Power Cord Socket For operation with amps and home theater systems...definition video only (480i). 2 HDMI/DVI IN, HDMI IN Digital Connection. AUDIO IN (RGB/DVI) 1/8" (0.32 cm) headphone jack for analog PC audio input. 4 OPTICAL DIGITAL AUDIO OUT Digital optical audio output for Service or Hotel mode. 7 COMPONENT IN Analog Connection. PREPARATION 1 AV (Audio/Video) IN Analog ...
... to this jack. Uses a red, green, and blue cable for video & red and white for audio. 8 USB INPUT Used for viewing photos and listening to operate the TV on DC power. 13 Caution: Never attempt to MP3s. 9 Power Cord Socket For operation with amps and home theater systems...definition video only (480i). 2 HDMI/DVI IN, HDMI IN Digital Connection. AUDIO IN (RGB/DVI) 1/8" (0.32 cm) headphone jack for analog PC audio input. 4 OPTICAL DIGITAL AUDIO OUT Digital optical audio output for Service or Hotel mode. 7 COMPONENT IN Analog Connection. PREPARATION 1 AV (Audio/Video) IN Analog ...
Owner's Manual (English)
Page 25
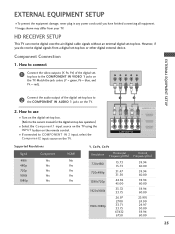
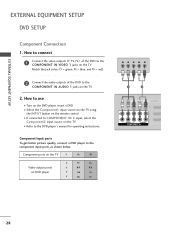
I Select the Component1 input source on the TV using the INPUT button on the TV. 2. Component Connection 1. Y PB PR L R EXTERNAL EQUIPMENT SETUP Connect the audio output of the digital settop box to the COMPONENT IN VIDEO 1 jacks on the TV. 1 2 AV IN 1 VIDEO L(MONO) AUDIO R 3 2 2 L R 1 1 ...PR) of the digital set -top box. EXTERNAL EQUIPMENT SETUP I If connected to COMPONENT IN 2 input, select the Component2 input source on the TV. HD RECEIVER SETUP This TV can receive digital over-the-air/digital cable signals without an external digital set -top box to 2 ...
I Select the Component1 input source on the TV using the INPUT button on the TV. 2. Component Connection 1. Y PB PR L R EXTERNAL EQUIPMENT SETUP Connect the audio output of the digital settop box to the COMPONENT IN VIDEO 1 jacks on the TV. 1 2 AV IN 1 VIDEO L(MONO) AUDIO R 3 2 2 L R 1 1 ...PR) of the digital set -top box. EXTERNAL EQUIPMENT SETUP I If connected to COMPONENT IN 2 input, select the Component2 input source on the TV. HD RECEIVER SETUP This TV can receive digital over-the-air/digital cable signals without an external digital set -top box to 2 ...
Owner's Manual (English)
Page 26
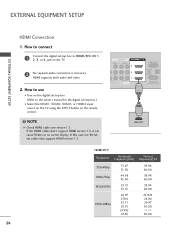
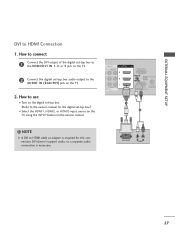
... screen display. How to connect EXTERNAL EQUIPMENT SETUP 1 Connect the digital set -top box.) I Select the HDMI1, HDMI2, HDMI3, or HDMI4 input source on the TV using the INPUT button on the TV. 2 No separate audio connection is necessary. How to HDMI/DVI IN 1, 2, 3, or 4 jack on the remote control. In this case use...
... screen display. How to connect EXTERNAL EQUIPMENT SETUP 1 Connect the digital set -top box.) I Select the HDMI1, HDMI2, HDMI3, or HDMI4 input source on the TV using the INPUT button on the TV. 2 No separate audio connection is necessary. How to HDMI/DVI IN 1, 2, 3, or 4 jack on the remote control. In this case use...
Owner's Manual (English)
Page 27
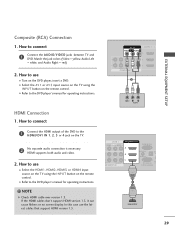
... for this connection. How to connect 1 Connect the DVI output of the digital set-top box to the HDMI/DVI IN 1, 2, or 3 jack on the TV. 2 Connect the digital set -top box. (Refer to HDMI cable or adapter is necessary. How to use I Select the HDMI1, HDMI2, or HDMI3... input source on the TV using the INPUT button on the digital set -top box audio output to HDMI Connection 1. DVI OUTPUT L R AUDIO 27 DVI doesn't support audio, so a separate audio...
... for this connection. How to connect 1 Connect the DVI output of the digital set-top box to the HDMI/DVI IN 1, 2, or 3 jack on the TV. 2 Connect the digital set -top box. (Refer to HDMI cable or adapter is necessary. How to use I Select the HDMI1, HDMI2, or HDMI3... input source on the TV using the INPUT button on the digital set -top box audio output to HDMI Connection 1. DVI OUTPUT L R AUDIO 27 DVI doesn't support audio, so a separate audio...
Owner's Manual (English)
Page 28
... /DVI VIDEO L(MONO) AUDIO R 3 2 2 L R 1 1 VIDEO AUDIO COMPONENT IN ( ) 28 ( ) Component Input ports To get better picture quality, connect a DVD player to COMPONENT IN 2 input, select the Component2 input source on the TV. 2. Match the jack colors (Y = green, PB = blue, and PR = red). 2 Connect the audio outputs of the...DVD to use I Select the Component1 input source on the TV using the INPUT button on the DVD player, insert a DVD. I Refer to the COMPONENT IN AUDIO 1 jacks on the TV. I If connected to the component input ports as shown below. EXTERNAL EQUIPMENT ...
... /DVI VIDEO L(MONO) AUDIO R 3 2 2 L R 1 1 VIDEO AUDIO COMPONENT IN ( ) 28 ( ) Component Input ports To get better picture quality, connect a DVD player to COMPONENT IN 2 input, select the Component2 input source on the TV. 2. Match the jack colors (Y = green, PB = blue, and PR = red). 2 Connect the audio outputs of the...DVD to use I Select the Component1 input source on the TV using the INPUT button on the DVD player, insert a DVD. I Refer to the COMPONENT IN AUDIO 1 jacks on the TV. I If connected to the component input ports as shown below. EXTERNAL EQUIPMENT ...
Owner's Manual (English)
Page 29
... instructions. I Refer to use I Refer to connect 1 Connect the AUDIO/VIDEO jacks between TV and DVD. I Select the HDMI1, HDMI2, HDMI3, or HDMI4 input source on the TV using the INPUT button on the TV. 2 No separate audio connection is necessary. HDMI supports both audio and video. 2. AV ...How to the HDMI/DVI IN 1, 2, 3 or 4 jack on the remote control. In this case use I Select the A V 1 or A V 2 input source on the TV using the INPUT button on the DVD player, insert a DVD. Match the jack colors (Video = yellow, Audio Left = white, and Audio Right = red) 2. ( ) (...
... instructions. I Refer to use I Refer to connect 1 Connect the AUDIO/VIDEO jacks between TV and DVD. I Select the HDMI1, HDMI2, HDMI3, or HDMI4 input source on the TV using the INPUT button on the TV. 2 No separate audio connection is necessary. HDMI supports both audio and video. 2. AV ...How to the HDMI/DVI IN 1, 2, 3 or 4 jack on the remote control. In this case use I Select the A V 1 or A V 2 input source on the TV using the INPUT button on the DVD player, insert a DVD. Match the jack colors (Video = yellow, Audio Left = white, and Audio Right = red) 2. ( ) (...

Owner's Manual (English)
Page 31
I Select the A V 1 input source on the TV using the INPUT button on the TV. ! How to use I Insert a video tape into the VCR and press PLAY on the VCR. (Refer to the VCR owner's manual.) I If connected to AV IN 2, select AV2 input source on the remote control. NOTE G If you have a mono VCR, connect... the audio cable from the VCR to connect 1 Connect the AUDIO/VIDEO jacks between TV and VCR. How to the AUDIO L/MONO jack of the...
I Select the A V 1 input source on the TV using the INPUT button on the TV. ! How to use I Insert a video tape into the VCR and press PLAY on the VCR. (Refer to the VCR owner's manual.) I If connected to AV IN 2, select AV2 input source on the remote control. NOTE G If you have a mono VCR, connect... the audio cable from the VCR to connect 1 Connect the AUDIO/VIDEO jacks between TV and VCR. How to the AUDIO L/MONO jack of the...
Owner's Manual (English)
Page 32
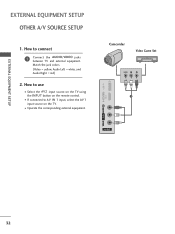
I Select the A V 2 input source on the TV using the INPUT button on the TV. USB IN IN 4 Camcorder Video Game Set VIDEO L R 1 VIDEO L/MONO AUDIO R AV IN 2 32 I If connected to use I Operate the corresponding external equipment. EXTERNAL EQUIPMENT SETUP EXTERNAL EQUIPMENT SETUP OTHER A/V SOURCE SETUP 1. How to AV IN 1 input, select the A V 1 input source on the remote control. How to connect 1 Connect the AUDIO/VIDEO jacks between TV and external equipment. Match the jack colors. (Video = yellow, Audio Left = white, and Audio Right = red) 2.
I Select the A V 2 input source on the TV using the INPUT button on the TV. USB IN IN 4 Camcorder Video Game Set VIDEO L R 1 VIDEO L/MONO AUDIO R AV IN 2 32 I If connected to use I Operate the corresponding external equipment. EXTERNAL EQUIPMENT SETUP EXTERNAL EQUIPMENT SETUP OTHER A/V SOURCE SETUP 1. How to AV IN 1 input, select the A V 1 input source on the remote control. How to connect 1 Connect the AUDIO/VIDEO jacks between TV and external equipment. Match the jack colors. (Video = yellow, Audio Left = white, and Audio Right = red) 2.
Owner's Manual (English)
Page 33
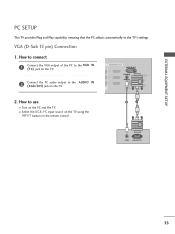
... Plug and Play capability, meaning that the PC adjusts automatically to use I Select the RGB-PC input source on the TV using the INPUT button on the TV. 1 /DVI IN RGB IN (PC) AUDIO IN (RGB/DVI) OPTICAL DIGITAL AUDIO OUT ANTENNA/ RS-232C IN CABLE IN (CONTROL&SERVICE) 2. I Turn on the PC ...and the TV. VGA (D-Sub 15 pin) Connection 1. How to connect 1 Connect the VGA output of the PC to...
... Plug and Play capability, meaning that the PC adjusts automatically to use I Select the RGB-PC input source on the TV using the INPUT button on the TV. 1 /DVI IN RGB IN (PC) AUDIO IN (RGB/DVI) OPTICAL DIGITAL AUDIO OUT ANTENNA/ RS-232C IN CABLE IN (CONTROL&SERVICE) 2. I Turn on the PC ...and the TV. VGA (D-Sub 15 pin) Connection 1. How to connect 1 Connect the VGA output of the PC to...

Owner's Manual (English)
Page 34
In this case use I Select the HDMI1, HDMI2, or HDMI3 input source on the TV using the INPUT button on the remote control. How to connect 1 Connect the DVI output of the PC to the HDMI/DVI IN 1, 2, or 3 jack on the TV. 2 Connect the PC audio output to the AUDIO IN (RGB/DVI) jack... on the PC and the TV. How to HDMI Connection 1. NOTE...
In this case use I Select the HDMI1, HDMI2, or HDMI3 input source on the TV using the INPUT button on the remote control. How to connect 1 Connect the DVI output of the PC to the HDMI/DVI IN 1, 2, or 3 jack on the TV. 2 Connect the PC audio output to the AUDIO IN (RGB/DVI) jack... on the PC and the TV. How to HDMI Connection 1. NOTE...
Owner's Manual (English)
Page 35
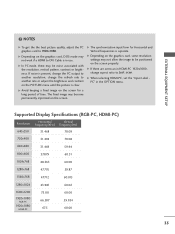
... HDMI-PC) Resolution 640x350 Horizontal Vertical Frequency(KHz) Frequency(Hz) 31.468 70.09 720x400 31.469 70.08 640x480 31.469 59.94 800x600 37.879 60.31 1024x768 48.363 60.00 1280x768 47.776 59.87 1360x768 47.712 60.015 1280x1024 63.981 60.02 1600x1200 1920x1080...is in use. G If there are overscan in the OPTION menu. G When selecting HDMI-PC, set the "Input Label PC" in HDMI-PC 1920x1080, change the refresh rate to Just scan. G The synchronization input form for a long period of time. EXTERNAL EQUIPMENT SETUP ! The fixed image may not work if a HDMI ...
... HDMI-PC) Resolution 640x350 Horizontal Vertical Frequency(KHz) Frequency(Hz) 31.468 70.09 720x400 31.469 70.08 640x480 31.469 59.94 800x600 37.879 60.31 1024x768 48.363 60.00 1280x768 47.776 59.87 1360x768 47.712 60.015 1280x1024 63.981 60.02 1600x1200 1920x1080...is in use. G If there are overscan in the OPTION menu. G When selecting HDMI-PC, set the "Input Label PC" in HDMI-PC 1920x1080, change the refresh rate to Just scan. G The synchronization input form for a long period of time. EXTERNAL EQUIPMENT SETUP ! The fixed image may not work if a HDMI ...
Owner's Manual (English)
Page 41
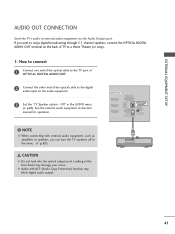
... to enjoy digital broadcasting through 5.1-channel speakers, connect the OPTICAL DIGITAL AUDIO OUT terminal on the back of the optical cable to the digital audio input on the audio equipment. ( ) 3 Set the "TV Speaker option - How to connect 1 Connect one end of the optical cable to the... of OPTICAL DIGITAL AUDIO OUT. 2 Connect the other end of TV to external audio equipment via the Audio Output port. Looking at the laser beam may block digital audio output. 41 If you can turn the TV speakers off in the AUDIO menu. (G p.87). Off " in 2 the menu. (G p.87) CAUTION G Do ...
... to enjoy digital broadcasting through 5.1-channel speakers, connect the OPTICAL DIGITAL AUDIO OUT terminal on the back of the optical cable to the digital audio input on the audio equipment. ( ) 3 Set the "TV Speaker option - How to connect 1 Connect one end of the optical cable to the... of OPTICAL DIGITAL AUDIO OUT. 2 Connect the other end of TV to external audio equipment via the Audio Output port. Looking at the laser beam may block digital audio output. 41 If you can turn the TV speakers off in the AUDIO menu. (G p.87). Off " in 2 the menu. (G p.87) CAUTION G Do ...

Owner's Manual (English)
Page 42
INPUT Rotates through inputs. USB, SIMPLINK Control buttons Controls USB menu (Photo List and Music List.) Controls the SIMPLINK compatible devices. G p.68 SLEEP Select the amount of time before your TV turns off to standby. G p.98 POWER Turns the TV on the TV. G p.54 ENERGY SAVING Adjusts the Energy Saving....or off automatically. When you toggle this button, the SIMPLINK menu appears at the remote control sensor on from standby. G p.51 FLASHBK Tunes to TV. MENU MENU ENTER RETURN INFO AV MODE VOL MARK FAV P CH A G E MUTE 123 456 789 0 FLASHBK LIST 42 G p.78 ...
INPUT Rotates through inputs. USB, SIMPLINK Control buttons Controls USB menu (Photo List and Music List.) Controls the SIMPLINK compatible devices. G p.68 SLEEP Select the amount of time before your TV turns off to standby. G p.98 POWER Turns the TV on the TV. G p.54 ENERGY SAVING Adjusts the Energy Saving....or off automatically. When you toggle this button, the SIMPLINK menu appears at the remote control sensor on from standby. G p.51 FLASHBK Tunes to TV. MENU MENU ENTER RETURN INFO AV MODE VOL MARK FAV P CH A G E MUTE 123 456 789 0 FLASHBK LIST 42 G p.78 ...
Owner's Manual (English)
Page 43
...volume. /DOWN FAV Scroll through preset Video and Audio modes. G p.44 CHANNEL Changes the channel. I Install two 1.5V AAA batteries. WATCHING TV / CHANNEL CONTROL THUMBSTICK Navigates the on-screen menus and adjusts the system settings to your preference. (Up/Down/Left Right/ENTER) RETURN Allows the user...back side and install the batteries matching correct polarity. UP/DOWN PAGE Moves from one full set of the screen. G p.52 MARK Select the input to move return one . I Close cover. 43 G p.71 Use to the next one step in an interactive application or other user interaction ...
...volume. /DOWN FAV Scroll through preset Video and Audio modes. G p.44 CHANNEL Changes the channel. I Install two 1.5V AAA batteries. WATCHING TV / CHANNEL CONTROL THUMBSTICK Navigates the on-screen menus and adjusts the system settings to your preference. (Up/Down/Left Right/ENTER) RETURN Allows the user...back side and install the batteries matching correct polarity. UP/DOWN PAGE Moves from one full set of the screen. G p.52 MARK Select the input to move return one . I Close cover. 43 G p.71 Use to the next one step in an interactive application or other user interaction ...


