
Specification (English)
Page 2
... 10.0" Weight in package 50.7 lbs UPC n/a Limited Warranty 1 Year Parts/Labor DIMENSIONS/REMOTE/INPUTS/OUTPUTS 3.5" 36.9" 24.1" 11.6" 7.9" (200mm) 22.9" 7.9" (200mm) 26.9" LG Electronics U.S.A., Inc. • 1000 Sylvan Avenue Englewood Cliffs, NJ 07632 Customer Service and Technical ... Audio Out 2 (1 Coaxial/1 Optical) HDMI/HDCP Input 2 (V.1.3 with Deep Color) RGB In (D-Sub 15pin) - Component 60p/30p/24p - 37LG50 LCD 1080P HDTV 37" Class (37.0" diagonal) TECHNICAL SPECIFICATIONS LCD PANEL Native Display Resolution 1920 x 1080p Brightness (cd...
... 10.0" Weight in package 50.7 lbs UPC n/a Limited Warranty 1 Year Parts/Labor DIMENSIONS/REMOTE/INPUTS/OUTPUTS 3.5" 36.9" 24.1" 11.6" 7.9" (200mm) 22.9" 7.9" (200mm) 26.9" LG Electronics U.S.A., Inc. • 1000 Sylvan Avenue Englewood Cliffs, NJ 07632 Customer Service and Technical ... Audio Out 2 (1 Coaxial/1 Optical) HDMI/HDCP Input 2 (V.1.3 with Deep Color) RGB In (D-Sub 15pin) - Component 60p/30p/24p - 37LG50 LCD 1080P HDTV 37" Class (37.0" diagonal) TECHNICAL SPECIFICATIONS LCD PANEL Native Display Resolution 1920 x 1080p Brightness (cd...

Owner's Manual (English)
Page 6
... Channel (Manual Tuning 41 - Picture Mode - Expert Control 61 Picture Improvement Technology 62 Advanced Control - Channel Editing 42 Input List 43 Input Label 44 AV Mode 45 SIMPLINK 46 USB Entry Modes 48 Photo List 49 Music List 53 PICTURE CONTROL Picture Size (...Setup 25 PC Setup 26 USB Connection 32 Audio Out Connection 33 WATCHING TV / CHANNEL CONTROL Remote Control Functions 34 Turning On the TV 36 Channel Selection 36 Volume Adjustment 36 Quick Menu / Favorite Channel Setup 37 Initial Setting 38 On-Screen Menus Selection 39 Channel Setup - Picture Mode...
... Channel (Manual Tuning 41 - Picture Mode - Expert Control 61 Picture Improvement Technology 62 Advanced Control - Channel Editing 42 Input List 43 Input Label 44 AV Mode 45 SIMPLINK 46 USB Entry Modes 48 Photo List 49 Music List 53 PICTURE CONTROL Picture Size (...Setup 25 PC Setup 26 USB Connection 32 Audio Out Connection 33 WATCHING TV / CHANNEL CONTROL Remote Control Functions 34 Turning On the TV 36 Channel Selection 36 Volume Adjustment 36 Quick Menu / Favorite Channel Setup 37 Initial Setting 38 On-Screen Menus Selection 39 Channel Setup - Picture Mode...

Owner's Manual (English)
Page 7
...Auto Shut-off Setting 85 PARENTAL CONTROL / RATINGS Set Password & Lock System 86 Channel Blocking 89 Movie & TV Rating 90 Downloadable Rating 95 External Input Blocking 96 Key lock 97 APPENDIX Troubleshooting 98 Maintenance 100 Product Specifications 101 Programming the Remote Control 102 IR ...Codes 105 External Control Through RS-232C 107 7 User Mode 70 Clear Voice 71 Balance 72 TV Speakers On/Off ...
...Auto Shut-off Setting 85 PARENTAL CONTROL / RATINGS Set Password & Lock System 86 Channel Blocking 89 Movie & TV Rating 90 Downloadable Rating 95 External Input Blocking 96 Key lock 97 APPENDIX Troubleshooting 98 Maintenance 100 Product Specifications 101 Programming the Remote Control 102 IR ...Codes 105 External Control Through RS-232C 107 7 User Mode 70 Clear Voice 71 Balance 72 TV Speakers On/Off ...

Owner's Manual (English)
Page 10
...) Remote Control Sensor POWER Button CH CHANNEL ( , ) Buttons VOL ENTER MENU INPUT VOLUME (+, -) Buttons ENTER Button MENU Button INPUT Button 10 PREPARATION PREPARATION FRONT PANEL INFORMATION I NOTE: If your TV has a protection tape attached, remove the tape. Illuminates blue when the set is included with a cloth (If a polishing cloth is switched on. (Can...
...) Remote Control Sensor POWER Button CH CHANNEL ( , ) Buttons VOL ENTER MENU INPUT VOLUME (+, -) Buttons ENTER Button MENU Button INPUT Button 10 PREPARATION PREPARATION FRONT PANEL INFORMATION I NOTE: If your TV has a protection tape attached, remove the tape. Illuminates blue when the set is included with a cloth (If a polishing cloth is switched on. (Can...

Owner's Manual (English)
Page 11
.... 7 DIGITAL AUDIO OUT Digital audio output for viewing photos and listening to this jack. 11 Supports standard definition video only (480i). 10 USB INPUT Used for use with amps and home theater systems. 9 AV (Audio/Video) IN ( ) Analog composite connection. Doesn't support 480i. Connect ...9 ( ) 9 AV IN 2 1 HDMI/DVI IN, HDMI IN Digital Connection. Supports standard definition video only (480i). Caution: Never attempt to operate the TV on DC power. 6 ANTENNA/CABLE IN Connect over-the air signals to MP3s. 11 Power Cord Socket For operation with amps and home theater systems...
.... 7 DIGITAL AUDIO OUT Digital audio output for viewing photos and listening to this jack. 11 Supports standard definition video only (480i). 10 USB INPUT Used for use with amps and home theater systems. 9 AV (Audio/Video) IN ( ) Analog composite connection. Doesn't support 480i. Connect ...9 ( ) 9 AV IN 2 1 HDMI/DVI IN, HDMI IN Digital Connection. Supports standard definition video only (480i). Caution: Never attempt to operate the TV on DC power. 6 ANTENNA/CABLE IN Connect over-the air signals to MP3s. 11 Power Cord Socket For operation with amps and home theater systems...

Owner's Manual (English)
Page 18
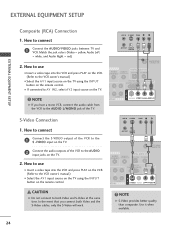
...00 59.94 60.00 I If connected to use I Turn on the TV. 2. However, if you have finished connecting all equipment. operation) I Select the Component 1 input source on the TV using the INPUT button on the TV. I Image shown may differ from a digital set-top box or other ...digital external device. How to COMPONENT IN2 input, select the Component 2 input source on the remote control. EXTERNAL EQUIPMENT SETUP...
...00 59.94 60.00 I If connected to use I Turn on the TV. 2. However, if you have finished connecting all equipment. operation) I Select the Component 1 input source on the TV using the INPUT button on the TV. I Image shown may differ from a digital set-top box or other ...digital external device. How to COMPONENT IN2 input, select the Component 2 input source on the remote control. EXTERNAL EQUIPMENT SETUP...

Owner's Manual (English)
Page 19
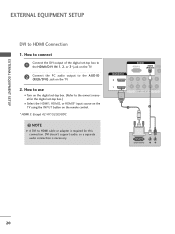
.... (Refer to the owner's manual for the digital set -top box to connect 1 Connect the digital set -top box.) I Select the HDMI1, HDMI2, or HDMI3* input source on the TV using the INPUT button on the TV. 2 No separate audio connection is necessary. HDMI supports both audio and video. 2. EXTERNAL EQUIPMENT SETUP HDMI Connection 1.
.... (Refer to the owner's manual for the digital set -top box to connect 1 Connect the digital set -top box.) I Select the HDMI1, HDMI2, or HDMI3* input source on the TV using the INPUT button on the TV. 2 No separate audio connection is necessary. HDMI supports both audio and video. 2. EXTERNAL EQUIPMENT SETUP HDMI Connection 1.
Owner's Manual (English)
Page 20
... set-top box. (Refer to the owner's manual for this connection. NOTE G A DVI to the A U D I Select the HDMI1, HDMI2, or HDMI3* input source on the TV using the INPUT button on the TV. 2. DVI doesn't support audio, so a separate audio connection is required for the digital set -top box to the HDMI/DVI IN...
... set-top box. (Refer to the owner's manual for this connection. NOTE G A DVI to the A U D I Select the HDMI1, HDMI2, or HDMI3* input source on the TV using the INPUT button on the TV. 2. DVI doesn't support audio, so a separate audio connection is required for the digital set -top box to the HDMI/DVI IN...

Owner's Manual (English)
Page 21
... a DVD player to the component input ports as shown below. I If connected to use I Select the Component 1 input source on the TV using the INPUT button on the TV. 2. I Turn on the TV. How to COMPONENT IN 2 input, select the Component 2 input source on the DVD player, insert... a DVD. Component ports on the TV Y Y Video output ports Y on the TV. Match the jack colors (Y ...
... a DVD player to the component input ports as shown below. I If connected to use I Select the Component 1 input source on the TV using the INPUT button on the TV. 2. I Turn on the TV. How to COMPONENT IN 2 input, select the Component 2 input source on the DVD player, insert... a DVD. Component ports on the TV Y Y Video output ports Y on the TV. Match the jack colors (Y ...

Owner's Manual (English)
Page 22
...2 Y 1 PB PR L VIDEO A COMPONENT IN 1 HDMI-DVD OUTPUT 22 How to use I Refer to use I Select the A V 1 input source on the TV using the INPUT button on the remote control. S-VIDEO AUDIO L R ANTENNA/ CABLE IN 1 2 DIGITAL AUDIO OUT DIO REMOTE B/DVI) CONTROL IN OPTICAL COAXIAL RS-232C.... How to connect 1 Connect the S-VIDEO output of the DVD to the S -VIDEO input on the TV. 2 Connect the audio outputs of the DVD to the AUDIO input jacks on the TV. 2 No separate audio connection is necessary. EXTERNAL EQUIPMENT SETUP EXTERNAL EQUIPMENT SETUP S-Video Connection ...
...2 Y 1 PB PR L VIDEO A COMPONENT IN 1 HDMI-DVD OUTPUT 22 How to use I Refer to use I Select the A V 1 input source on the TV using the INPUT button on the remote control. S-VIDEO AUDIO L R ANTENNA/ CABLE IN 1 2 DIGITAL AUDIO OUT DIO REMOTE B/DVI) CONTROL IN OPTICAL COAXIAL RS-232C.... How to connect 1 Connect the S-VIDEO output of the DVD to the S -VIDEO input on the TV. 2 Connect the audio outputs of the DVD to the AUDIO input jacks on the TV. 2 No separate audio connection is necessary. EXTERNAL EQUIPMENT SETUP EXTERNAL EQUIPMENT SETUP S-Video Connection ...
Owner's Manual (English)
Page 24
... to both Video and the S-Video cables, only the S-Video will work. CAUTION G Do not connect to AV IN2, select AV2 input source on the TV. 2 Connect the audio outputs of the TV. ANT IN S-VIDEO VIDEO L R ANT OUT OUTPUT SWITCH 1 ANTENNA/ CABLE IN DIGITAL AUDIO OUT AUDIO REMOTE (RGB/DVI) CONTROL... of the VCR to the VCR owner's manual.) I Insert a video tape into the VCR and press PLAY on the VCR. (Refer to the S -VIDEO input on the TV. ! NOTE G If you connect both Video and S-Video at the same time. ANT IN S-VIDEO VIDEO L R ANT OUT OUTPUT SWITCH ANTENNA/ CABLE IN...
... to both Video and the S-Video cables, only the S-Video will work. CAUTION G Do not connect to AV IN2, select AV2 input source on the TV. 2 Connect the audio outputs of the TV. ANT IN S-VIDEO VIDEO L R ANT OUT OUTPUT SWITCH 1 ANTENNA/ CABLE IN DIGITAL AUDIO OUT AUDIO REMOTE (RGB/DVI) CONTROL... of the VCR to the VCR owner's manual.) I Insert a video tape into the VCR and press PLAY on the VCR. (Refer to the S -VIDEO input on the TV. ! NOTE G If you connect both Video and S-Video at the same time. ANT IN S-VIDEO VIDEO L R ANT OUT OUTPUT SWITCH ANTENNA/ CABLE IN...

Owner's Manual (English)
Page 25
EXTERNAL EQUIPMENT SETUP OTHER A/V SOURCE SETUP 1. I Operate the corresponding external equipment. Match the jack colors. (Video = yellow, Audio Left = white, and Audio Right = red) 2. I If connected to AV IN1 input, select the A V 1 input source on the remote control. VIDEO L/MONO AUDIO R HDMI IN 3 USB IN Camcorder Video Game Set VIDEO L R 1 AV IN 2 25 How to connect 1 Connect the AUDIO/VIDEO jacks between TV and external equipment. How to use I Select the A V 2 input source on the TV using the INPUT button on the TV.
EXTERNAL EQUIPMENT SETUP OTHER A/V SOURCE SETUP 1. I Operate the corresponding external equipment. Match the jack colors. (Video = yellow, Audio Left = white, and Audio Right = red) 2. I If connected to AV IN1 input, select the A V 1 input source on the remote control. VIDEO L/MONO AUDIO R HDMI IN 3 USB IN Camcorder Video Game Set VIDEO L R 1 AV IN 2 25 How to connect 1 Connect the AUDIO/VIDEO jacks between TV and external equipment. How to use I Select the A V 2 input source on the TV using the INPUT button on the TV.
Owner's Manual (English)
Page 26
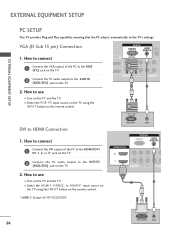
How to the AUDIO (RGB/DVI) jack on the TV. 2. I Select the RGB-PC input source on the TV using the INPUT button on the PC and the TV. I Select the HDMI1, HDMI2, or HDMI3* input source on the TV using the INPUT button on the PC and the TV. How to connect 1 Connect the DVI output of the... PC to the R G B (P C) jack on the TV. 2 Connect the PC...
How to the AUDIO (RGB/DVI) jack on the TV. 2. I Select the RGB-PC input source on the TV using the INPUT button on the PC and the TV. I Select the HDMI1, HDMI2, or HDMI3* input source on the TV using the INPUT button on the PC and the TV. How to connect 1 Connect the DVI output of the... PC to the R G B (P C) jack on the TV. 2 Connect the PC...
Owner's Manual (English)
Page 27
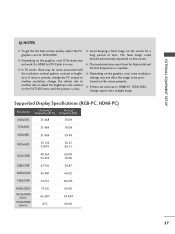
...) Resolution Horizontal Vertical Frequency(KHz) Frequency(Hz) 640x350 31.468 70.09 720x400 31.469 70.08 640x480 31.469 59.94 800x600 35.156 37.879 56.25 60.31 1024x768 48.363 56.476 60.00 70.06 1280x768 47.776 59.87 1280x1024 63.981 60.02 1360x768....00 27 The fixed image could become permanently imprinted on the PICTURE menu until the picture is clear. G Depending on the screen properly. G The synchronization input form for a long period of time. G If there are overscan in use. G Depending on the screen for Horizontal and Vertical frequencies is in HDMI-PC...
...) Resolution Horizontal Vertical Frequency(KHz) Frequency(Hz) 640x350 31.468 70.09 720x400 31.469 70.08 640x480 31.469 59.94 800x600 35.156 37.879 56.25 60.31 1024x768 48.363 56.476 60.00 70.06 1280x768 47.776 59.87 1280x1024 63.981 60.02 1360x768....00 27 The fixed image could become permanently imprinted on the PICTURE menu until the picture is clear. G Depending on the screen properly. G The synchronization input form for a long period of time. G If there are overscan in use. G Depending on the screen for Horizontal and Vertical frequencies is in HDMI-PC...
Owner's Manual (English)
Page 33
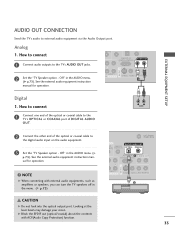
... the laser beam may damage your vision. EXTERNAL EQUIPMENT SETUP AUDIO OUT CONNECTION Send the TV's audio to the digital audio input on the audio equipment. 3 Set the "TV Speaker option - How to connect 1 Connect audio outputs to the TV's AUDIO OUT jacks. NOTE G When connecting with ACP(Audio Copy Protection) function. G Block the...
... the laser beam may damage your vision. EXTERNAL EQUIPMENT SETUP AUDIO OUT CONNECTION Send the TV's audio to the digital audio input on the audio equipment. 3 Set the "TV Speaker option - How to connect 1 Connect audio outputs to the TV's AUDIO OUT jacks. NOTE G When connecting with ACP(Audio Copy Protection) function. G Block the...

Owner's Manual (English)
Page 34
...menu (Photo List and Music List.) Control the SIMPLINK compatible devices. TV/STB/DVD/VCR Select the remote operating mode: TV, STB, DVD, or VCR. Q.MENU Select the desired quick menu source. INPUT External input modes rotate in regular sequence. VOLUME UP Increase/decrease the sound level... 3 456 789 0 FLASHBK 34 POWER Turns your TV or any menu. Clear all on-screen displays and return to the next one. G p.37 MUTE Switch the sound on the TV. G p.36 CHANNEL Select available channels. TV POWER DVD STB VCR Q. G p.37 MENU Displays the main menu. UP/DOWN PAGE Move...
...menu (Photo List and Music List.) Control the SIMPLINK compatible devices. TV/STB/DVD/VCR Select the remote operating mode: TV, STB, DVD, or VCR. Q.MENU Select the desired quick menu source. INPUT External input modes rotate in regular sequence. VOLUME UP Increase/decrease the sound level... 3 456 789 0 FLASHBK 34 POWER Turns your TV or any menu. Clear all on-screen displays and return to the next one. G p.37 MUTE Switch the sound on the TV. G p.36 CHANNEL Select available channels. TV POWER DVD STB VCR Q. G p.37 MENU Displays the main menu. UP/DOWN PAGE Move...

Owner's Manual (English)
Page 36
...button to adjust the volume. 2 If you intend to be away on the remote control. The TV reverts to select a channel number. I This TV is out. 3 When finished using the INPUT button on vacation, disconnect the power plug from the wall power outlet. NOTE G If you ... to standby mode. At this moment, the TV switches to turn TV on, press the , INPUT, CH ( ) button on the TV or press the POWER, INPUT, CH( or ), Number (0~9) button on the remote control. WATCHING TV / CHANNEL CONTROL WATCHING TV / CHANNEL CONTROL TURNING ON THE TV 1 First, connect power cord correctly.
...button to adjust the volume. 2 If you intend to be away on the remote control. The TV reverts to select a channel number. I This TV is out. 3 When finished using the INPUT button on vacation, disconnect the power plug from the wall power outlet. NOTE G If you ... to standby mode. At this moment, the TV switches to turn TV on, press the , INPUT, CH ( ) button on the TV or press the POWER, INPUT, CH( or ), Number (0~9) button on the remote control. WATCHING TV / CHANNEL CONTROL WATCHING TV / CHANNEL CONTROL TURNING ON THE TV 1 First, connect power cord correctly.

Owner's Manual (English)
Page 39
...Balance 0L R Sound Mode : Standard • SRS TruSurround XT: Off • Treble 50 • Bass 50 • Reset TV Speaker : On OPTION Language Input Label SIMPLINK Key Lock Caption Set ID Power Indicator Initial Setting Move Enter : English : On : Off : Off : 1 :...Move Enter Lock System : Off Set Password Block Channel Movie Rating TV Rating-Children TV Rating-General Downloadable Rating Input Block Lock System : Off Set Password Block Channel TV Rating-English TV Rating-French Downloadable Rating Input Block For USA For Canada 1 MENU Display each menu. 2 ...
...Balance 0L R Sound Mode : Standard • SRS TruSurround XT: Off • Treble 50 • Bass 50 • Reset TV Speaker : On OPTION Language Input Label SIMPLINK Key Lock Caption Set ID Power Indicator Initial Setting Move Enter : English : On : Off : Off : 1 :...Move Enter Lock System : Off Set Password Block Channel Movie Rating TV Rating-Children TV Rating-General Downloadable Rating Input Block Lock System : Off Set Password Block Channel TV Rating-English TV Rating-French Downloadable Rating Input Block For USA For Canada 1 MENU Display each menu. 2 ...

Owner's Manual (English)
Page 40
WATCHING TV / CHANNEL CONTROL WATCHING TV / CHANNEL CONTROL CHANNEL SETUP Auto Scan (Auto Tuning) Automatically finds all channels available through antenna or cable inputs, and stores them in memory on . 40 MENU Return to begin auto tuning. CHANNEL Auto Tuning Manual Tuning Channel Edit... Move Enter CHANNEL Auto Tuning Manual Tuning Channel Edit Move Enter Press 'Yes' button to TV viewing. Yes No 1 MENU Select...
WATCHING TV / CHANNEL CONTROL WATCHING TV / CHANNEL CONTROL CHANNEL SETUP Auto Scan (Auto Tuning) Automatically finds all channels available through antenna or cable inputs, and stores them in memory on . 40 MENU Return to begin auto tuning. CHANNEL Auto Tuning Manual Tuning Channel Edit... Move Enter CHANNEL Auto Tuning Manual Tuning Channel Edit Move Enter Press 'Yes' button to TV viewing. Yes No 1 MENU Select...

Owner's Manual (English)
Page 41
... CONTROL Add/Delete Channel (Manual Tuning) If selecting DTV or CADTV input signal, you want to TV viewing. ENTER Select A d d or D e l e t e. 6 RETURN Return to see the quality of the signal being received. Channel 2 DTV 2-1 Bad Normal Good Delete Close 1 MENU 2 ENTER 3 ENTER 4 5 ...
... CONTROL Add/Delete Channel (Manual Tuning) If selecting DTV or CADTV input signal, you want to TV viewing. ENTER Select A d d or D e l e t e. 6 RETURN Return to see the quality of the signal being received. Channel 2 DTV 2-1 Bad Normal Good Delete Close 1 MENU 2 ENTER 3 ENTER 4 5 ...


