
Owner's Manual (English)
Page 1
... set . Record model number and serial number of power-saving guidelines issued by the U.S. As an ENERGY STAR Partner LGE U.S.A., Inc. www.lgusa.com / www.lg.ca LCD TV OWNER'S MANUAL LCD TV MODELS 37LB5D / 42LB5D / 47LB5D 52LB5D 32LB4D / 37LB4D / 42LB4D Please read this manual carefully before operating your dealer when you require service.
... set . Record model number and serial number of power-saving guidelines issued by the U.S. As an ENERGY STAR Partner LGE U.S.A., Inc. www.lgusa.com / www.lg.ca LCD TV OWNER'S MANUAL LCD TV MODELS 37LB5D / 42LB5D / 47LB5D 52LB5D 32LB4D / 37LB4D / 42LB4D Please read this manual carefully before operating your dealer when you require service.
Owner's Manual (English)
Page 5
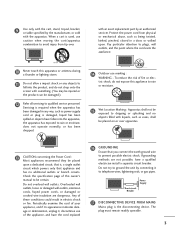
... no additional outlets or branch circuits. Check the specification page of the appliance, and have fallen into the product, and do not expose this owner's manual to be certain. Do not try to ground the unit by connecting it , discontinue use marking : WARNING - The plug must remain readily operable. 3 9 Use only...
... no additional outlets or branch circuits. Check the specification page of the appliance, and have fallen into the product, and do not expose this owner's manual to be certain. Do not try to ground the unit by connecting it , discontinue use marking : WARNING - The plug must remain readily operable. 3 9 Use only...
Owner's Manual (English)
Page 6
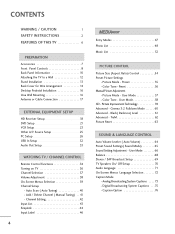
... A/V Source Setup 25 PC Setup 26 USB In Setup 32 Audio Out Setup 33 WATCHING TV / CHANNEL CONTROL Remote Control Functions 34 Turning on TV 36 Channel Selection 37 Volume Adjustment 38 On-Screen Menus Selection 39 Channel Setup - Auto Scan ( Auto Tuning... 40 - Picture Mode - Preset 56 Manual Picture Adjustment - Cinema 3:2 Pulldown Mode 60 Advanced - Analog Broadcasting System Captions . . . . 73 - Digital ...
... A/V Source Setup 25 PC Setup 26 USB In Setup 32 Audio Out Setup 33 WATCHING TV / CHANNEL CONTROL Remote Control Functions 34 Turning on TV 36 Channel Selection 37 Volume Adjustment 38 On-Screen Menus Selection 39 Channel Setup - Auto Scan ( Auto Tuning... 40 - Picture Mode - Preset 56 Manual Picture Adjustment - Cinema 3:2 Pulldown Mode 60 Advanced - Analog Broadcasting System Captions . . . . 73 - Digital ...
Owner's Manual (English)
Page 7
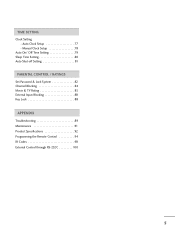
Auto Clock Setup 77 - Manual Clock Setup 78 Auto On/ Off Time Setting 79 Sleep Time Setting 80 Auto Shut-off Setting 81 PARENTAL CONTROL / RATINGS Set Password & Lock System 82 Channel Blocking 84 Movie & TV Rating 85 External Input Blocking 88 Key Lock 88 APPENDIX Troubleshooting 89 Maintenance 91 Product Specifications 92 Programming the Remote Control 94 IR Codes 98 External Control through RS-232C 100 5 TIME SETTING Clock Setting -
Auto Clock Setup 77 - Manual Clock Setup 78 Auto On/ Off Time Setting 79 Sleep Time Setting 80 Auto Shut-off Setting 81 PARENTAL CONTROL / RATINGS Set Password & Lock System 82 Channel Blocking 84 Movie & TV Rating 85 External Input Blocking 88 Key Lock 88 APPENDIX Troubleshooting 89 Maintenance 91 Product Specifications 92 Programming the Remote Control 94 IR Codes 98 External Control through RS-232C 100 5 TIME SETTING Clock Setting -
Owner's Manual (English)
Page 9
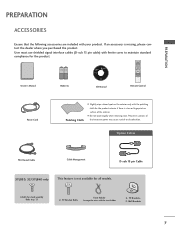
.... MENU BRIGHT + TIMER RATIO SIMPLINK BACK APM CC AUTO DEMO M/C EJECT Owner's Manual Batteries CD Manual Remote Control Power Cord Polishing Cloth I Do not wipe roughly when removing stain. TV Bracket Bolts Twist Holder Arrange the wires with ferrite cores to maintain standard compliance for ...75Ω Round Cable Cable Management D-sub 15 pin Cable 37LB5D, 32/37LB4D only This feature is not available for all models. 4-bolts for the product. 1.5V 1.5V LCD TV PLASMA TV Owner's Manual http://www.lgusa.com www.lg.ca Copyright© 2007 LGE, All Rights Reserved. User must...
.... MENU BRIGHT + TIMER RATIO SIMPLINK BACK APM CC AUTO DEMO M/C EJECT Owner's Manual Batteries CD Manual Remote Control Power Cord Polishing Cloth I Do not wipe roughly when removing stain. TV Bracket Bolts Twist Holder Arrange the wires with ferrite cores to maintain standard compliance for ...75Ω Round Cable Cable Management D-sub 15 pin Cable 37LB5D, 32/37LB4D only This feature is not available for all models. 4-bolts for the product. 1.5V 1.5V LCD TV PLASMA TV Owner's Manual http://www.lgusa.com www.lg.ca Copyright© 2007 LGE, All Rights Reserved. User must...
Owner's Manual (English)
Page 20
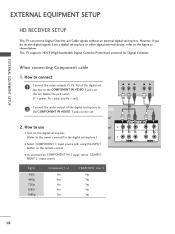
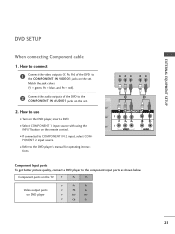
...to the COMPONENT IN AUDIO 1 jacks on the set. However, if you do receive digital signals from a digital set -top box. This TV supports HDCP (High-bandwidth Digital Contents Protection) protocol for the digital set-top bo(xDV.)I) I Select COMPONENT 1 input source with using the...18 I Turn on the digital set-top box. (Refer to the owner's manual for Digital Contents. When connecting Component cable 1. Y PB PR L R 1 2 2. EXTERNAL EQUIPMENT SETUP EXTERNAL EQUIPMENT SETUP HD RECEIVER SETUP This TV can receive Digital Over-the-air/Cable signals without an external digital set -...
...to the COMPONENT IN AUDIO 1 jacks on the set. However, if you do receive digital signals from a digital set -top box. This TV supports HDCP (High-bandwidth Digital Contents Protection) protocol for the digital set-top bo(xDV.)I) I Select COMPONENT 1 input source with using the...18 I Turn on the digital set-top box. (Refer to the owner's manual for Digital Contents. When connecting Component cable 1. Y PB PR L R 1 2 2. EXTERNAL EQUIPMENT SETUP EXTERNAL EQUIPMENT SETUP HD RECEIVER SETUP This TV can receive Digital Over-the-air/Cable signals without an external digital set -...
Owner's Manual (English)
Page 21
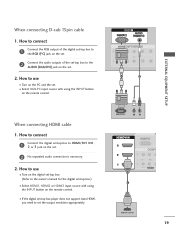
... INPUT button on the set . 2 No separated audio connection is necessary. 2. How to use I Turn on the digital set-top box. (Refer to the owner's manual for the digital set-top box.) I If the digital set-top box player does not support Auto HDMI, you need to use I Select RGB-PC...
... INPUT button on the set . 2 No separated audio connection is necessary. 2. How to use I Turn on the digital set-top box. (Refer to the owner's manual for the digital set-top box.) I If the digital set-top box player does not support Auto HDMI, you need to use I Select RGB-PC...
Owner's Manual (English)
Page 22
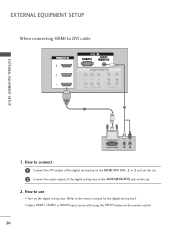
EXTERNAL EQUIPMENT SETUP When connecting HDMI to the owner's manual for the digital set . 2. How to use I Select HDMI1, HDMI2 or HDMI3 input source with using the INPUT button on the digital set-top box. (Refer to DVI cable RGB 3 EXTERNAL EQUIPMENT SETUP 2 1 DVI-DTV OUTPUT L R 1. How to connect 1 Connect the DVI output of the digital set-top box to the HDMI/DVI IN1, 2 or 3 jack on the set. 2 Connect the audio output of the digital set-top box to the AUDIO(RGB/DVI) jack on the set -top box.) I Turn on the remote control. 20
EXTERNAL EQUIPMENT SETUP When connecting HDMI to the owner's manual for the digital set . 2. How to use I Select HDMI1, HDMI2 or HDMI3 input source with using the INPUT button on the digital set-top box. (Refer to DVI cable RGB 3 EXTERNAL EQUIPMENT SETUP 2 1 DVI-DTV OUTPUT L R 1. How to connect 1 Connect the DVI output of the digital set-top box to the HDMI/DVI IN1, 2 or 3 jack on the set. 2 Connect the audio output of the digital set-top box to the AUDIO(RGB/DVI) jack on the set -top box.) I Turn on the remote control. 20
Owner's Manual (English)
Page 23
... (Y = green, PB = blue, and PR = red). 2 Connect the audio outputs of the DVD to the component input ports as shown below. Component ports on the TV Y PB PR Video output ports on the set . 2. EXTERNAL EQUIPMENT SETUP DVD SETUP When connecting Component cable 1. I Refer to the COMPONENT IN AUDIO1 jacks on... PR Y Pb Pr Y B-Y R-Y Y Cb Cr 21 PONENT 2 input source. How to connect 1 Connect the video outputs (Y, PB, PR) of the DVD to the DVD player's manual for operating instruc-
... (Y = green, PB = blue, and PR = red). 2 Connect the audio outputs of the DVD to the component input ports as shown below. Component ports on the TV Y PB PR Video output ports on the set . 2. EXTERNAL EQUIPMENT SETUP DVD SETUP When connecting Component cable 1. I Refer to the COMPONENT IN AUDIO1 jacks on... PR Y Pb Pr Y B-Y R-Y Y Cb Cr 21 PONENT 2 input source. How to connect 1 Connect the video outputs (Y, PB, PR) of the DVD to the DVD player's manual for operating instruc-
Owner's Manual (English)
Page 24
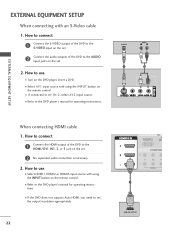
... source. S-VIDEO AUDIO L R 1 2 EXTERNAL EQUIPMENT SETUP When connecting HDMI cable 1. I If connected to the DVD player's manual for operating instructions. How to connect 1 Connect the HDMI output of the DVD to the DVD player's manual for operating instructions. How to the HDMI/DVI IN1, 2 or 3 jack on the set the output resolution...
... source. S-VIDEO AUDIO L R 1 2 EXTERNAL EQUIPMENT SETUP When connecting HDMI cable 1. I If connected to the DVD player's manual for operating instructions. How to connect 1 Connect the HDMI output of the DVD to the DVD player's manual for operating instructions. How to the HDMI/DVI IN1, 2 or 3 jack on the set the output resolution...
Owner's Manual (English)
Page 25
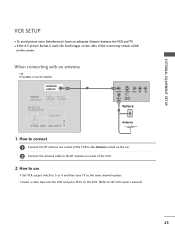
When connecting with an antenna i.e) 37/42LB4D, 37/42/47/52LB5D ANTENNA/ CABLE IN 1 ANT OUT S-VIDEO VIDEO L R ANT IN OUTPUT SWITCH Wall Jack 2 Antenna 1. the fixed images on the sides of the ... screen. EXTERNAL EQUIPMENT SETUP VCR SETUP I To avoid picture noise (interference), leave an adequate distance between the VCR and TV I Set VCR output switch to 3 or 4 and then tune TV to the VCR owner's manual.) 23 I Insert a video tape into the VCR and press PLAY on the VCR. (Refer to the same channel...
When connecting with an antenna i.e) 37/42LB4D, 37/42/47/52LB5D ANTENNA/ CABLE IN 1 ANT OUT S-VIDEO VIDEO L R ANT IN OUTPUT SWITCH Wall Jack 2 Antenna 1. the fixed images on the sides of the ... screen. EXTERNAL EQUIPMENT SETUP VCR SETUP I To avoid picture noise (interference), leave an adequate distance between the VCR and TV I Set VCR output switch to 3 or 4 and then tune TV to the VCR owner's manual.) 23 I Insert a video tape into the VCR and press PLAY on the VCR. (Refer to the same channel...
Owner's Manual (English)
Page 26
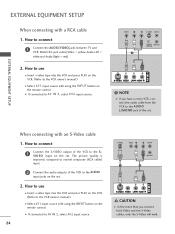
How to the VCR owner's manual.) I Select AV1 input source with using the INPUT button on the set . 2. How to connect 1 Connect the ... CABLE IN 1 NOTE If you connect both Video and the S-Video cables, only the S-Video will work. compared to the VCR owner's manual.) I Select A V 1 input source with using the INPUT button on the set . When connecting with a RCA cable 1. How to ... VCR and press PLAY on the VCR. (Refer to connect 1 Connect the AUDIO/VIDEO jacks between TV and VCR. EXTERNAL EQUIPMENT SETUP EXTERNAL EQUIPMENT SETUP When connecting with an S-Video cable 1.
How to the VCR owner's manual.) I Select AV1 input source with using the INPUT button on the set . 2. How to connect 1 Connect the ... CABLE IN 1 NOTE If you connect both Video and the S-Video cables, only the S-Video will work. compared to the VCR owner's manual.) I Select A V 1 input source with using the INPUT button on the set . When connecting with a RCA cable 1. How to ... VCR and press PLAY on the VCR. (Refer to connect 1 Connect the AUDIO/VIDEO jacks between TV and VCR. EXTERNAL EQUIPMENT SETUP EXTERNAL EQUIPMENT SETUP When connecting with an S-Video cable 1.
Owner's Manual (English)
Page 35
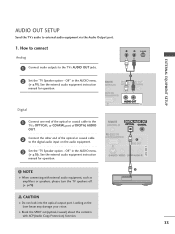
... with external audio equipment, such as amplifiers or speakers, please turn the TV speakers off. (G p.70) CAUTION G Do not look into the optical output port. See the external audio equipment instruction manual for operation. See the external audio equipment instruction manual for operation. NOTE G When connecting with ACP(Audio Copy Protection) function. 1 2 33...
... with external audio equipment, such as amplifiers or speakers, please turn the TV speakers off. (G p.70) CAUTION G Do not look into the optical output port. See the external audio equipment instruction manual for operation. See the external audio equipment instruction manual for operation. NOTE G When connecting with ACP(Audio Copy Protection) function. 1 2 33...
Owner's Manual (English)
Page 41
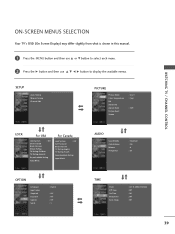
... Time Auto Sleep : Oct 19, 2006, 03:44 AM : Off : Off : Off : Off 39 WATCHING TV / CHANNEL CONTROL ON-SCREEN MENUS SELECTION Your TV's OSD (On Screen Display) may differ slightly from what is shown in this manual. 1 Press the MENU button and then use D or E button to select each menu. 2 Press the...
... Time Auto Sleep : Oct 19, 2006, 03:44 AM : Off : Off : Off : Off 39 WATCHING TV / CHANNEL CONTROL ON-SCREEN MENUS SELECTION Your TV's OSD (On Screen Display) may differ slightly from what is shown in this manual. 1 Press the MENU button and then use D or E button to select each menu. 2 Press the...

Owner's Manual (English)
Page 42
...MEDIA HOST BRIGHT - NOTE Auto Tuning Manual Tuning Channel Edit G Selection ( G or ) leads you to Auto Tuning menu if the Lock System is required to gain access to the AuFtoouTnudnCinhgannel(s): 16 screen. MENU BRIGHT + TIMER RATIO SIMPLINK WATCHING TV / CHANNEL CONTROL Auto Tuning CK 1...to stop the current scan and start ANALOG ANTENNA channel scan. Analog TV antenna Digital DTV antenna Analog CATV cable Digital CADTV cable 40 Auto Tuning Manual Tuning Channel Edit Processing Auto Tuning... Manual Tuning BACK Channel Edit BACK C PICTURE SOUND SAP PICTURE SAP CC...
...MEDIA HOST BRIGHT - NOTE Auto Tuning Manual Tuning Channel Edit G Selection ( G or ) leads you to Auto Tuning menu if the Lock System is required to gain access to the AuFtoouTnudnCinhgannel(s): 16 screen. MENU BRIGHT + TIMER RATIO SIMPLINK WATCHING TV / CHANNEL CONTROL Auto Tuning CK 1...to stop the current scan and start ANALOG ANTENNA channel scan. Analog TV antenna Digital DTV antenna Analog CATV cable Digital CADTV cable 40 Auto Tuning Manual Tuning Channel Edit Processing Auto Tuning... Manual Tuning BACK Channel Edit BACK C PICTURE SOUND SAP PICTURE SAP CC...
Owner's Manual (English)
Page 43
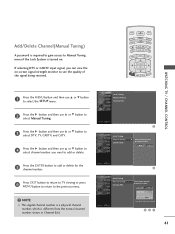
... SAP CC 2 Press the MARK USB EJECT G button and then use D or button to E MARK USB EJECT select Manual Tuning. 3 Press the G button and then use D or E button to select DTV, TV, CADTV, and CATV. 4 Press the G button and then use D or E button to the previous menu. Auto ...Tuning Manual Tuning Channel Edit BACK PI PICTURE SOUND CC MARK USB EJECT Auto Tuning Manual Tuning Channel Edit G Select channel type and RF-channel number...
... SAP CC 2 Press the MARK USB EJECT G button and then use D or button to E MARK USB EJECT select Manual Tuning. 3 Press the G button and then use D or E button to select DTV, TV, CADTV, and CATV. 4 Press the G button and then use D or E button to the previous menu. Auto ...Tuning Manual Tuning Channel Edit BACK PI PICTURE SOUND CC MARK USB EJECT Auto Tuning Manual Tuning Channel Edit G Select channel type and RF-channel number...
Owner's Manual (English)
Page 44
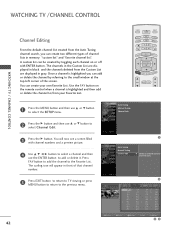
...to select MARK USBEJECT the SETUP menu. MENU BRIGHT + TIMER RATIO SIMPLINK Auto Tuning Manual Tuning Channel Edit PICTURE SOUND MARK USB EJECT BACK CC Auto Tuning Manual Tuning Channel Edit G Selection ( G or ) leads you can create your Favorite ...List. Use the FAV button on or off with channel numbers and a preview picture. 4 Use D E F G button to select a channel and then use the ENTER button to the Favorite List. WATCHING TV / CHANNEL CONTROL WATCHING TV /CHANNEL CONTROL TV INPUT TV...
...to select MARK USBEJECT the SETUP menu. MENU BRIGHT + TIMER RATIO SIMPLINK Auto Tuning Manual Tuning Channel Edit PICTURE SOUND MARK USB EJECT BACK CC Auto Tuning Manual Tuning Channel Edit G Selection ( G or ) leads you can create your Favorite ...List. Use the FAV button on or off with channel numbers and a preview picture. 4 Use D E F G button to select a channel and then use the ENTER button to the Favorite List. WATCHING TV / CHANNEL CONTROL WATCHING TV /CHANNEL CONTROL TV INPUT TV...
Owner's Manual (English)
Page 59
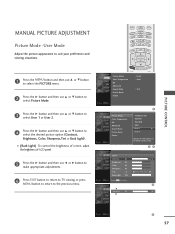
MENU BRIGHT + TV INP TIMER RATIO SIMPLINK Picture Mode : User1 1 Press the MENU ...2. 4 Press the G button and then use F or G button to make appropriate adjustments. 6 Press EXIT button to return to TV viewing or press MENU button to return to select the desired picture option (Contrast, Brightness, Color, Sharpness,Tint or Back Light). ...50 Sharpness 50 Tint 0 R Back Light 100 Press MENU to suit your preference and viewing situations. TV INPUT TV INPUT MANUAL PICTURE ADJUSTMENT STB MEDIA HOST STB MEDIA HOST Picture Mode -User Mode Adjust the picture appearance to ...
MENU BRIGHT + TV INP TIMER RATIO SIMPLINK Picture Mode : User1 1 Press the MENU ...2. 4 Press the G button and then use F or G button to make appropriate adjustments. 6 Press EXIT button to return to TV viewing or press MENU button to return to select the desired picture option (Contrast, Brightness, Color, Sharpness,Tint or Back Light). ...50 Sharpness 50 Tint 0 R Back Light 100 Press MENU to suit your preference and viewing situations. TV INPUT TV INPUT MANUAL PICTURE ADJUSTMENT STB MEDIA HOST STB MEDIA HOST Picture Mode -User Mode Adjust the picture appearance to ...
Owner's Manual (English)
Page 61
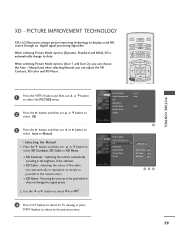
... Contrast On XD Color On XD Noise On 4 Press EXIT button to return to TV viewing or press MENU button to return to select Auto or Manual. * Selecting the Manual 1. PICTURE SAP CC MARK USB EJECT MARK USB EJECT 3 Press the G button and then use D or E button to...E button and then use D or E button to Auto. STB MEDIA HOST When selecting Picture Mode options (Dynamic, Standard and Mild), XD is LG Electronics unique picture improving technology to display a real HD source througShTB an digital MEDIA HOST signal processing algorithm. BACK BACK 2 Press the PICTURE SOUND ...
... Contrast On XD Color On XD Noise On 4 Press EXIT button to return to TV viewing or press MENU button to return to select Auto or Manual. * Selecting the Manual 1. PICTURE SAP CC MARK USB EJECT MARK USB EJECT 3 Press the G button and then use D or E button to...E button and then use D or E button to Auto. STB MEDIA HOST When selecting Picture Mode options (Dynamic, Standard and Mild), XD is LG Electronics unique picture improving technology to display a real HD source througShTB an digital MEDIA HOST signal processing algorithm. BACK BACK 2 Press the PICTURE SOUND ...
Owner's Manual (English)
Page 79
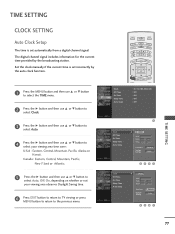
...TIMER RATIO SIMPLINK TV IN 1 Press... then use D or E button to BACK select Clock. Date - - / - Date - - / - TV INPUT STB MEDIA HOST BRIGHT - PICTURE SOUND SAP CC PICTURE SAP CC MARK USB EJECT MARK USB EJECT BACK PIC... not your viewing area observes Daylight Saving time. 6 Press EXIT button to return to TV viewing or press MENU button to return to select your viewing area time zone : U.S.A... Time Sleep Time Auto Sleep G Auto Year - - - TIME SETTING CLOCK SETTING TV INPUT TV INPUT Auto Clock Setup STB MEDIA HOST STB MEDIA HOST The time is set automatically...
...TIMER RATIO SIMPLINK TV IN 1 Press... then use D or E button to BACK select Clock. Date - - / - Date - - / - TV INPUT STB MEDIA HOST BRIGHT - PICTURE SOUND SAP CC PICTURE SAP CC MARK USB EJECT MARK USB EJECT BACK PIC... not your viewing area observes Daylight Saving time. 6 Press EXIT button to return to TV viewing or press MENU button to return to select your viewing area time zone : U.S.A... Time Sleep Time Auto Sleep G Auto Year - - - TIME SETTING CLOCK SETTING TV INPUT TV INPUT Auto Clock Setup STB MEDIA HOST STB MEDIA HOST The time is set automatically...


