Owners Manual
Page 1
Please read the safety information carefully before using the product. IPS LED Monitor (LED Monitor) Model List 29UM50 29UM60 34UM60 www.lg.com Owner's Manual IPS LED MONITOR (LED MONITOR*) *LG LED Monitors are LCD Monitors with LED Backlighting.
Please read the safety information carefully before using the product. IPS LED Monitor (LED Monitor) Model List 29UM50 29UM60 34UM60 www.lg.com Owner's Manual IPS LED MONITOR (LED MONITOR*) *LG LED Monitors are LCD Monitors with LED Backlighting.
Owners Manual
Page 2
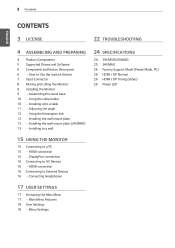
Assembling the stand base 10 - Adjusting the angle 12 - Installing to a wall 24 SPECIFICATIONS 24 29UM50/29UM60 25 34UM60 26 Factory Support Mode (Preset Mode, PC) 26 HDMI / DP Normal 26 HDMI / DP Timing (Video) 26 Power LED 15 USING THE MONITOR 15 Connecting to External Devices 16 - HDMI connection 16 Connecting to a PC 15 - Installing onto a table 11 - Installing the wall mount plate 12 - HDMI connection 15 - Main Menu Features 18 User Settings 18 - Menu Settings DisplayPort connection 16 Connecting to Use the Joystick Button 7 Input Connector 8 Moving and Lifting...
Assembling the stand base 10 - Adjusting the angle 12 - Installing to a wall 24 SPECIFICATIONS 24 29UM50/29UM60 25 34UM60 26 Factory Support Mode (Preset Mode, PC) 26 HDMI / DP Normal 26 HDMI / DP Timing (Video) 26 Power LED 15 USING THE MONITOR 15 Connecting to External Devices 16 - HDMI connection 16 Connecting to a PC 15 - Installing onto a table 11 - Installing the wall mount plate 12 - HDMI connection 15 - Main Menu Features 18 User Settings 18 - Menu Settings DisplayPort connection 16 Connecting to Use the Joystick Button 7 Input Connector 8 Moving and Lifting...

Owners Manual
Page 3
VESA, VESA logo, DisplayPort compliance logo and DisplayPort compliance logo for more information on display if there is no adjustment to display. * To make this setting be disabled, change the option to be turned off automatically in 4 hours after you turned on the license. ENEGNLGISH LICENSE 3 LICENSE Each model has different licenses. in OSD menu of HDMI Licensing Administrator, Inc. The following content is only applied...
VESA, VESA logo, DisplayPort compliance logo and DisplayPort compliance logo for more information on display if there is no adjustment to display. * To make this setting be disabled, change the option to be turned off automatically in 4 hours after you turned on the license. ENEGNLGISH LICENSE 3 LICENSE Each model has different licenses. in OSD menu of HDMI Licensing Administrator, Inc. The following content is only applied...
Owners Manual
Page 4
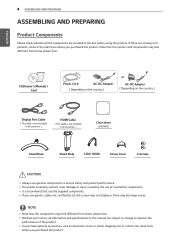
... country ) Display Port Cable ( This cable is not included in this manual are subject to change to ensure safety and product performance. yyIt is not included in all information and specifications in all countries. ) HDMI Cable ( This cable is recommend that the product and components may be image noises. yyWithout prior notice, all countries. ) Clear sheet (34UM60) Stand Base Stand Body Cable Holder Screw Cover 2 Screws CAUTION yyAlways use of...
... country ) Display Port Cable ( This cable is not included in this manual are subject to change to ensure safety and product performance. yyIt is not included in all information and specifications in all countries. ) HDMI Cable ( This cable is recommend that the product and components may be image noises. yyWithout prior notice, all countries. ) Clear sheet (34UM60) Stand Base Stand Body Cable Holder Screw Cover 2 Screws CAUTION yyAlways use of...

Owners Manual
Page 5
yyOptional: You can download and install the latest version from the enclosed CD or from the LGE website (www.lg.com). ASSEMBLING AND PREPARING 5 ENEGNLGISH Supported Drivers and Software Check the drivers and software supported by your product and refer to the manuals on the CD enclosed in the product package. Drivers and Software Monitor Driver OnScreen Control Dual Controller Installation Priority Recommended Recommended Optional 29UM50/29UM60/34UM60 O O O yyRequired and Recommended: You can download and install the latest version from the LGE website (www.lg.com).
yyOptional: You can download and install the latest version from the enclosed CD or from the LGE website (www.lg.com). ASSEMBLING AND PREPARING 5 ENEGNLGISH Supported Drivers and Software Check the drivers and software supported by your product and refer to the manuals on the CD enclosed in the product package. Drivers and Software Monitor Driver OnScreen Control Dual Controller Installation Priority Recommended Recommended Optional 29UM50/29UM60/34UM60 O O O yyRequired and Recommended: You can download and install the latest version from the LGE website (www.lg.com).
Owners Manual
Page 6
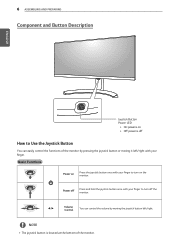
... turn on yyOff: power is off the monitor. ◄/► Volume Control You can easily control the functions of the monitor. Basic Functions Power on Press the joystick button once with your finger to turn off How to Use the Joystick Button You can control the volume by pressing the joystick button or moving the joystick button left/right. 6 ASSEMBLING AND PREPARING Component and Button Description ENEGNLGISH Joystick Button Power LED...
... turn on yyOff: power is off the monitor. ◄/► Volume Control You can easily control the functions of the monitor. Basic Functions Power on Press the joystick button once with your finger to turn off How to Use the Joystick Button You can control the volume by pressing the joystick button or moving the joystick button left/right. 6 ASSEMBLING AND PREPARING Component and Button Description ENEGNLGISH Joystick Button Power LED...
Owners Manual
Page 9
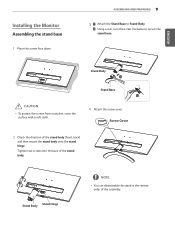
Installing the Monitor Assembling the stand base 1 Place the screen face down. Stand Body Stand Hinge NOTE yyYou can disassemble the stand in the reverse order of the stand body. Tighten two screws into the back of the assembly. Screw Cover 2 Check the direction of the stand body (front, back) and then mount the stand body onto the stand hinge. ENEGNLGISH Stand Body Stand Base CAUTION yyTo protect the screen from scratches, cover the surface with...
Installing the Monitor Assembling the stand base 1 Place the screen face down. Stand Body Stand Hinge NOTE yyYou can disassemble the stand in the reverse order of the stand body. Tighten two screws into the back of the assembly. Screw Cover 2 Check the direction of the stand body (front, back) and then mount the stand body onto the stand hinge. ENEGNLGISH Stand Body Stand Base CAUTION yyTo protect the screen from scratches, cover the surface with...
Owners Manual
Page 10
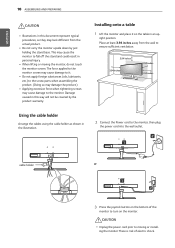
... monitor to the monitor, then plug the power cord into the wall outlet. The force applied to the monitor screen may cause the monitor to ensure sufficient ventilation. 3.94 inches 3.94 inches 3.94 inches 3.94 inches Using the cable holder Arrange the cables using the cable holder as shown in this way will not be covered by just holding the stand base. ENEGNLGISH 10 ASSEMBLING AND PREPARING CAUTION yyIllustrations in an up- Installing...
... monitor to the monitor, then plug the power cord into the wall outlet. The force applied to the monitor screen may cause the monitor to ensure sufficient ventilation. 3.94 inches 3.94 inches 3.94 inches 3.94 inches Using the cable holder Arrange the cables using the cable holder as shown in this way will not be covered by just holding the stand base. ENEGNLGISH 10 ASSEMBLING AND PREPARING CAUTION yyIllustrations in an up- Installing...

Owners Manual
Page 12
... yyThe wall mount plate is optional. yyFor more information on installation, refer to the moni- yyFor more information on installation, refer to the wall mount plate's installation guide. Installing the wall mount plate (34UM60) This monitor supports the specification of the Kensington lock is sold separately. Installing the wall mount plate This monitor supports the specification of the standard wall mount plate or compatible device. 1 Place the screen face down . Connect the Kensington security system cable between the Monitor set .
... yyThe wall mount plate is optional. yyFor more information on installation, refer to the moni- yyFor more information on installation, refer to the wall mount plate's installation guide. Installing the wall mount plate (34UM60) This monitor supports the specification of the Kensington lock is sold separately. Installing the wall mount plate This monitor supports the specification of the standard wall mount plate or compatible device. 1 Place the screen face down . Connect the Kensington security system cable between the Monitor set .

Owners Manual
Page 15
... or install any manual drivers. yyUse a certified cable with Ethernet High-Speed HDMI®/TM Cable with the HDMI logo attached. DisplayPort connection Transmits the digital video and audio signals from the input menu. HDMI connection Transmits the digital video and audio signals from the input menu. NOTE yyThere may be image noises. yy If you do not use generic cables not certified by LG, the screen may not display or there may occur. If you use a certified HDMI cable, the screen...
... or install any manual drivers. yyUse a certified cable with Ethernet High-Speed HDMI®/TM Cable with the HDMI logo attached. DisplayPort connection Transmits the digital video and audio signals from the input menu. HDMI connection Transmits the digital video and audio signals from the input menu. NOTE yyThere may be image noises. yy If you do not use generic cables not certified by LG, the screen may not display or there may occur. If you use a certified HDMI cable, the screen...
Owners Manual
Page 17
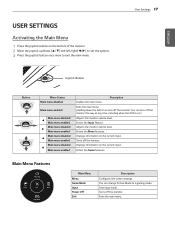
... input. Sets input mode. You can change Picture Mode to turn off the monitor. You can turn off the monitor this way at any time, including when the OSD is on.) Adjusts the monitor volume level. Exits the main menu. Turns off the monitor. Displays information on the current input. Enters the Game features. Main Menu Features Power Off Power Off Input Input Exit Exit Menu Menu Power Off Game Mode Game Mode Input Exit Menu Power Off Game Mode Input Exit Menu Game Mode Main Menu Menu Game Mode Input Power...
... input. Sets input mode. You can change Picture Mode to turn off the monitor. You can turn off the monitor this way at any time, including when the OSD is on.) Adjusts the monitor volume level. Exits the main menu. Turns off the monitor. Displays information on the current input. Enters the Game features. Main Menu Features Power Off Power Off Input Input Exit Exit Menu Menu Power Off Game Mode Game Mode Input Exit Menu Power Off Game Mode Input Exit Menu Game Mode Main Menu Menu Game Mode Input Power...

Owners Manual
Page 18
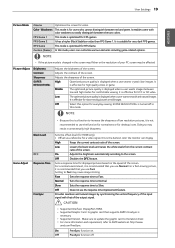
... manual. Menu > Quick Settings Description Brightness Contrast Adjusts the color contrast and brightness of the video signal input. yy When you exit. Adjusts the aspect ratio of the screen. Sync, to set other menu items, move the joystick to◄ or pressing ( / Ok) it. 4 If you want to exit the OSD menu, move the joystick to ◄ until you enter the menu, instructions on FreeSync Mode. ( Go to Picture → Game Adjust → Free- Optimizes the screen for viewing...
... manual. Menu > Quick Settings Description Brightness Contrast Adjusts the color contrast and brightness of the video signal input. yy When you exit. Adjusts the aspect ratio of the screen. Sync, to set other menu items, move the joystick to◄ or pressing ( / Ok) it. 4 If you want to exit the OSD menu, move the joystick to ◄ until you enter the menu, instructions on FreeSync Mode. ( Go to Picture → Game Adjust → Free- Optimizes the screen for viewing...
Owners Manual
Page 19
... games. On Adjusts the brightness automatically according to the latest driver. Off Disables the DFC feature. NOTE yy Because this mode, users can display. High Keeps the current contrast ratio of low resolution pictures, it is a function to easily distinguish between low and high modes for high quality video or game. Provides seamless and natural images by synchronizing the vertical frequency of the input signal with color weakness to...
... games. On Adjusts the brightness automatically according to the latest driver. Off Disables the DFC feature. NOTE yy Because this mode, users can display. High Keeps the current contrast ratio of low resolution pictures, it is a function to easily distinguish between low and high modes for high quality video or game. Provides seamless and natural images by synchronizing the vertical frequency of the input signal with color weakness to...
Owners Manual
Page 20
... of the screen colors. Yes Reset No Cancel Cross Hair provides a mark on the center of the six colors (Red, Green, Blue, Cyan, Magenta and Yellow) and then saving the settings. Likewise, the lower 2, Mode 3 the gamma value, the lighter the image becomes. The lower the value, the less saturated and brighter the colors become . Users can customize the picture color using Red, Green, and Blue colors. Meets the user requirements...
... of the screen colors. Yes Reset No Cancel Cross Hair provides a mark on the center of the six colors (Red, Green, Blue, Cyan, Magenta and Yellow) and then saving the settings. Likewise, the lower 2, Mode 3 the gamma value, the lighter the image becomes. The lower the value, the less saturated and brighter the colors become . Users can customize the picture color using Red, Green, and Blue colors. Meets the user requirements...
Owners Manual
Page 21
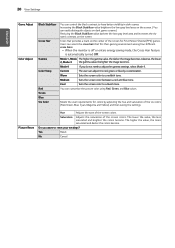
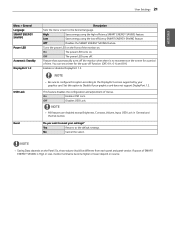
... time. Set this option according to the default settings. No Cancel the select. User Settings 21 ENEGNLGISH Menu > General Language SMART ENERGY SAVING Power LED Automatic Standby DisplayPort 1.2 OSD Lock Reset Description Sets the menu screen to Disable if your graphics card does not support DisplayPort 1.2. Off The power LED turns off function. (Off, 4 H, 6 H, and 8 H) Enables or disables DisplayPort 1.2. This feature disables the configuration and adjustment of the monitor on source. Do you want to reset your settings? If...
... time. Set this option according to the default settings. No Cancel the select. User Settings 21 ENEGNLGISH Menu > General Language SMART ENERGY SAVING Power LED Automatic Standby DisplayPort 1.2 OSD Lock Reset Description Sets the menu screen to Disable if your graphics card does not support DisplayPort 1.2. Off The power LED turns off function. (Off, 4 H, 6 H, and 8 H) Enables or disables DisplayPort 1.2. This feature disables the configuration and adjustment of the monitor on source. Do you want to reset your settings? If...
Owners Manual
Page 22
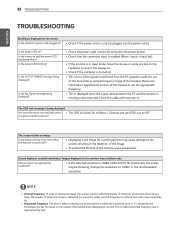
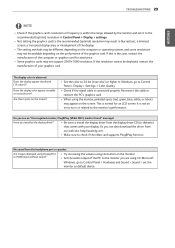
... out of the horizontal or vertical frequency range of the monitor, use a screensaver. Did you press the Menu button? Is the power on the monitor leave shadow trails. yyIf the monitor is turned on the keyboard, to 1080P or the recommended resolution. Is the monitor's power cord plugged in the retention of this manual to set OSD Lock to display an image, the screen must be flickering. yyCheck if the computer is in sleep mode, move the...
... out of the horizontal or vertical frequency range of the monitor, use a screensaver. Did you press the Menu button? Is the power on the monitor leave shadow trails. yyIf the monitor is turned on the keyboard, to 1080P or the recommended resolution. Is the monitor's power cord plugged in the retention of this manual to set OSD Lock to display an image, the screen must be flickering. yyCheck if the computer is in sleep mode, move the...
Owners Manual
Page 23
... video card supports Plug&Play function. Do you installed the display driver? Are images displayed using DisplayPort yyTry increasing the volume using the monitor, pixilated spots (red, green, blue, white, or black) may result in Control Panel > Display > settings. On Microsoft Windows, go to the monitor you can also download the driver from the headphone port or speaker. yyWhen using the button on the performance of the PC to Control Panel > Display > Settings > Color Quality. No sound from our web site: http://www.lg.com. If the resolution...
... video card supports Plug&Play function. Do you installed the display driver? Are images displayed using DisplayPort yyTry increasing the volume using the monitor, pixilated spots (red, green, blue, white, or black) may result in Control Panel > Display > settings. On Microsoft Windows, go to the monitor you can also download the driver from the headphone port or speaker. yyWhen using the button on the performance of the PC to Control Panel > Display > Settings > Color Quality. No sound from our web site: http://www.lg.com. If the resolution...
Owners Manual
Page 24
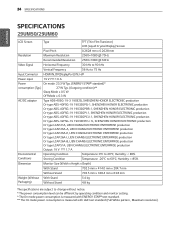
... LGE test standard (Full White pattern , Maximum resolution). 24 SPECIFICATIONS ENEGNLGISH SPECIFICATIONS 29UM50/29UM60 LCD Screen Type TFT (Thin Film Transistor) LCD (Liquid Crystal Display) Screen Pixel Pitch 0.2628 mm x 0.2628 mm Resolution Maximum Resolution 2560×1080 @ 75Hz Recommended Resolution 2560×1080 @ 60Hz Video Signal Horizontal Frequency 30 kHz to 90 kHz Vertical Frequency 56 Hz to 75 Hz Input Connector HDMI IN, DP(DisplayPort) IN, H/P Power input 19 V 1.6 A Power On mode: 23.3 W Typ. (ENERGY...
... LGE test standard (Full White pattern , Maximum resolution). 24 SPECIFICATIONS ENEGNLGISH SPECIFICATIONS 29UM50/29UM60 LCD Screen Type TFT (Thin Film Transistor) LCD (Liquid Crystal Display) Screen Pixel Pitch 0.2628 mm x 0.2628 mm Resolution Maximum Resolution 2560×1080 @ 75Hz Recommended Resolution 2560×1080 @ 60Hz Video Signal Horizontal Frequency 30 kHz to 90 kHz Vertical Frequency 56 Hz to 75 Hz Input Connector HDMI IN, DP(DisplayPort) IN, H/P Power input 19 V 1.6 A Power On mode: 23.3 W Typ. (ENERGY...

Owners Manual
Page 25
... Stand 6.4 kg 5.8 kg The specificat ions are subject to 40°C; SPECIFICATIONS 25 ENEGNLGISH SPECIFICATIONS 34UM60 LCD Screen Type TFT (Thin Film Transistor) LCD (Liquid Crystal Display) Screen Pixel Pitch 0.312 mm x 0.310 mm Resolution Maximum Resolution 2560×1080 @ 75 Hz Recommended Resolution 2560×1080 @ 60 Hz Video Signal Horizontal Frequency 30 kHz to 90 kHz Vertical Frequency 56 Hz to 75 Hz Input Connector HDMI IN, DP(DisplayPort) IN, H/P Power input 19 V 2.0 A Power...
... Stand 6.4 kg 5.8 kg The specificat ions are subject to 40°C; SPECIFICATIONS 25 ENEGNLGISH SPECIFICATIONS 34UM60 LCD Screen Type TFT (Thin Film Transistor) LCD (Liquid Crystal Display) Screen Pixel Pitch 0.312 mm x 0.310 mm Resolution Maximum Resolution 2560×1080 @ 75 Hz Recommended Resolution 2560×1080 @ 60 Hz Video Signal Horizontal Frequency 30 kHz to 90 kHz Vertical Frequency 56 Hz to 75 Hz Input Connector HDMI IN, DP(DisplayPort) IN, H/P Power input 19 V 2.0 A Power...
Owners Manual
Page 27
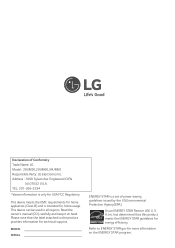
...owner's manual (CD) carefully and keep it at hand. A.,Inc. Address : 1000 Sylvan Ave. Englewood Cliffs NJ 07632 U.S.A TEL: 201-266-2534 *above information is only for USA FCC Regulatory This device meets the EMC requirements for home appliances (Class B) and is a set of Conformity Trade Name: LG Model : 29UM50,29UM60,34UM60 Responsible Party: LG... Electronics Inc. This device can be used in all regions. Declaration of power-saving guidelines issued by the U.S.Environmental ...
...owner's manual (CD) carefully and keep it at hand. A.,Inc. Address : 1000 Sylvan Ave. Englewood Cliffs NJ 07632 U.S.A TEL: 201-266-2534 *above information is only for USA FCC Regulatory This device meets the EMC requirements for home appliances (Class B) and is a set of Conformity Trade Name: LG Model : 29UM50,29UM60,34UM60 Responsible Party: LG... Electronics Inc. This device can be used in all regions. Declaration of power-saving guidelines issued by the U.S.Environmental ...


