
Owners Manual
Page 2
... CONTENTS 3 LICENSE 4 ASSEMBLING AND PREPARING 4 Product Components 5 Supported Drivers and Software 6 Component and Button Description 6 - Installing the wall mount plate 15 - Menu Settings 27 TROUBLESHOOTING 29 SPECIFICATIONS 29 32UD99 30 Factory Support Mode (Preset Mode, PC) 30 HDMI 30 DisplayPort / USB-C 31 HDMI Timing (Video) 31 Power LED 17 USING THE MONITOR 17 Connecting to AV Devices 18 - How to Use the Joystick Button 7 Input Connector 8 Moving and Lifting the Monitor 9 Installing the Monitor 9 - Assembling the stand base 10 - HDMI connection 19 Connecting Peripherals 19...
... CONTENTS 3 LICENSE 4 ASSEMBLING AND PREPARING 4 Product Components 5 Supported Drivers and Software 6 Component and Button Description 6 - Installing the wall mount plate 15 - Menu Settings 27 TROUBLESHOOTING 29 SPECIFICATIONS 29 32UD99 30 Factory Support Mode (Preset Mode, PC) 30 HDMI 30 DisplayPort / USB-C 31 HDMI Timing (Video) 31 Power LED 17 USING THE MONITOR 17 Connecting to AV Devices 18 - How to Use the Joystick Button 7 Input Connector 8 Moving and Lifting the Monitor 9 Installing the Monitor 9 - Assembling the stand base 10 - HDMI connection 19 Connecting Peripherals 19...
Owners Manual
Page 5
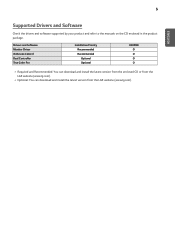
5 ENEGNLGISH Supported Drivers and Software Check the drivers and software supported by your product and refer to the manuals on the CD enclosed in the product package. Drivers and Software Monitor Driver OnScreen Control Dual Controller True Color Pro Installation Priority Recommended Recommended Optional Optional 32UD99 O O O O yyRequired and Recommended: You can download and install the latest version from the LGE website (www.lg.com). yyOptional: You can download and install the latest version from the enclosed CD or from the LGE website (www.lg.com).
5 ENEGNLGISH Supported Drivers and Software Check the drivers and software supported by your product and refer to the manuals on the CD enclosed in the product package. Drivers and Software Monitor Driver OnScreen Control Dual Controller True Color Pro Installation Priority Recommended Recommended Optional Optional 32UD99 O O O O yyRequired and Recommended: You can download and install the latest version from the LGE website (www.lg.com). yyOptional: You can download and install the latest version from the enclosed CD or from the LGE website (www.lg.com).

Owners Manual
Page 6
... the monitor. Power off the monitor. ◄/► Volume Control You can control the volume by pressing the joystick button or moving the joystick button left/right. NOTE y y The joystick button is on the monitor. Basic Functions Power on Press the joystick button once with your finger to turn off Press and hold the joystick button once with your finger to Use the Joystick Button Joystick Button Power LED y yOn: power...
... the monitor. Power off the monitor. ◄/► Volume Control You can control the volume by pressing the joystick button or moving the joystick button left/right. NOTE y y The joystick button is on the monitor. Basic Functions Power on Press the joystick button once with your finger to turn off Press and hold the joystick button once with your finger to Use the Joystick Button Joystick Button Power LED y yOn: power...

Owners Manual
Page 11
... or install- y yIf you need another power cord, please contact your local dealer or the nearest retail store. 2 Connect the Power cord to the monitor, then plug the power cord into the wall outlet. 3 Press the joystick button on the bottom of electric shock. There is provided in an up- Cautions When Connecting Power Cord 3.94 inches 3.94 inches 3.94 inches 3.94 inches 100-240 V ~ y yMake sure to use the power cord that...
... or install- y yIf you need another power cord, please contact your local dealer or the nearest retail store. 2 Connect the Power cord to the monitor, then plug the power cord into the wall outlet. 3 Press the joystick button on the bottom of electric shock. There is provided in an up- Cautions When Connecting Power Cord 3.94 inches 3.94 inches 3.94 inches 3.94 inches 100-240 V ~ y yMake sure to use the power cord that...

Owners Manual
Page 13
... avoid scratching the stand base, make sure that some Windows versions and some graphics card drivers may use different settings for the screen pivot key or may not support the pivot key at all. y yThe screen can be rotated easily using the pivot feature, the stand does not make contact with your Windows operating system. Note that when rotating the monitor using the screen pivot shortcut key provided...
... avoid scratching the stand base, make sure that some Windows versions and some graphics card drivers may use different settings for the screen pivot key or may not support the pivot key at all. y yThe screen can be rotated easily using the pivot feature, the stand does not make contact with your Windows operating system. Note that when rotating the monitor using the screen pivot shortcut key provided...

Owners Manual
Page 14
... of the monitor head. Connect the Kensington security system cable between the display and the stand base. The accessories can be purchased at your fingers between the Monitor set . ENEGNLGISH 14 WARNING y yTake care when rotating the monitor if the cable is optional. Adjust the horizontal level of the monitor head can be slightly rotated up or down (up to the Kensington lock user manual or...
... of the monitor head. Connect the Kensington security system cable between the display and the stand base. The accessories can be purchased at your fingers between the Monitor set . ENEGNLGISH 14 WARNING y yTake care when rotating the monitor if the cable is optional. Adjust the horizontal level of the monitor head can be slightly rotated up or down (up to the Kensington lock user manual or...

Owners Manual
Page 15
... the wall. 1 If you use screw longer than standard, the monitor might be obtained from mounted position. Make sure that the wall mounting bracket is securely fixed to the monitor and to the moni- y yFor more information on the bottom center of the back of the monitor. 1 Installing to install and set up a tilting wall mounting bracket. 3.94 inches 3.94 inches 3.94 inches 3.94 inches Installing the wall mount plate This monitor supports the specification of the monitor. 15...
... the wall. 1 If you use screw longer than standard, the monitor might be obtained from mounted position. Make sure that the wall mounting bracket is securely fixed to the monitor and to the moni- y yFor more information on the bottom center of the back of the monitor. 1 Installing to install and set up a tilting wall mounting bracket. 3.94 inches 3.94 inches 3.94 inches 3.94 inches Installing the wall mount plate This monitor supports the specification of the monitor. 15...
Owners Manual
Page 17
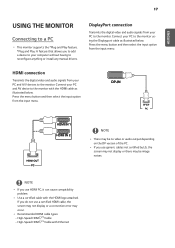
... input menu. NOTE y yThere may occur. y y If you use HDMI PC, it can cause compatibility problem. NOTE y yIf you do not use a certified HDMI cable, the screen may not display or a connection error may be image noises. If you use generic cables not certified by LG, the screen may not display or there may be no video or audio output depending on the DP version of the PC. HDMI connection Transmits the digital video and audio signals...
... input menu. NOTE y yThere may occur. y y If you use HDMI PC, it can cause compatibility problem. NOTE y yIf you do not use a certified HDMI cable, the screen may not display or a connection error may be image noises. If you use generic cables not certified by LG, the screen may not display or there may be no video or audio output depending on the DP version of the PC. HDMI connection Transmits the digital video and audio signals...

Owners Manual
Page 18
... input menu. High-Speed HDMI®/TM Cable with Ethernet Connecting to AV Devices HDMI connection Transmits the digital video and audio signals from your PC to the monitor. High-Speed HDMI®/TM Cable - Connect the monitor to your PC using the USB-C cable as illustrated below . If you do not use a certified HDMI cable, the screen may not display or a connection error may not work properly depending on the connected device's specifications and the environment. ENEGNLGISH 18 USB-C connection...
... input menu. High-Speed HDMI®/TM Cable with Ethernet Connecting to AV Devices HDMI connection Transmits the digital video and audio signals from your PC to the monitor. High-Speed HDMI®/TM Cable - Connect the monitor to your PC using the USB-C cable as illustrated below . If you do not use a certified HDMI cable, the screen may not display or a connection error may not work properly depending on the connected device's specifications and the environment. ENEGNLGISH 18 USB-C connection...

Owners Manual
Page 19
... upstream cable is not connected, data transmission through the USB1/2 port is recommended to the monitor via the headphones port. connecting your keyboard, mouse, or other USB storage devices to the monitor). (Go to General > Quick Charge to set to install the most recent Windows OS service pack before using the product. PC The USB port on the audio settings of the PC and external device, headphones and speaker...
... upstream cable is not connected, data transmission through the USB1/2 port is recommended to the monitor via the headphones port. connecting your keyboard, mouse, or other USB storage devices to the monitor). (Go to General > Quick Charge to set to install the most recent Windows OS service pack before using the product. PC The USB port on the audio settings of the PC and external device, headphones and speaker...

Owners Manual
Page 20
... monitor. ENEGNLGISH 20 USER SETTINGS Activating the Main Menu 1 Press the joystick button on the bottom of the monitor. 2 Move the joystick up/down the button to turn off the monitor this way at any time, including when the OSD is on.) Adjusts the monitor volume level. Main Menu Features Power Off Power Off Input Input Exit Exit Menu Menu Power Off Game Mode Game Mode Input Exit Menu Power Off Game Mode Input Exit Menu Game Mode Main Menu Menu Game Mode Input Power...
... monitor. ENEGNLGISH 20 USER SETTINGS Activating the Main Menu 1 Press the joystick button on the bottom of the monitor. 2 Move the joystick up/down the button to turn off the monitor this way at any time, including when the OSD is on.) Adjusts the monitor volume level. Main Menu Features Power Off Power Off Input Input Exit Exit Menu Menu Power Off Game Mode Game Mode Input Exit Menu Power Off Game Mode Input Exit Menu Game Mode Main Menu Menu Game Mode Input Power...
Owners Manual
Page 21
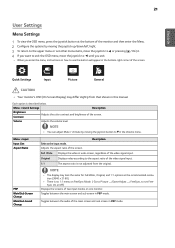
.... Menu > Quick Settings Description Brightness Contrast Adjusts the color contrast and brightness of the screen. Volume Adjusts the volume level. Adjusts the aspect ratio of the screen. NOTE y y The display may differ slightly from the original. Toggles between the audio of the main screen and sub screen in the Volume menu. Menu > Input Input List Aspect Ratio PBP Main/Sub Screen Change Main/Sub Sound Change Selects the input mode. ENEGNLGISH 21 User Settings Menu Settings 1 To view the OSD menu, press the joystick button at the recommended resolution...
.... Menu > Quick Settings Description Brightness Contrast Adjusts the color contrast and brightness of the screen. Volume Adjusts the volume level. Adjusts the aspect ratio of the screen. NOTE y y The display may differ slightly from the original. Toggles between the audio of the main screen and sub screen in the Volume menu. Menu > Input Input List Aspect Ratio PBP Main/Sub Screen Change Main/Sub Sound Change Selects the input mode. ENEGNLGISH 21 User Settings Menu Settings 1 To view the OSD menu, press the joystick button at the recommended resolution...

Owners Manual
Page 23
... A standard RGB color space for video. y y Calibration 2 : Installation of your PC screen may be adjusted. Menu > Picture Picture Mode Description Custom Allows the user to easily distinguish between red and green. You can customize various elements including game-related options. FPS Game 2 It has a higher Black Stabilizer value than FPS Game 1. Calibration 1 Adjusts to the previously calibrated screen. Cinema Optimizes the screen for the monitor and printer. NOTE y y If the picture mode is optimized for...
... A standard RGB color space for video. y y Calibration 2 : Installation of your PC screen may be adjusted. Menu > Picture Picture Mode Description Custom Allows the user to easily distinguish between red and green. You can customize various elements including game-related options. FPS Game 2 It has a higher Black Stabilizer value than FPS Game 1. Calibration 1 Adjusts to the previously calibrated screen. Cinema Optimizes the screen for the monitor and printer. NOTE y y If the picture mode is optimized for...

Owners Manual
Page 24
... white levels from the current contrast ratio of the image. HDMI ULTRA HD Provides sharper images when connected to On. yy If a problem occurs, set to a device supporting ULTRA HD Deep Color. It is the darkest color the monitor can display. yy Offset: as a reference for UCC or SD video. DFC Uniformity On Adjusts the brightness automatically according to Off. High Optimized picture quality is effective for a video signal, this mode...
... white levels from the current contrast ratio of the image. HDMI ULTRA HD Provides sharper images when connected to On. yy If a problem occurs, set to a device supporting ULTRA HD Deep Color. It is the darkest color the monitor can display. yy Offset: as a reference for UCC or SD video. DFC Uniformity On Adjusts the brightness automatically according to Off. High Optimized picture quality is effective for a video signal, this mode...
Owners Manual
Page 25
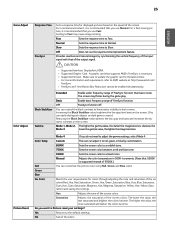
... frequency range of the six colors(Red_Hue, Red_Saturation, Green_Hue, Green_Saturation, Blue_Hue, Blue_Saturation, Cyan_Hue, Cyan_Saturation, Magenta_Hue, Magenta_Saturation, Yellow_Hue, Yellow_Saturation) and saving the settings. Likewise, the Mode 3 lower the gamma value, the lighter the image becomes. Green Blue Six Color Meets the user requirements for displayed pictures based on the speed of the screen colors. yy Supported Graphic Card : A graphic card that supports AMD's FreeSync is supported instead of 9500K.) Red You can control the black contrast...
... frequency range of the six colors(Red_Hue, Red_Saturation, Green_Hue, Green_Saturation, Blue_Hue, Blue_Saturation, Cyan_Hue, Cyan_Saturation, Magenta_Hue, Magenta_Saturation, Yellow_Hue, Yellow_Saturation) and saving the settings. Likewise, the Mode 3 lower the gamma value, the lighter the image becomes. Green Blue Six Color Meets the user requirements for displayed pictures based on the speed of the screen colors. yy Supported Graphic Card : A graphic card that supports AMD's FreeSync is supported instead of 9500K.) Red You can control the black contrast...

Owners Manual
Page 26
.../or panel vendor. Do you want to reset your keyboard, mouse, or other USB storage devices to the USB 3.0 port. Low Saves energy using the high-efficiency SMART ENERGY SAVING feature. NOTE yy Be sure to configure this option to Large or Small. connecting your settings? Off Disables OSD Lock. 26 ENEGNLGISH Menu > General Language SMART ENERGY SAVING Power LED Automatic Standby DisplayPort 1.2 Quick Charge OSD Lock OSD Size Reset Description Sets the menu screen to the default settings. Quick...
.../or panel vendor. Do you want to reset your keyboard, mouse, or other USB storage devices to the USB 3.0 port. Low Saves energy using the high-efficiency SMART ENERGY SAVING feature. NOTE yy Be sure to configure this option to Large or Small. connecting your settings? Off Disables OSD Lock. 26 ENEGNLGISH Menu > General Language SMART ENERGY SAVING Power LED Automatic Standby DisplayPort 1.2 Quick Charge OSD Lock OSD Size Reset Description Sets the menu screen to the default settings. Quick...
Owners Manual
Page 27
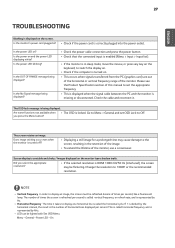
... monitor's power cord plugged in sleep mode, move the mouse, or press any key on the keyboard, to the screen, resulting in the retention of horizontal lines displayed per second. Is the power LED blinking? Does image sticking occur even when the monitor is enabled (Menu > Input > Input list). Change the resolution to display one horizontal line is called horizontal frequency and is represented by the horizontal interval, the result is the number of the image...
... monitor's power cord plugged in sleep mode, move the mouse, or press any key on the keyboard, to the screen, resulting in the retention of horizontal lines displayed per second. Is the power LED blinking? Does image sticking occur even when the monitor is enabled (Menu > Input > Input list). Change the resolution to display one horizontal line is called horizontal frequency and is represented by the horizontal interval, the result is the number of the image...
Owners Manual
Page 28
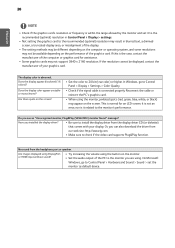
... monitor, pixilated spots (red, green, blue, white, or black) may not be displayed, contact the manufacturer of the display. yyBe sure to install the display driver from the headphone port or speaker. Are images displayed using DisplayPort yyTry increasing the volume using . yySet the audio output of the computer or graphics card for an LCD screen. On Microsoft Windows, go to Control Panel > Hardware and Sound > Sound > set it related to the monitor you see an "Unrecognized monitor, Plug&Play (VESA DDC) monitor...
... monitor, pixilated spots (red, green, blue, white, or black) may not be displayed, contact the manufacturer of the display. yyBe sure to install the display driver from the headphone port or speaker. Are images displayed using DisplayPort yyTry increasing the volume using . yySet the audio output of the computer or graphics card for an LCD screen. On Microsoft Windows, go to Control Panel > Hardware and Sound > Sound > set it related to the monitor you see an "Unrecognized monitor, Plug&Play (VESA DDC) monitor...

Owners Manual
Page 29
... Inc. 29 ENEGNLGISH SPECIFICATIONS 32UD99 LCD Screen Type TFT (Thin Film Transistor) LCD (Liquid Crystal Display) Screen Pixel Pitch 0.18159 mm x 0.18159 mm Resolution Maximum Resolution 3840 x 2160 @ 60 Hz Recommended Resolution 3840 x 2160 @ 60 Hz Video Signal Horizontal Frequency 30 kHz to 135 kHz Vertical Frequency 56 Hz to change without notice. * The power consumption level can be different by operating condition and monitor setting. * The On mode power consumption is measured with...
... Inc. 29 ENEGNLGISH SPECIFICATIONS 32UD99 LCD Screen Type TFT (Thin Film Transistor) LCD (Liquid Crystal Display) Screen Pixel Pitch 0.18159 mm x 0.18159 mm Resolution Maximum Resolution 3840 x 2160 @ 60 Hz Recommended Resolution 3840 x 2160 @ 60 Hz Video Signal Horizontal Frequency 30 kHz to 135 kHz Vertical Frequency 56 Hz to change without notice. * The power consumption level can be different by operating condition and monitor setting. * The On mode power consumption is measured with...
Owners Manual
Page 32
...power-saving guidelines issued by the U.S.Environmental Protection Agency(EPA). Please note that this product meets the ENERGY STAR guidelines for energy efficiency. MODEL SERIAL ENERGY STAR is intended for more information on the ENERGY STAR program. Read the owner's manual (CD) carefully and keep it at hand. A.,Inc. This device can be used... This device meets the EMC requirements for technical support. Refer to the product provides information for home appliances (Class B) and is a set of Conformity Trade Name: LG Model : 32UD99 Responsible Party: LG Electronics Inc.
...power-saving guidelines issued by the U.S.Environmental Protection Agency(EPA). Please note that this product meets the ENERGY STAR guidelines for energy efficiency. MODEL SERIAL ENERGY STAR is intended for more information on the ENERGY STAR program. Read the owner's manual (CD) carefully and keep it at hand. A.,Inc. This device can be used... This device meets the EMC requirements for technical support. Refer to the product provides information for home appliances (Class B) and is a set of Conformity Trade Name: LG Model : 32UD99 Responsible Party: LG Electronics Inc.


