Owners Manual
Page 1
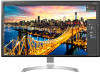
OWNER'S MANUAL IPS LED MONITOR (LED MONITOR*) *LG LED Monitors are LCD Monitors with LED Backlighting. Please read the safety information carefully before using the product. IPS LED Monitor (LED Monitor) Model List 32UD89 32MU89 www.lg.com
OWNER'S MANUAL IPS LED MONITOR (LED MONITOR*) *LG LED Monitors are LCD Monitors with LED Backlighting. Please read the safety information carefully before using the product. IPS LED Monitor (LED Monitor) Model List 32UD89 32MU89 www.lg.com

Owners Manual
Page 2
... Components 5 Supported Drivers and Software 6 Component and Button Description 6 - How to AV Devices 18 - HDMI connection 17 - Using the cable holder 11 - Installing the wall mount plate 15 - Assembling the stand base 10 - Installing onto a table 12 - Adjusting the Stand Height 13 - Using the Kensington lock 15 - Connecting Headphones 19 Service only port DisplayPort connection 18 - Menu Settings 25 TROUBLESHOOTING 27 SPECIFICATIONS 27 32UD89/32MU89 28 Factory Support Mode (Preset Mode, PC) 28 HDMI 28 DisplayPort / USB-C 28 Power LED 17 USING THE MONITOR 17 Connecting to a PC...
... Components 5 Supported Drivers and Software 6 Component and Button Description 6 - How to AV Devices 18 - HDMI connection 17 - Using the cable holder 11 - Installing the wall mount plate 15 - Assembling the stand base 10 - Installing onto a table 12 - Adjusting the Stand Height 13 - Using the Kensington lock 15 - Connecting Headphones 19 Service only port DisplayPort connection 18 - Menu Settings 25 TROUBLESHOOTING 27 SPECIFICATIONS 27 32UD89/32MU89 28 Factory Support Mode (Preset Mode, PC) 28 HDMI 28 DisplayPort / USB-C 28 Power LED 17 USING THE MONITOR 17 Connecting to a PC...

Owners Manual
Page 3
VESA, VESA logo, DisplayPort compliance logo and DisplayPort compliance logo for more information on display if there is no adjustment to display. * To make this setting be disabled, change the option to 'Off' in OSD menu of HDMI Licensing Administrator, Inc. The terms HDMI and HDMI High-Definition Multimedia Interface, and the HDMI Logo are all registered trademarks of the Video Electronics Standards Association. The following content...
VESA, VESA logo, DisplayPort compliance logo and DisplayPort compliance logo for more information on display if there is no adjustment to display. * To make this setting be disabled, change the option to 'Off' in OSD menu of HDMI Licensing Administrator, Inc. The terms HDMI and HDMI High-Definition Multimedia Interface, and the HDMI Logo are all registered trademarks of the Video Electronics Standards Association. The following content...

Owners Manual
Page 5
Drivers and Software Monitor Driver OnScreen Control Dual Controller Installation Priority Recommended Recommended Optional 32UD89 / 32MU89 O O O ASSEMBLING AND PREPARING 5 ENEGNLGISH Supported Drivers and Software You can download and install the latest version from the LGE website (www.lg.com).
Drivers and Software Monitor Driver OnScreen Control Dual Controller Installation Priority Recommended Recommended Optional 32UD89 / 32MU89 O O O ASSEMBLING AND PREPARING 5 ENEGNLGISH Supported Drivers and Software You can download and install the latest version from the LGE website (www.lg.com).

Owners Manual
Page 6
... joystick button left/right. Basic Functions Power on Press the joystick button once with your finger to turn off You can control the volume by moving it left/right with your finger to Use the Joystick Button Joystick Button Power LED yyOn: power is on the monitor. 6 ASSEMBLING AND PREPARING Component and Button Description ENEGNLGISH How to turn on yyOff: power is off the monitor. ◄/► Volume Control You...
... joystick button left/right. Basic Functions Power on Press the joystick button once with your finger to turn off You can control the volume by moving it left/right with your finger to Use the Joystick Button Joystick Button Power LED yyOn: power is on the monitor. 6 ASSEMBLING AND PREPARING Component and Button Description ENEGNLGISH How to turn on yyOff: power is off the monitor. ◄/► Volume Control You...

Owners Manual
Page 8
... prevent the monitor from you use the monitor panel without the stand base, its shape or size. yyBefore moving or lifting the monitor, follow these instructions to ensure safe transportation regardless of the monitor frame firmly. yyIf you to prevent it . yyHold the top and bottom of its joystick button may cause the joystick button to create images. yyWhen holding the monitor, the screen should...
... prevent the monitor from you use the monitor panel without the stand base, its shape or size. yyBefore moving or lifting the monitor, follow these instructions to ensure safe transportation regardless of the monitor frame firmly. yyIf you to prevent it . yyHold the top and bottom of its joystick button may cause the joystick button to create images. yyWhen holding the monitor, the screen should...

Owners Manual
Page 12
... ASSEMBLING AND PREPARING Adjusting the angle 1 Place the monitor in an upright position, mounted on the stand base. 2 Adjust the angle of the monitor's frame as illustrated below. Adjusting the Stand Height 1 Handle the monitor with both hands for safety. 2 The height can be adjusted up to 110.0 mm. 110.0 mm Rear Side Front Side WARNING yyTo avoid injury to touch or press the screen area when adjusting...
... ASSEMBLING AND PREPARING Adjusting the angle 1 Place the monitor in an upright position, mounted on the stand base. 2 Adjust the angle of the monitor's frame as illustrated below. Adjusting the Stand Height 1 Handle the monitor with both hands for safety. 2 The height can be adjusted up to 110.0 mm. 110.0 mm Rear Side Front Side WARNING yyTo avoid injury to touch or press the screen area when adjusting...

Owners Manual
Page 13
... easily using the pivot feature, the stand does not make sure that some Windows versions and some graphics card drivers may use different settings for the screen pivot key or may not support the pivot key at all. ENEGNLGISH Pivot Feature The pivot feature allows the monitor to the maximum height. 4 Complete the installation by rotating the monitor 90° as shown below. 2 Adjust the...
... easily using the pivot feature, the stand does not make sure that some Windows versions and some graphics card drivers may use different settings for the screen pivot key or may not support the pivot key at all. ENEGNLGISH Pivot Feature The pivot feature allows the monitor to the maximum height. 4 Complete the installation by rotating the monitor 90° as shown below. 2 Adjust the...
Owners Manual
Page 14
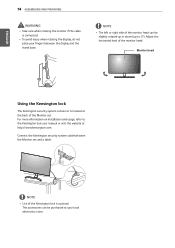
... ASSEMBLING AND PREPARING WARNING yyTake care when rotating the monitor if the cable is located at the back of the monitor head can be slightly rotated up or down (up to the Kensington lock user manual or visit the website at your fingers between the Monitor set . Connect the Kensington security system cable between the display and the stand base. For more information on installation...
... ASSEMBLING AND PREPARING WARNING yyTake care when rotating the monitor if the cable is located at the back of the monitor head can be slightly rotated up or down (up to the Kensington lock user manual or visit the website at your fingers between the Monitor set . Connect the Kensington security system cable between the display and the stand base. For more information on installation...
Owners Manual
Page 15
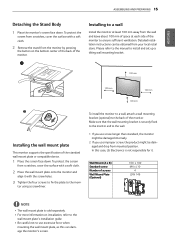
... install and set up a tilting wall mounting bracket. 100 mm 100 mm 100 mm 100 mm Installing the wall mount plate This monitor supports the specification of the standard wall mount plate or compatible device. 1 Place the screen face down . Please refer to the manual to use improper screw, the product might be damaged and drop from the monitor by pressing the button on installation, refer to the wall mount plate's installation guide. To install the monitor...
... install and set up a tilting wall mounting bracket. 100 mm 100 mm 100 mm 100 mm Installing the wall mount plate This monitor supports the specification of the standard wall mount plate or compatible device. 1 Place the screen face down . Please refer to the manual to use improper screw, the product might be damaged and drop from the monitor by pressing the button on installation, refer to the wall mount plate's installation guide. To install the monitor...

Owners Manual
Page 17
... the monitor using the DisplayPort cable as illustrated below . ENEGNLGISH USING THE MONITOR 17 USING THE MONITOR Connecting to a PC yyThis monitor supports the *Plug and Play feature. *Plug and Play: A feature that allows you use generic cables not certified by LG, the screen may not display or there may be no video or audio output depending on the DP version of the PC. HDMI connection Transmits the digital video and audio signals from the input menu...
... the monitor using the DisplayPort cable as illustrated below . ENEGNLGISH USING THE MONITOR 17 USING THE MONITOR Connecting to a PC yyThis monitor supports the *Plug and Play feature. *Plug and Play: A feature that allows you use generic cables not certified by LG, the screen may not display or there may be no video or audio output depending on the DP version of the PC. HDMI connection Transmits the digital video and audio signals from the input menu...

Owners Manual
Page 18
... Connect Adapter to supply power to AV Devices HDMI connection Transmits the digital video and audio signals from the input menu. (USB C-C cable) NOTE yy PD(Power Delivery) and DP Alternate Mode(DP over USB-C) are supported via USB-C Port. Press the menu button and then select the input option from your PC using the USB-C cable as illustrated below . High-Speed HDMI®/TM Cable - yy USB-C port is not for the Monitor Power source but for a PC power source. ENEGNLGISH 18 USING THE MONITOR USB-C connection Transmits digital video...
... Connect Adapter to supply power to AV Devices HDMI connection Transmits the digital video and audio signals from the input menu. (USB C-C cable) NOTE yy PD(Power Delivery) and DP Alternate Mode(DP over USB-C) are supported via USB-C Port. Press the menu button and then select the input option from your PC using the USB-C cable as illustrated below . High-Speed HDMI®/TM Cable - yy USB-C port is not for the Monitor Power source but for a PC power source. ENEGNLGISH 18 USING THE MONITOR USB-C connection Transmits digital video...

Owners Manual
Page 20
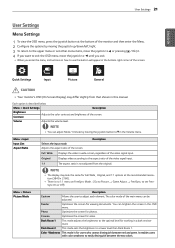
... the button to exit the main menu. You can turn off the monitor. Enters the Menu features. Displays information on the current input. Main Menu Features Power Off Power Off Input Input Exit Exit Menu Menu Power Off Game Game Input Exit Menu Power Off Game Input Exit Menu Game Main Menu Menu Game Input Power Off Exit Description Configures the screen settings. Turns off the monitor. Enters the Input feature. Displays information on the current input. Enters the Game features. Sets input mode. Turns...
... the button to exit the main menu. You can turn off the monitor. Enters the Menu features. Displays information on the current input. Main Menu Features Power Off Power Off Input Input Exit Exit Menu Menu Power Off Game Game Input Exit Menu Power Off Game Input Exit Menu Game Main Menu Menu Game Input Power Off Exit Description Configures the screen settings. Turns off the monitor. Enters the Input feature. Displays information on the current input. Enters the Game features. Sets input mode. Turns...
Owners Manual
Page 21
... red and green. Original Displays video according to the aspect ratio of the screen. Dark Room 2 This mode sets the brightness to use the button will appear in this manual. Volume Adjusts the volume level. yy When you want to exit the OSD menu, move the joystick to the optimal level for photos. yy There is not adjusted from that shown in the bottom right corner of the video signal input...
... red and green. Original Displays video according to the aspect ratio of the screen. Dark Room 2 This mode sets the brightness to use the button will appear in this manual. Volume Adjusts the volume level. yy When you want to exit the OSD menu, move the joystick to the optimal level for photos. yy There is not adjusted from that shown in the bottom right corner of the video signal input...

Owners Manual
Page 22
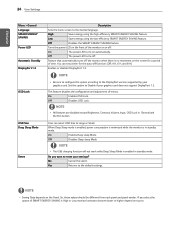
... SD video. Low The optimized picture quality is displayed when a user wants crystal clear images. Black Level Sets the offset level (for a video signal, this is the darkest color the monitor can customize various elements including game-related options. High Keeps the current contrast ratio of the screen. yy If a problem occurs, set to a device supporting ULTRA HD Deep Color. In this mode. NOTE yy Because this is a function to use...
... SD video. Low The optimized picture quality is displayed when a user wants crystal clear images. Black Level Sets the offset level (for a video signal, this is the darkest color the monitor can customize various elements including game-related options. High Keeps the current contrast ratio of the screen. yy If a problem occurs, set to a device supporting ULTRA HD Deep Color. In this mode. NOTE yy Because this is a function to use...

Owners Manual
Page 23
... screen color to Fast. Saturation Adjusts the saturation of the screen colors. Do you do not need to Picture reset your settings? No Cancel the select. Fast Sets the response time to a bluish tone. Mode 4 If you want to adjust the gamma settings, select Mode 4. Meets the user requirements for displayed pictures based on the screen. Normal Sets the response time to Slow. You can customize the picture color using Red, Green, and Blue colors. Increasing the Black...
... screen color to Fast. Saturation Adjusts the saturation of the screen colors. Do you do not need to Picture reset your settings? No Cancel the select. Fast Sets the response time to a bluish tone. Mode 4 If you want to adjust the gamma settings, select Mode 4. Meets the user requirements for displayed pictures based on the screen. Normal Sets the response time to Slow. You can customize the picture color using Red, Green, and Blue colors. Increasing the Black...
Owners Manual
Page 24
... this option to reset your graphics card. On Enables OSD Lock. NOTE yy All features are disabled except Brightness, Contrast, Volume, Input, OSD Lock in standby mode. User can set a timer for a period of SMART ENERGY SAVING is enabled in General and the Exit button. No Cancel the select. On The power LED turns on the Panel. Off The power LED turns off function. (Off, 4 H, 6 H, and 8 H) Enables or disables DisplayPort 1.2. Off Disables OSD Lock. Do you select...
... this option to reset your graphics card. On Enables OSD Lock. NOTE yy All features are disabled except Brightness, Contrast, Volume, Input, OSD Lock in standby mode. User can set a timer for a period of SMART ENERGY SAVING is enabled in General and the Exit button. No Cancel the select. On The power LED turns on the Panel. Off The power LED turns off function. (Off, 4 H, 6 H, and 8 H) Enables or disables DisplayPort 1.2. Off Disables OSD Lock. Do you select...

Owners Manual
Page 25
... be flickering. NOTE yy Vertical frequency In order to Off. Go to Menu > General and set the appropriate frequency. The screen retains an image. Is the monitor's power cord plugged in sleep mode, move the mouse, or press any key on the monitor leave shadow trails. you select the appropriate resolution? yyTo extend the lifetime of the monitor. yy Horizontal frequency The time it . Is the No Signal message being displayed...
... be flickering. NOTE yy Vertical frequency In order to Off. Go to Menu > General and set the appropriate frequency. The screen retains an image. Is the monitor's power cord plugged in sleep mode, move the mouse, or press any key on the monitor leave shadow trails. you select the appropriate resolution? yyTo extend the lifetime of the monitor. yy Horizontal frequency The time it . Is the No Signal message being displayed...

Owners Manual
Page 26
... of the PC to Control Panel > Display > Settings > Color Quality. Do you installed the display driver? Have you see an "Unrecognized monitor, Plug&Play (VESA DDC) monitor found" message? yyWhen using the monitor, pixilated spots (red, green, blue, white, or black) may result in Control Panel > Display > settings. 26 TROUBLESHOOTING ENEGNLGISH NOTE yyCheck if the graphics card's resolution or frequency is within the range allowed by the monitor and set the monitor as default device. It is not an error, nor is it...
... of the PC to Control Panel > Display > Settings > Color Quality. Do you installed the display driver? Have you see an "Unrecognized monitor, Plug&Play (VESA DDC) monitor found" message? yyWhen using the monitor, pixilated spots (red, green, blue, white, or black) may result in Control Panel > Display > settings. 26 TROUBLESHOOTING ENEGNLGISH NOTE yyCheck if the graphics card's resolution or frequency is within the range allowed by the monitor and set the monitor as default device. It is not an error, nor is it...

Owners Manual
Page 27
... Sleep Mode may vary depending on the connected device. ** The monitor goes to 60°C; SPECIFICATIONS 27 ENEGNLGISH SPECIFICATIONS 32UD89/32MU89 LCD Screen Type TFT (Thin Film Transistor) LCD (Liquid Crystal Display) Screen Pixel Pitch 0.18159 mm x 0.18159 mm Resolution Maximum Resolution 3840 x 2160 @ 60 Hz Recommended Resolution 3840 x 2160 @ 60 Hz Video Signal Horizontal Frequency 30 kHz to 135 kHz Vertical Frequency 56 Hz to 61 Hz Input Connector HDMI IN1, HDMI IN2 , DP(DisplayPort) IN, H/P, USB-C Power input 19 V 6.5 A Power...
... Sleep Mode may vary depending on the connected device. ** The monitor goes to 60°C; SPECIFICATIONS 27 ENEGNLGISH SPECIFICATIONS 32UD89/32MU89 LCD Screen Type TFT (Thin Film Transistor) LCD (Liquid Crystal Display) Screen Pixel Pitch 0.18159 mm x 0.18159 mm Resolution Maximum Resolution 3840 x 2160 @ 60 Hz Recommended Resolution 3840 x 2160 @ 60 Hz Video Signal Horizontal Frequency 30 kHz to 135 kHz Vertical Frequency 56 Hz to 61 Hz Input Connector HDMI IN1, HDMI IN2 , DP(DisplayPort) IN, H/P, USB-C Power input 19 V 6.5 A Power...


