User Manual
Page 2
... and, if not installed and used in accordance with the instructions, may be determined by turning the equipment off and on a circuit different from LG Electronics Corporation. Unauthorized modification could void the user's authority to radio communications. Any changes or modifications not expressly approved by one or more of important operating and maintenance (servicing) instructions in a residential installation. Consult the dealer...
... and, if not installed and used in accordance with the instructions, may be determined by turning the equipment off and on a circuit different from LG Electronics Corporation. Unauthorized modification could void the user's authority to radio communications. Any changes or modifications not expressly approved by one or more of important operating and maintenance (servicing) instructions in a residential installation. Consult the dealer...
User Manual
Page 4
..., stand, tripod, bracket, or table specified by an authorized servicer. Overloaded wall outlets, loose or damaged wall outlets, extension cords, frayed power cords, or damaged or cracked wire insulation are dangerous. Servicing is turned on the monitor's performance. - However, they be carried out in electric shock or fire. Any of these conditions could result in accordance to the regulations of this owner's manual to...
..., stand, tripod, bracket, or table specified by an authorized servicer. Overloaded wall outlets, loose or damaged wall outlets, extension cords, frayed power cords, or damaged or cracked wire insulation are dangerous. Servicing is turned on the monitor's performance. - However, they be carried out in electric shock or fire. Any of these conditions could result in accordance to the regulations of this owner's manual to...
User Manual
Page 5
... Stand Antenna Connection External AV Source Setup Digital Audio Output VCR Setup Cable TV Setup DVD Setup HDSTB Setup PC Setup Installation Operation Screen Setup 22 for PC mode 22 23 23 Basic operation 23 23 24 25 26 Setup Menu 27 Options 27 28 28 29 29 Video Menu 30 Options 30 31 32 32 33 33 Audio Menu 34 Options 34 35 Adjustments for screen Position, Clock, and Phase Initializing (Reset to original factory values) Turning on the TV Volume Adjustment Channel Selection On-screen...
... Stand Antenna Connection External AV Source Setup Digital Audio Output VCR Setup Cable TV Setup DVD Setup HDSTB Setup PC Setup Installation Operation Screen Setup 22 for PC mode 22 23 23 Basic operation 23 23 24 25 26 Setup Menu 27 Options 27 28 28 29 29 Video Menu 30 Options 30 31 32 32 33 33 Audio Menu 34 Options 34 35 Adjustments for screen Position, Clock, and Phase Initializing (Reset to original factory values) Turning on the TV Volume Adjustment Channel Selection On-screen...

User Manual
Page 9
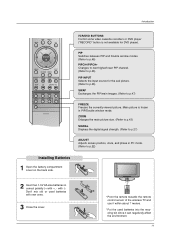
... ADJUST LIGHT Illuminates the remote control buttons. POWER Turns your TV turns itself off , depending on mode. FLASHBK Return to operate external devices. Remote Control Key Functions Introduction LIGHT MODE POWER TV/VIDEO COMP/RGB/DVI TIMER FLASHBK MUTE VOL SURF CH INFO SAP RATIO CC ENTER MENU SOUND VIDEO EXIT PLAY PAUSE STOP RECORD REW FF SKIP PIP PIPCH- Select other programmed equipment on or off automatically. (Refer to p.37) NUMBER buttons - (DASH) Used to enter a program number...
... ADJUST LIGHT Illuminates the remote control buttons. POWER Turns your TV turns itself off , depending on mode. FLASHBK Return to operate external devices. Remote Control Key Functions Introduction LIGHT MODE POWER TV/VIDEO COMP/RGB/DVI TIMER FLASHBK MUTE VOL SURF CH INFO SAP RATIO CC ENTER MENU SOUND VIDEO EXIT PLAY PAUSE STOP RECORD REW FF SKIP PIP PIPCH- Select other programmed equipment on or off automatically. (Refer to p.37) NUMBER buttons - (DASH) Used to enter a program number...
User Manual
Page 11
...) PIP INPUT Selects the input source for DVD player). with +, - Introduction INFO SAP RATIO CC ENTER MENU SOUND VIDEO EXIT PLAY PAUSE STOP RECORD REW FF SKIP PIP PIPCH- PIP Switches between PIP and Double window modes. (Refer to p.46) PIPCH-/PIPCH+ Changes to next higher/lower PIP channel. (Refer to p.47) FREEZE Freezes the currently-viewed picture. PIPCH+ PIPINPUT FREEZE ZOOM SIGNAL SWAP ADJUST VCR/DVD BUTTONS Control some video cassette recorders or DVD player ("RECORD" button is...
...) PIP INPUT Selects the input source for DVD player). with +, - Introduction INFO SAP RATIO CC ENTER MENU SOUND VIDEO EXIT PLAY PAUSE STOP RECORD REW FF SKIP PIP PIPCH- PIP Switches between PIP and Double window modes. (Refer to p.46) PIPCH-/PIPCH+ Changes to next higher/lower PIP channel. (Refer to p.47) FREEZE Freezes the currently-viewed picture. PIPCH+ PIPINPUT FREEZE ZOOM SIGNAL SWAP ADJUST VCR/DVD BUTTONS Control some video cassette recorders or DVD player ("RECORD" button is...
User Manual
Page 15
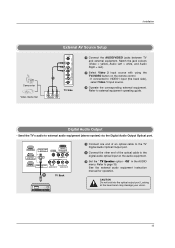
... digital audio optical input on the remote control. - Refer to external equipment operating guide. Off" in the AUDIO menu. Match the jack colours (Video = yellow, Audio Left = white, and Audio Right = red). 2 Select Video 2 input source with using the TV/VIDEO button on the audio equipment. 3 Set the " TV Speaker option - Installation Camcorder Video Game Set External AV Source Setup S-VIDEO VIDEO 2 R (MONO) L VIDEO AUDIO COMPONENT 2 VIDEO 1 TV Side R AUDIO L VIDEO 1 Connect the AUDIO/VIDEO jacks between TV and external equipment. CAUTION Do not look into the optical output...
... digital audio optical input on the remote control. - Refer to external equipment operating guide. Off" in the AUDIO menu. Match the jack colours (Video = yellow, Audio Left = white, and Audio Right = red). 2 Select Video 2 input source with using the TV/VIDEO button on the audio equipment. 3 Set the " TV Speaker option - Installation Camcorder Video Game Set External AV Source Setup S-VIDEO VIDEO 2 R (MONO) L VIDEO AUDIO COMPONENT 2 VIDEO 1 TV Side R AUDIO L VIDEO 1 Connect the AUDIO/VIDEO jacks between TV and external equipment. CAUTION Do not look into the optical output...
User Manual
Page 16
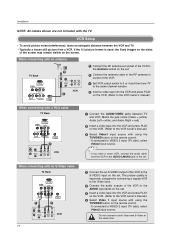
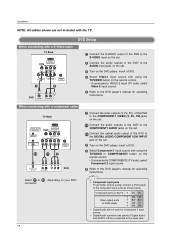
... fixed images on the sides of the VCR. 3 Set VCR output switch to 3 or 4 and then tune TV to the same channel number. 4 Insert a video tape into the VCR and press PLAY on the VCR. (Refer to the VCR owner's manual.) 4 Select Video 1 input source with the TV. VCR Setup - The picture quality is used; Installation NOTE: All cables shown are not included with using the TV/VIDEO button on the remote control...
... fixed images on the sides of the VCR. 3 Set VCR output switch to 3 or 4 and then tune TV to the same channel number. 4 Insert a video tape into the VCR and press PLAY on the VCR. (Refer to the VCR owner's manual.) 4 Select Video 1 input source with the TV. VCR Setup - The picture quality is used; Installation NOTE: All cables shown are not included with using the TV/VIDEO button on the remote control...
User Manual
Page 17
... remote control. - When connecting with the cable box remote control. Match the jack colors (Video = yellow, Audio Left = white, and Audio Right = red) 2 Select Video1 input source with using the TV/VIDEO button on the cable box. 5 Select channels at the cable box or with a RCA cable TV Back DVI INPUT (PC/DTV INPUT) S-VIDEO R AUDIO L/MONO VIDEO VIDEO1 COMPONENT1 R L AUDIO INPUT VIDEO INPUT Antenna 1 Cable Box (R) AUDIO (L) VIDEO TV VCR OUTPUT SWITCH 34 RF Cable 1 Connect the AUDIO/VIDEO jacks between TV and VCR. The TV cannot display TV programming unless a TV tuner device...
... remote control. - When connecting with the cable box remote control. Match the jack colors (Video = yellow, Audio Left = white, and Audio Right = red) 2 Select Video1 input source with using the TV/VIDEO button on the cable box. 5 Select channels at the cable box or with a RCA cable TV Back DVI INPUT (PC/DTV INPUT) S-VIDEO R AUDIO L/MONO VIDEO VIDEO1 COMPONENT1 R L AUDIO INPUT VIDEO INPUT Antenna 1 Cable Box (R) AUDIO (L) VIDEO TV VCR OUTPUT SWITCH 34 RF Cable 1 Connect the AUDIO/VIDEO jacks between TV and VCR. The TV cannot display TV programming unless a TV tuner device...
User Manual
Page 18
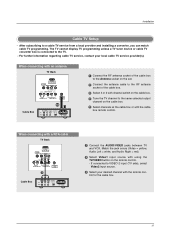
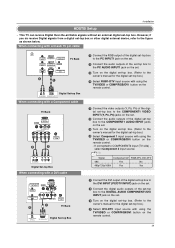
... Connect the optical audio output of the DVD to the DIGITAL AUDIO COMPONENT1/DVI INPUT jack on the set . 3 Turn on the DVD player, insert a DVD. 4 Select Video1 input source with using the TV/VIDEO button on the remote control. - Installation NOTE: All cables shown are connected at the same time. Select 2-1 or 2-2 , depending on your DVD connector. 18 • Component Input ports To get better picture quality, connect a DVD player to the DVD player's manual for operating instructions. If connected to VIDEO 2 input (TV side), select Video 2 input source. 5 Refer to the component input...
... Connect the optical audio output of the DVD to the DIGITAL AUDIO COMPONENT1/DVI INPUT jack on the set . 3 Turn on the DVD player, insert a DVD. 4 Select Video1 input source with using the TV/VIDEO button on the remote control. - Installation NOTE: All cables shown are connected at the same time. Select 2-1 or 2-2 , depending on your DVD connector. 18 • Component Input ports To get better picture quality, connect a DVD player to the DVD player's manual for operating instructions. If connected to VIDEO 2 input (TV side), select Video 2 input source. 5 Refer to the component input...
User Manual
Page 19
... INPUT (PC/DTV INPUT) jack on the set. 2 Connect the digital audio outputs of the digital set-top box to the COMPONENT1 AUDIO INPUT jacks on the set. 3 Turn on the digital set-top box. (Refer to the owner's manual for the digital set -top box.) 4 Select DVI-DTV input source with using the TV/VIDEO or COMP/RGB/DVI button on the remote control. - When connecting with a D-sub 15 pin cable AC IN PC AUDIO INPUT2 PC INPUT2 DIGITAL AUDIO (OPTICAL) SPEAKER OUT RS-232C INPUT (CONTROL/SERVICE) OUTPUT...
... INPUT (PC/DTV INPUT) jack on the set. 2 Connect the digital audio outputs of the digital set-top box to the COMPONENT1 AUDIO INPUT jacks on the set. 3 Turn on the digital set-top box. (Refer to the owner's manual for the digital set -top box.) 4 Select DVI-DTV input source with using the TV/VIDEO or COMP/RGB/DVI button on the remote control. - When connecting with a D-sub 15 pin cable AC IN PC AUDIO INPUT2 PC INPUT2 DIGITAL AUDIO (OPTICAL) SPEAKER OUT RS-232C INPUT (CONTROL/SERVICE) OUTPUT...
User Manual
Page 20
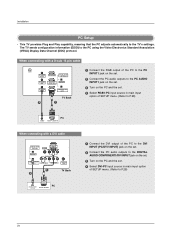
... R L INPUT AUDIO INPUT VIDEO INPUT Antenna 1 TV Back 2 DIGITAL AUDIO OPTICAL DVI-PC OUTPUT PC 1 Connect the DVI output of the PC to the DVI INPUT (PC/DTV INPUT) jack on the set. 2 Connect the PC audio outputs to the DIGITAL AUDIO COMPONENT1/DVI INPUT jack on the set. 3 Turn on the PC and the set. 4 Select DVI-PC input source in main input option of SETUP menu. (Refer to the PC using the Video Electronics Standard Association (VESA) Display Data Channel (DDC) protocol. Installation...
... R L INPUT AUDIO INPUT VIDEO INPUT Antenna 1 TV Back 2 DIGITAL AUDIO OPTICAL DVI-PC OUTPUT PC 1 Connect the DVI output of the PC to the DVI INPUT (PC/DTV INPUT) jack on the set. 2 Connect the PC audio outputs to the DIGITAL AUDIO COMPONENT1/DVI INPUT jack on the set. 3 Turn on the PC and the set. 4 Select DVI-PC input source in main input option of SETUP menu. (Refer to the PC using the Video Electronics Standard Association (VESA) Display Data Channel (DDC) protocol. Installation...
User Manual
Page 21
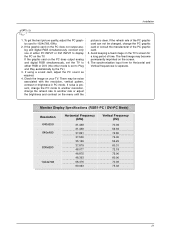
....02 21 The fixed image may be changed, change the refresh rate to another rate or adjust the brightness and contrast on the screen. 6. To get the best picture quality, adjust the PC graphics card to Plug and Play automatically by the TV.) 3. There may become permanently imprinted on the menu until the picture is present, change the PC mode to another resolution, change the PC...
....02 21 The fixed image may be changed, change the refresh rate to another rate or adjust the brightness and contrast on the screen. 6. To get the best picture quality, adjust the PC graphics card to Plug and Play automatically by the TV.) 3. There may become permanently imprinted on the menu until the picture is present, change the PC mode to another resolution, change the PC...
User Manual
Page 23
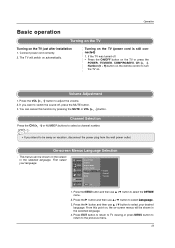
... menu. 2. SETUP Aspect Ratio Caption VIDEO Caption Mode Caption Option AUDIO Language G TIME Cinema Demo OPTION LOCK MENU Prev. Press the G button and then use D / E button to select Language. 3. Channel Selection Press the CH (+, -) or NUMBER buttons to select a channel number. • If you want to switch the sound off • Press the ON/OFF button on the TV or press the POWER, TV/VIDEO, COMP/RGB/DVI, CH (+, -), Number (0 ~ 9) button on the remote control to the previous menu. 23 Turning...
... menu. 2. SETUP Aspect Ratio Caption VIDEO Caption Mode Caption Option AUDIO Language G TIME Cinema Demo OPTION LOCK MENU Prev. Press the G button and then use D / E button to select Language. 3. Channel Selection Press the CH (+, -) or NUMBER buttons to select a channel number. • If you want to switch the sound off • Press the ON/OFF button on the TV or press the POWER, TV/VIDEO, COMP/RGB/DVI, CH (+, -), Number (0 ~ 9) button on the remote control to the previous menu. 23 Turning...

User Manual
Page 24
... Aux. Press the MENU button and then D / E button to display the available menus. Block OPTION LOCK G SETUP Audio Language EZ SoundRite VIDEO EZ Sound Balance 0L R AUDIO G Treble 50 TIME Bass 50 Front Surround OPTION TV Speaker LOCK SETUP VIDEO AUDIO TIME Aspect Ratio Caption Caption Mode Caption Option Language Cinema Demo OPTIONG LOCK SETUP VIDEO AUDIO TIME G Auto Clock Manual Clock Off Timer On Timer Sleep Timer Auto Off OPTION LOCK • The OSD (On Screen Display) function enables you to adjust the screen status conveniently since it...
... Aux. Press the MENU button and then D / E button to display the available menus. Block OPTION LOCK G SETUP Audio Language EZ SoundRite VIDEO EZ Sound Balance 0L R AUDIO G Treble 50 TIME Bass 50 Front Surround OPTION TV Speaker LOCK SETUP VIDEO AUDIO TIME Aspect Ratio Caption Caption Mode Caption Option Language Cinema Demo OPTIONG LOCK SETUP VIDEO AUDIO TIME G Auto Clock Manual Clock Off Timer On Timer Sleep Timer Auto Off OPTION LOCK • The OSD (On Screen Display) function enables you to adjust the screen status conveniently since it...
User Manual
Page 27
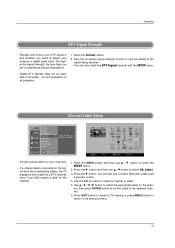
... Input Front Display SET ID LOCK MENU Prev. If a channel label is and whether you to the channel logo screen. - Use the CH +/- Use D / E / F / G button to select the appropriate label for a DTV channel: even if you are broadcast on -screen signal strength monitor to select the SETUP menu. 2. Press the G button and then use D / E button to see a screen filled with the SETUP menu. - Digital DTV Signals: May not be available in all programs. Channel Label Setup SETUP VIDEO AUDIO TIME OPTION EZ Scan...
... Input Front Display SET ID LOCK MENU Prev. If a channel label is and whether you to the channel logo screen. - Use the CH +/- Use D / E / F / G button to select the appropriate label for a DTV channel: even if you are broadcast on -screen signal strength monitor to select the SETUP menu. 2. Press the G button and then use D / E button to see a screen filled with the SETUP menu. - Digital DTV Signals: May not be available in all programs. Channel Label Setup SETUP VIDEO AUDIO TIME OPTION EZ Scan...

User Manual
Page 44
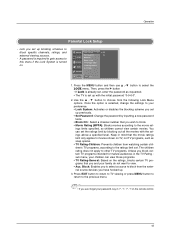
... • Video 1, 2 • Component 1, 2 • RGB 1, 2, and DVI (On, Off) (On, Off) (On, Off) 44 Viewing can be blocked by the type of program and by the categories chosen to be used to block specific channels, ratings and other viewing sources. Movies that have been shown at the theaters or direct-to TV-PG, TV-14) • Language - Operation Lock Menu Options Parental Control can...
... • Video 1, 2 • Component 1, 2 • RGB 1, 2, and DVI (On, Off) (On, Off) (On, Off) 44 Viewing can be blocked by the type of program and by the categories chosen to be used to block specific channels, ratings and other viewing sources. Movies that have been shown at the theaters or direct-to TV-PG, TV-14) • Language - Operation Lock Menu Options Parental Control can...
User Manual
Page 45
... only applies to view. • Aux. SETUP Lock System G Off Set Password On VIDEO Block Ch. Keep in '7', '7', '7', '7' on TV, not TV programs, such as requested. • The TV is selected, change the settings to block specific channels, ratings, and external viewing sources. - Lets you ever forget your family do not want to movies shown on the remote control. 45 Press the MENU button and then use D / E button to choose...
... only applies to view. • Aux. SETUP Lock System G Off Set Password On VIDEO Block Ch. Keep in '7', '7', '7', '7' on TV, not TV programs, such as requested. • The TV is selected, change the settings to block specific channels, ratings, and external viewing sources. - Lets you ever forget your family do not want to movies shown on the remote control. 45 Press the MENU button and then use D / E button to choose...

User Manual
Page 49
... errors. Data 1: Illegal Code 2: Not supported function 3: Wait more time COM- Use this format when receiving normal data. LOCK MENU Prev. Aspect Ratio k 04. Volume Control k 07. OSD Select k 13. Channel Add/Del m b 23. Key mc 01 ~ 87 01 ~ 87 00 ~ FE 00 ~ FE 00 ~ FE 00 ~ FE 00 ~ 01 49 VIDEO AUDIO DTV Signal Ch. Input Select k 03. Screen Mute k 05. Volume Mute k 06. Color k 10. Sharpness k 12. PIP...
... errors. Data 1: Illegal Code 2: Not supported function 3: Wait more time COM- Use this format when receiving normal data. LOCK MENU Prev. Aspect Ratio k 04. Volume Control k 07. OSD Select k 13. Channel Add/Del m b 23. Key mc 01 ~ 87 01 ~ 87 00 ~ FE 00 ~ FE 00 ~ FE 00 ~ FE 00 ~ 01 49 VIDEO AUDIO DTV Signal Ch. Input Select k 03. Screen Mute k 05. Volume Mute k 06. Color k 10. Sharpness k 12. PIP...
User Manual
Page 52
... set this bit high(1). Color Temperature (Command2:u) G To adjust color temperature. If the physical channel sending is ATSC digital cable, it 's not mandatory), using one part channel number, minor channel does not need. Example) 1. In case of using physical channel, NTSC cable 'xx' data: don't care major and minor channel number in PIP/Double Window mode. Channel Add/Del (Command: m b) G To add and delete the channels Transmission [m][b][ ][Set ID][ ][Data][Cr] Data 0: Channel Delete 1: Channel...
... set this bit high(1). Color Temperature (Command2:u) G To adjust color temperature. If the physical channel sending is ATSC digital cable, it 's not mandatory), using one part channel number, minor channel does not need. Example) 1. In case of using physical channel, NTSC cable 'xx' data: don't care major and minor channel number in PIP/Double Window mode. Channel Add/Del (Command: m b) G To add and delete the channels Transmission [m][b][ ][Set ID][ ][Data][Cr] Data 0: Channel Delete 1: Channel...

User Manual
Page 57
Troubleshooting Checklist Reference The operation does not work . Power is any function to another product's power cord into wall power outlet? • Check your service center, if the picture has not appeared after switching on station tuned with correct polarity (+ to -)? • Correct remote operating mode set ? • Check the power control settings. No picture & No sound • Check whether the product is turned on some channels • Station or cable product experiencing problems, tune...
Troubleshooting Checklist Reference The operation does not work . Power is any function to another product's power cord into wall power outlet? • Check your service center, if the picture has not appeared after switching on station tuned with correct polarity (+ to -)? • Correct remote operating mode set ? • Check the power control settings. No picture & No sound • Check whether the product is turned on some channels • Station or cable product experiencing problems, tune...


