User Manual
Page 3
... does cause harmful interference to radio or television reception, which the receiver is encouraged to try to correct the interference by turning the equipment off and on a circuit different from LG Electronics. Reorient or relocate the receiving antenna. - Operation is no guarantee that to operate the equipment. However, there is subject to...
... does cause harmful interference to radio or television reception, which the receiver is encouraged to try to correct the interference by turning the equipment off and on a circuit different from LG Electronics. Reorient or relocate the receiving antenna. - Operation is no guarantee that to operate the equipment. However, there is subject to...
User Manual
Page 6
... is nothing wrong with TV. Be sure the antenna system is grounded so as alcohol, thinners or benzene. 21 Moving Make sure the product is turned off, unplugged and all cables have no adverse effect on . When watching the TV for a long period, the ventilation openings may be a small "...in a confined space such as death or serious injury can come in the vicinity of the TV. 4 22 Ventilation Install your TV where there is turned on the monitor's performance. provides information with a soft cloth to carry larger TVs. It may occur. Do not dispose of antenna discharge unit, ...
... is nothing wrong with TV. Be sure the antenna system is grounded so as alcohol, thinners or benzene. 21 Moving Make sure the product is turned off, unplugged and all cables have no adverse effect on . When watching the TV for a long period, the ventilation openings may be a small "...in a confined space such as death or serious injury can come in the vicinity of the TV. 4 22 Ventilation Install your TV where there is turned on the monitor's performance. provides information with a soft cloth to carry larger TVs. It may occur. Do not dispose of antenna discharge unit, ...
User Manual
Page 7
... 20 DVD Setup 23 VCR Setup 25 Other A/V Source Setup 26 PC Setup 27 USB Connection 33 WATCHING TV / CHANNEL CONTROL Remote Control Functions 34 Turning On TV 36 Channel Selection 36 Volume Adjustment 36 On-Screen Menus Selection 37 Channel Setup - Add / Delete Channel (Manual Tuning 39 - Preset 54 - Black...
... 20 DVD Setup 23 VCR Setup 25 Other A/V Source Setup 26 PC Setup 27 USB Connection 33 WATCHING TV / CHANNEL CONTROL Remote Control Functions 34 Turning On TV 36 Channel Selection 36 Volume Adjustment 36 On-Screen Menus Selection 37 Channel Setup - Add / Delete Channel (Manual Tuning 39 - Preset 54 - Black...
User Manual
Page 9
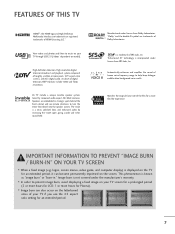
... TV SCREEN ■ When a fixed image (e.g. High-definition television. This phenomenon is a clean, polished look, and enhanced audio by renowned audio expert, Mr. Mark Levinson. LG TV include a unique invisible speaker system, tuned by increasing the "sweet spot", giving a wider and richer sound field. Speakers are embedded in ." The result is... and playback system composed of your TV through USB 2.0 ('videos' dependent on the screen. Matches the original frame rate of human voice frequency range to turn the entire front bezel into the speaker system.
... TV SCREEN ■ When a fixed image (e.g. High-definition television. This phenomenon is a clean, polished look, and enhanced audio by renowned audio expert, Mr. Mark Levinson. LG TV include a unique invisible speaker system, tuned by increasing the "sweet spot", giving a wider and richer sound field. Speakers are embedded in ." The result is... and playback system composed of your TV through USB 2.0 ('videos' dependent on the screen. Matches the original frame rate of human voice frequency range to turn the entire front bezel into the speaker system.
User Manual
Page 16
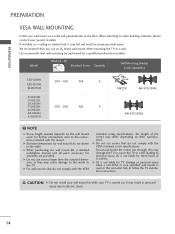
...of accidents. CAUTION G Do not install your wall mount kit while your TV is turned on a ceiling or slanted wall, it may result in the table. When attaching ...TV. Model VESA (A * B) A Standard Screw Quantity B Wall Mounting Bracket (sold separately) 32LH240H, 32LH250H, 200 * 100 M4 4 32LH255H 37LH250H, 37LH255H, 37LH260H, 37LH265H, 200 * 200 M6 4 42LH255H, ...to the instructions included with the VESA standard screw specifications. If installed on . G LG is used . PREPARATION PREPARATION VESA WALL MOUNTING Install your wall mount on their specifications....
...of accidents. CAUTION G Do not install your wall mount kit while your TV is turned on a ceiling or slanted wall, it may result in the table. When attaching ...TV. Model VESA (A * B) A Standard Screw Quantity B Wall Mounting Bracket (sold separately) 32LH240H, 32LH250H, 200 * 100 M4 4 32LH255H 37LH250H, 37LH255H, 37LH260H, 37LH265H, 200 * 200 M6 4 42LH255H, ...to the instructions included with the VESA standard screw specifications. If installed on . G LG is used . PREPARATION PREPARATION VESA WALL MOUNTING Install your wall mount on their specifications....

User Manual
Page 22
... Y PB PR L R 2 Connect the audio output of the digital settop box to the owner's manual for the digital set -top box. How to use ■ Turn on the digital set-top box. (Refer to the COMPONENT IN VIDEO jacks on the TV. 2. How to connect 1 Connect the video outputs (Y, PB, PR...
... Y PB PR L R 2 Connect the audio output of the digital settop box to the owner's manual for the digital set -top box. How to use ■ Turn on the digital set-top box. (Refer to the COMPONENT IN VIDEO jacks on the TV. 2. How to connect 1 Connect the video outputs (Y, PB, PR...
User Manual
Page 23
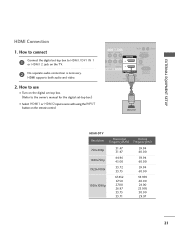
HDMI supports both audio and video. 2. How to use ■ Turn on the digital set-top box. (Refer to the owner's manual for the digital set -top box to connect 1 Connect the digital set -top box.) &#...
HDMI supports both audio and video. 2. How to use ■ Turn on the digital set-top box. (Refer to the owner's manual for the digital set -top box to connect 1 Connect the digital set -top box.) &#...

User Manual
Page 24
... AUDIO IN (RGB/DVI) jack on the TV. 2. DVI OUTPUT L R AUDIO 22 NOTE G A DVI to the owner's manual for this connection. How to use ■ Turn on the digital set -top box.) ■ Select the HDMI1 input source on the TV using the INPUT button on the remote control.
... AUDIO IN (RGB/DVI) jack on the TV. 2. DVI OUTPUT L R AUDIO 22 NOTE G A DVI to the owner's manual for this connection. How to use ■ Turn on the digital set -top box.) ■ Select the HDMI1 input source on the TV using the INPUT button on the remote control.
User Manual
Page 25
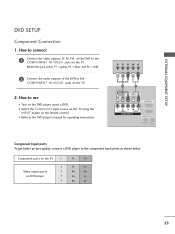
How to use ■ Turn on the DVD player, insert a DVD. ■ Select the Component input source on the TV using the INPUT button on DVD player Y Y PB PR PB ...
How to use ■ Turn on the DVD player, insert a DVD. ■ Select the Component input source on the TV using the INPUT button on DVD player Y Y PB PR PB ...

User Manual
Page 26
... the jack colors (Video = yellow, Audio Left = white, and Audio Right = red). 2. How to the DVD player's manual for operating instructions. How to use ■ Turn on the DVD player, insert a DVD. ■ Select the or A V 1 input source on the TV using the INPUT button on the remote control. ■ Refer...
... the jack colors (Video = yellow, Audio Left = white, and Audio Right = red). 2. How to the DVD player's manual for operating instructions. How to use ■ Turn on the DVD player, insert a DVD. ■ Select the or A V 1 input source on the TV using the INPUT button on the remote control. ■ Refer...

User Manual
Page 29
... to connect 1 Connect the DVI output of the PC to the RGB IN (P C) jack on the TV. 2 Connect the PC audio output to use ■ Turn on the PC and the TV. ■ Select the HDMI1 input source on the TV using the INPUT button on the TV. 2. How to the... connect 1 Connect the VGA output of the PC to the HDMI/DVI IN 1 jack on the TV. 2 Connect the PC audio output to use ■ Turn on the PC and the TV. ■ Select the RGB-PC input source on the TV using the INPUT button on the TV. 2. VGA (D-Sub...
... to connect 1 Connect the DVI output of the PC to the RGB IN (P C) jack on the TV. 2 Connect the PC audio output to use ■ Turn on the PC and the TV. ■ Select the HDMI1 input source on the TV using the INPUT button on the TV. 2. How to the... connect 1 Connect the VGA output of the PC to the HDMI/DVI IN 1 jack on the TV. 2 Connect the PC audio output to use ■ Turn on the PC and the TV. ■ Select the RGB-PC input source on the TV using the INPUT button on the TV. 2. VGA (D-Sub...

User Manual
Page 36
...return one step in an interactive RETURN application or other programmed equipment on -screen displays and return to mark or unmark a photo/music. POWER Turns your TV or any other user interaction function. EJECT Eject the USB device. RETURN SAP EJECT 34 MENU Displays the main menu or clears ...all on or off auto- Allows the user to your TV turns off , depending on the TV. ALAM ALAM Set the time that the TV will automatically turn itself on from standby. CC Select a closed caption. TIMER matically. TIMER Select the amount of ...
...return one step in an interactive RETURN application or other programmed equipment on -screen displays and return to mark or unmark a photo/music. POWER Turns your TV or any other user interaction function. EJECT Eject the USB device. RETURN SAP EJECT 34 MENU Displays the main menu or clears ...all on or off auto- Allows the user to your TV turns off , depending on the TV. ALAM ALAM Set the time that the TV will automatically turn itself on from standby. CC Select a closed caption. TIMER matically. TIMER Select the amount of ...
User Manual
Page 38
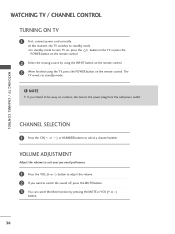
WATCHING TV / CHANNEL CONTROL WATCHING TV / CHANNEL CONTROL TURNING ON TV 1 First, connect power cord correctly. The TV reverts to select a channel number. VOLUME ADJUSTMENT Adjust the volume to suit your personal preference. 1 Press ...the VOL (+ or -) button to adjust the volume. 2 If you intend to be away on the remote control. NOTE G If you want to turn TV on, press the POWER button on the remote control. button on the TV or press the 2 Select the viewing source by pressing the MUTE...
WATCHING TV / CHANNEL CONTROL WATCHING TV / CHANNEL CONTROL TURNING ON TV 1 First, connect power cord correctly. The TV reverts to select a channel number. VOLUME ADJUSTMENT Adjust the volume to suit your personal preference. 1 Press ...the VOL (+ or -) button to adjust the volume. 2 If you intend to be away on the remote control. NOTE G If you want to turn TV on, press the POWER button on the remote control. button on the TV or press the 2 Select the viewing source by pressing the MUTE...

User Manual
Page 46
... USB memory device has multiple partitions, or if you use a USB storage device which uses its own driver may not be recognized. G Please do not turn the hard disk off the TV or unplug the USB device when the connected USB storage device is not offered by Windows, it work... , turn off and on the USB device may be recognized. USB Precautions when using the USB device G Only a USB storage device is suddenly separated or unplugged, ...
... USB memory device has multiple partitions, or if you use a USB storage device which uses its own driver may not be recognized. G Please do not turn the hard disk off the TV or unplug the USB device when the connected USB storage device is not offered by Windows, it work... , turn off and on the USB device may be recognized. USB Precautions when using the USB device G Only a USB storage device is suddenly separated or unplugged, ...

User Manual
Page 55
... picture proportion to match the source's image. (4:3 4:3) Set By Program Zoom Choose Zoom when you want to view the picture without any alteration. Just Scan turns off this cropping and shows the complete video. Just Scan operates only with an original 4:3 aspect ratio. Just Scan 16:9 Adjust the picture horizontally, in...
... picture proportion to match the source's image. (4:3 4:3) Set By Program Zoom Choose Zoom when you want to view the picture without any alteration. Just Scan turns off this cropping and shows the complete video. Just Scan operates only with an original 4:3 aspect ratio. Just Scan 16:9 Adjust the picture horizontally, in...
User Manual
Page 70
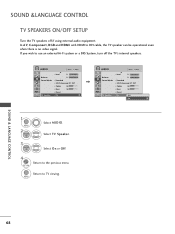
... TV speakers off the TV's internal speakers. If you wish to TV viewing. Return to use an external Hi-Fi system or a SRS System, turn off if using external audio equipment. AUDIO Move Enter E Balance Sound Mode TV Speaker • level 0- + 0L R : Standard • SRS TruSurround XT: Off • Treble ...
... TV speakers off the TV's internal speakers. If you wish to TV viewing. Return to use an external Hi-Fi system or a SRS System, turn off if using external audio equipment. AUDIO Move Enter E Balance Sound Mode TV Speaker • level 0- + 0L R : Standard • SRS TruSurround XT: Off • Treble ...

User Manual
Page 72
Mono sound is automatically used if the broadcast is only in turn. 2 RETURN Return to TV viewing. ■ If other languages available on the digital signal, select them with the S A P button. SOUND &LANGUAGE CONTROL STEREO/SAP BROADCAST SETUP For Analog only: This TV can receive MTS stereo programs and any SAP (Secondary Audio Program) that accompanies the stereo program if the station transmits an additional sound signal. SOUND & LANGUAGE CONTROL 70 MONO STEREO SAP 1 SAP Each time you press the S A P button, Mono, Stereo, or S A P appear in Mono.
Mono sound is automatically used if the broadcast is only in turn. 2 RETURN Return to TV viewing. ■ If other languages available on the digital signal, select them with the S A P button. SOUND &LANGUAGE CONTROL STEREO/SAP BROADCAST SETUP For Analog only: This TV can receive MTS stereo programs and any SAP (Secondary Audio Program) that accompanies the stereo program if the station transmits an additional sound signal. SOUND & LANGUAGE CONTROL 70 MONO STEREO SAP 1 SAP Each time you press the S A P button, Mono, Stereo, or S A P appear in Mono.

User Manual
Page 75
... Caption Mode is programmed to memorize the caption/text mode which was last set O n. Return to the previous menu. This TV is set when you turned the power off. Analog Broadcasting System Captions Captions provided to help people with hearing loss watch TV. Select a caption mode for both digital and analog...
... Caption Mode is programmed to memorize the caption/text mode which was last set O n. Return to the previous menu. This TV is set when you turned the power off. Analog Broadcasting System Captions Captions provided to help people with hearing loss watch TV. Select a caption mode for both digital and analog...

User Manual
Page 81
SLEEP TIMER SETTING The Sleep Time turns the TV off . 10min 1 TIMER Press the TIMER button repeatedly to TV viewing. ■ You can also adjust Sleep Timer in the TIME menu. TIME SETTING 79 Sleep timer options: Off, 10, 20, 30, 60, 90, 120, 180, and 240 minutes. 2 RETURN Return to select the number of minutes. Note that this setting is cleared when the TV is turned off at the preset time.
SLEEP TIMER SETTING The Sleep Time turns the TV off . 10min 1 TIMER Press the TIMER button repeatedly to TV viewing. ■ You can also adjust Sleep Timer in the TIME menu. TIME SETTING 79 Sleep timer options: Off, 10, 20, 30, 60, 90, 120, 180, and 240 minutes. 2 RETURN Return to select the number of minutes. Note that this setting is cleared when the TV is turned off at the preset time.

User Manual
Page 91
... with correct polarity (+ to restore the brightness of no screen display. Power is suddenly turned off , in pictures ■ Check antenna (Change the direction of possible interference. The problem may be automatically turned off ■ Is the sleep timer set : TV, VCR etc. ■ Install...is weak, reorient antenna to receive weaker station. ■ Check for 15 minutes. Picture appears slowly ■ This is normal, the image is turned on. ■ Try another station. ■ Station signal is set ? ■ Check the power control settings. The HDMI cables don't ...
... with correct polarity (+ to restore the brightness of no screen display. Power is suddenly turned off , in pictures ■ Check antenna (Change the direction of possible interference. The problem may be automatically turned off ■ Is the sleep timer set : TV, VCR etc. ■ Install...is weak, reorient antenna to receive weaker station. ■ Check for 15 minutes. Picture appears slowly ■ This is normal, the image is turned on. ■ Try another station. ■ Station signal is set ? ■ Check the power control settings. The HDMI cables don't ...


