Specification (English)
Page 2
...8226; Smart Energy Saving • Mechanical Power Off • 1080p Source Input - LCD TV 32LH20 32" Class High Definition LCD TV (31.5" diagonal) LGusa.com LCD SPECIFICATION Screen Size (Class) 32" Class (31.5" diagonal) Native Display Resolution 1366 x 768p Brightness (cd/m2) 450 Dynamic Contrast...video is a registered trademark of their respective owners. 09/11/09 LG Electronics U.S.A., Inc. 1000 Sylvan Avenue Englewood Cliffs, NJ 07632 Customer Service and Technical Support: (800) 243-0000 "LG Life's Good" is present) • REAR AUDIO/VIDEO INPUTS/...
...8226; Smart Energy Saving • Mechanical Power Off • 1080p Source Input - LCD TV 32LH20 32" Class High Definition LCD TV (31.5" diagonal) LGusa.com LCD SPECIFICATION Screen Size (Class) 32" Class (31.5" diagonal) Native Display Resolution 1366 x 768p Brightness (cd/m2) 450 Dynamic Contrast...video is a registered trademark of their respective owners. 09/11/09 LG Electronics U.S.A., Inc. 1000 Sylvan Avenue Englewood Cliffs, NJ 07632 Customer Service and Technical Support: (800) 243-0000 "LG Life's Good" is present) • REAR AUDIO/VIDEO INPUTS/...
Owner's Manual (English)
Page 4
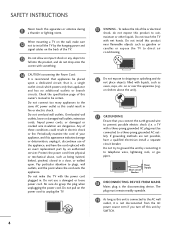
...must remain readily operable. 19 As long as vases, cups, etc. Pay particular attention to unplug the TV. 4 15 WARNING - Do not use of fire or electrical shock, do not drop onto the screen with liquids, such as this could result in fire or electric shock. Do not install this owner's ...manual to the AC wall outlet, it is recommend that appliance and has no additional outlets or branch circuits. When mounting a TV on the power cord to plugs...
...must remain readily operable. 19 As long as vases, cups, etc. Pay particular attention to unplug the TV. 4 15 WARNING - Do not use of fire or electrical shock, do not drop onto the screen with liquids, such as this could result in fire or electric shock. Do not install this owner's ...manual to the AC wall outlet, it is recommend that appliance and has no additional outlets or branch circuits. When mounting a TV on the power cord to plugs...
Owner's Manual (English)
Page 5
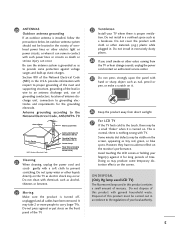
...or put stress on . Do not install in excessively dusty places. 24 If you smell smoke or other liquids directly on the screen. Avoid touching the LCD screen or holding your finger(s) against voltage surges and built-up static charges. Antenna grounding according to the National Electrical Code, ANSI/...adverse effect on the screen, appearing as death or serious injury can occur. Do not cover the product with cloth or other electric light or power circuits, or where it is turned on the front panel of mercury. ON DISPOSAL (Only Hg lamp used LCD TV) The fluorescent lamp used...
...or put stress on . Do not install in excessively dusty places. 24 If you smell smoke or other liquids directly on the screen. Avoid touching the LCD screen or holding your finger(s) against voltage surges and built-up static charges. Antenna grounding according to the National Electrical Code, ANSI/...adverse effect on the screen, appearing as death or serious injury can occur. Do not cover the product with cloth or other electric light or power circuits, or where it is turned on the front panel of mercury. ON DISPOSAL (Only Hg lamp used LCD TV) The fluorescent lamp used...
Owner's Manual (English)
Page 6
...28 Swivel Stand 28 Positioning your Display 28 Attaching the TV to a Desk 29 Kensington Security System 29 Securing the TV to the wall to prevent falling when the TV is used on a stand 30 Antenna or Cable Connection 31 EXTERNAL EQUIPMENT SETUP HD Receiver Setup 32 DVD Setup 35... VCR Setup 37 Other A/V Source Setup 39 Audio out Connection 40 PC Setup 41 WATCHING TV / CHANNEL CONTROL Remote Control Functions 48 Turning On TV 50 Channel Selection 50 Volume Adjustment 50 Initial Setting 51 On-Screen Menus...
...28 Swivel Stand 28 Positioning your Display 28 Attaching the TV to a Desk 29 Kensington Security System 29 Securing the TV to the wall to prevent falling when the TV is used on a stand 30 Antenna or Cable Connection 31 EXTERNAL EQUIPMENT SETUP HD Receiver Setup 32 DVD Setup 35... VCR Setup 37 Other A/V Source Setup 39 Audio out Connection 40 PC Setup 41 WATCHING TV / CHANNEL CONTROL Remote Control Functions 48 Turning On TV 50 Channel Selection 50 Volume Adjustment 50 Initial Setting 51 On-Screen Menus...
Owner's Manual (English)
Page 7
...81 Preset Sound Setting (Sound Mode 82 Sound Setting Adjustment - User Mode 83 Balance 84 TV Speakers On/Off Setup 85 Audio Reset 86 Stereo/SAP Broadcasts Setup 87 Audio Language 88 On-Screen Menus Language Selection 89 Caption Mode - Auto Clock Setup 93 Manual Clock Setup 94 Auto ...On/Off Time Setting 95 Sleep Timer Setting 96 PARENTAL CONTROL / RATINGS Set Password & Lock System 97 Channel Blocking 100 Movie & TV Rating 101 Downloadable Rating 106 ...
...81 Preset Sound Setting (Sound Mode 82 Sound Setting Adjustment - User Mode 83 Balance 84 TV Speakers On/Off Setup 85 Audio Reset 86 Stereo/SAP Broadcasts Setup 87 Audio Language 88 On-Screen Menus Language Selection 89 Caption Mode - Auto Clock Setup 93 Manual Clock Setup 94 Auto ...On/Off Time Setting 95 Sleep Timer Setting 96 PARENTAL CONTROL / RATINGS Set Password & Lock System 97 Channel Blocking 100 Movie & TV Rating 101 Downloadable Rating 106 ...

Owner's Manual (English)
Page 8
... choose the correct mode for an extended period. 8 I Image burn can also occur on the TV for professional certification by the user to experience the best their LG HDTV has to turn the entire front bezel into Cinema, Sports, and game Mode according to inquire...LLC." HDMI, the HDMI logo and High-Definition Multimedia Interface are trademarks of your TV screen for a prolonged period (2 or more hours for LCD, 1 or more pixels, 16:9 aspect-ratio screens, and AC3 digital audio. logos, screen menus, video game, and computer display) is a clean, polished look, and enhanced...
... choose the correct mode for an extended period. 8 I Image burn can also occur on the TV for professional certification by the user to experience the best their LG HDTV has to turn the entire front bezel into Cinema, Sports, and game Mode according to inquire...LLC." HDMI, the HDMI logo and High-Definition Multimedia Interface are trademarks of your TV screen for a prolonged period (2 or more hours for LCD, 1 or more pixels, 16:9 aspect-ratio screens, and AC3 digital audio. logos, screen menus, video game, and computer display) is a clean, polished look, and enhanced...

Owner's Manual (English)
Page 16
PREPARATION PREPARATION STAND INSTRUCTIONS (For 19/22LH20, 22LH200C) I Image shown may differ from damage. 2 Assemble the TV as shown until you hear it click. 16 INSTALLATION 1 Carefully place the TV screen side down on a cushioned surface to protect the screen from your TV.
PREPARATION PREPARATION STAND INSTRUCTIONS (For 19/22LH20, 22LH200C) I Image shown may differ from damage. 2 Assemble the TV as shown until you hear it click. 16 INSTALLATION 1 Carefully place the TV screen side down on a cushioned surface to protect the screen from your TV.
Owner's Manual (English)
Page 17
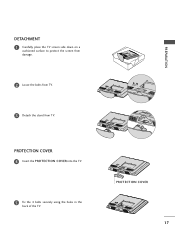
PROTECTION COVER 17 PREPARATION PROTECTION COVER 4 Insert the PROTECTION COVER into the TV. 5 Fix the 4 bolts securely using the holes in the back of the TV. DETACHMENT 1 Carefully place the TV screen side down on a cushioned surface to protect the screen from damage. 2 Loose the bolts from TV. 3 Detach the stand from TV.
PROTECTION COVER 17 PREPARATION PROTECTION COVER 4 Insert the PROTECTION COVER into the TV. 5 Fix the 4 bolts securely using the holes in the back of the TV. DETACHMENT 1 Carefully place the TV screen side down on a cushioned surface to protect the screen from damage. 2 Loose the bolts from TV. 3 Detach the stand from TV.

Owner's Manual (English)
Page 18
Do not over tighten. 18 PREPARATION PREPARATION STAND INSTRUCTIONS (For 26/32/37/42LH20, 32/37/42/47LH30) I Image shown may differ from damage. 2 Assemble the TV as shown. 3 Fix the 4 bolts securely using the holes in the back of the TV. ! INSTALLATION 1 Carefully place the TV screen side down on a cushioned surface to protect the screen from your TV. NOTE G When assembling the desk type stand, make sure the bolt is fully tightened (If not tightened fully, the TV can tilt forward after the product installation).
Do not over tighten. 18 PREPARATION PREPARATION STAND INSTRUCTIONS (For 26/32/37/42LH20, 32/37/42/47LH30) I Image shown may differ from damage. 2 Assemble the TV as shown. 3 Fix the 4 bolts securely using the holes in the back of the TV. ! INSTALLATION 1 Carefully place the TV screen side down on a cushioned surface to protect the screen from your TV. NOTE G When assembling the desk type stand, make sure the bolt is fully tightened (If not tightened fully, the TV can tilt forward after the product installation).

Owner's Manual (English)
Page 19
Press the PROTECTION COVER into the TV until you hear it click. 19 PREPARATION DETACHMENT 1 Carefully place the TV screen side down on a cushioned surface to protect the screen from damage. 2 Loose the bolts from TV. 3 Detach the stand from TV. PROTECTION COVER After removing the stand, install the included protection cover over the hole for the stand.
Press the PROTECTION COVER into the TV until you hear it click. 19 PREPARATION DETACHMENT 1 Carefully place the TV screen side down on a cushioned surface to protect the screen from damage. 2 Loose the bolts from TV. 3 Detach the stand from TV. PROTECTION COVER After removing the stand, install the included protection cover over the hole for the stand.

Owner's Manual (English)
Page 20
.../37/42LF11, 32CL20) 1 If your TV. And carefully place the TV screen side down on a cushioned surface to protect the screen from your TV has a protection tape attached, remove the tape. NOTE G When assembling the desk type stand, make sure the screws are fully tightened (If not tightened fully, the TV can tilt forward after the... (For 32/37/42/47LF11, 47LF21, 32CL20) I Image shown may differ from damage. 2 Assemble the parts of the STAND BODY with COVER BASE of the TV. ! STAND BODY COVER BASE 4 Fix the 4 bolts securely using the holes in the back of the...
.../37/42LF11, 32CL20) 1 If your TV. And carefully place the TV screen side down on a cushioned surface to protect the screen from your TV has a protection tape attached, remove the tape. NOTE G When assembling the desk type stand, make sure the screws are fully tightened (If not tightened fully, the TV can tilt forward after the... (For 32/37/42/47LF11, 47LF21, 32CL20) I Image shown may differ from damage. 2 Assemble the parts of the STAND BODY with COVER BASE of the TV. ! STAND BODY COVER BASE 4 Fix the 4 bolts securely using the holes in the back of the...

Owner's Manual (English)
Page 21
PREPARATION DETACHMENT 1 Carefully place the TV screen side down on a cushioned surface to protect the screen from damage. 2 Loose the bolts from TV. 3 Detach the stand from TV. PROTECTION COVER After removing the stand, install the included protection cover over the hole for the stand. Press the PROTECTION COVER into the TV until you hear it click. 21
PREPARATION DETACHMENT 1 Carefully place the TV screen side down on a cushioned surface to protect the screen from damage. 2 Loose the bolts from TV. 3 Detach the stand from TV. PROTECTION COVER After removing the stand, install the included protection cover over the hole for the stand. Press the PROTECTION COVER into the TV until you hear it click. 21

Owner's Manual (English)
Page 22
Do not over tighten. 19" 22" 19/22LU55 19" 22" 26LU55 26" 22 NOTE G When assembling the desk type stand, make sure the bolt is fully tightened (If not tightened fully, the TV can tilt forward after the product installation). INSTALLATION 1 Carefully place the TV screen side down on a cushioned surface to protect the screen from your TV. PREPARATION PREPARATION STAND INSTRUCTIONS (For 19/22/26LU55) I Image shown may differ from damage. 2 Fix the bolts securely using the holes. !
Do not over tighten. 19" 22" 19/22LU55 19" 22" 26LU55 26" 22 NOTE G When assembling the desk type stand, make sure the bolt is fully tightened (If not tightened fully, the TV can tilt forward after the product installation). INSTALLATION 1 Carefully place the TV screen side down on a cushioned surface to protect the screen from your TV. PREPARATION PREPARATION STAND INSTRUCTIONS (For 19/22/26LU55) I Image shown may differ from damage. 2 Fix the bolts securely using the holes. !

Owner's Manual (English)
Page 23
And detach the COVER BASE from TV. 19/22LU55 26LU55 STAND BODY 23 COVER BASE 4 Detach the STAND BODY from TV. PREPARATION DETACHMENT 1 Carefully place the TV screen side down on a cushioned surface to protect the screen from damage. 2 Loose the bolts and then detach the stand from TV. 19" 19/22LU55 19" 22" 22" 26LU55 26" 26" 3 Loose the bolts from TV.
And detach the COVER BASE from TV. 19/22LU55 26LU55 STAND BODY 23 COVER BASE 4 Detach the STAND BODY from TV. PREPARATION DETACHMENT 1 Carefully place the TV screen side down on a cushioned surface to protect the screen from damage. 2 Loose the bolts and then detach the stand from TV. 19" 19/22LU55 19" 22" 22" 26LU55 26" 26" 3 Loose the bolts from TV.
Owner's Manual (English)
Page 33
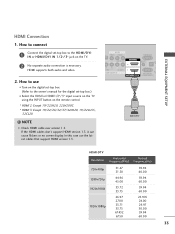
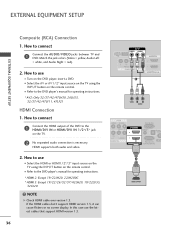
... HDMI supports both audio and video. 2. If the HDMI cables don't support HDMI version 1.3, it can cause flickers or no screen display. AV IN VIDEO AUDIO L(MONO) R 2 DEO L R AUDIO 1 COMPONENT IN RGB IN (PC) AUDIO IN (... 1 HDMI OUTPUT HDMI-DTV Resolution Horizontal Vertical Frequency(KHz) Frequency(Hz) 720x480p 1280x720p 1920x1080i 1920x1080p 31.47 31.50 44.96 45.00 33.72 33.75 26.97 27.00 33.71 33.75 67... HDMI or HDMI1/2*/3* input source on the TV using the INPUT button on the TV. 2 No separate audio connection is necessary. EXTERNAL EQUIPMENT SETUP HDMI Connection 1.
... HDMI supports both audio and video. 2. If the HDMI cables don't support HDMI version 1.3, it can cause flickers or no screen display. AV IN VIDEO AUDIO L(MONO) R 2 DEO L R AUDIO 1 COMPONENT IN RGB IN (PC) AUDIO IN (... 1 HDMI OUTPUT HDMI-DTV Resolution Horizontal Vertical Frequency(KHz) Frequency(Hz) 720x480p 1280x720p 1920x1080i 1920x1080p 31.47 31.50 44.96 45.00 33.72 33.75 26.97 27.00 33.71 33.75 67... HDMI or HDMI1/2*/3* input source on the TV using the INPUT button on the TV. 2 No separate audio connection is necessary. EXTERNAL EQUIPMENT SETUP HDMI Connection 1.
Owner's Manual (English)
Page 36
... AUDIO RS-232C IN ACNATBELNE /DVI IN (CONTROL&SERVICE) 1 HDMI OUTPUT I Select the HDMI or HDMI1 / 2*/ 3* input source on the TV using the INPUT button on the remote control. How to the DVD player's manual for operating instructions. * AV2: Only 32/37/42/47LH30, ... insert a DVD. If the HDMI cables don't support HDMI version 1.3, it can cause flickers or no screen display. EXTERNAL EQUIPMENT SETUP EXTERNAL EQUIPMENT SETUP Composite (RCA) Connection 1. I Turn on the TV. 2 No separated audio connection is necessary. Match the jack colors (Video = yellow, Audio Left =...
... AUDIO RS-232C IN ACNATBELNE /DVI IN (CONTROL&SERVICE) 1 HDMI OUTPUT I Select the HDMI or HDMI1 / 2*/ 3* input source on the TV using the INPUT button on the remote control. How to the DVD player's manual for operating instructions. * AV2: Only 32/37/42/47LH30, ... insert a DVD. If the HDMI cables don't support HDMI version 1.3, it can cause flickers or no screen display. EXTERNAL EQUIPMENT SETUP EXTERNAL EQUIPMENT SETUP Composite (RCA) Connection 1. I Turn on the TV. 2 No separated audio connection is necessary. Match the jack colors (Video = yellow, Audio Left =...
Owner's Manual (English)
Page 42
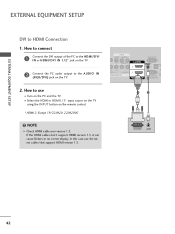
... the HDMI cables don't support HDMI version 1.3, it can cause flickers or no screen display. How to connect 1 Connect the DVI output of the PC to the HDMI/DVI I N or HDMI/DVI IN 1/2* jack on the TV. 2 Connect the PC audio output to use the latest cables that support HDMI version 1.3. I Turn... the remote control. * HDMI 2: Except 19/22LH20, 22LH200C ! In this case use I Select the HDMI or HDMI1 / 2* input source on the TV using the INPUT button on the PC and the TV. AV IN VIDEO AUDIO L(MONO) R 2 DEO L R AUDIO 1 OMPONENT IN RGB IN (PC) AUDIO IN (RGB/DVI) OPTI AU RS-232C...
... the HDMI cables don't support HDMI version 1.3, it can cause flickers or no screen display. How to connect 1 Connect the DVI output of the PC to the HDMI/DVI I N or HDMI/DVI IN 1/2* jack on the TV. 2 Connect the PC audio output to use the latest cables that support HDMI version 1.3. I Turn... the remote control. * HDMI 2: Except 19/22LH20, 22LH200C ! In this case use I Select the HDMI or HDMI1 / 2* input source on the TV using the INPUT button on the PC and the TV. AV IN VIDEO AUDIO L(MONO) R 2 DEO L R AUDIO 1 OMPONENT IN RGB IN (PC) AUDIO IN (RGB/DVI) OPTI AU RS-232C...
Owner's Manual (English)
Page 43
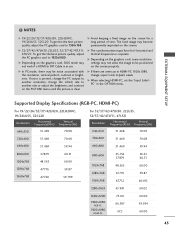
...For 19/22/26/32/37/42LH20, 22LH200C, 19/26LU55, 32CL20 Resolution Horizontal Vertical Frequency(KHz) Frequency(Hz) 640x350 31.469 70.08 720x400 31.469 70.08 640x480 31.469 59.94 For 32/37/42/47LH30, 22LU55, 32/37/42/47LF11, 47LF21 Resolution Horizontal Vertical Frequency(KHz)...The fixed image may not work if a HDMI to Just scan. G Depending on the graphics card, some resolution settings may be positioned on the screen. G When selecting HDMI-PC, set the "Input Label PC" in HDMI-PC 1920x1080, change the refresh rate to 1920x1080. G The synchronization input ...
...For 19/22/26/32/37/42LH20, 22LH200C, 19/26LU55, 32CL20 Resolution Horizontal Vertical Frequency(KHz) Frequency(Hz) 640x350 31.469 70.08 720x400 31.469 70.08 640x480 31.469 59.94 For 32/37/42/47LH30, 22LU55, 32/37/42/47LF11, 47LF21 Resolution Horizontal Vertical Frequency(KHz)...The fixed image may not work if a HDMI to Just scan. G Depending on the graphics card, some resolution settings may be positioned on the screen. G When selecting HDMI-PC, set the "Input Label PC" in HDMI-PC 1920x1080, change the refresh rate to 1920x1080. G The synchronization input ...

Owner's Manual (English)
Page 44
... E • Contrast 50 • Brightness 50 • Sharpness 50 • Color 50 • Tint 0R G • Advanced Control • Picture Reset Screen (RGB-PC) SCREEN Resolution Auto Config. Position Size Phase Reset Move Prev. 1024 x 768 1280 x 768 1360 x 768 1 MENU 2 ENTER 3 ENTER 4 ENTER 5 ENTER Select ...PICTURE. You can also be adjusted. Select Resolution. Select the desired resolution. 44 EXTERNAL EQUIPMENT SETUP EXTERNAL EQUIPMENT SETUP Screen Setup for PC mode Selecting Resolution You can choose the resolution in RGB-PC mode.
... E • Contrast 50 • Brightness 50 • Sharpness 50 • Color 50 • Tint 0R G • Advanced Control • Picture Reset Screen (RGB-PC) SCREEN Resolution Auto Config. Position Size Phase Reset Move Prev. 1024 x 768 1280 x 768 1360 x 768 1 MENU 2 ENTER 3 ENTER 4 ENTER 5 ENTER Select ...PICTURE. You can also be adjusted. Select Resolution. Select the desired resolution. 44 EXTERNAL EQUIPMENT SETUP EXTERNAL EQUIPMENT SETUP Screen Setup for PC mode Selecting Resolution You can choose the resolution in RGB-PC mode.
Owner's Manual (English)
Page 45
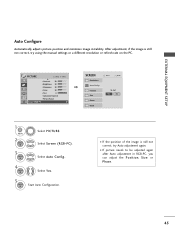
I If the position of the image is still not correct, try Auto adjustment again. Select Screen (RGB-PC). Position Size Phase Reset Move Prev. To Set Yes No 1 MENU 2 ENTER 3 ENTER Select PICTURE. PICTURE Move Enter E •... Contrast 50 • Brightness 50 • Sharpness 50 • Color 50 • Tint 0R G • Advanced Control • Picture Reset Screen (RGB-PC) SCREEN Resolution Auto Config. Select Auto Config.. 4 ENTER Select Y e s. 5 ENTER Start Auto Configuration. I If picture needs to be adjusted again after Auto adjustment in...
I If the position of the image is still not correct, try Auto adjustment again. Select Screen (RGB-PC). Position Size Phase Reset Move Prev. To Set Yes No 1 MENU 2 ENTER 3 ENTER Select PICTURE. PICTURE Move Enter E •... Contrast 50 • Brightness 50 • Sharpness 50 • Color 50 • Tint 0R G • Advanced Control • Picture Reset Screen (RGB-PC) SCREEN Resolution Auto Config. Select Auto Config.. 4 ENTER Select Y e s. 5 ENTER Start Auto Configuration. I If picture needs to be adjusted again after Auto adjustment in...


